- [Solved] E: Unable to locate package in Kali Linux
- How to solve Kali Linux apt-get install: E: Unable to locate package checkinstall
- 1. Edit the apt sources.list file with some editor
- 2. Append old repositories information
- 3. Check if your can install the package
- Install Linux Headers Kali 2020 | Unable to Locate Package linux-headers-5.4.0-kali2-amd64
- How to Install Linux Headers Kali 2020?
- The Annoying “Unable to locate package linux-headers”
- Setting up Linux Headers in a Nutshell
- Installing Linux Headers
- Method 1 – Installing Linux-Headers using apt-get
- Method 2 – Manual Method
- Step 1
- Step 2
- Step 3
- How to Fix Repository Error “Unable to Locate Package” in Kali Linux?
- Устранение ошибки «E: Unable to locate package» на Ubuntu
- Устранение ошибки «Unable to locate package» на Ubuntu
- 1. Имя пакета
- 2. Обновление кэша репозитория
- 3. Доступен ли пакет для используемой версии Ubuntu
- Ничего не помогло, что делать?
[Solved] E: Unable to locate package in Kali Linux
Like other Linux distribution Kali Linux also needs a dedicated source to download and install the packages we need. By default, Kali Linux doesn’t come with the necessary source links.
We need to manually put the list of sources from where we want to install our required packages. If there is no sources list or bad sources list on the Linux system it will result in ‘E: unable to locate package‘ error.
This problem may comes due to bad internet connection. If the internet connection is not the problem then it might because for the wrong repository. We will solve this problem by going through the processes explained in this article.
First we need to go to our Kali Linux’s computer File system and navigate to etc/apt folder.
Right-click on the ‘sources.list‘ text file and open it with any text editor.
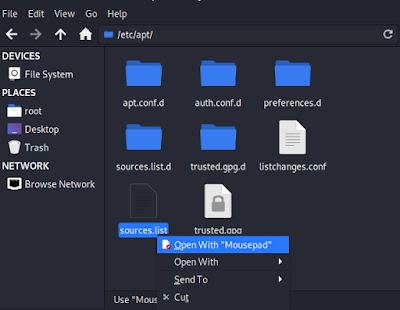 |
| editing sources.list on mousepad |
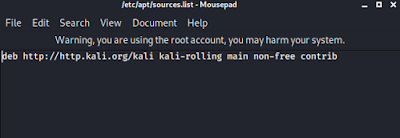
Delete if there is anything already wrote on the text file. Then copy and paste following lines there.
deb http://http.kali.org/kali kali-rolling main non-free contrib
Then save and close it.
There is another way to do it more easily. We can use a single command to do all these works. We just need to open a terminal and run the following command:
This command may ask the super user password (SuDo password) of the Kali Linux machine and fix the repository.
Now we need to update the system by using following command:
Now it will start update and after update our problem is fixed.
So this is the most simple way to fix unable to locate package in Kali Linux.
Источник
How to solve Kali Linux apt-get install: E: Unable to locate package checkinstall
Read this article in other language
In some of our tutorials, we like to build packages from source as this helps you to get more experience as a developer, knowing the why of the things etc. Unfortunately, some reports mentioned the exception of the failure of the installation of the checkinstall package with the following command:
The error triggered in the terminal (Unable to locate package), says basically that the package cannot be found in the repositories list of apt that you have currently in your Kali Linux. In this short article, we will explain you how to install the checkinstall package adding some missing entries to the sources of apt in Kali Linux.
1. Edit the apt sources.list file with some editor
As part of its operation, Apt uses a file that lists the ‘sources’ from which packages can be obtained. This file is /etc/apt/sources.list and you need to edit it with some either CLI editor o text editor, we will use the nano editor in this case:
We will append some text at the end of this file in the next step.
2. Append old repositories information
Now that you know the file that you need to edit, proceed to append the following entries at the end of the file:
This basically adds the old kali repositories to apt, so we will be able to install the checkinstall tool with the regular command. The first word on each line, deb or deb-src, indicates the type of archive. Deb indicates that the archive contains binary packages (deb), the pre-compiled packages that we normally use. Deb-src indicates source packages, which are the original program sources plus the Debian control file (.dsc) and the diff.gz containing the changes needed for packaging the program.
Save changes to the file and proceed to update the repositories list with:
3. Check if your can install the package
Finally, after saving changes and running sudo apt-get update , proceed with the installation of the checkinstall package with the following command:
Now you should be able to install this package without any issue.
Источник
Install Linux Headers Kali 2020 | Unable to Locate Package linux-headers-5.4.0-kali2-amd64

How to Install Linux Headers Kali 2020?
Welcome Fellow Hackers and Tinkerers. In this post, we will share a solution for a Kali Linux Headers Issue that most of us have been facing for years.
The Annoying “Unable to locate package linux-headers”
If you have been playing around with Kali Linux, you might be familiar with some the below mention errors.
Updated : March 2020
“Unable to locate packages “.
E: Unable to locate package linux-headers-5.4.0-kali2-amd64
E: Couldn’t find any package by glob ‘linux-headers-5.4.0-kali2-amd64’
E: Couldn’t find any package by regex ‘linux-headers-5.4.0-kali2-amd64’
We have been struggling to install this linux-headers for days but whatever we do, we end up with this error.
Setting up Linux Headers in a Nutshell
Time needed: 5 minutes.
How to Install Linux Headers Kali 2020?
- Add the right Repositories
Perform an Update and an Upgrade
Directly install Linux Headers
Download and manually install Linux Headers
Installing Linux Headers
I have a solution for this issue and this worked for almost all my colleagues. Give it a shot!
There are two methods – The Usual Method to install Kali Linux Header and a Manual Method. Here I will explained both.
Method 1 – Installing Linux-Headers using apt-get
First go to this link and Add the correct repositories to the source.list file.
Then run this commands in the terminal.
After that, reboot the system, open up the terminal and run
By running that command, it is supposed to install the linux kernel headers but in Kali 2019 it was not working. So I went with Method 2.
Method 2 – Manual Method
Step 1
Like we did in the first method, add proper Kali Linux repo to /etc/apt/sources.list
Then run this commands in the terminal
Make sure you Reboot after successfully completing the operation
Step 2
After rebooting, open up the terminal and execute the command
It will show you the current version
Step 3
Now Download the required header files and install it using the command
Commonly used header files are provided below.
| linux-headers-5.4.0-kali2-all_5.4.8-1kali1_amd6..> | 800768 | 06-Jan-2020 17:15 |
| linux-headers-5.4.0-kali2-all_5.4.8-1kali1_arm6..> | 800768 | 06-Jan-2020 19:23 |
| linux-headers-5.4.0-kali2-all_5.4.8-1kali1_arme..> | 800768 | 06-Jan-2020 22:08 |
| linux-headers-5.4.0-kali2-all_5.4.8-1kali1_armh..> | 800768 | 07-Jan-2020 05:16 |
| linux-headers-5.4.0-kali2-all_5.4.8-1kali1_i386..> | 800764 | 06-Jan-2020 17:17 |
| linux-headers-5.4.0-kali2-amd64_5.4.8-1kali1_am..> | 1305420 | 06-Jan-2020 17:15 |
| linux-headers-5.4.0-kali2-arm64_5.4.8-1kali1_ar..> | 1260632 | 06-Jan-2020 19:23 |
| linux-headers-5.4.0-kali2-armmp-lpae_5.4.8-1kal..> | 1275164 | 07-Jan-2020 05:16 |
| linux-headers-5.4.0-kali2-armmp_5.4.8-1kali1_ar..> | 1271996 | 07-Jan-2020 05:16 |
| linux-headers-5.4.0-kali2-cloud-amd64_5.4.8-1ka..> | 1057744 | 06-Jan-2020 17:15 |
If these aren’t the files you are looking for, follow the below links and download any version of header you want.
This will help you successfully install the linux-header.
Источник
How to Fix Repository Error “Unable to Locate Package” in Kali Linux?

So you may notice that after installing Kali Linux whenever you try to install some new packages and use apt-get install command there was an error “ E : Unable to Locate Package” and the command is not working. This error occurs generally due to the repository error i.e. “sources.list” file is either blank or is setup with a dead repository.

To fix this error follow these steps:
Open sources.list file by command: #atom /etc/apt/sources.list

Here you need to remove the entry as this causes a broken Kali Linux installation. Apt uses this file /etc/apt/sources.list that lists the ‘sources’ from which packages can be obtained. This file is need to be edited with some either CLI editor or text editor.
Here there are two repositories that you need to edit.
First copy the sources repositories

Then copy regular repositories

Paste these two entires in source.list file and save it
 Exit the editor
Go to terminal and update the packages with the command: #apt-get update

Now try to install any package

The error has been fixed successfully and now any package can be installed easily.
Источник
Устранение ошибки «E: Unable to locate package» на Ubuntu

Туториал для новичков: как избавиться от ошибки «E: Unable to locate package» на Linux Ubuntu.
Команда apt или apt-get — один из способов установки ПО на Ubuntu. В терминале после команды прописывается название программы, которую нужно установить.
Иногда в процессе установки происходит сбой. Уведомление выглядит следующим образом:
Текст ошибки говорит сам за себя. Система не может найти пакеты, которые вы пытаетесь установить. Почему это происходит?
Устранение ошибки «Unable to locate package» на Ubuntu

Шаг за шагом рассмотрим, что могло пойти не так.
1. Имя пакета
Это нужно проверить в первую очередь. Возможно, в название закралась опечатка. Если нужно установить «vlc», а в команде прописано «vcl», то, вполне естественно, процесс прервётся.
2. Обновление кэша репозитория
Во время первого старта системы необходимо запустить обновление при помощи следующей команды:
Эта команда не будет сразу же обновлять Ubuntu. Она предназначена для обновления информации о пакетах, содержащихся в репозиториях.
Когда запускается команда установки, apt-менеджер находит в кэше информацию о пакете и его версии, после чего загружает файлы через репозиторий. Соответственно, если пакета нет в кэше, появится уведомление об ошибке.
Сразу после установки новой системы, её кэш еще пуст. Именно поэтому в таких случаях необходимо прописать команду обновления как для Ubuntu, так и для любого другого дистрибутива на её основе (например, Linux Mint) во время первого запуска.
Но даже при работе с давно установленной системой есть шанс, что нужный пакет не был подгружен. Чтобы исключить такую вероятность, стоит перестраховаться и обновить кэш.
3. Доступен ли пакет для используемой версии Ubuntu
Итак, название написано правильно, кэш обновлён, но ошибка всё равно появляется.
Вероятно, пакет доступен через репозиторий Universe, а ваша система или не поддерживает его, или версия Ubuntu не поддерживается данной программой.
Шаг первый – проверить актуальную версию Ubuntu через терминал.
На выходе отображается номер версии и кодовое имя.
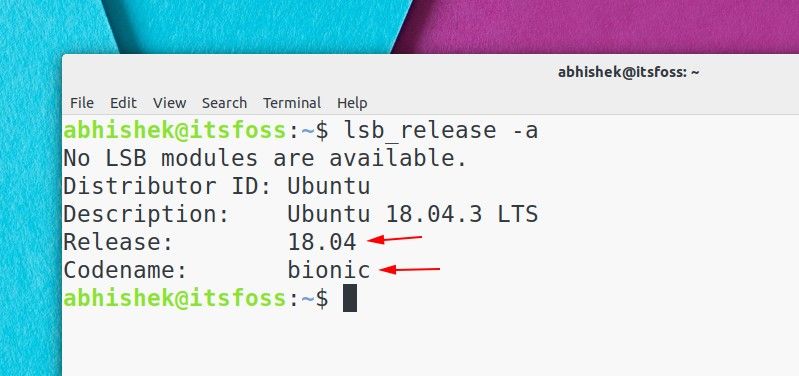
Например, версия Ubuntu 18.04 c кодовым именем “bionic”.
Шаг второй – расширенный поиск на сайте пакетов Ubuntu.
На сайте доступна опция поиска по ключевому слову. Вводим название пакета и выставляем кодовое имя дистрибутива. В графе ”секция” нужно выставить значение ”any”. Запускаем поиск.

Так можно узнать, доступен ли пакет для конкретной версии Ubuntu и, если доступен, то к какому репозиторию он относится. Разберём на примере Shutter, программы для создания скриншотов, которую не обновляли в течение последних лет. Для версии Ubuntu18.04 Bionic будут выведены следующие данные.
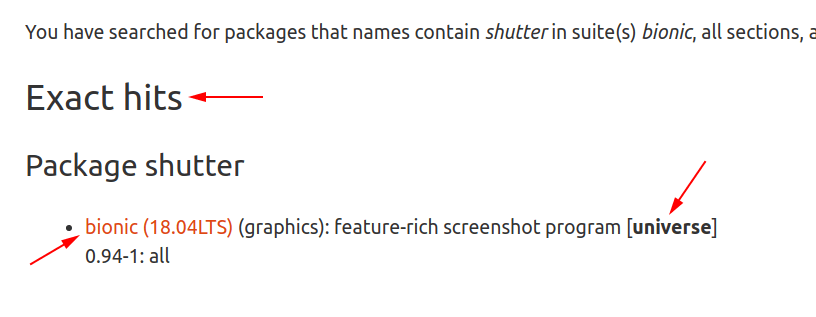
В этом случае есть точное совпадение с названием пакета. Он доступен для версии Ubuntu 18.04 Bionic и относится к репозиторию Universe.
Если искомый пакет доступен для вашей версии системы, но относится к Universe или Multiverse, необходимо установить дополнительные репозитории.
После этого обновите кэш, чтобы убедиться, что пакеты доступны через репозитории.
Ничего не помогло, что делать?
Если пакет недоступен и на сайте Ubuntu, то нужно искать другой способ установки. Усилиями сторонних разработчиков были созданы персональные архивы пакетов (PPA). Здесь стоит быть осторожными с неофициальными архивами и не добавлять сомнительные версии в систему.
Если этот способ не сработал, можно посетить официальный сайт проекта и уточнить, есть ли альтернативные способы установки их программ. На некоторых ресурсах доступны .DEB или AppImage файлы. Какие-то проекты могли перейти на пакеты Snap.
Всегда есть вероятность, что проект был закрыт и более не поддерживается. В таком случае выход один: искать альтернативу самой программе.
Источник


