- Answer files (unattend.xml)
- Windows settings overview
- Answer file settings
- Create and modify an answer file
- Step 1: Create a catalog file
- Step 2: Create an answer file
- Step 3: Add new answer file settings
- Add the answer file and script to the image
- Step 6: Mount an image and add the answer file
- Установка Windows 10 с помощью файла ответов
Answer files (unattend.xml)
Answer files (or Unattend files) can be used to modify Windows settings in your images during Setup. You can also create settings that trigger scripts in your images that run after the first user creates their account and picks their default language.
Windows Setup will automatically search for answer files in certain locations, or you can specify an unattend file to use by using the /unattend: option when running Windows Setup (setup.exe).
Windows settings overview
While you can set many Windows settings in audit mode, some settings can only be set by using an answer file or Windows Configuration Designer, such as adding manufacturer’s support information. A full list of answer file settings (also known as Unattend settings) is in the Unattended Windows Setup Reference.
Enterprises can control other settings by using Group Policy. For more info, see Group Policy.
Answer file settings
You can specify which configuration pass to add new settings:
1 windowsPE: These settings are used by the Windows Setup installation program. If you’re modifying existing images, you can usually ignore these settings.
4 specialize: Most settings should be added here. These settings are triggered both at the beginning of audit mode and at the beginning of OOBE. If you need to make multiple updates or test settings, generalize the device again and add another batch of settings in the Specialize Configuration pass.
6 auditUser: Runs as soon as you start audit mode.
This is a great time to run a system test script — we’ll add Microsoft-Windows-Deployment\RunAsynchronousCommand as our example. To learn more, see Add a Custom Script to Windows Setup.
7 oobeSystem: Use sparingly. Most of these settings run after the user completes OOBE. The exception is the Microsoft-Windows-Deployment\Reseal\Mode = Audit setting, which we’ll use to bypass OOBE and boot the PC into audit mode.
If your script relies on knowing which language the user selects during OOBE, you’d add it to the oobeSystem pass.
These settings could be lost if the user resets their PC with the built-in recovery tools. To see how to make sure these settings stay on the device during a reset, see Sample scripts: Keeping Windows settings through a recovery.
Create and modify an answer file
Step 1: Create a catalog file
Start Windows System Image Manager.
Click File > Select Windows Image.
In Select a Windows Image, browse to and select the image file (D:\install.wim). Next, select an edition of Windows, for example, WindowsВ 10 Pro, and click OK. Click Yes to create the catalog file. Windows SIM creates the file based on the image file, and saves it to the same folder as the image file. This process can take several minutes.
The catalog file appears in the Windows Image pane. WindowsВ SIM lists the configurable components and packages in that image.
Troubleshooting: If Windows SIM does not create the catalog file, try the following steps:
To create a catalog file for either 32-bit or ARM-based devices, use a 32-bit device.
Make sure the Windows base-image file (\Sources\Install.wim) is in a folder that has read-write privileges, such as a USB flash drive or on your hard drive.
Step 2: Create an answer file
Click File > New Answer File.
The new answer file appears in the Answer File pane.
NoteВ В If you open an existing answer file, you might be prompted to associate the answer file with the image. Click Yes.
Step 3: Add new answer file settings
In the Windows Image pane, expand Components, right-click amd64_Microsoft-Windows-Shell-Setup_(version), and then select Add Setting to Pass 4 specialize.
In the Answer File pane, select Components\4 specialize\amd64_Microsoft-Windows-Shell-Setup_neutral\OEMInformation.
In the OEMInformation Properties pane, in the Settings section, select:
- Manufacturer= Fabrikam
- Model= Notebook Model 1
- Logo= C:\Fabrikam\Fabrikam.bmp
Create a 32-bit color with a maximum size of 120×120 pixels, save it as D:\AnswerFiles\Fabrikam.bmp file on your local PC, or use the sample from the USB-B key: D:\ConfigSet\$OEM$\$$\System32\OEM\Fabrikam.bmp .
We’ll copy the logo into the Windows image in a few steps.
Set the device to automatically boot to audit mode:
In the Windows Image pane, expand Components, right-click amd64_Microsoft-Windows-Deployment_(version), and then select Add Setting to Pass 7 oobeSystem.
In the Answer File pane, select Components\7 oobeSystem\amd64_Microsoft-Windows-Deployment_neutral\Reseal.
In the Reseal Properties pane, in the Settings section, select Mode= Audit .
Prepare a script to run after Audit mode begins.
In the Windows Image pane, right-click amd64_ Microsoft-Windows-Deployment_(version) and then click Add Setting to Pass 6 auditUser.
In the Answer File pane, expand Components\6 auditUser\amd64_Microsoft-Windows-Deployment_neutral\RunAsynchronous. Right-click RunAsynchronousCommand Properties and click Insert New AsynchronousCommand.
In the AsynchronousCommand Properties pane, in the Settings section, add the following values:
Description = Sample command to run a system diagnostic check.
Order = 1 (Determines the order that commands are run, starting with 1.)
Add a registry key. In this example, we add keys for the OEM Windows Store program. Use the same process as adding a script, using CMD /c REG ADD .
For Windows 10 Customer Systems, you may use the OEM Store ID alone or in combination with a Store Content Modifier (SCM) to identify an OEM brand for the OEM Store. By adding a SCM, you can target Customer Systems at a more granular level. For example, you may choose to target commercial devices separately from consumer devices by inserting unique SCMs for consumer and commercial brands into those devices.
Add RunAsynchronousCommands for each registry key to add. (Right-click RunAsynchronousCommand Properties and click Insert New AsynchronousCommand).
See the Unattended Windows Setup Reference for a full list of configuration options.
Step 4: Save the answer file
Save the answer file, for example: D:\AnswerFiles\BootToAudit-x64.xml.
NoteВ В Windows SIM will not allow you to save the answer file into the mounted image folders. В Step 5: Create a script
Since we specified a script to run in Step 3, let’s create that script now.
Copy the following sample script into Notepad, and save it as D:\AnswerFiles\SampleCommand.cmd.
Add the answer file and script to the image
Step 6: Mount an image and add the answer file
Use DISM to mount a Windows image. To learn how to mount an image, see Mount and modify a Windows image using DISM
Copy the answer file into the image into the \Windows\Panther folder, and name it unattend.xml. The Panther folder is one of the folders where Windows searches for an answer file. Create the folder if it doesn’t exist. If there’s an existing answer file, replace it or use Windows System Image Manager to edit/combine settings if necessary.
Unmount the image, committing the changes. For example:
where C is the drive letter of the drive that contains the mounted image.
This process may take several minutes.
When you apply your image, Windows will process your unattend file and will configure your settings based on what you specified in the unattend.
Установка Windows 10 с помощью файла ответов
Новая задача: Это разобрать как устанавливается Windows 10 Pro через файл ответов согласно моим пожеланиям , а в последствии данная заметка ляжет в основу моего сервиса в локальной сети по разворачиванию системы через PXE не использую ни CDROM/DVDROM, ни USB Flash Drive. Просто сейчас январские праздники, а раз так, то времени свободного много, так почему бы его не провести с пользой и сделать себе заметку по установке Windows через файл ответов.
Основная система это Windows 10 Pro x64 обязательно установленная на SSD диск.
Потребуется Virtualbox на виртуальный контейнер с шаблоном Windows 10 будет тестироваться полученный образ с файлом ответов на вопросы инсталляции системы.
Также нужно будет чтобы каталог с виртуальными машинами обязательно располагался на SSD, в этом случае процесс из разворачивания будет происходить быстрее.
Шаг №1: На основную систему под управлением Windows 10 Pro amd64 устанавливаю пакет Windows ADK
Шаг №2: На логическом диске C: каталог isoproject , распаковываю дистрибутив Windows 10 x64 Pro скачанный через утилиту Media Creation tools . (на момент написания заметки: 10.0.17134.112 )
Шаг №3: Проверяем, какие редакции содержаться в образе:
C:\WINDOWS\system32>dism /get-wiminfo /wimfile:c:\isoproject\sources\install.esd
Сведения об образе : c:\isoproject\sources\install.esd
Имя : Windows 10 Домашняя
Описание : Windows 10 Домашняя
Размер (байт): 14 337 146 177
Имя : Windows 10 Домашняя для одного языка
Описание : Windows 10 Домашняя для одного языка
Размер (байт): 14 338 601 440
Имя : Windows 10 для образовательных учреждений
Описание : Windows 10 для образовательных учреждений
Размер (байт): 14 581 309 528
Имя : Windows 10 Pro
Описание : Windows 10 Pro
Размер (байт): 14 579 639 733
Операция успешно завершена.
Шаг №4: Из вывода видно, что в скачанном образе присутствует 4 редакции Windows которые можно установить на компьютере. Мне нужна только редакция номер четыре, а из этого следует, нужно извлечь install.wim (Windows 10 Pro) из install.esd:
C:\Windows\system32>dism /export-image /sourceimagefile:c:\isoproject\sources\install.esd /sourceindex:4 /destinationimagefile:c:\isoproject\sources\install.wim
После проверяю, какая редакция в файле install.wim
C:\WINDOWS\system32>dism /get-wiminfo /wimfile:c:\isoproject\sources\install.wim
Сведения об образе : c:\isoproject\sources\install.wim
Имя : Windows 10 Pro
Описание : Windows 10 Pro
Размер (байт): 14 579 639 733
Операция успешно завершена.
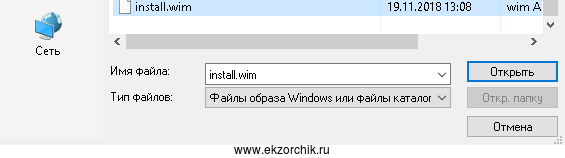
Win – Windows Kits – и запускаю « Диспетчер установки Windows ” с правами администратора, после выбираю образ Файл — Выбрать образ Windows —
C:\isoproject\sources\install.wim и нажимаю « Открыть »
но у меня ошибка:
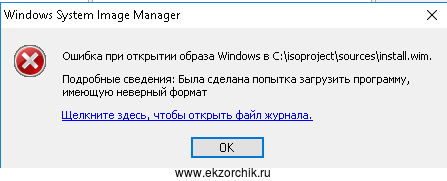
При щелчке на « Щелкните здесь, чтобы открыть файл журнала » в самом верху лога вижу:
15:02 : Для этой операции требуется версия 10.0.17763.1 Windows ADK.
Чтобы устранить проблему, установите эту версию
15:03 : Ошибка при открытии образа Windows в С:\isoproject\sources\install.wim.
C:\WINDOWS\system32>wmic /output:»c:\1\product.html» product list full /format:htable
у меня версия пакета Windows ADK: 10.1.17763.1 . Так что не нравится?
Попробую так выгрузить install.wim с проверкой из install.esd:
C:\WINDOWS\system32>del c:\isoproject\sources\install.wim
C:\WINDOWS\system32>dism /export-image /sourceimagefile:c:\isoproject\sources\install.esd /sourceindex:4 /destinationimagefile:c:\isoproject\sources\install.wim /compress:max /checkintegrity
В этот раз ошибок нет.
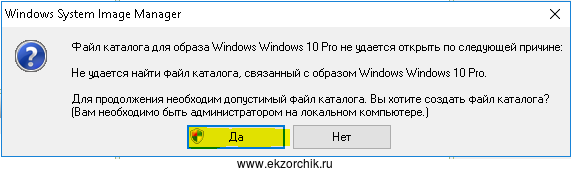
После повторяю шаги открытия install.wim через « Диспетчер установки Windows ”, предыдущей ошибки нет, но есть уведомление, нажимаю « Да »
После ожидаю завершения процесс создания файла каталога:
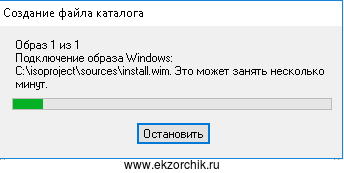
И по прошествии некоторого количества времени запустится оснастка « Windows System Image Manager ” с указанным install.wim файла редакции Windows 10 Pro.
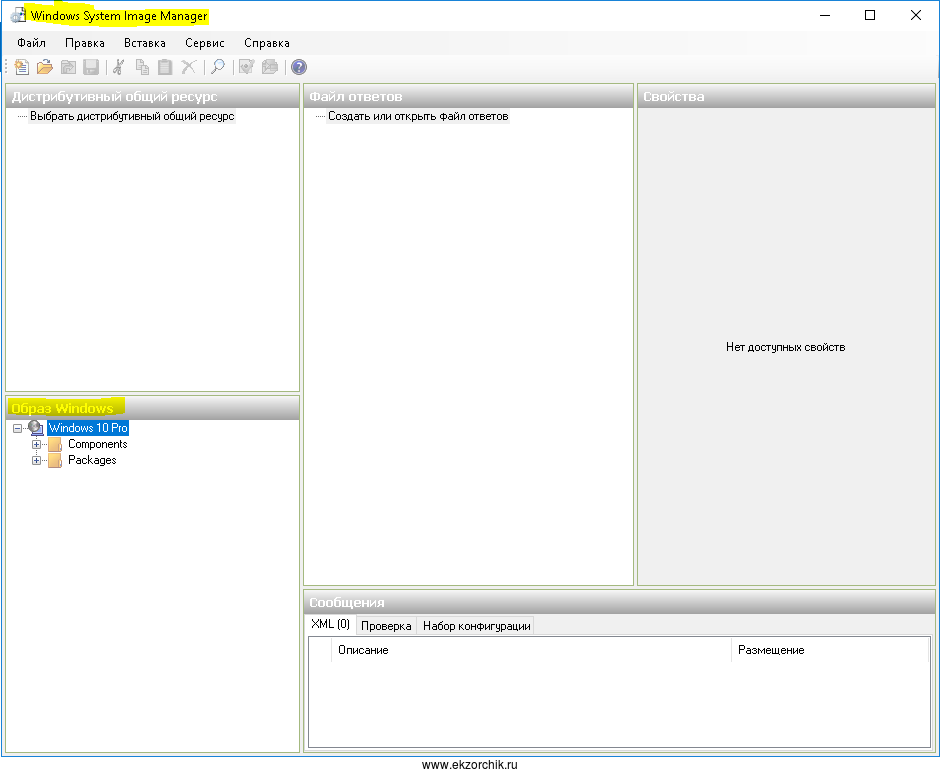
Теперь указываю что мне нужно создать новый файл ответов:
Файл — Новый файл ответов, и во фрейме «Файл ответов» скриншота выше будет сформирована дефолтная структура:
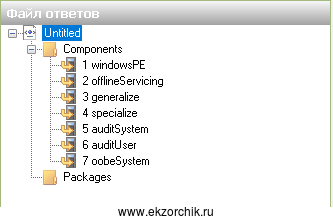
которую мне предстоит наполнить.
Создаю опираясь на документацию с сайта Майкрософт. Также за основу можно взять мой файл ответов для Windows 7 Pro SP1 amd64 который я выложил, как пример в своей заметке. Не забываем сохранить свои результаты создания файла Autounattend.xml
На заметку: После формирования файла ответов следует закрыть оснастку: Autounattend.xml – Windows System Image Manager: Файл — Выход
На заметку: Файл ответов должен именоваться, как Autounattend.xml и лежать в корне распакованного дистрибутива на основе которого создается образ системы где установка происходит в автоматическом режиме.
На заметку: Группа в которую включать учетную запись должна быть написана на английском языке, т. е . Administrators иначе будет учетная запись в системе, но без прав администратора.
Шаг №6: Формирую образ с интегрированным файлом ответов Autounattend.xml
На заметку: Перед тем как формировать образ iso нужно в каталоге isoproject удалить esd файл т. к. на нем спотыкается установщик при разворачивании из образа iso на системе.
C:\WINDOWS\system32>del c:\isoproject\sources\install.esd
Win → Windows Kits – и через правый клик мышь выбрав меню « Запуск с правами администратора » запускаю « Среда средств развертывания и работы с образами »
C:\Program Files (x86)\Windows Kits\10\Assessment and Deployment Kit\Deployment Tools>oscdimg -u2 -m -o -lWIN10PROX64 -b»c:\Program Files\Windows AIK\Tools\PETools\amd64\boot\etfsboot.com» c:\isoproject c:\Win10_Pro_x64.iso
а если пакет Windows 10 ADK (а не Windows 7 AIK) , то
C:\Program Files (x86)\Windows Kits\10\Assessment and Deployment Kit\Deployment Tools>oscdimg -u2 -m -o -lWIN10PROX64 -b»c:\Program Files (x86)\Windows Kits\10\Assessment and Deployment Kit\Deployment Tools\amd64\Oscdimg\etfsboot.com» c:\isoproject c:\Win10_Pro_x64.iso
На заметку: В Файле присутствует ключ, это ключ OEM редакции, но также его можно заменить действующим если он у Вас есть.
После поступаю так же, как и при тестировании образа Windows 7 Pro SP 1 amd64 обкатываю его на Virtualbox , если система Windows 10 Pro amd64 развернулась и нигде не было ошибок, то можете себя поздравить. Я лично, сделал свой собственный файл ответов. (Autounattend)
Заметка работоспособна, на этом у меня всё, с уважением автор блога Олло Александр aka ekzorchik.


