- Zip and unzip files
- Compressed and Uncompressed Sources
- Decompression problem: uncompressed block size is too big, как исправить
- Ошибка «uncompressed block size is too big» – суть и причины дисфункции
- Как исправить «Decompression problem: uncompressed block size is too big»
- Заключение
- How to extract or decompress a compressed file
- How to decompress a file in Windows
- Decompress a file in MS-DOS or the Windows command line
- 3 Ways to Disable Automatic File Compression in Windows
- Keep Those Files Uncompressed!
Zip and unzip files
Zipped (compressed) files take up less storage space and can be transferred to other computers more quickly than uncompressed files. In Windows, you work with zipped files and folders in the same way that you work with uncompressed files and folders. Combine several files into a single zipped folder to more easily share a group of files.
Locate the file or folder that you want to zip.
Press and hold (or right-click) the file or folder, select (or point to) Send to, and then select Compressed (zipped) folder.
A new zipped folder with the same name is created in the same location. To rename it, press and hold (or right-click) the folder, select Rename, and then type the new name.
Locate the zipped folder that you want to unzip (extract) files or folders from.
Do one of the following:
To unzip a single file or folder, open the zipped folder, then drag the file or folder from the zipped folder to a new location.
To unzip all the contents of the zipped folder, press and hold (or right-click) the folder, select Extract All, and then follow the instructions.
To add files or folders to a zipped folder you created earlier, drag them to the zipped folder.
If you add encrypted files to a zipped folder, they’ll be unencrypted when they’re unzipped, which might result in unintentional disclosure of personal or sensitive information. For that reason, we recommend that you avoid zipping encrypted files.
Some types of files, like JPEG images, are already highly compressed. If you zip several JPEG pictures into a folder, the total size of the folder will be about the same as the original collection of pictures.
Compressed and Uncompressed Sources
Package authors can reduce the size of their installation packages by compressing the source files and including them in cabinet files. The source file image can be compressed, uncompressed, or a mixture of both types.
A source consisting entirely of compressed files should include the compressed flag bit in the Word Count Summary Property. The compressed source files must be stored in cabinet files located in a data stream inside the .msi file or in a separate cabinet file located at the root of the source tree. All of the cabinets in the source must be listed in the Media table.
A source consisting entirely of uncompressed source files should omit the compressed flag bit from the Word Count Summary Property. All of the uncompressed files in the source must exist in the source tree specified by the Directory table.
To mix compressed and uncompressed source files in the same package, override the Word Count Summary property default by setting the msidbFileAttributesCompressed or msidbFileAttributesNoncompressed bit flags on particular files. These bit flags are set in the Attributes column of the File table if the compression state of the file does not match the default specified by the Word Count Summary property.
For example, if the Word Count Summary property has the compressed flag bit set, all files are treated as compressed into a cabinet. Any uncompressed files in the source must include msidbFileAttributesNoncompressed in the Attributes column of the File table. The uncompressed files must be located at the root of the source tree.
If the Word Count Summary property has the uncompressed flag set, files are treated as uncompressed by default and any compressed files must include msidbFileAttributesCompressed in the Attributes column of the File table. All of the compressed files must be stored in cabinet files located in a data stream inside the .msi file or in a separate cabinet file located at the root of the source tree.
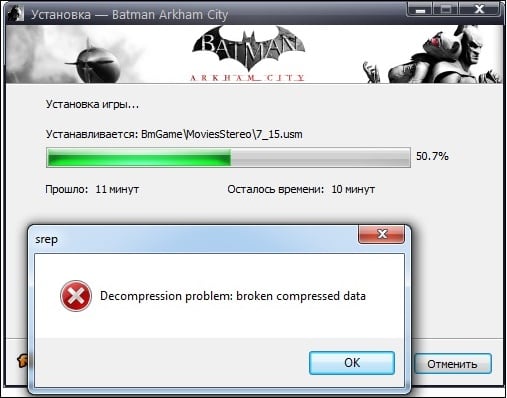
Decompression problem: uncompressed block size is too big, как исправить
При инсталляции какой-либо программы (обычно игровой) пользователь может столкнуться с ошибкой распаковки, сопровождающейся сообщением «Decompression problem: uncompressed block size is too big». Появление данной дисфункции напрямую связано с памятью ПК, требуя выполнения ряда шагов для решения возникшей проблемы. В данном материале я разберу, что это за ошибка Decompression problem, каковы её причины, и как исправить uncompressed block size is too big на вашем компьютере.
Ошибка «uncompressed block size is too big» – суть и причины дисфункции
В переводе с английского языка текст ошибки звучит как «Проблема распаковки: размер распакованного блока слишком большой». Проблема обычно возникает в ситуации, когда инсталлятор программы распаковывает архив программы в память ПК, и при этом очередной распакованный блок оказался больше, нежели позволяет отведённый для этого участок системной памяти.
Поскольку в инсталляторе чётко прописано, что и куда распаковывать при существующих стандартах памяти, то возникновение описываемой в статье ошибки может произойти по следующим причинам:
- Память пользовательского ПК работает некорректно (наиболее распространённая причина ошибки «block size too big»);
- Инсталлятор программы повреждён по различным причинам (тело программы не полностью скачано с торрентов, при скачивании возникли ошибки и т.д.);
- Репак (взлом) игры выполнен некорректно;
- Корректной распаковке помешали вирусные или антивирусные программы;
- Имеется недостаточное количество свободного места на винчестере ПК.


Такая ошибка может возникнуть практически в любой распаковываемой пользователей игре, скачанной с сети. К примеру, фиксировались ошибки при распаковке игр Syberia 3, Far Cry, Assassins Creed и других современных игровых программах.
Как исправить «Decompression problem: uncompressed block size is too big»
Чтобы решить проблему uncompressed block size is too big рекомендуется выполнить следующее:
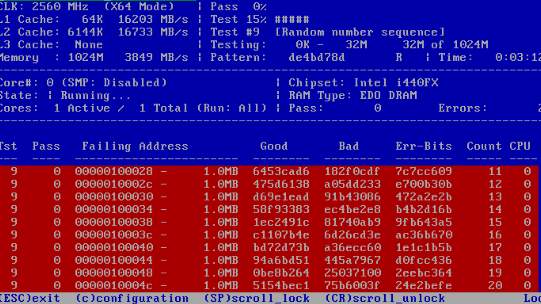
- Проверьте работоспособность планок памяти вашего ПК. Для этого пригодятся различные программы уровня «MemTest86», которые необходимо скачать на компьютер, и протестировать ими память вашего PC. Если программой будут найдены ошибки, попробуйте аккуратно протереть контакты планки памяти обычной школьной резинкой (ластиком). Если это не поможет, замените проблемную планку на работоспособный аналог;
- Скачайте репак (взлом) от другого автора. В ряде случаев именно некорректно выполненный репак становится причиной decompression problem на пользовательском ПК. Попробуйте репак от альтернативного автора;
- Перекачайте проблемный архив (особенно в ситуации, когда вы скачали его с торрентов);
- При скачивании и инсталляции программы отключите вашу антивирусную программу и файервол. Функционал последней может блокировать корректную установку инсталляционных файлов в системе;
- Проверьте ваш PC на наличие вирусных программ. Помогут испытанные антивирусные инструменты уровня «AdwCleaner», «ДокторВеб Кюрейт» и других аналогов;
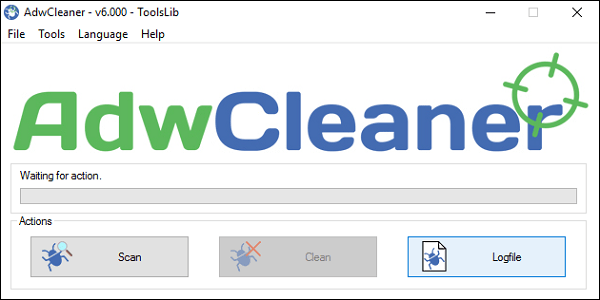 Воспользуйтесь функционалом «AdwCleaner» для борьбы с вредоносными программами
Заключение
В абсолютном большинстве случаев данная проблема вызвана нестабильной работой планок памяти пользовательского ПК. Если у других пользователей не наблюдалось проблемы при распаковке данной программы, рекомендуется проверить вашу память с помощью соответствующих утилит, и при необходимости заменить нестабильно работающую планку на полноценный работоспособный аналог. Выполнение этого и других, перечисленных в статье, советов позволит избавиться от ошибки Decompression problem: uncompressed block size is too big на вашем компьютере.
How to extract or decompress a compressed file
How to decompress a file in Windows
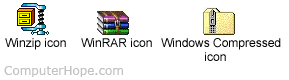
Before extracting the data from a compressed file, you must first determine the compressed file type. On an IBM compatible computer running Windows, this can be determined by the file extension. Most compressed files are either .ZIP, .RAR, .GZ, or .TGZ files. Below are examples of what some of the different compressed icons look like in Microsoft Windows.
Once the compressed file type is determined, use the appropriate program. For example, many users use WinZip and Pkzip to extract ZIP files and WinRAR to extract RAR files in Windows. However, we recommend Windows users use 7-Zip since this program is free, open source, and supports all major compressed file formats.
7-Zip is capable of opening most of the more common types of compressed files, including .ZIP, .GZ, .TAR, .WIM , and .XZ
If you are using Microsoft Windows XP, Vista, 7, or later, your computer should already be cable of extracting the contents of ZIP files.
If you do not want to or cannot install a program on your computer, you can also compress and decompress files online.
Once a compression program is installed on the computer, you can extract the contents from the compressed file. Below are some basic steps on how you can extract files.
If you are extracting a file in e-mail, save the file to a folder on the computer first.
In Microsoft Windows, locate the compressed file and right-click it. A menu should open that gives you the options to Extract or Extract all the file. Click one of these options to extract the file. A window should open with additional options, such as the location to where you want to extract the files. If you have installed 7-Zip, click 7-Zip and then Extract to «xxxx\,» where xxxx is the name of the compressed file.
When extracting the files, pay attention to where you are extracting the files. Extracting the files to the incorrect location, such as the desktop, can extract multiple files to the desktop.
If the compressed file is for a program installation, open the folder containing the extracted files and run the setup to start the installation process.
Decompress a file in MS-DOS or the Windows command line
MS-DOS users need to extract the files using the command line. We recommend users use the pkzip and pkunzip utilities to compress and uncompress their files. Additional help and information about how files can be extracted from the command line is available on our PKZIP and PKUNZIP page.
3 Ways to Disable Automatic File Compression in Windows
Keep Those Files Uncompressed!
File compression is a process used by operating systems to make files smaller by compressing them to save space. This can be used when you are running low on hard drive space and don’t have any files that you can manually remove to free up space on your drive. If you run too low on hard drive space on your Windows drive (usually C:), then your computers performance will begin to suffer.
Windows will sometimes automatically compress files on your computer to free up room when you start getting low on hard drive space. Many times you won’t even notice that your files have been compressed and it might be something you don’t want to be done automatically. In order to access a compressed file, Windows needs to decompress it first and that takes additional time to do although it’s very minimal.
One way you can tell if a file or folder is compressed by the way the file or folder icon looks. As you can see in the image below, one file has two blue arrows on it indicated that it’s a compressed file.

It’s possible to manually decompress files and folders if you notice that they happen to be compressed. To do so, right click on the file or folder and choose Properties. Then click on the Advanced button on the General tab. Then uncheck the box that says Compress contents to save disk space and click OK. It might ask you if you want to decompress subfolders as well so if that’s what you want to do say yes.

Now we will go into how to prevent Windows from automatically compressing your files so you don’t need to worry about this happening again. Keep in mind when you do this process you will not be able to manually compress files yourself either.
Method 1
The first method we will discuss involves using the Windows Local Group Policy Editor. If you have a home version of Windows then you will not be able to do it this way but if you have a professional or enterprise version of Windows then you can use this method.
To begin click on Start or on Cortana for Windows 10 users and type in gpedit.msc and press enter. Then navigate to Computer Configuration\Administrative Templates\System\Filesystem\NTFS and double click on Do not allow compression on all NTFS volumes. Then change the status from Not Configured to Enabled and click OK.

You should then see it listed as Enabled in the Group Policy Editor.

Now reboot your computer and you will be all set.
Method 2
The next method involves making a registry change on your computer. Click on Start or Cortana again and type in regedit and press enter. Then navigate to Computer\HKEY_LOCAL_MACHINE\SYSTEM\CurrentControlSet\Policies and find the value called NtfsDisableCompression and double click it.

Then change the value from 0 to 1 and click Ok.

Then reboot your computer and once again you will be all set.
Method 3
The final method involves using a command prompt to disable file compression on your computer.
1. Click on Start or Cortana and type in cmd.
2. When you see Command Prompt or cmd.exe in the list of results right click on it and choose Run as administrator.
3. If you are prompted for a password, enter credentials for an account that has administrator rights.
4. Type the following in the box (or copy and paste from here) and press Enter. fsutil behavior set disablecompression 1

Then you will need to reboot your computer for the changes to take effect just like it tells you in the command prompt box.


