- UNetbootin
- Features
- Using UNetbootin
- Supported Distributions
- Installing Other Distributions Using UNetbootin
- Distribution X isn’t on the list of supported distributions, will it work?
- UNetbootin isn’t able to download the distribution, what should I do?
- My USB stick isn’t booting, what should I do?
- My USB stick/hard drive isn’t detected, what should I do?
- How do I use UNetbootin from the command line?
- How does UNetbootin work, and what does it do?
- Where can I report bugs, submit patches, etc?
- Does UNetbootin have any spyware, viruses, trojans, or other malware?
- What translations are available, and how can I use them?
- Can I help translate?
- Removal Instructions (Applicable only to Hard Disk installs)
- Where’s the source code, and how can I compile or modify it?
- License
- Other open-source projects from the creators of UNetbootin
- HabitLab
- UNetbootin для Windows
- Отзывы о программе UNetbootin
- 3 простых шага по исправлению ошибок UNETBOOTIN-WINDOWS-494.EXE
- 1- Очистите мусорные файлы, чтобы исправить unetbootin-windows-494.exe, которое перестало работать из-за ошибки.
- 2- Очистите реестр, чтобы исправить unetbootin-windows-494.exe, которое перестало работать из-за ошибки.
- 3- Настройка Windows для исправления критических ошибок unetbootin-windows-494.exe:
- Как вы поступите с файлом unetbootin-windows-494.exe?
- Некоторые сообщения об ошибках, которые вы можете получить в связи с unetbootin-windows-494.exe файлом
- UNETBOOTIN-WINDOWS-494.EXE
- процессов:
- BootDev
- Страницы
- 2020-04-14
- UNetbootin: Создание установочной/загрузочной Linux флешки
- Содержание
- Почему UNetbootin
- Создание Live USB
UNetbootin
UNetbootin allows you to create bootable Live USB drives for Ubuntu and other Linux distributions without burning a CD.
You can either let UNetbootin download one of the many distributions supported out-of-the-box for you, or supply your own Linux .iso file.
Features
UNetbootin can create a bootable Live USB drive
It loads distributions either by downloading a ISO (CD image) files for you, or by using an ISO file you’ve already downloaded.
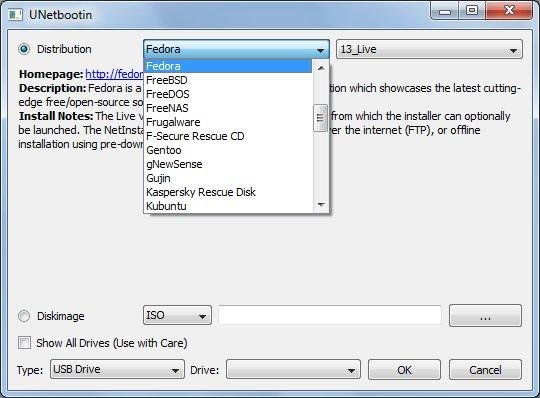
Using UNetbootin
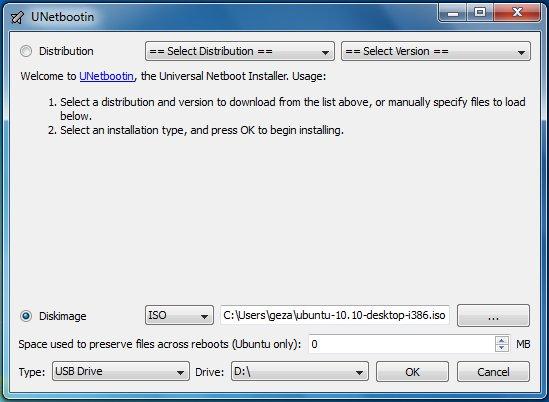
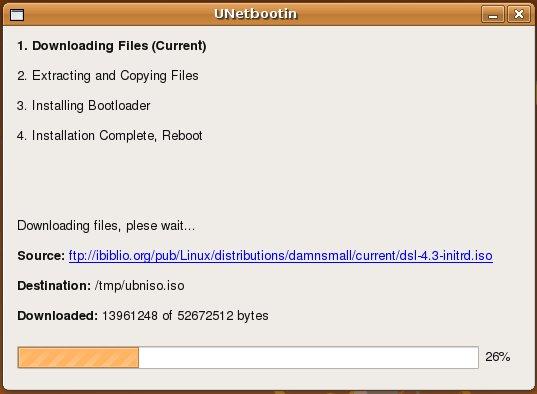
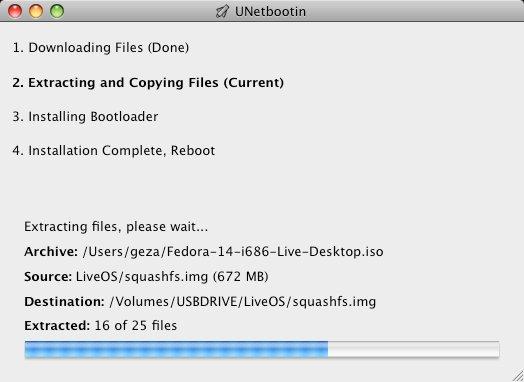
Select an ISO file or a distribution to download, select a target drive (USB Drive or Hard Disk), then reboot once done. If your USB drive doesn’t show up, reformat it as FAT32.
If you used the «USB Drive» install mode: After rebooting, boot from the USB drive. On PCs, this usually involves pressing a button such as Esc or F12 immediately after you turn on your computer, while on Macs, you should hold the Option key before OSX boots.
If you used the «Hard Disk» install mode: After rebooting, select the UNetbootin entry from the Windows Boot Menu.
Supported Distributions
UNetbootin has built-in support for automatically downloading and loading the following distributions, though installing other distributions is also supported:
UNetbootin can also be used to load various system utilities, including:
Installing Other Distributions Using UNetbootin
Download and run UNetbootin, then select the «disk image» option and supply it with an ISO (CD image).
UNetbootin doesn’t use distribution-specific rules for making your live USB drive, so most Linux ISO files should load correctly using this option. However, not all distributions support booting from USB, and some others require extra boot options or other modifications before they can boot from USB drives, so these ISO files will not work as-is. Also, ISO files for non-Linux operating systems have a different boot mechanism, so don’t expect them to work either.
Distribution X isn’t on the list of supported distributions, will it work?
UNetbootin isn’t able to download the distribution, what should I do?
Download the ISO straight from the website, then provide it to UNetbootin via the diskimage option.
My USB stick isn’t booting, what should I do?
Reformat the USB drive as FAT32, then use UNetbootin again to put your distribution on the USB stick.
My USB stick/hard drive isn’t detected, what should I do?
Reformat the USB drive as FAT32, then use UNetbootin again. If it still isn’t showing up, use the targetdrive command line option.
How do I use UNetbootin from the command line?
How does UNetbootin work, and what does it do?
Where can I report bugs, submit patches, etc?
First, make sure you are using the latest version available on this website.
» See Github Issues to file a bug report.
» See Github Pull Requests to submit a patch.
Does UNetbootin have any spyware, viruses, trojans, or other malware?
No; though some anti-virus products may raise «Trojan.generic» warnings due to the auto-uninstall feature, these are false positives. Just make sure you obtain UNetbootin from this site, not some shady third-party source. If you’re absolutely paranoid, you can check the source code and compile it yourself.

What translations are available, and how can I use them?
A number of translations are included in the latest UNetbootin release. See the Translations Page for the status of each.
If a translation corresponding to your system’s native language has already been included into UNetbootin, it should automatically load the corresponding translation. Alternatively, you can force the language to use via the lang=es command-line option, where you substitute es with the the 2-letter ISO 639-1 code for your language.
Can I help translate?
If you’d like to help translate this website, join the project on Transifex, then edit translations either on this website or on Transifex.
If you’d like to help translate the UNetbootin program itself, please use Launchpad Translations. If you are new to Launchpad, you will first have to join the corresponding Ubuntu Translators group for the language you intend to translate. For information on using the Launchpad Translations system, see the translations help page.
Removal Instructions (Applicable only to Hard Disk installs)
If using Windows, UNetbootin should prompt you to remove it the next time you boot into Windows. Alternatively, you can remove it via Add/Remove Programs in the Control Panel.
If using Linux, re-run the UNetbootin executable (with root priveledges), and press OK when prompted to uninstall.
Removal is only required if you used the «Hard Drive» installation mode; to remove the bootloader from a USB drive, back up its contents and reformat it.
Uninstalling UNetbootin simply removes the UNetbootin entry from your boot menu; if you installed an operating system to a partition using UNetbootin, removing UNetbootin will not remove the OS.
To manually remove a Linux installation, you will have to restore the Windows bootloader using «fixmbr» from a recovery CD, and use Parted Magic to delete the Linux partition and expand the Windows partition.
Where’s the source code, and how can I compile or modify it?
Source code is on Github, though you may prefer a tarball of the latest release.
License
UNetbootin was created and written by Geza Kovacs (Github: gkovacs, Launchpad: gezakovacs, contact info).
Translators are listed on the translations page.
UNetbootin is licensed under the GNU General Public License (GPL) Version 2 or above. Site materials, documentation, screenshots, and logos are licensed as Creative Commons Attribution-Share-Alike 3.0.
Other open-source projects from the creators of UNetbootin

HabitLab
A Chrome extension to help you waste less time online (on sites like Facebook, Youtube, etc) by experimenting with different interventions (news feed blockers, comment hiders, and more) to find the ones that work best for you.
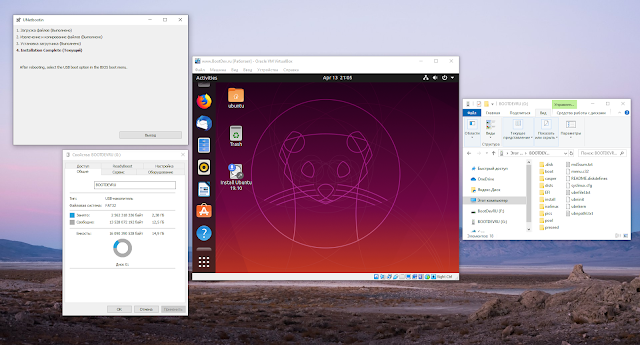
UNetbootin для Windows
| Оценка: |
4.59 /5 голосов — 69 |
| Лицензия: | Бесплатная |
| Версия: | 7.00 | Сообщить о новой версии |
| Обновлено: | 09.11.2020 |
| ОС: | Windows 10, 8.1, 8, 7, XP |
| Интерфейс: | Английский, Русский |
| Разработчик: | Geza Kovacs |
| Категория: | другое |
| Загрузок (сегодня/всего): | 16 / 137 856 | Статистика |
| Размер: | 4,63 Мб |
| СКАЧАТЬ | |

UNetbootin — мультиплатформенная утилита, при помощи которой можно легко устанавливать различные Linux/BSD дистрибутивы на раздел жёсткого диска или USB-накопитель, путем копирования и преобразования содержимого CD/DVD диска с системой для запуска и работы со съемными дисками.
Также присутствует возможность создания загрузочных образов Parted Magic, Super Grub Disk, Backtrack, NTPasswd, Smart Boot Manager (SBM), FreeDOS и др. Поддерживается большинство Linux дистрибутивов.
Windows 7 USB/DVD Download Tool — отличный инструмент от компании Microsoft, с помощью которого можно легко.
MapKeyboard — небольшая бесплатная утилита с помощью которой можно легко переназначить или.
Распространяемый компонент Microsoft Visual C++ для Visual Studio 2015, 2017 и 2019, поскольку в VS 2015 и более.
Starus Partition Recovery — инструмент для эффективного восстановления логических дисков, удаленных или переформатированных в другую файловую систему.
Process Lasso — Небольшая утилита для операционных систем Windows, которая позволяет вручную или.
ASUS Fan Xpert — удобная утилита для материнских плат производства ASUS, с помощью которой можно не.
Отзывы о программе UNetbootin
magond про UNetbootin 6.55 [12-11-2017]
Shyryp87 про UNetbootin 5.85 [21-04-2014]
Алексей про UNetbootin 5.85 [22-07-2013]
Программа отличная.Одним словом — делает своё дело!В ней ничего лишнего,только то,для чего она предназначена.
3 | 4 | Ответить
Сергей про UNetbootin 5.83 [26-01-2013]
maksimkat1 про UNetbootin 5.49 [04-06-2011]
Очень актуально полезная программка, спасибо сайту!
4 | 2 | Ответить
3 простых шага по исправлению ошибок UNETBOOTIN-WINDOWS-494.EXE
Файл unetbootin-windows-494.exe из Geza Kovacs является частью UNetbootin — Universal Netboot Installer. unetbootin-windows-494.exe, расположенный в d: \programas de nides \\ unetbootin-windows-494 .exe с размером файла 4556800 байт, версия файла Unknown version, подпись b12339f7a2022550983e27ce1598f6f4.
В вашей системе запущено много процессов, которые потребляют ресурсы процессора и памяти. Некоторые из этих процессов, кажется, являются вредоносными файлами, атакующими ваш компьютер.
Чтобы исправить критические ошибки unetbootin-windows-494.exe,скачайте программу Asmwsoft PC Optimizer и установите ее на своем компьютере
1- Очистите мусорные файлы, чтобы исправить unetbootin-windows-494.exe, которое перестало работать из-за ошибки.
- Запустите приложение Asmwsoft Pc Optimizer.
- Потом из главного окна выберите пункт «Clean Junk Files».
- Когда появится новое окно, нажмите на кнопку «start» и дождитесь окончания поиска.
- потом нажмите на кнопку «Select All».
- нажмите на кнопку «start cleaning».
2- Очистите реестр, чтобы исправить unetbootin-windows-494.exe, которое перестало работать из-за ошибки.

3- Настройка Windows для исправления критических ошибок unetbootin-windows-494.exe:

- Нажмите правой кнопкой мыши на «Мой компьютер» на рабочем столе и выберите пункт «Свойства».
- В меню слева выберите » Advanced system settings».
- В разделе «Быстродействие» нажмите на кнопку «Параметры».
- Нажмите на вкладку «data Execution prevention».
- Выберите опцию » Turn on DEP for all programs and services . » .
- Нажмите на кнопку «add» и выберите файл unetbootin-windows-494.exe, а затем нажмите на кнопку «open».
- Нажмите на кнопку «ok» и перезагрузите свой компьютер.
Всего голосов ( 18 ), 9 говорят, что не будут удалять, а 9 говорят, что удалят его с компьютера.
Как вы поступите с файлом unetbootin-windows-494.exe?
Некоторые сообщения об ошибках, которые вы можете получить в связи с unetbootin-windows-494.exe файлом
(unetbootin-windows-494.exe) столкнулся с проблемой и должен быть закрыт. Просим прощения за неудобство.
(unetbootin-windows-494.exe) перестал работать.
unetbootin-windows-494.exe. Эта программа не отвечает.
(unetbootin-windows-494.exe) — Ошибка приложения: the instruction at 0xXXXXXX referenced memory error, the memory could not be read. Нажмитие OK, чтобы завершить программу.
(unetbootin-windows-494.exe) не является ошибкой действительного windows-приложения.
(unetbootin-windows-494.exe) отсутствует или не обнаружен.
UNETBOOTIN-WINDOWS-494.EXE

Проверьте процессы, запущенные на вашем ПК, используя базу данных онлайн-безопасности. Можно использовать любой тип сканирования для проверки вашего ПК на вирусы, трояны, шпионские и другие вредоносные программы.
процессов:
Cookies help us deliver our services. By using our services, you agree to our use of cookies.
BootDev
Создание загрузочных дисков и прочие полезные мелочи
Страницы
2020-04-14
UNetbootin: Создание установочной/загрузочной Linux флешки
Содержание
Почему UNetbootin
Начиная с массовой глобализации UEFI BIOS, необходимость подобных утилит постепенно отпадет. Все потому, что для подготовки загрузочного или установочного USB-диска Linux/Windows, способного грузиться в UEFI подсистеме, достаточно скопировать содержимое установочного ISO-образа на FAT32 раздел целевого USB-накопителя.
Но вот если дело касается подготовки подобного Live USB для Legacy BIOS, то подобные утилиты просто незаменимы. Они избавят вас от таких проблем как установка необходимого загрузчика, и MBR-записи, а так же скопирует необходимые файлы.
Чем хорош UNetbootin? Удобство, это наверное самый главный аргумент в пользу использования данной программы. Выбираем дистрибутив, выбираем целевой USB-диск, запускаем процесс подготовки.
Как результат, мы получим Live USB с выбранным нами дистрибутивом, способным грузиться как в Legacy BIOS, так и в UEFI BIOS. Замечу, что UNetbootin кроссплатформенная программа. Что позволит воспользоваться ее удобством не только в операционной системе Windows, но так же в Linux, и MacOS.
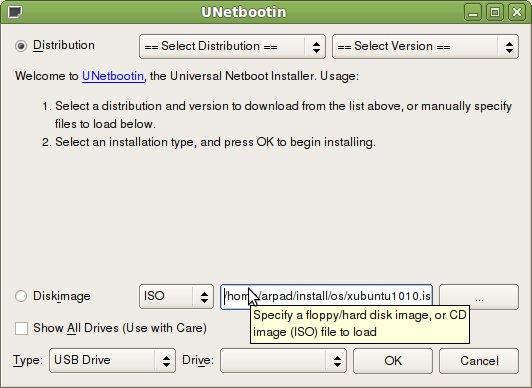
Создание Live USB
Первым делом скачаем программу. Скачать UNetbootin можно на его официальной странице по ссылке https://unetbootin.github.io/. Программа поставляется в портативном исполнении, и не требует установки.
Запустим программу, и взглянем на ее интерфейс.
В верхней части окна располагаются два выпадающих списка выбора дистрибутива, и версии выбранного дистрибутива. Список дистрибутивов довольно обширен.
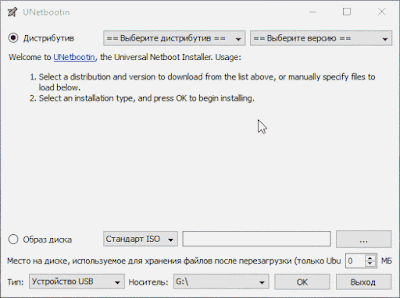
В нижней части окна можно выбрать, уже скачанный вами образ диска.
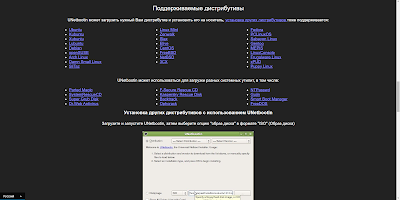
Но тут есть одна оговорка, он должен быть поддерживаемым. Список поддерживаемых дистрибутивов расположен на главной станице проекта (ссылка выше).
В нижней части окна, можно выбрать устройство, на которое в итоге будет записан выбранный выше дистрибутив.

К сожалению, программа не может корректно определять жесткие диски, и вовсе не видит внешних USB жестких дисков. Но, USB флешки при этом корректно определяются.
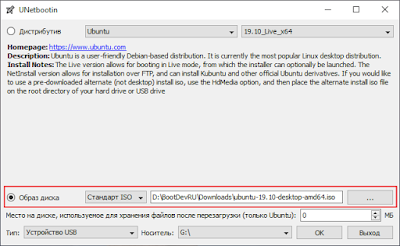
Что ж, попробуем создать Live USB. Выбираем необходимые параметры и запускаем процесс. В моем случае, я выбрал создание Live USB с использованием имеющегося ISO-образа, так как загрузка необходимого образа через саму программу проходила чрезвычайно долго.
Важное замечание! UNetbootin не создает разделы и не умеет их форматировать, так что обязательно перед использованием программы подготовьте соответствующим образом флешку. Создайте разделы если их нет, и отформатируйте необходимый раздел флешки в файловую систему FAT32.
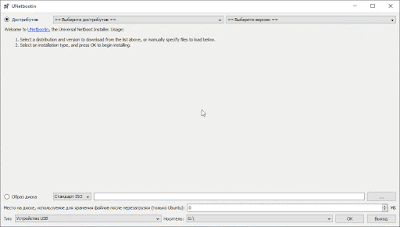
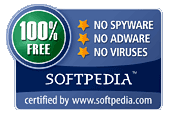
После завершения всех подготовок, пробуем загрузиться с флешки. Воспользуемся виртуальной машиной VirtualBox.
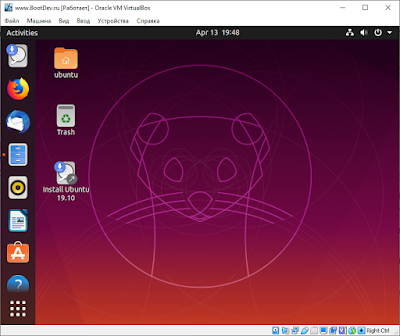
Создание диска USB Live с дистрибутивом Ubuntu успешно выполнено.


