- UNetbootin
- Features
- Using UNetbootin
- Supported Distributions
- Installing Other Distributions Using UNetbootin
- Distribution X isn’t on the list of supported distributions, will it work?
- UNetbootin isn’t able to download the distribution, what should I do?
- My USB stick isn’t booting, what should I do?
- My USB stick/hard drive isn’t detected, what should I do?
- How do I use UNetbootin from the command line?
- How does UNetbootin work, and what does it do?
- Where can I report bugs, submit patches, etc?
- Does UNetbootin have any spyware, viruses, trojans, or other malware?
- What translations are available, and how can I use them?
- Can I help translate?
- Removal Instructions (Applicable only to Hard Disk installs)
- Where’s the source code, and how can I compile or modify it?
- License
- Other open-source projects from the creators of UNetbootin
- HabitLab
- Unetbootin windows установка windows с флешки
- Загрузочная флешка с помощью unetbootin
- BootDev
- Страницы
- 2020-04-14
- UNetbootin: Создание установочной/загрузочной Linux флешки
- Содержание
- Почему UNetbootin
- Создание Live USB
- Установка Windows 7 через USB-флешку (UNetbootin)
- 7 Responses to Установка Windows 7 через USB-флешку (UNetbootin)
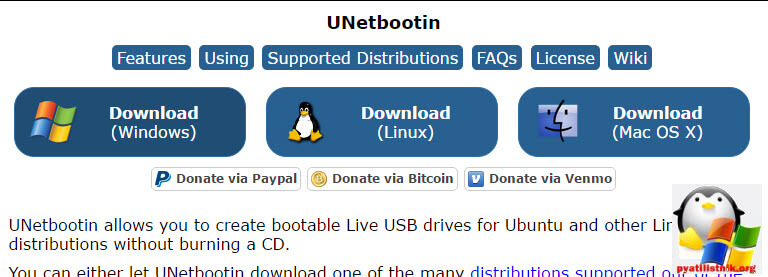
UNetbootin
UNetbootin allows you to create bootable Live USB drives for Ubuntu and other Linux distributions without burning a CD.
You can either let UNetbootin download one of the many distributions supported out-of-the-box for you, or supply your own Linux .iso file.
Features
UNetbootin can create a bootable Live USB drive
It loads distributions either by downloading a ISO (CD image) files for you, or by using an ISO file you’ve already downloaded.
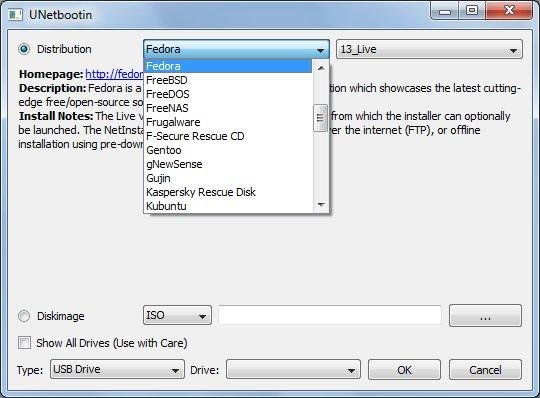
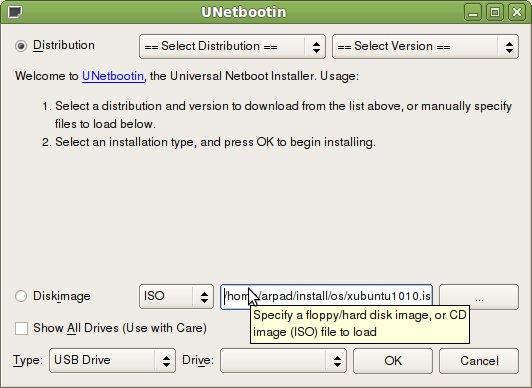
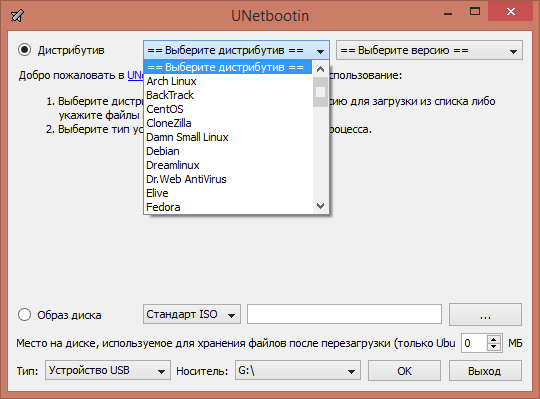
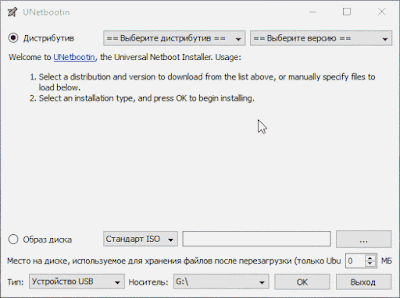
Using UNetbootin
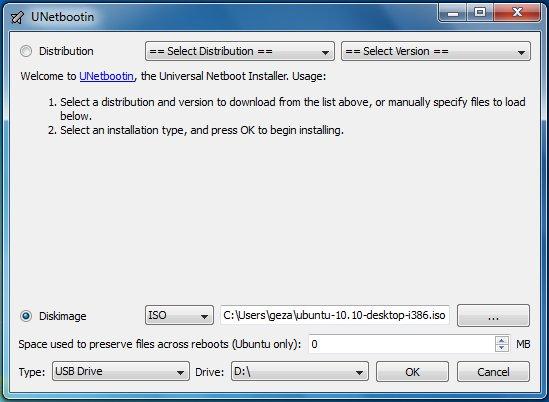
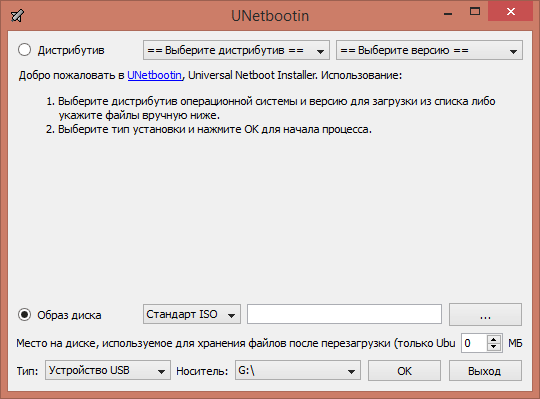
Select an ISO file or a distribution to download, select a target drive (USB Drive or Hard Disk), then reboot once done. If your USB drive doesn’t show up, reformat it as FAT32.
If you used the «USB Drive» install mode: After rebooting, boot from the USB drive. On PCs, this usually involves pressing a button such as Esc or F12 immediately after you turn on your computer, while on Macs, you should hold the Option key before OSX boots.
If you used the «Hard Disk» install mode: After rebooting, select the UNetbootin entry from the Windows Boot Menu.
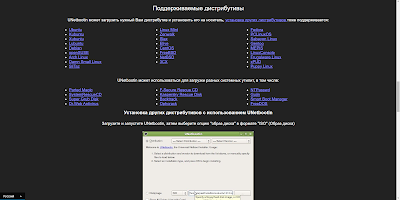
Supported Distributions
UNetbootin has built-in support for automatically downloading and loading the following distributions, though installing other distributions is also supported:
UNetbootin can also be used to load various system utilities, including:
Installing Other Distributions Using UNetbootin
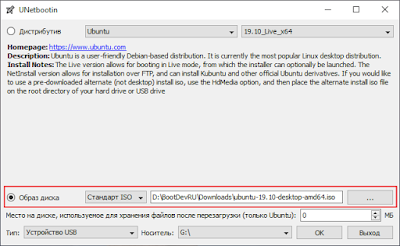
Download and run UNetbootin, then select the «disk image» option and supply it with an ISO (CD image).
UNetbootin doesn’t use distribution-specific rules for making your live USB drive, so most Linux ISO files should load correctly using this option. However, not all distributions support booting from USB, and some others require extra boot options or other modifications before they can boot from USB drives, so these ISO files will not work as-is. Also, ISO files for non-Linux operating systems have a different boot mechanism, so don’t expect them to work either.
Distribution X isn’t on the list of supported distributions, will it work?
UNetbootin isn’t able to download the distribution, what should I do?
Download the ISO straight from the website, then provide it to UNetbootin via the diskimage option.
My USB stick isn’t booting, what should I do?
Reformat the USB drive as FAT32, then use UNetbootin again to put your distribution on the USB stick.
My USB stick/hard drive isn’t detected, what should I do?
Reformat the USB drive as FAT32, then use UNetbootin again. If it still isn’t showing up, use the targetdrive command line option.
How do I use UNetbootin from the command line?
How does UNetbootin work, and what does it do?
Where can I report bugs, submit patches, etc?
First, make sure you are using the latest version available on this website.
» See Github Issues to file a bug report.
» See Github Pull Requests to submit a patch.
Does UNetbootin have any spyware, viruses, trojans, or other malware?
No; though some anti-virus products may raise «Trojan.generic» warnings due to the auto-uninstall feature, these are false positives. Just make sure you obtain UNetbootin from this site, not some shady third-party source. If you’re absolutely paranoid, you can check the source code and compile it yourself.

What translations are available, and how can I use them?
A number of translations are included in the latest UNetbootin release. See the Translations Page for the status of each.
If a translation corresponding to your system’s native language has already been included into UNetbootin, it should automatically load the corresponding translation. Alternatively, you can force the language to use via the lang=es command-line option, where you substitute es with the the 2-letter ISO 639-1 code for your language.
Can I help translate?
If you’d like to help translate this website, join the project on Transifex, then edit translations either on this website or on Transifex.
If you’d like to help translate the UNetbootin program itself, please use Launchpad Translations. If you are new to Launchpad, you will first have to join the corresponding Ubuntu Translators group for the language you intend to translate. For information on using the Launchpad Translations system, see the translations help page.
Removal Instructions (Applicable only to Hard Disk installs)
If using Windows, UNetbootin should prompt you to remove it the next time you boot into Windows. Alternatively, you can remove it via Add/Remove Programs in the Control Panel.
If using Linux, re-run the UNetbootin executable (with root priveledges), and press OK when prompted to uninstall.
Removal is only required if you used the «Hard Drive» installation mode; to remove the bootloader from a USB drive, back up its contents and reformat it.
Uninstalling UNetbootin simply removes the UNetbootin entry from your boot menu; if you installed an operating system to a partition using UNetbootin, removing UNetbootin will not remove the OS.
To manually remove a Linux installation, you will have to restore the Windows bootloader using «fixmbr» from a recovery CD, and use Parted Magic to delete the Linux partition and expand the Windows partition.
Where’s the source code, and how can I compile or modify it?
Source code is on Github, though you may prefer a tarball of the latest release.
License
UNetbootin was created and written by Geza Kovacs (Github: gkovacs, Launchpad: gezakovacs, contact info).
Translators are listed on the translations page.
UNetbootin is licensed under the GNU General Public License (GPL) Version 2 or above. Site materials, documentation, screenshots, and logos are licensed as Creative Commons Attribution-Share-Alike 3.0.
Other open-source projects from the creators of UNetbootin

HabitLab
A Chrome extension to help you waste less time online (on sites like Facebook, Youtube, etc) by experimenting with different interventions (news feed blockers, comment hiders, and more) to find the ones that work best for you.
Unetbootin windows установка windows с флешки
 Всем привет, ранее мы изучили способ как создать загрузочную флешку — 6 часть: утилита rufus, двигаемся дальше и начинаем рассматривать 7 способ, а именно как создать загрузочную флешку — 7 часть: утилита unetbootin.
Утилита очень хорошая, может делать загрузочную флешку с ESXi, Windows, Linux и всякими антивирусными дисками. Так же может их скачивать сама из интернета, что сильно упрощает жизнь.
Загрузочная флешка с помощью unetbootin
Скачать ее можно с нашего сайта (Скачать UNetbootin ) или с официального сайта (unetbootin.sourceforge.net). Как можете заметить программа имеет дистрибутивы на все популярные платформы:
unetbootin не требует от пользователя установки, как многие утилиты. Запускаем ее. Как я писал выше, то что можно скачать из интернета, очень удобная вещь, так как облегчает пользователю поиск нужных дистрибутивов и экономит ему трафик, для кого то как ни странно в 2016 году это еще очень актуально.
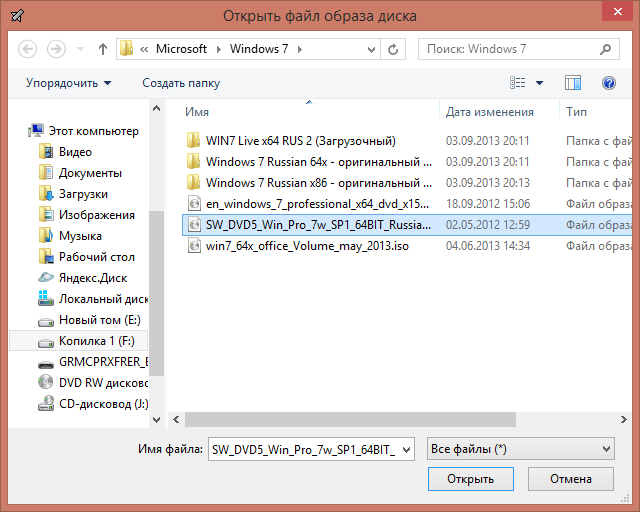
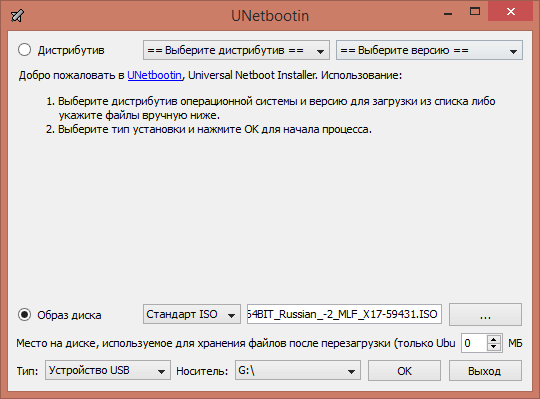
Если у вас уже подготовлен ISO дистрибутив например с Windows, то выбираем пункт Образ диска и выбираем наш ISO с нужной вам операционной системой.
Нажимаем кнопку с точками, это тоже самое, что browse и натравливаем утилиту на ваш ISO.
Для запуска создания загрузочной флешки нажимаем Ок и unetbootin начинает создание устройства.
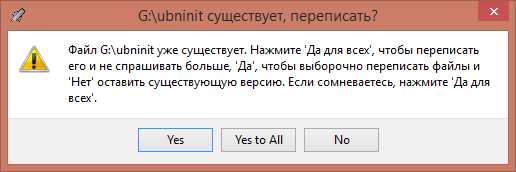
Выскочит предупреждение, жмем Yes to All, оно вам сообщает, что вся информация на носителе будет уничтожена в следствии форматирования.
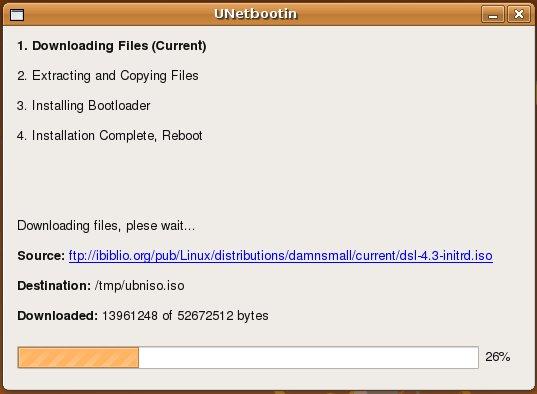
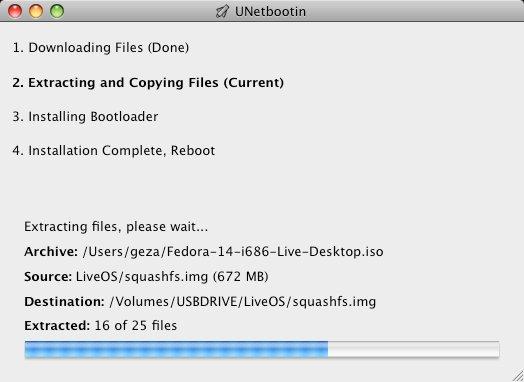
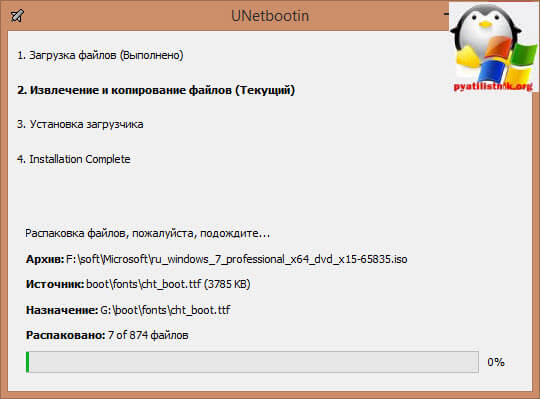
Начнется запись файлов на флешку, unetbootin покажет вам, сколько будет распаковано файлов и на третьем этапе будет создан сам загрузчик.
после недолго времени запись закончиться и у вас на руках будет установочная флешка. Я думаю, что благодаря этой небольшой заметке у вас в будущем не возникнет вопрос как же создается загрузочная флешка через unetbootin программу. На текущий момент самая актуальная версия unetbootin-windows-625.
BootDev
Создание загрузочных дисков и прочие полезные мелочи
Страницы
2020-04-14
UNetbootin: Создание установочной/загрузочной Linux флешки
Содержание
Почему UNetbootin
Начиная с массовой глобализации UEFI BIOS, необходимость подобных утилит постепенно отпадет. Все потому, что для подготовки загрузочного или установочного USB-диска Linux/Windows, способного грузиться в UEFI подсистеме, достаточно скопировать содержимое установочного ISO-образа на FAT32 раздел целевого USB-накопителя.
Но вот если дело касается подготовки подобного Live USB для Legacy BIOS, то подобные утилиты просто незаменимы. Они избавят вас от таких проблем как установка необходимого загрузчика, и MBR-записи, а так же скопирует необходимые файлы.
Чем хорош UNetbootin? Удобство, это наверное самый главный аргумент в пользу использования данной программы. Выбираем дистрибутив, выбираем целевой USB-диск, запускаем процесс подготовки.
Как результат, мы получим Live USB с выбранным нами дистрибутивом, способным грузиться как в Legacy BIOS, так и в UEFI BIOS. Замечу, что UNetbootin кроссплатформенная программа. Что позволит воспользоваться ее удобством не только в операционной системе Windows, но так же в Linux, и MacOS.
Создание Live USB
Первым делом скачаем программу. Скачать UNetbootin можно на его официальной странице по ссылке https://unetbootin.github.io/. Программа поставляется в портативном исполнении, и не требует установки.
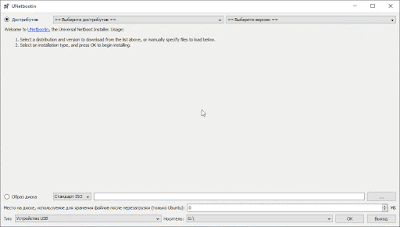
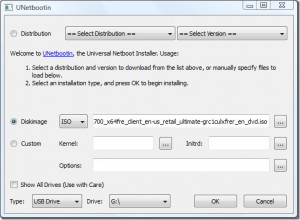
Запустим программу, и взглянем на ее интерфейс.
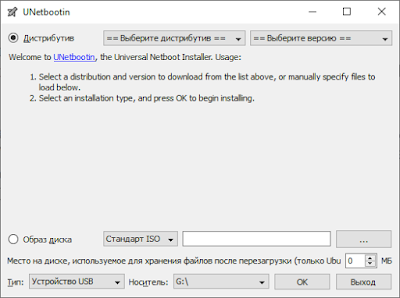
В верхней части окна располагаются два выпадающих списка выбора дистрибутива, и версии выбранного дистрибутива. Список дистрибутивов довольно обширен.
В нижней части окна можно выбрать, уже скачанный вами образ диска.
Но тут есть одна оговорка, он должен быть поддерживаемым. Список поддерживаемых дистрибутивов расположен на главной станице проекта (ссылка выше).
В нижней части окна, можно выбрать устройство, на которое в итоге будет записан выбранный выше дистрибутив.

К сожалению, программа не может корректно определять жесткие диски, и вовсе не видит внешних USB жестких дисков. Но, USB флешки при этом корректно определяются.
Что ж, попробуем создать Live USB. Выбираем необходимые параметры и запускаем процесс. В моем случае, я выбрал создание Live USB с использованием имеющегося ISO-образа, так как загрузка необходимого образа через саму программу проходила чрезвычайно долго.
Важное замечание! UNetbootin не создает разделы и не умеет их форматировать, так что обязательно перед использованием программы подготовьте соответствующим образом флешку. Создайте разделы если их нет, и отформатируйте необходимый раздел флешки в файловую систему FAT32.
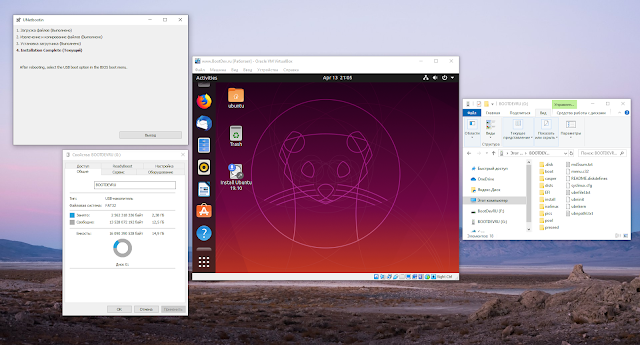
После завершения всех подготовок, пробуем загрузиться с флешки. Воспользуемся виртуальной машиной VirtualBox.
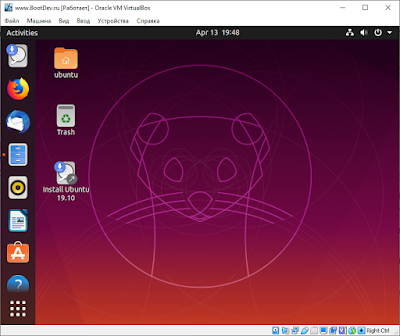
Создание диска USB Live с дистрибутивом Ubuntu успешно выполнено.
Установка Windows 7 через USB-флешку (UNetbootin)
1. Для установки Windows 7 с флешки нужно изначально отформатировать её в NTFS. Флешки, отформатированные в FAT32 не подойдут.
2. Скачать Unetbootin версии 494 (или 490). В последних версиях Unetbootin убрали галочку “показать все устройства”. Без неё вам Unetbootin не покажет устройства с NTFS. Также для Linux необходимо добавить права на выполнение (в Windows нужно просто распаковать архив):
3. Указать путь к образу ISO
4. Дождаться (минут 15) пока система скопирует на флешку файлы и сделает её загрузочной 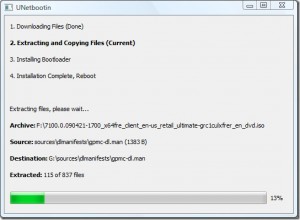
5. Вставить флешку в нужный компьютер, загрузиться с неё. 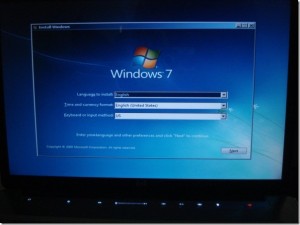
Credits:
http://www.addictivetips.com/windows-tips/install-windows-7-from-usb-drive-requires-2-simple-steps/
http://www.webupd8.org/2010/10/create-bootable-windows-7-usb-drive.html
7 Responses to Установка Windows 7 через USB-флешку (UNetbootin)
Хочу предупредить, что Unetbootin работает не со всеми флэшками. Пробовал 4 разные флэшки, только с одной из них сработало. На остальных кажет, будто на флэшке есть унетбутин, но нет оси для установки. Форматированы все были в NTFS. Ввиду этой “радости” я для себя предпочёл официальное бесплатное решение от Microsoft: “Windows 7 USB/DVD Download Tool”
Спасибо за предупреждение. Посмотрите какие у них стоят флаги. Возможно, дело в этом. “Windows 7 USB/DVD Download Tool” штука хорошая, но версии под Linux нет.
grub4dos тоже для этого подходит, если что 🙂


