- Разворачивание Unifi сети. Личный опыт от и до
- Установка Unifi controller на Ubuntu Server/Debian/в Docker
- davecoutts / unifi_ubuntu_2004.sh
- This comment has been minimized.
- nugget commented May 9, 2020
- This comment has been minimized.
- goldengit commented May 31, 2020
- This comment has been minimized.
- chucklebrother commented Jun 15, 2020 •
- This comment has been minimized.
- jbloz7 commented Jun 19, 2020
- This comment has been minimized.
- ThomasLobker commented Jun 19, 2020
- This comment has been minimized.
- Flurkmark commented Aug 15, 2020
- This comment has been minimized.
- tmuncks commented Aug 22, 2020
- This comment has been minimized.
- davecoutts commented Aug 22, 2020
- This comment has been minimized.
- Smugger21 commented Sep 13, 2020 •
- This comment has been minimized.
- firecat53 commented Sep 18, 2020
- This comment has been minimized.
- tonyappleton commented Oct 30, 2020
- This comment has been minimized.
- Zilog-80 commented Dec 7, 2020
- This comment has been minimized.
- mephibosheth commented Dec 21, 2020
- This comment has been minimized.
- adrianoapmartins commented Jan 13, 2021
- This comment has been minimized.
- ARolek commented Feb 6, 2021 •
- This comment has been minimized.
- rnicolaev commented Feb 13, 2021
- This comment has been minimized.
- davecoutts commented Feb 13, 2021
- This comment has been minimized.
- Dudleydogg commented Mar 7, 2021
- This comment has been minimized.
- kkarhan commented Mar 8, 2021
- This comment has been minimized.
- Maciej-Majcherek commented Mar 26, 2021
- This comment has been minimized.
- davecoutts commented Mar 26, 2021
- This comment has been minimized.
- Maciej-Majcherek commented Mar 26, 2021
- This comment has been minimized.
- davecoutts commented Mar 26, 2021
- This comment has been minimized.
- Bubba-Kastorsky commented Apr 9, 2021
- This comment has been minimized.
- crayz9000 commented Apr 21, 2021
- This comment has been minimized.
- earenasr commented Apr 21, 2021
- This comment has been minimized.
- crayz9000 commented Apr 21, 2021
- This comment has been minimized.
- earenasr commented Apr 21, 2021
- This comment has been minimized.
- davecoutts commented Apr 21, 2021
- This comment has been minimized.
- ganter799 commented Jun 29, 2021
- This comment has been minimized.
- AHrubik commented Jul 16, 2021
- This comment has been minimized.
- warybyte commented Jul 23, 2021
- This comment has been minimized.
- dbosk commented Aug 10, 2021
- This comment has been minimized.
- larrydevops commented Aug 15, 2021
- This comment has been minimized.
- Thijxx commented Aug 26, 2021 •
- This comment has been minimized.
- emulated24 commented Aug 27, 2021
- This comment has been minimized.
- Thijxx commented Aug 30, 2021
- This comment has been minimized.
- emulated24 commented Aug 31, 2021
- This comment has been minimized.
- RocketLR commented Sep 13, 2021
- This comment has been minimized.
- ficematt commented Oct 2, 2021 •
- This comment has been minimized.
- Starkstromkonsument commented Oct 2, 2021
- This comment has been minimized.
- ficematt commented Oct 3, 2021
Разворачивание Unifi сети. Личный опыт от и до
Wi-FI сети прочно вошли в нашу жизнь и уверенно обосновались на улицах, в домах и офисах. Вот и у меня на работе начальство и менеджеры обзавелись продукцией «какой-то фруктовой компании» и возжелали вайфаю. Первой мыслью было купить пару бытовых Wi-Fi роутеров, настроить один как БС, второй как репитер и дело, казалось бы, в шляпе. Но тут есть одно неудобство, при первом переключении между точками приходиться снова вводить пароль доступа. А так как площадь офиса вскоре должна была увеличиться вдвое и соответственно должно было увеличиться количество таких переключений, было принято решение настроить Wi-Fi с бесшовным роумингом. До недавнего времени на рынке данного оборудования бал правили гиганты Cisco,HP и иже сними. Стоит ли говорить, что цена их решений составляет десятки и сотни тысяч рублей. Но спасибо бесценному habrahabr и данной статье, которая поведала о совсем недорогом решении основанном на Unifi. UniFi продукт компании Ubiquiti — система корпоративного Wi-Fi с бесплатным контроллером. Я опишу весь процесс разворачивания сети на основе Unifi от настройки роутера до монтажа точек на потолок исходя из личного опыта.
Настройка роутера.
Т.к. Unifi Access Point (AP) не являются самостоятельными устройствами, для полноценной жизни им необходим роутер. В моем примере таковым является Netgear JWNR2000 и все представленные настройки, коих немного, будут от него. Внешний IP адрес у меня статический, поэтому мастер установки уверенно посылаем в сад и переходим в секцию «Основные настройки». Здесь выставляем необходимые данные и жмем применить.

Также самим точкам Unifi необходим DHCP сервер. В роутере он включен по умолчанию, и я лишь закрепил IP адреса для своих AP для удобства.
Этих настроек достаточно, чтобы подключенные к Unifi клиенты смогли выйти в интернет. Остальные настройки на ваше усмотрение. Лично я включил возможность удаленного доступа через внешний адрес, и он не раз пригодился.
Установка/настройка контроллера.
Как говориться на сайте Unifi.ru: «Сердце системы UniFi – программируемый контролер.» И существует три их версии: для Windows, для Mac и для Linux.
Замечания касательно Windows. Контроллер успешно запустился лишь на чистой установке. До этого на двух разных ноутбуках контроллер устанавливался, но запускаться упорно отказывался, хотя никаких конфликтов ни по портам, ни по чему еще либо, не было.
Если вы решите устанавливать контроллер на Linux, то вот тут есть хорошее руководство по установке на Ubuntu 10.10. Шаг про установку DHCP можете пропустить, потому что в нашем случае он есть на роутере. Если вкратце, то:
1. Правим /etc/apt/sources.list. Добавляем репозиторий: deb www.ubnt.com/downloads/unifi/distros/deb/maverick maverick ubiquiti
2. Добавляем в терминале через sudo GPG key: sudo apt-key adv —keyserver keyserver.ubuntu.com —recv C0A52C50
3. Устанавливаем пакет UniFi:
apt-get update
apt-get install unifi
apt-get upgrade
После установки, рекомендуется выключить репозиторий, так как могут возникнуть проблемы с установкой пакетов. Если ошибок не выскочило, то система установлена и уже даже работает.
4. После установки заходим на localhost:8080/, либо на IP-адрес:8080/, подтверждаем сертификат, и входим в систему через Ubiquiti UniFi Wizard.
Про план помещения.
Мне было интересно получить результат как на скриншотах в инете. Там где виден радиус распространения сигнала. Вставить картинку и кинуть на нее точки доступа из панельки слева не проблема, а вот с радиусом действия немного сложнее. Для этого нужно выставить масштаб, а делается это с помощью хитрой комбинации пальцев. Сначала щелкаем по треугольничку линейки, под ползунком увеличения вида, жмем мышкой в какой либо точке карты и тянем линию (она красного цвета). Линия должна быть совершенно определенного размера, который потом следует указать.
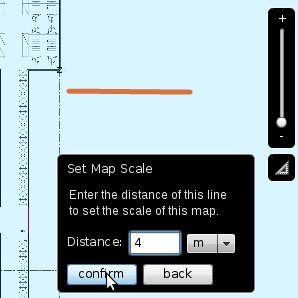
После того как мы указали масштаб, жмем на кнопку «Coverage» и любуемся фиолетово-оранжевыми разводами.
Описание подробных настроек системы я опущу т.к. про это много написана на Unifi.ru, да и интерфейс достаточно интуитивный.
Подключение AP.
Сам монтаж точек на потолок никаких вопросов не вызывает. Они изначально рассчитаны для установки на потолочные плитки или стену и в комплекте есть все необходимое, а вот схема физического подключения до меня дошла не сразу. Хотя в руководстве есть вроде бы понятная иллюстрация.

Кстати: включать компьютер с контроллером непосредственно в свитч или роутер после настройки необязательно. Можно подключиться к WI-FI сети построенной на Unifi и управлять настройками через нее.
Но если вы выполните подключение по ней, то будете долго ждать каких-либо результатов. А ведь достаточно было нарисовать вот так.
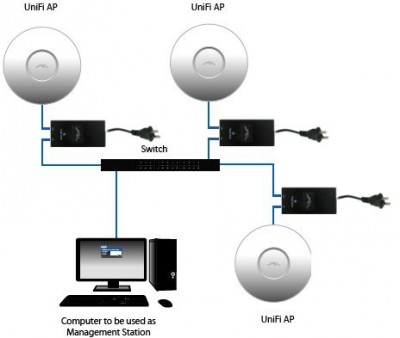
Адаптер и точка доступа соединяются по порту «POE» а второй порт адаптера «LAN» включается в роутер, ну или свитч, как на картинке. Вот собственно и все. После запуска контроллера он сам найдет запущенные Unifi устройства о чем поведает индикатором «Pending». После этого следует перейти на вкладку «Access Point» и у найденных устройств нажать кнопку «Adopt». Устройства зарегистрируются в системе о чем, кроме всего прочего, сообщат зеленым светодиодом на корпусе.
Немного о бытовом.
Сброс настроек. Бывает что Unifi неудачно регистрируется или отваливается в процессе настройки и экспериментов. Вернуть настройки точки доступа в состояние по умолчанию, можно следующим образом. Узнать IP адрес (можно либо на вкладке «access point» контроллера, либо в секции «Подключенные устройства» Netgear роутера) и попытаться зайти на него через ssh. Тут один нюанс. Если точка успела зарегистрироваться, то заходить надо через имя и пароль которые вы установили на контроллере, если же нет, то имя и пароль дефолтные ubnt/ubnt. После успешного логина на точку, нужно выполнить команду ‘syswrapper.sh restore-default’. Точка сбросит настройки после чего ее снова нужно будет зарегистрировать. У меня была ситуация, когда зайти на Unifi по ssh не удавалось. Уж я и резет ей жал (нажать скрепкой на пять секунд возле сетевого порта) и питание отключал/включал, ничего не помогало. Уже собрался было сдавать по гарантии. Но полежав денек и подключившись последовательно Розетка — Адаптер — POE порт адаптера — Unifi — L AN порт адаптера — роутер, и о чудо! И удалось зайти по ssh, и сбросить настойки, и успешно затем зарегистрировать.
Контроль доступа.
Руководством было принято решение о том, что доступ должен предоставляться только по MAC адресам. На форуме ubnt.com честно сообщается, что такая функция будет, но только в версии контроллера 2. (Бета версия контроллера 2 уже есть в сети) Там же народ делится своим опытом по контролю доступа при помощи RADIUS сервера, но городить огород мне не хотелось. Пришлось зайти со стороны роутера. У Netgear JWNR2000 такая функция есть, вот только предназначена она для Wi-Fi который он сам же и раздает. А т. к. мы эту функцию переложили на Unifi, было придумано следующее решение. Заходим в админку роутера, секция «Службы блокировки». Жмем кнопку Добавить. И запрещаем доступ по всем портам всему диапазону сети.
После этого, чтобы разрешить кому-либо доступ, MAC адрес разрешенного устройства добавляем в DHCP (это было описано выше) и разрешенный IP удаляем из диапазона блокируемых адресов.
Вот собственно и весь процесс.
В целом система очень стабильная. Ежедневная нагрузка составляет 30-35пользователей и никаких замечаний пока не было. Монтаж и настройка системы занимают всего несколько часов, а расширение системы и того меньше. В общем впечатления самые положительные. Надеюсь что мой опыт кому-то пригодится и поможет.
Источник
Установка Unifi controller на Ubuntu Server/Debian/в Docker
Думаю многим знакома эта проблема, когда программный контроллер Unifi-тарелок работает некоторое время (день, два, пять) и вдруг падает ни с того ни с сего, у меня держался без падений максимум неделю на чистой Windows с конфигурацией сети с нуля и все равно упал.
Было принято решение перенести его на # Linux. Сделать это было просто
вместо 6.0.28 вы можете подставить свою версию
собственно после этого можно заходить в веб-интерфейс https://ваш_айпи:8443 и настраивать/восстанавливать сохраненный с # Windows конфиг, который идеально встает на линуксовый вариант контроллера и всё работает без сбоев 🙂
Дальше — больше, выделять целую виртуалку под один контроллер показалось многовато, было принято решение занести всё в контейнер Docker’a, для экономии ресурсов
грузим образ Unifi controller’a, если образ уже есть, то он обновится
docker pull jacobalberty/unifi:stable-6
создаем папки для точек монтирования контейнера с нашим контроллером
это необходимо для того, чтобы при обновлении контейнера из образа с новой версией не приходилось каждый раз восстанавливать конфиг
Запускаем образ в контейнер
docker run —name unifi-controller —volume=/docker/unifi:/var/lib/unifi -p 8080:8080/tcp -p 8081:8081/tcp -p 8443:8443/tcp -p 8843:8843/tcp -p 8880:8880/tcp -p 8883:8883/tcp -p 3478:3478/udp jacobalberty/unifi:stable-6
Далее можно переходить на веб-интерфейс и восстанавливать конфиг
Источник
davecoutts / unifi_ubuntu_2004.sh
| # Install Ubiquiti Unifi Controller on Ubuntu 20.04. |
| # As tested on a fresh install of ubuntu-20.04.1-live-server, August 22nd 2020. |
| # Thanks to https://gist.github.com/tmuncks for posting the updated install steps. |
| sudo apt update |
| sudo apt install —yes apt-transport-https |
| echo ‘ deb https://www.ui.com/downloads/unifi/debian stable ubiquiti ‘ | sudo tee /etc/apt/sources.list.d/100-ubnt-unifi.list |
| sudo wget -O /etc/apt/trusted.gpg.d/unifi-repo.gpg https://dl.ui.com/unifi/unifi-repo.gpg |
| sudo apt update |
| sudo apt install —yes openjdk-8-jre-headless unifi |
| sudo apt clean |
| sudo systemctl status —no-pager —full mongodb.service unifi.service |
| # Now log into https://unifi_controller_hostname:8443/ |
| # # ———————————————————————————————————————— |
| # # Previous install steps from when unifi still required mongodb-server |
| # # unifi has since been updated to work with mongodb-server 3.6. Which is available from the Ubuntu 20.04 main repository. |
| # # ———————————————————————————————————————— |
| # |
| # sudo apt install —yes ca-certificates apt-transport-https |
| # echo ‘deb https://www.ui.com/downloads/unifi/debian stable ubiquiti’ | sudo tee /etc/apt/sources.list.d/100-ubnt-unifi.list |
| # sudo apt-key adv —keyserver keyserver.ubuntu.com —recv 06E85760C0A52C50 |
| # wget -qO — https://www.mongodb.org/static/pgp/server-3.4.asc | sudo apt-key add — |
| # echo ‘deb https://repo.mongodb.org/apt/ubuntu xenial/mongodb-org/3.4 multiverse’ | sudo tee /etc/apt/sources.list.d/mongodb-org-3.4.list |
| # sudo apt-mark hold openjdk-11-* |
| # sudo apt update |
| # # mongodb 3.4 dependency |
| # wget http://security.ubuntu.com/ubuntu/pool/main/o/openssl1.0/libssl1.0.0_1.0.2n-1ubuntu5.3_amd64.deb -P /tmp |
| # sudo apt install —yes /tmp/libssl1.0.0_1.0.2n-1ubuntu5.3_amd64.deb |
| # rm /tmp/libssl1.0.0_1.0.2n-1ubuntu5.3_amd64.deb |
| # sudo apt install —yes mongodb-org |
| # sudo apt install —yes unifi |
This comment has been minimized.
Copy link Quote reply
nugget commented May 9, 2020
Thanks so much for this!
This comment has been minimized.
Copy link Quote reply
goldengit commented May 31, 2020
Thanks for this — got me pointed in the right direction with install — had to edit JRE path before unifi service successfully launched — see here:
This comment has been minimized.
Copy link Quote reply
chucklebrother commented Jun 15, 2020 •
no jre8 installed, not sure I liked the idea of messing with the init script as per goldengit’s instructions especial as the init script seemed aware of the architectural path names that the linked post addresses.
Given that the init script seems aware that it needs to specify architecture, and seem fairly specific about wanting java 8 I thought I’d run:
sudo apt install openjdk-8-jdk
This seems to have worked and I got the unifi controller landing page and successfully imported my backup from the controller on my previous server.
This comment has been minimized.
Copy link Quote reply
jbloz7 commented Jun 19, 2020
Installing Java worked for me too.
This comment has been minimized.
Copy link Quote reply
ThomasLobker commented Jun 19, 2020
For me downgrading MongoDB was not necessary. I currently have version 3.6.9 installed from the Ubuntu 20.04 repository.
This comment has been minimized.
Copy link Quote reply
Flurkmark commented Aug 15, 2020
Just posting to preserve my findings for posterity, maybe someone with similar issues will find this.
Ubuntu 20.04. Got it working by changing the init-scripts as stated above. Stopped working after reboot. Server only binds ipv6, and db stopping.
Fixes:
Add to init string:
Also, /usr/lib/unifi/run is linked and gets broken after reboot. I just created it as a directory in place. You could off course just re-link it proper.
This comment has been minimized.
Copy link Quote reply
tmuncks commented Aug 22, 2020
For me, this is all that was needed on a clean 20.04 install:
This comment has been minimized.
Copy link Quote reply
davecoutts commented Aug 22, 2020
Thanks all for the notes and feedback.
It would seem that the Unifi Controller has been updated since I first released the gist 4 months ago.
mongodb-server
This comment has been minimized.
Copy link Quote reply
Smugger21 commented Sep 13, 2020 •
I have to run:
sudo java -jar /usr/lib/unifi/lib/ace.jar discover
In order to get the service to even start up
( To get the system.properties file to generate )
Otherwise it errors out saying «file or folder not found» in the log for the Unifi Service
Just though I would post this.
Otherwise all the other steps work as posted.
So here is my setup process:
This comment has been minimized.
Copy link Quote reply
firecat53 commented Sep 18, 2020
Thanks! Finally able to update my last container to 20.04 base.
This comment has been minimized.
Copy link Quote reply
tonyappleton commented Oct 30, 2020
Worked like a charm — thank you!!
This comment has been minimized.
Copy link Quote reply
Zilog-80 commented Dec 7, 2020
Works great thank you.
This comment has been minimized.
Copy link Quote reply
mephibosheth commented Dec 21, 2020
Just gotta say, «Thank you!» Done in 10 minutes and with no industrial language. Just what the doctor ordered.
This comment has been minimized.
Copy link Quote reply
adrianoapmartins commented Jan 13, 2021
Great, thanks for the rundown. In my set up I actually had to reboot the machine, for some reason I wasn’t able to log in with my Ubiquiti account but it was fixed after a restart, for some reason.
This comment has been minimized.
Copy link Quote reply
ARolek commented Feb 6, 2021 •
Worked great for me! I did have to make some firewall adjustments:
- port 8443 is needed for the web console
- port 3478 is needed for the STUN communication
This comment has been minimized.
Copy link Quote reply
rnicolaev commented Feb 13, 2021
Hi guys, can you please explain how to update the Unifi controller on Ubuntu 20.04, when Unifi will release new versions of the controller in the future.
This comment has been minimized.
Copy link Quote reply
davecoutts commented Feb 13, 2021
Once the Unifi controller is installed it is simply a matter of executing the commands ,
When you run the apt update command you will see that the latest Unifi https://dl.ubnt.com/unifi/debian repository package list is downloaded.
If Unifi have released a new version and placed it in their repository, the apt upgrade command will download and install it.
This comment has been minimized.
Copy link Quote reply
Dudleydogg commented Mar 7, 2021
Fresh install Ubuntu Server, Ran the .sh script. went to the URL, uploaded my Backup file and I was up and running, even populated my cloud URL. Wow fantastic thanks.
This comment has been minimized.
Copy link Quote reply
kkarhan commented Mar 8, 2021
For me, this is all that was needed on a clean 20.04 install:
This comment has been minimized.
Copy link Quote reply
Maciej-Majcherek commented Mar 26, 2021
@davecoutts Do you also have : ERROR Error processing element InMemoryAppender ([Appenders: null]): CLASS_NOT_FOUND
This comment has been minimized.
Copy link Quote reply
davecoutts commented Mar 26, 2021
Yes I do see that error.
These errors first appeared after I upgraded from version 6.0.45 to 6.1.71, which I did today.
I checked the unifi log history with journalctl -u unifi.service —no-pager to confirm this.
In my case the Unifi Controller is still running normally, even with the new set of errors.
This comment has been minimized.
Copy link Quote reply
Maciej-Majcherek commented Mar 26, 2021
Thanks for quick reply Dave. I was just curious if it is only on my environment.
I’ve got one last question 😅
Did You upgrade controller via sudapt update unifi ?
This comment has been minimized.
Copy link Quote reply
davecoutts commented Mar 26, 2021
You are welcome Maciej.
I updated the server with sudo apt update && sudo apt upgrade and that picked up the new unifi version.
This comment has been minimized.
Copy link Quote reply
Bubba-Kastorsky commented Apr 9, 2021
Worked great for me! I did have to make some firewall adjustments:
- port 8443 is needed for the web console
- port 3478 is needed for the STUN communication
Also i need to make:
sudo ufw allow 8080/tcp
*port 8080 Port used for device and controller communication.
This comment has been minimized.
Copy link Quote reply
crayz9000 commented Apr 21, 2021
With a fresh Ubuntu 20.04 install, the script worked to install UniFi 6.1.71-15061-1, except the web interface wouldn’t start, and this message was reported by systemctl status:
unifi[36574]: WARN Unable to load properties from ‘/usr/lib/unifi/data/system.properties’ — /usr/lib/unifi/data/system.properties (No such file or directory)
Checking the permissions on /usr/lib/unifi showed that everything was owned root:root, while all processes were running under user unifi. Running chown -R unifi:unifi /usr/lib/unifi allowed the service to restart successfully.
This comment has been minimized.
Copy link Quote reply
earenasr commented Apr 21, 2021
hola buen dia, instale satisfactoriamente, me estaba funcionando bien pero de un momento a otro no me abre por web, no conozco del tema podrian ayudarme por favor
This comment has been minimized.
Copy link Quote reply
crayz9000 commented Apr 21, 2021
hola buen dia, instale satisfactoriamente, me estaba funcionando bien pero de un momento a otro no me abre por web, no conozco del tema podrian ayudarme por favor
Trate de usar sudo chown -R unifi:unifi /usr/lib/unifi y sudo systemctl restart unifi
This comment has been minimized.
Copy link Quote reply
earenasr commented Apr 21, 2021
hola buen dia, instale satisfactoriamente, me estaba funcionando bien pero de un momento a otro no me abre por web, no conozco del tema podrian ayudarme por favor
Trate de usar sudo chown -R unifi:unifi /usr/lib/unifi y sudo systemctl restart unifi
nada no me funciona, no se que mas hacer tengo 200 equipos que se validan en ese cloud, usted sabe de alguien que pueda revisarlo y pago sus servicios ?
This comment has been minimized.
Copy link Quote reply
davecoutts commented Apr 21, 2021
With a fresh Ubuntu 20.04 install, the script worked to install UniFi 6.1.71-15061-1, except the web interface wouldn’t start, and this message was reported by systemctl status:
unifi[36574]: WARN Unable to load properties from ‘/usr/lib/unifi/data/system.properties’ — /usr/lib/unifi/data/system.properties (No such file or directory)
Checking the permissions on /usr/lib/unifi showed that everything was owned root:root, while all processes were running under user unifi. Running chown -R unifi:unifi /usr/lib/unifi allowed the service to restart successfully.
I believe the /usr/lib/unifi/data/system.properties (No such file or directory) error only occurs the first time the unifi application starts, following the installation.
I don’t know the unifi application post installation initialisation process, but it could be that the system.properties file needs time to be generated.
If you check soon after application start, you will see the system.properties file in directory /var/lib/unifi , which is soft linked from /usr/lib/unifi/data .
I don’t believe you need to change the ownership of /usr/lib/unifi .
To check this you could try restarting the unifi application without changing the /usr/lib/unifi directory ownership, and see if the system.properties error reoccurs. In my case I didn’t see the system.properties error on restarting the unifi application.
This comment has been minimized.
Copy link Quote reply
ganter799 commented Jun 29, 2021
Just wanna thanks for your guide. Had some problems installing on Ubuntu 21.04 and switch to my Raspberry4 with Raspberry PI OS lite. Had to install ufw and open port 8443/tcp. Don’t know if the last step was really necessary but it worked. Maybe I was too stupid and mixed up the IP. Now everything works like charm.
This comment has been minimized.
Copy link Quote reply
AHrubik commented Jul 16, 2021
Thanks for this — got me pointed in the right direction with install — had to edit JRE path before unifi service successfully launched — see here:
This is still required using Ubuntu 20.04-2.
This comment has been minimized.
Copy link Quote reply
warybyte commented Jul 23, 2021
This also works on my configuration of 18.04. Thanks so much!
This comment has been minimized.
Copy link Quote reply
dbosk commented Aug 10, 2021
On a Raspberry Pi 4 (arm64), I needed to modify one line:
This comment has been minimized.
Copy link Quote reply
larrydevops commented Aug 15, 2021
Works perfectly. Tried on Ubuntu 20.04.02
This comment has been minimized.
Copy link Quote reply
Thijxx commented Aug 26, 2021 •
Does not work (anymore) as it currently fails a mongodb dependency check unfortunately.
I’m working with Ubuntu 21.04, that is probably the problem. Manually installed Mongo but unifi keeps nagging about it missing no matter what I do.
This comment has been minimized.
Copy link Quote reply
emulated24 commented Aug 27, 2021
Does not work (anymore) as it currently fails a mongodb dependency check unfortunately.
I’m working with Ubuntu 21.04, that is probably the problem. Manually installed Mongo but unifi keeps nagging about it missing no matter what I do.
I did this on Ubuntu Server 21.04 on arm64 RPi4b, works fine, mongodb 3.6.3 gets installed:
This comment has been minimized.
Copy link Quote reply
Thijxx commented Aug 30, 2021
I used the pre-installed Raspberry Pi image for Ubuntu 21.04, maybe there is a difference there? Otherwise I cannot explain why it did not work out for me. I’ve moved to the LinuxServer docker container with Unifi.
This comment has been minimized.
Copy link Quote reply
emulated24 commented Aug 31, 2021
I used the pre-installed Raspberry Pi image for Ubuntu 21.04, maybe there is a difference there? Otherwise I cannot explain why it did not work out for me. I’ve moved to the LinuxServer docker container with Unifi.
Not sure what went wrong, but I used this image for installation: ubuntu-21.04-preinstalled-server-arm64+raspi.img.xz
Then did what’s above, twice already, no problem at all. 🙂
This comment has been minimized.
Copy link Quote reply
RocketLR commented Sep 13, 2021
For me, this is all that was needed on a clean 20.04 install:
Jupp thanks man. This worked flawlessly.
This comment has been minimized.
Copy link Quote reply
ficematt commented Oct 2, 2021 •
I have followed these steps but can seem to access the Unifi console. When I check the unifi.service status bellow is the output.
● unifi.service — unifi
Loaded: loaded (/lib/systemd/system/unifi.service; enabled; vendor preset: enabled)
Active: active (running) since Fri 2021-10-01 23:04:39 CDT; 3min 13s ago
Process: 1001 ExecStart=/usr/lib/unifi/bin/unifi.init start (code=exited, status=0/SUCCESS)
Main PID: 1196 (jsvc)
Tasks: 37 (limit: 43313)
Memory: 313.0M
CGroup: /system.slice/unifi.service
├─1196 unifi -cwd /usr/lib/unifi -home /usr/lib/jvm/java-8-openjdk-amd64 -cp /usr/share/java/commo>
├─1199 unifi -cwd /usr/lib/unifi -home /usr/lib/jvm/java-8-openjdk-amd64 -cp /usr/share/java/commo>
└─1200 unifi -cwd /usr/lib/unifi -home /usr/lib/jvm/java-8-openjdk-amd64 -cp /usr/share/java/commo>
Oct 01 23:03:36 dvr1 systemd[1]: Starting unifi.
Oct 01 23:03:36 dvr1 unifi.init[1001]: * Starting Ubiquiti UniFi Controller unifi
Oct 01 23:04:39 dvr1 unifi.init[1001]: . fail!
Oct 01 23:04:39 dvr1 systemd[1]: Started unifi.
lines 1-16/16 (END)
The third line up from the bottom is the one that has me worried. I have tried looking online for a solution, but have come up empty handed.
Also, when I check the open ports with sudo lsof -nP -iTCP -sTCP:LISTEN I don’t see where the port 8443 is listening and open. I do not have UFW active. I have not had an issue with getting portainer and cockpit running. Those ports are shown listening when I ran the above command.
This comment has been minimized.
Copy link Quote reply
Starkstromkonsument commented Oct 2, 2021
I have followed these steps but can seem to access the Unifi console. When I check the unifi.service status bellow is the output. ● unifi.service — unifi Loaded: loaded (/lib/systemd/system/unifi.service; enabled; vendor preset: enabled) Active: active (running) since Fri 2021-10-01 23:04:39 CDT; 3min 13s ago Process: 1001 ExecStart=/usr/lib/unifi/bin/unifi.init start (code=exited, status=0/SUCCESS) Main PID: 1196 (jsvc) Tasks: 37 (limit: 43313) Memory: 313.0M CGroup: /system.slice/unifi.service ├─1196 unifi -cwd /usr/lib/unifi -home /usr/lib/jvm/java-8-openjdk-amd64 -cp /usr/share/java/commo> ├─1199 unifi -cwd /usr/lib/unifi -home /usr/lib/jvm/java-8-openjdk-amd64 -cp /usr/share/java/commo> └─1200 unifi -cwd /usr/lib/unifi -home /usr/lib/jvm/java-8-openjdk-amd64 -cp /usr/share/java/commo>
Oct 01 23:03:36 dvr1 systemd[1]: Starting unifi. Oct 01 23:03:36 dvr1 unifi.init[1001]: * Starting Ubiquiti UniFi Controller unifi Oct 01 23:04:39 dvr1 unifi.init[1001]: . fail! Oct 01 23:04:39 dvr1 systemd[1]: Started unifi. lines 1-16/16 (END)
The third line up from the bottom is the one that has me worried. I have tried looking online for a solution, but have come up empty handed. Also, when I check the open ports with sudo lsof -nP -iTCP -sTCP:LISTEN I don’t see where the port 8443 is listening and open. I do not have UFW active. I have not had an issue with getting portainer and cockpit running. Those ports are shown listening when I ran the above command.
Same problem here. After enforcing some debugging in /etc/init.d/unifi I get a lot of Java-Output and this line:
[. ] main ERROR Unable to create file logs/server.log java.io.IOException: Could not create directory /logs
Any ideas anybody? The logging paths semm to be set up correctly. Why is it trying to create that directory? /var/log/unifi is present and writable by the user in question. Some more debugging data:
OS: Ubuntu Server 20.04.3 LTS (focal)
This comment has been minimized.
Copy link Quote reply
ficematt commented Oct 3, 2021
I got the Unifi application running. I uninstalled the Unifi application. Then I ran the script found HERE.
Be sure you are running the latest script. You have to scroll down and copy the link from further down in the post. Below is the command you need to run. Refer to the post linked above for the most current information.
apt-get update; apt-get install ca-certificates wget -y
wget https://get.glennr.nl/unifi/install/unifi-6.4.54.sh
bash unifi-6.4.54.sh
You can’t perform that action at this time.
You signed in with another tab or window. Reload to refresh your session. You signed out in another tab or window. Reload to refresh your session.
Источник


