- Как удалить драйвер Nvidia в Ubuntu
- Удаление драйвера Nvidia в Ubuntu
- Шаг 1. Переключение к консоль
- Шаг 2. Очистка конфигурации
- Шаг 3. Удаление драйвера
- Шаг 4. Переустановка nouveau
- Шаг 5. Обновление конфигурации
- Шаг 6. Готово
- Удаление драйвера, полученного из официального сайта
- Выводы
- How to disable and remove Nvidia drivers on Ubuntu
- Disable Nvidia drivers GUI
- Uninstalling Nvidia drivers command-line
- Debian nVidia driver uninstall
- How to Install Nvidia Driver on Ubuntu 20.04
- Check hardware Information of GPU
- Install Nvidia drivers using from GUI
- Install Nvidia driver from the command line (CLI)
- Verify using nvidia-smi
- Configure the Nvidia Graphics driver
- How to uninstall the proprietary Nvidia driver
- Uninstall Nvidia Driver through GUI
- Conclusion
Как удалить драйвер Nvidia в Ubuntu
Для видеокарты Nvidia в Linux выпускается два вида драйверов — открытые nouveau, с открытым исходным кодом, который разрабатывается сообществом и закрытый проприетарный драйвер Nvidia, от производителя.
Первый встроен в ядро и с ним никогда не возникает проблем, второй же устанавливается в систему ручным способом или с помощью пакетного менеджера. Он не всегда совместим с новыми версиями ядра, поэтому иногда после обновления драйвера или ядра до не поддерживаемой версии мы не сможем загрузиться в графический интерфейс во время следующей перезагрузки. Многие пользователи, которые еще не знают о такой особенности, часто сталкиваются с этой проблемой.
Чтобы исправить эту ошибку нужно просто использовать совместимую версию ядра или удалить проприетарный драйвер, так чтобы использовался nouveau. В этой инструкции мы рассмотрим как правильно выполняется удаление драйверов nvidia в Ubuntu.
Удаление драйвера Nvidia в Ubuntu
Удалить драйвер можно несколькими способами, все зависит от того каким образом выполнялась установка. Если вы устанавливали драйвер с помощью пакетного менеджера, то удалять его нужно тоже с его помощью. Для этого просто выполните все описанные ниже шаги.
Шаг 1. Переключение к консоль
Если вы видите перед собой черный экран, то сначала нужно переключиться в первую текстовую консоль TTY1, чтобы иметь возможность выполнять команды. Для этого нажмите одновременно Ctrl+Alt+F1, затем введите логин и пароль.
Шаг 2. Очистка конфигурации
С помощью утилиты nvidia-settings удалите из системы всю оставшуюся конфигурацию:
sudo nvidia-settings —uninstall
Шаг 3. Удаление драйвера
Дальше можно полностью удалить драйвер. Чтобы выполнить полное удаление драйверов видеокарты Nvidia, сначала найдите все её пакеты в системе:
dpkg -l | grep -i nvidia
Теперь удалите их все, кроме пакета nvidia-common. Просто перечислите их в этой команде, разделяя имена пакетов пробелами:
sudo apt remove —purge пакет1 пакет2
sudo apt remove —purge nvidia-current
Мы могли бы просто написать nvidia-*, но тогда будет удален пакет nvidia-common, а от него зависит ubuntu-desktop. Это значит, что вы снесете все программы окружения рабочего стола. Конечно, его можно потом установить, но это потеря времени.
Шаг 4. Переустановка nouveau
Затем переустановите пакеты nouveau:
sudo apt remove —purge xserver-xorg-video-nouveau xserver-xorg-video-nv
sudo apt-get install xserver-xorg-video-nouveau
sudo apt install —reinstall libgl1-mesa-glx libgl1-mesa-dri xserver-xorg-core
Шаг 5. Обновление конфигурации
Осталось обновить файлы настройки xorg, для этого выполните:
sudo dpkg-reconfigure xserver-xorg
Шаг 6. Готово
После выполнения всех этих действий, удаление драйвера Nvidia в Ubuntu будет завершено. Вы можете перезагрузить свой компьютер и полноценно использовать систему.
Удаление драйвера, полученного из официального сайта
Удалить драйвер Nvidia Ubuntu если драйвер был получен из официального сайта не так сложно, как в предыдущем варианте. Но тут вам нужен сам файл установщика. Перейдите в папку с файлом установщика и выполните его с опцией —uninstall, например:
Если сейчас у вас нет установщика, вы можете скачать его с помощью такой команды, для x86_64:
Затем нужно дать права на выполнение:
chmod u+x ./NVIDIA-Linux-x86_64-445.87.run
После выполнения первой команды удаление драйверов Nvidia в Ubuntu будет полностью завершено и вы сможете перезагрузить компьютер чтобы работать в вашей системе.
Выводы
Проблемы с драйверами могут возникнуть у всех и важно уметь их решать. Из этой статьи вы узнали как удалить драйвер Nvidia Ubuntu и я надеюсь, что это поможет вам в сложной ситуации.
Источник
How to disable and remove Nvidia drivers on Ubuntu
Mar 25, 2020
Comment
The proprietary Nvidia driver is essential to Ubuntu users looking to play video games. However, if you are a gamer, there is no need to have this driver installed, as the open-source one works just fine.
Uninstalling the Nvidia driver on Ubuntu is tough, especially for those new to Ubuntu. So, please follow along with this guide to learn how to uninstall the Nvidia driver.
Note: in this guide, we assume you are using Ubuntu’s Gnome desktop environment. If you use Xubuntu, Kubuntu, or another Ubuntu spin, you will still be able to follow along with the instructions, but some of the steps may change.
Disable Nvidia drivers GUI
Disabling your Nvidia drivers on Ubuntu is easiest done with the built-in GUI. The reason? The driver GUI in Ubuntu is quite polished, has a simple UI, and even your grandmother could figure it out. If you’re trying to figure out how to uninstall the Nvidia drivers so you can go back to the open-source ones, follow the step-by-step instructions below.
Step 1: Press the Win (windows key) on your keyboard. By pressing this key, you will bring up Ubuntu’s desktop search area. In the desktop search area, type out the search term “Software & Updates.” As you type, it should show up in the search results.
Step 2: Click on the “Software & Updates” icon in the search results to open up Ubuntu’s Software & Updates app.
Step 3: Inside of the “Software & Updates” app, you will see several different tabs available to click on. These tabs are “Ubuntu Software,” “Other Software,” “Updates,” “Authentication,” “Additional Drivers,” and “Developer Options.” Select the “Additional Drivers” tab with the mouse to access your Ubuntu PC’s proprietary drivers panel.
Step 4: In the “Additional Drivers” tab, you should see all of the devices on your Ubuntu PC that require third-party drivers.
Look through the list of devices for one that says “NVIDIA Corporation.” The “NVIDIA Corporation” one is your graphics card.
Step 5: Select the box next to “Using X.Org x server – Noveau display driver.” This option is the open-source Nvidia driver.
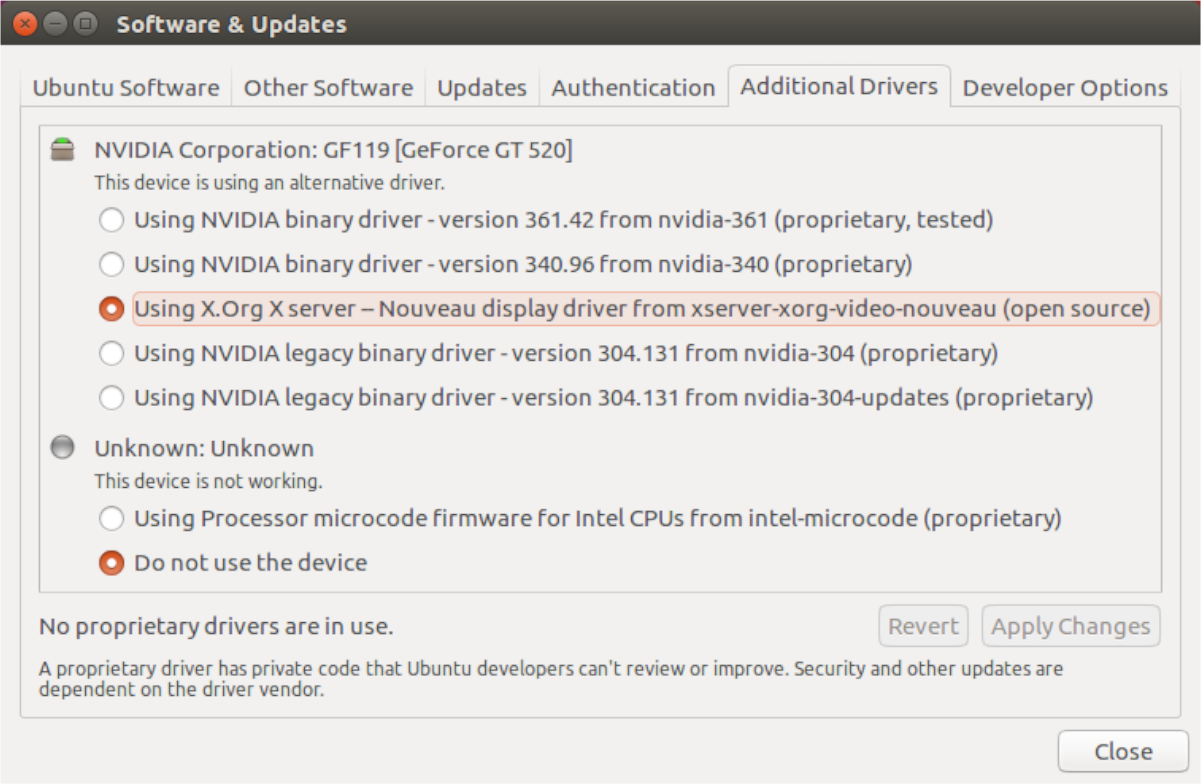
By selecting this option, your graphics card will de-select the Nvidia graphics driver option and start to install/reinstall the open-source driver in its place. During this process, it is essential to be patient. Switching graphics drivers can take a bit of time. Do not shut off your computer or close the Software & Updates window!
Step 6: When your Nvidia driver is done uninstalling through Software & Updates, you will see a message in the window that says, “No proprietary drivers are in use.”
With the proprietary Nvidia driver successfully removed, locate the “Close” button in the bottom right portion of the window and click on it with the mouse to close the Software & Updates app.
Step 7: Once the Software & Updates app is closed, the process of removing the Nvidia driver from your Ubuntu PC is taken care of. Now you must reboot your PC.
To reboot, find the power off button, and select it with the mouse. Then, click the “Restart” option. Or, launch a terminal window and run the sudo reboot command.
Upon logging back in from the reboot, you will no longer be using the Nvidia driver on your system!
Uninstalling Nvidia drivers command-line
Those that prefer to use the command-line in Ubuntu will be happy to know that it is possible to uninstall all of the Nvidia drivers from the system in the Linux terminal. To start the uninstallation process, launch a terminal by pressing Ctrl + Alt + T or Ctrl + Shift + T on the keyboard. Then, follow the step-by-step instructions outlined below.
Step 1: Before attempting to uninstall the Nvidia driver, you should confirm that you indeed have it installed in the first place.
To determine if you have the Nvidia drivers installed on your system, make use of the dpkg -l command. It will list all installed Nvidia packages on Ubuntu.
Assuming Nvidia packages show up in the command output, you have Nvidia drivers installed on Ubuntu and can go forward with uninstallation. If not, discontinue this guide.
Step 2: Getting rid of the Nvidia drivers on Ubuntu requires making use of the purge flag. This flag will uninstall the Nvidia drivers from the system, but it will also erase all configuration files as well.
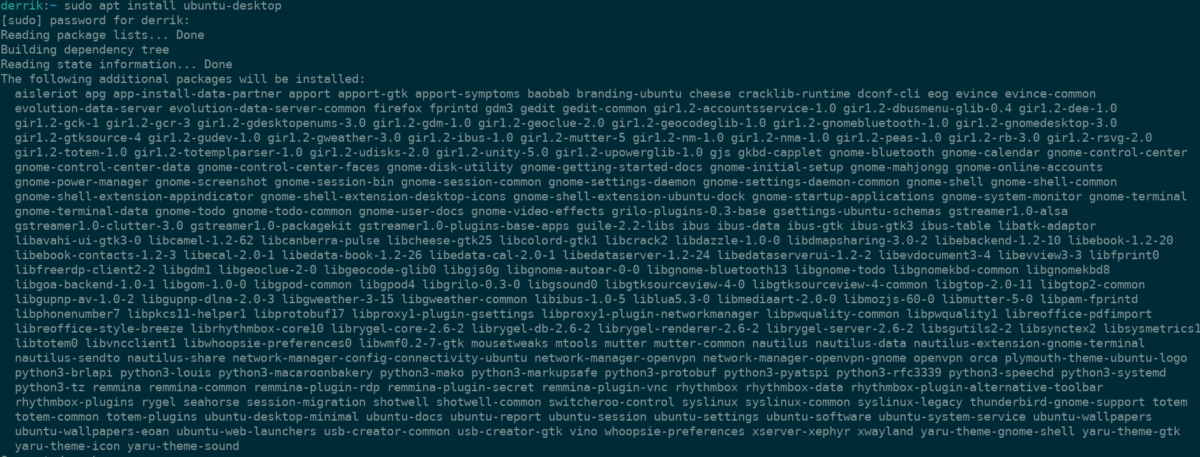
Step 3: Once the Nvidia drivers are purged from the system, you will need to reinstall the Ubuntu-desktop package, as it will have been uninstalled during step 2.
Step 4: By uninstalling the Nvidia driver from Ubuntu, you may find the open-source driver blacklisted. To fix this issue, make use of the following echo command.
Step 5: Lastly, you must remove the Xorg configuration file as it has Nvidia driver settings in it. To remove it, run the rm command.
Once the Xorg configuration file is removed, reboot your Ubuntu PC. Upon logging back in, the Nvidia driver is removed.
Источник
Debian nVidia driver uninstall
Здравствуйте! Устанавливал драйвера на карту, скачал скрипт с сайта nVidia, наустанавливал пакетов, вообщем делал все по вики. Не заработало, решил установить «debian-way». В итоге ничего хорошего, теперь при установке чего-либо связанного с дровами вылезает Errors were encountere while processing: linglx-nvidia-alternatives nvidia-glx
Подскажите, как удалить все драйвера из системы? Перепробовал aptitude purge
nnvidia nvidia-installer —uninstall из скрипта При повторной установке все равно вылезает такая ошибка.
Ноутбук lenovo y570 GeForce 555M+Intel graphics. Debian 2.6.32-5-amd64


aptitude install nvidia-installer-cleanup
Errors were encountere while processing: linglx-nvidia-alternatives nvidia-glx
Это результат, а причина написана выше. Приложите полный лог.

Запусти установщик блоба с —uninstall.
root@zl2:/home/zl2# aptitude install nvidia-installer-cleanup Couldn’t find any package whose name or description matched «nvidia-installer-cleanup» Couldn’t find any package whose name or description matched «nvidia-installer-cleanup» The following partially installed packages will be configured: libglx-nvidia-alternatives nvidia-glx No packages will be installed, upgraded, or removed. 0 packages upgraded, 0 newly installed, 0 to remove and 0 not upgraded. Need to get 0 B of archives. After unpacking 0 B will be used. Setting up libglx-nvidia-alternatives (195.36.31-6squeeze2) . Adding ‘diversion of /usr/lib/xorg/modules/extensions/libglx.so to /usr/lib/nvidia/diversions/libglx.so by libglx-nvidia-alternatives’ dpkg-divert: rename involves overwriting `/usr/lib/nvidia/diversions/libglx.so’ with different file `/usr/lib/xorg/modules/extensions/libglx.so’, not allowed dpkg: error processing libglx-nvidia-alternatives (—configure): subprocess installed post-installation script returned error exit status 2 configured to not write apport reports dpkg: dependency problems prevent configuration of nvidia-glx: nvidia-glx depends on libglx-nvidia-alternatives; however: Package libglx-nvidia-alternatives is not configured yet. dpkg: error processing nvidia-glx (—configure): dependency problems — leaving unconfigured configured to not write apport reports Errors were encountered while processing: libglx-nvidia-alternatives nvidia-glx E: Sub-process /usr/bin/dpkg returned an error code (1) A package failed to install. Trying to recover: Setting up libglx-nvidia-alternatives (195.36.31-6squeeze2) . Adding ‘diversion of /usr/lib/xorg/modules/extensions/libglx.so to /usr/lib/nvidia/diversions/libglx.so by libglx-nvidia-alternatives’ dpkg-divert: rename involves overwriting `/usr/lib/nvidia/diversions/libglx.so’ with different file `/usr/lib/xorg/modules/extensions/libglx.so’, not allowed dpkg: error processing libglx-nvidia-alternatives (—configure): subprocess installed post-installation script returned error exit status 2 dpkg: dependency problems prevent configuration of nvidia-glx: nvidia-glx depends on libglx-nvidia-alternatives; however: Package libglx-nvidia-alternatives is not configured yet. dpkg: error processing nvidia-glx (—configure): dependency problems — leaving unconfigured Errors were encountered while processing: libglx-nvidia-alternatives nvidia-glx
Извините, я не так давно использую linux. Можно поподробнее?)
Это он и есть. Вы его запускали как-то так, да?
sh NVIDIA-Linux. run
sh NVIDIA-Linux. run —uninstall
Делал, не помогает! «Перепробовал aptitude purge
nnvidia nvidia-installer —uninstall из скрипта»
Тогда, как уже сказал AITap, давай полный лог.
Источник
How to Install Nvidia Driver on Ubuntu 20.04

As Linux getting more user friendly, game developers are adding more support thanks to Steam. The performance of graphics processing units (GPUs) mainly depends on drivers. Ubuntu by default use open source video driver Nouveau which has limited support and features when compared with proprietary Nvidia drivers.
The proprietary Nvidia driver is essential to Ubuntu users looking to play games. However, if you are a basic user, there is no need to have this driver installed, as the open-source one works just fine.
In this tutorial, we are going to learn different ways to install Nvidia drivers on Ubuntu 20.04 LTS.
Check hardware Information of GPU
Before installing Nvidia drivers on Ubuntu, ensure that you have Nvidia GPU in your system. There are lots of commands available to get Linux hardware details.
To confirm this, simply run the following hwinfo command.

You can check which card is being used by the prime-select command:

The lshw command can display hardware and driver details of the currently used Nvidia card.

The lspci command is another option to get the GPU hardware details.
If you have installed inxi tool, run the following command.
Install Nvidia drivers using from GUI
Lets first check how to install Nvidia driver from the graphical user interface. On the main menu, type «software update manager» and click on it to open.

On the software updater pop-up, click on the ‘Settings & Livepatch‘ button as shown.

This will launch the ‘Software and Updates‘ window as shown below:

At the top-most section of the ‘Software and updates’ windows, be sure to find a couple of options displayed which include Ubuntu software, other software, updates e.t.c. In this case, click on Additional Drivers, you can see there, the ‘Nvidia — driver -435’ (proprietary, tested) is set up as default driver used for Nvidia card, along with some proprietary divers listed.
Both, ‘Nvidia — drivers 430’ (proprietary) and ‘Nvidia — drivers 390’ (proprietary) are available for GeForce GTX 1080 Ti card. Select the first option to install Nvidia driver 430. When you are done, click on the Apply changes button to install the driver.
Then wait for the download to complete from the internet and click on the close button.
Reboot your computer for the changes to take effect. Run the following to reboot your PC.
Install Nvidia driver from the command line (CLI)
Then, run the following commands to check the list of driver devices available for the Nvidia card from the default Ubuntu repository.

There are four Nvidia drivers available for the GeForce MX130 model. They include the Nvidia driver -440 non-free (which is recommended for Ubuntu system), Nvidia driver -435, and -390 distro non-free and the nouveau distro free builtin opensource video driver (default). Now you can run the following commands to install the specific driver you want.


After the Nvidia diver has been installed, we have to reboot the computer in order to allow Nvidia prime (which is the technology) to switch in between the Intel Graphics and the Nvidia Graphics card.
Verify using nvidia-smi
The nvidia-smi command line is a utility that is used for providing monitor and management capabilities for each and every devices i.e Nvidia Tesla, GRID, Quadro, and GeForce from Fermi and other higher architect families. Open the Terminal application and run the following command to see the Graphics Processing Unit and the process that is using the Nvidia GPU.

Configure the Nvidia Graphics driver
The Nvidia settings command starts a Graphics User Interface(GUI) tool for configuration of Nvidia Graphics driver. This enables you to have a glance at all the GPU information and configure external monitors that are connected to your system.
Run the command below to launch the ‘Nvidia and Server Settings‘ window.

How to uninstall the proprietary Nvidia driver
From open forums, I have noticed many users end up issues with removing Nvidia drivers and reinstalling. Let me share the steps I have followed to successfully uninstall the Nvidia driver and switch to the nouveau driver.
Step 1: Run the following command to confirm Nvidia drivers are installed in your system.

Step 2: Run the following commands to uninstall the proprietary Nvidia driver.

Note that, the use of purge command will remove Nvidia diver together with all configurations that will be made. Run the flowing command to reinstall the Ubuntu desktop package.
Step 3: Run these commands to switch back to the nouveau driver.
Step 3: Remove the Xorg configuration file
Run the rm command to remove the Xorg configuration file
Step 4: After that, reboot your system.
Uninstall Nvidia Driver through GUI
Uninstalling the Nvidia driver using a GUI is quite easy. First, locate the ‘software & Updates’ app then click on it to open. Once it has opened, select on the Additional Drivers tab.
This will display all the Nvidia drivers that are available on Ubuntu. On the list under the ‘Nvidia Corporation,’ select » using X.Org X server — Nouveau display.» This option will pass up the Nvidia graphics diver and it will install Nouveau display driver. For changes to take effect, click on the Apply changes button, and wait for some minutes.

Once Nvidia driver is uninstalled, a message will display saying, «No proprietary drivers are in use» Now close the Software & Updates application and then reboot your computer.
Conclusion
In this tutorial, we have covered two ways that you can use to install Nvidia drivers on Ubuntu 20.04 LTS.
With that said, Nvidia is bringing Vulkan which is intended to offer higher performance and more balanced CPU/GPU usage driver to Linux, a replacement for OpenGL.
In recent years Redhat developers are adding extra code to Nouveau improve opensource code to make it much better, let’s hope the near future we could use it for the modern game.
From Ubuntu 19.10, proprietary Nvidia drivers are available on install media (ie in ISO), which will bring a better fresh install experience for ubuntu users.
If you have any questions or feedback, feel free to leave a comment.
Источник


