- How to delete apps on your Mac
- Use Launchpad to delete an app
- Use the Finder to delete an app
- Learn more
- Install and uninstall apps from the Internet or disc on Mac
- Install apps
- Uninstall apps
- How to completely uninstall Microsoft Edge from Mac
- How to remove Microsoft Edge from Mac
- How to delete Microsoft Edge leftovers from Mac
- Uninstall windows from mac
- Speed up your Mac with a few clicks
- How to delete apps on Mac
- How to Remove Windows from Mac along with BootCamp?
- How to Delete BootCamp Partition and Windows OS on Mac?
- Obstacles You May Face When Trying to Erase Boot Camp-Services
- How to Remove BootCamp Partition Using Disk Utility?
- Uninstall Boot Camp Services with the Help of Special Tools
How to delete apps on your Mac
Deleting an app removes it from your Mac hard drive and makes the storage space it was using available for other items. You can delete apps from Launchpad or the Finder.
Use Launchpad to delete an app
Launchpad offers a convenient way to delete apps that were downloaded from the App Store.
- To open Launchpad, click it in the Dock or open it from your Applications folder. You can also pinch closed with your thumb and three fingers on your trackpad.
- If you don’t see the app in Launchpad, type its name in the search field at the top of the screen. Or swipe right or left with two fingers on your trackpad to show the next or previous page.
- Press and hold the Option (⌥) key, or click and hold any app until the apps jiggle.
- Click next to the app that you want to delete, then click Delete to confirm. The app is deleted immediately. Apps that don’t show either didn’t come from the App Store or are required by your Mac. To delete an app that didn’t come from the App Store, use the Finder instead.

Deleting an app doesn’t cancel any subscription you may have purchased with that app. Learn how to cancel subscriptions for apps that were downloaded from the App Store.
Use the Finder to delete an app
- Locate the app in the Finder. Most apps are in your Applications folder, which you can open by clicking Applications in the sidebar of any Finder window. Or use Spotlight to find the app, then press and hold the Command (⌘) key while double-clicking the app in Spotlight.
- Drag the app to the Trash, or select the app and choose File > Move to Trash.

- If you’re asked for a user name and password, enter the name and password of an administrator account on your Mac. This is probably the name and password you use to log in to your Mac.
- To delete the app, choose Finder > Empty Trash.

Learn more
To use an app again after deleting it, either reinstall it or restore it from a backup.
- To reinstall apps that were installed as part of macOS, reinstall macOS. This applies to apps such as Safari, iTunes, Books, Messages, Mail, Calendar, Photos, and FaceTime.
- You can also redownload apps, music, movies, TV shows, and books that were installed from the App Store, iTunes Store, or Apple Books.
Install and uninstall apps from the Internet or disc on Mac
You can download and install apps from the Internet or a disc. If you no longer want an app, you can remove it.
Install apps
On your Mac, do any of the following:
For apps downloaded from the Internet: In the Downloads folder, double-click the disk image or package file (looks like an open box). If the provided installer doesn’t open automatically, open it, then follow the onscreen instructions.
Note: If you get a warning dialogue about installing an app from an unidentified developer, see Open a Mac app from an unidentified developer.
For apps on a disc: Insert the disc into the optical drive on your Mac or connected to your Mac.
To reinstall apps you downloaded from the App Store, use App Store. See Install purchases from the App Store on Mac.
Uninstall apps
You can remove apps that you downloaded and installed from the Internet or from a disc.
On your Mac, click the Finder icon  in the Dock, then click Applications in the Finder sidebar.
Do one of the following:
If an app is in a folder, open the app’s folder to check for an Uninstaller. If you see Uninstall [App] or [App] Uninstaller, double-click it, then follow the onscreen instructions.
If an app isn’t in a folder or doesn’t have an Uninstaller, drag the app from the Applications folder to the Trash (at the end of the Dock).
WARNING: The app is permanently removed from your Mac the next time you or the Finder empties the Trash. If you have files that you created with the app, you may not be able to open them again. If you decide you want to keep the app, get it back before emptying the Trash — select the app in the Trash, then choose File > Put Back.
To uninstall apps you downloaded from the App Store, use Launchpad.
How to completely uninstall Microsoft Edge from Mac
Microsoft Edge is a feature-rich web browser for Mac computers. But if you want to uninstall Microsoft Edge from your Mac, then this article describes the process of uninstalling Microsoft Edge from macOS and delete all the leftovers so that you can install the browser in the future without any digital footprint.
How to remove Microsoft Edge from Mac
To uninstall Microsoft Edge from Mac, follow these steps-
- Make sure that you are on the home screen.
- Click the Go button in the status bar.
- Select the Applications option.
- Right-click on the Microsoft Edge icon.
- Select Move to Bin option.
- Confirm the deletion.
Let’s check out these steps in detail.
At first, you need to visit the home screen, if you have opened a window of any other app. After that, click the Go button in the status bar and select Applications from the list.
Then, find out Microsoft Edge in this panel and right-click on it. You should see an option called Move to Bin.
You need to use this option to uninstall Microsoft Edge from the Mac computer. Once you select the Move to Bin option, it might ask you for confirmation. If so, you need to choose the affirmative option.
Now, you need to delete all the leftovers. If you do not remove the leftovers, they will come back when you re-install the browser in the future.
How to delete Microsoft Edge leftovers from Mac
To delete Microsoft Edge leftovers from Mac, follow these steps-
- Navigate to Go > Go to File.
- Enter
/Library in the empty box.
Click the Go button in the status bar and select Go to Folder option. After that, type
/Library, and click the Go button to open the Library folder. After that, navigate to these paths and remove the folders, as mentioned below.
Delete Microsoft Edge from here.
Find Microsoft Edge and delete it.
Remove com.microsoft.edgemac.savedState from here.
Move com.microsoft.edgemac to the trash.
Delete com.microsoft.edgemac.plist file from the Preferences folder.
Now Microsoft Edge is completely removed from your computer.
Uninstall windows from mac
By Adam Rosen • 4:00 am, April 14, 2011
- How-To
- Top stories
Uninstalling software under Mac OS X is generally a straightforward procedure — just delete the program from the Applications folder. Few vendors offer uninstallers on the Mac, and generally they’re not necessary. Most programs don’t run background components or alter system settings files (like the Registry on Windows), and leaving old preferences and support files on the hard drive generally doesn’t do much harm.
But if you are trying to remove an old or corrupt component, reinstall software to change a serial number, or just free up disk space, removing all components of the old application can be important. These components include the application itself, preferences and support items, and sometimes hidden files or kernel extensions. Anyone who’s had problems installing an Adobe CS application or removing Symantec AntiVirus will appreciate how hard it can be to fully remove old software.
Speed up your Mac with a few clicks
Applications
Be default, Mac OS X software is stored in the Applications folder on your hard drive. Most programs are single icons (iTunes, Firefox), while others contain one or more folders full of items (Adobe Acrobat, Microsoft Office). You can also occasionally find applications on the desktop, if dragged there during installation or moved from the Applications folder.
Drag the program’s icon or folder to the Trash to begin the uninstall process. If you are not the user who originally installed the software, or your are not an admin user on your Macintosh, you will need to enter an administrator’s name and password to continue.
Note: the icon for most programs is actually a bit of an illusion. What you’re seeing on the hard drive is an application package, a folder full of items including the executable program code and supporting files. When a package is labelled with the .app extension, it appears as a single, launchable icon in the Finder. If you’re curious whats inside, right-click (or control-click) on the icon and select Show Package Contents.
How to delete apps on Mac
Preferences and Application Support Files
There are two locations on your hard drive, both named Library, where programs store their preferences and supporting files. The first Library is at the top level of your hard drive, the second is inside your Home Folder. Removing items from both these locations is necessary to completely uninstall software.
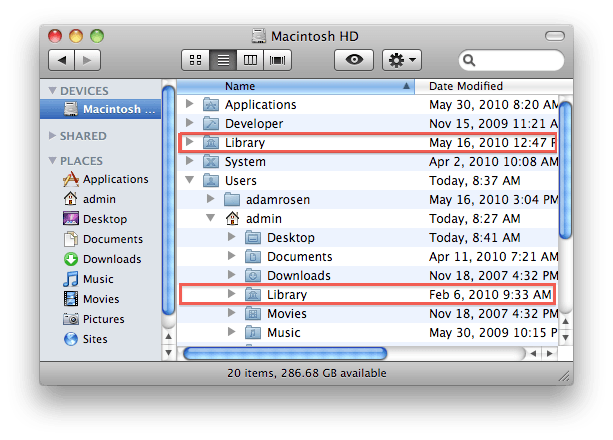
Start with the Top Level Library on your hard drive /Library. You are looking to remove any files or folders which contain the name of the program (Acrobat, Word) or the vendor (Adobe, Microsoft) in their names. Search the following locations:
- /Library
- /Library/Application SupportIn these two locations you’re looking for non-Apple folders full of items: Adobe, Microsoft, etc.
- /Library/PreferencesInside Preferences you may find single files, folders full of items – Adobe, Microsoft – along with .plist documents usually starting with com – com.Adobe.Acrobat.plist, com.microsoft.Word.plist
- /Library/LaunchAgents
- /Library/LaunchDaemons
- /Library/PreferencePanes
- /Library/StartupItemsMost software does not use LaunchAgents, Preference Panes or Startup Items, but some things do, particularly items which control system behavior or keep background processes running
Next, remove any similarly named items you find inside the User Library inside your Home Folder
/Library in the same set of folders:
For the vast majority of applications that’s all you need to remove. Empty the Trash to complete the process. If you get a message that an item is “in use and can’t be deleted” reboot the Mac, then try again.
Kernel Extensions and Hidden Files
If you’ve deleted everything from the Applications and Library folders and some vestiges of old software still remain, you may be dealing with a kernel extension or hidden file. These items will not be obvious to find, doing a Google search about the components for your specific software situation is highly recommended.
Software that uses background processing – anti-virus and security programs, printers, device sync software – often install one or more kernel extensions. If your old installation of Symantec Utilities keeps telling you it’s out of date six years after you’ve deleted the program, chances are there’s still an old kernel extension loading up.
Warning: kernel extensions are necessary for correct operation of your system. Do not move or delete any items unless you have the ability to redo changes made by booting from a second Macintosh or drive and restoring changes made to the first hard drive.
Kernel extensions are located in /System/Library/Extensions and end with the extension .kext. Again you are looking for items with the name of the program or vendor in the name. For example, with old copies of troublesome Symantec software you might find SymEvent.kext and SymOSXKernelUtilities.kext lurking on your system.
Drag any probable items to the desktop first to make a copy, then move the original to the trash. Don’t empty the trash yet – reboot and see if the issue is fixed. If not, restore the item and try another.
Hidden files are items whose name starts with a period (.) They don’t display in the Finder by default. Programs sometimes use hidden files for authentication purposes, many are located in your home folder. You can use Terminal (inside Applications/Utilities) to list the contents of the directory in question and delete the offending item.
For example, the following set of commands will navigate to the home folder (
), list all contents, then delete a hidden file named .parallels_settings:
%> ls -al
%> sudo rm .parallels_settings
Using sudo to do the deletion will require you to enter an admin password when prompted.
—
Updated April 2014: added info about LaunchAgents and LaunchDaemons
How to Remove Windows from Mac along with BootCamp?
Boot Camp is a native macOS utility mainly used for running multiple operating systems. Despite the regular application status, removing a Boot Camp partition is nothing similar to deleting a regular Mac app. You can erase unwanted partition with the help of Boot Camp Assistant or Mac’s very own Disk Utility. Read on for detailed instructions on how to do that and, while you’re at it, you can free up even more space on your drive using MacFly Pro.
Why in the world would anyone want to install Windows 7, Windows 8, or Windows 10 on Apple computer when it has its native Mac OS X or macOS? The point is you can access Windows software like Internet Explorer only once you install this operating system on your Apple device. “How can I get Microsoft products for my MacBook Pro or Mac mini?” It is not a rare question even among those who prefer working with Apple only. Perhaps, you have heard about the special utility called Boot Camp. It is used to run two operating systems at the same time.

While you may need a second system just for several purposes, you can without hesitation erase Windows and delete Bootcamp from your hard drive once you are done. If you can’t or don’t know how to uninstall them completely, the guide below will show you the way out.
A Boot Camp method is one of the most popular approaches to setting up Windows on Macs. This utility does not simply allow installing the latest operating system from Microsoft on the Apple computer. It also makes it possible to dual-boot between the two partitions. From one side, it may be useful if you wish to play games compatible only with Windows. However, once you’ve accomplished the task, it might be a smart idea to get rid of the second operating system.
How to Delete BootCamp Partition and Windows OS on Mac?

Originally, BootCamp arrives with your Mac, as reported by the official Apple’s resource. Thus, Apple realizes its users may want to install Windows OS on your hard drive for some reasons, and they make the life easier by offering such utility. However, if you don’t need it at all, you may ask, “How do I remove the unnecessary software?” Some people wind up formatting the Macintosh HD or external hard drive and recovering from a Time Machine backup. But it is way easier to erase just the Windows Boot Camp partition, leaving the native operating system untouched.

Start with rebooting your Apple computer into macOS.
- Hold down the Option button and choose your hard drive.
- Launch Boot Camp Assistant. It’s in the Utilities folder from Applications.
- Pick Continue and put a checkmark next to the Install or remove Windows 7 or later version. Leave the rest of the boxes unchecked.
- Select Restore disk to a single Mac OS partition. Push the Continue button once more.
- Verify the modifications in the Restore Disk window. Pick Restore to begin the deletion.
- Once you are done, shut down the Boot Camp Assistant tool.
That is how a user can uninstall the partition with the help of Boot Camp Assistant on MacBook Pro or any other Apple computer. Some errors may still occur, and the next part explains the potential causes.
Obstacles You May Face When Trying to Erase Boot Camp-Services
Many reasons exist why a Mac owner may be unable to uninstall all Boot Camp-services from the very beginning. You should still try each of the recommended methods as the leftovers may lead to some issues in the future. You will be amazed how fast your machine may become without those useless files.
Anyway, here is a list of typical problems users face when attempting to delete BootCamp services:
- A user lacks access to eliminate the services.
- It is impossible to launch the file necessary to start the procedure.
- Boot Camp-services are absent in the expected folder.
- A mistake took place. The system failed to erase all of the files.
- A different process that is using the required file prevents the services from being deleted.
- The items related to BootCamp are present on the hard disk even after the uninstallation.
Some other problems may also show up, but these are the most common. Do not worry – at least one of the deletion methods listed in this guide should help!
How to Remove BootCamp Partition Using Disk Utility?
“Are there any other ways to remove BootCamp partition from my disk?” What if you can’t resize or erase Boot Camp partition using the Boot Camp Assistant tool? What if some of the necessary buttons are grayed out, or another error shows up? If you choose BootCamp partition to boot to the Windows operating system, you may notice a drop in speed of work due to the fact the second system requires plenty of OS X resources. Thus, it makes sense to get rid of this program along with the OS released by Microsoft. To reinstall the operating system, make Boot Camp bootable, or, vice versa, erase it, one can use Mac’s built-in tool called Disk Utility. In case you merge any partitions, be ready that the entire data will be gone after you remove one of them. Start mastering your Disk Utility opportunities now!

- Move to the Disk Utility.app.
- Choose Windows Partition.
- Pick Erase and choose it to be formatted as Mac OS Extended (Journaled).
- Delete the partition.
If you wish to come up with a single, full partition again, continue with the offered steps:
- After that, choose the Complete Disk (Not Partitioned).
- It is time to choose Partition.
- Pick the newly Formatted Windows partition and push the minus button to eliminate the partition.
- Choose the primary partition, and enter the Disk’s full size to the right and choose Enter.
- Once the tool is done with resizing, a user should have a single, complete partition.
Uninstall Boot Camp Services with the Help of Special Tools
“Can I uninstall Boot Camp completely as some files associated with this utility are still left after the ordinary removal?” Many Mac owners wonder how to eliminate the program’s support software as well to make the device fast again. In the previous section, discover common reasons why some users can’t get rid of the Boot Camp-services entirely. No matter whether you run Windows 7, Windows 8, or Windows 10, at least one of the offered ways to remove the utility from your computer’s drivers should work. No matter whether you use MacBook Pro or another model of Apple computer, start with backing up with Time Machine.
Instead of the method described in the previous section, one may use a special Microsoft’s tool called Program Install and Uninstall troubleshooter or a third-party cleaner for Mac. You may use the official program to erase the app once and forever or upgrade to the fifth version of Bootcamp. Try these techniques in case it is impossible to delete the fourth version of the program by choosing Uninstall in the Control Panel.
As for the third-party cleaning software, it is a great option for Mac owners who wish to clean their computers globally, without leaving any sign of junk. Except for uninstalling various applications like Boot Camp thanks to the inserted app uninstallers, such cleaners may take care of the rest of the useless items such as duplicates, temporary files, login/startup items, and so much more.


