- How to Remove Installed Updates in Windows 10 and Windows Server?
- How to Uninstall Windows Updates Using the Control Panel?
- How to Prevent (Block) a Specific Update from Installing in Windows 10?
- WUSA.exe: Removing Windows Updates via the Command Line
- How to Uninstall a Windows Update using WSUS?
- Removing Windows Update Using the GPO
- How To Uninstall Windows Updates When Computer Is Not Booting?
- Guide to install or uninstall Windows Subsystem for Linux on Windows 10 Anniversary Update and Creators Update
- Uninstalling/Removing the legacy distro
- Manually deleting the legacy distro
- How to uninstall Windows update?
How to Remove Installed Updates in Windows 10 and Windows Server?
Sometimes it happens that the security updates for Microsoft products (released under MS Patch Tuesday) cause problems with the OS or third-party software. The issues caused by the updates can be either mass and occur in a large number of devices or private that occur in some combinations of the Windows OS version and some apps.
If the Windows (or Office) patch causes a problem on the computers of many users, and this is confirmed by Microsoft experts, the update is pulled by the company and after a while is replaced by a new one with the bugs fixed. But if necessary, in Windows there is a way to uninstall any security update or patch.
In this article we’ll show how to properly uninstall updates in Windows OS (the article covers Windows 10, 8.1, 7 and Windows Server 2016, 2012/R2, 2008/R2). These ways of removing updates can be used if you installed the update manually from a CAB or MSU file, your device automatically received it from the Windows Update servers or your WSUS server.
There are several ways to uninstall updates in Windows (Windows Server):
How to Uninstall Windows Updates Using the Control Panel?
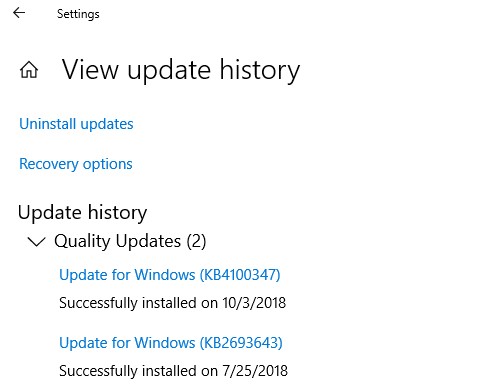
Let’s look on how to uninstall updates in Windows 10. Open the menu Settings app and go to the Update & Security -> Windows update -> View Update History -> Uninstall updates.
You can also go to the “Uninstall an update” panel using the classic Control Panel (Control Panel\Programs\Programs and Features) and press the button “View installed updates”.
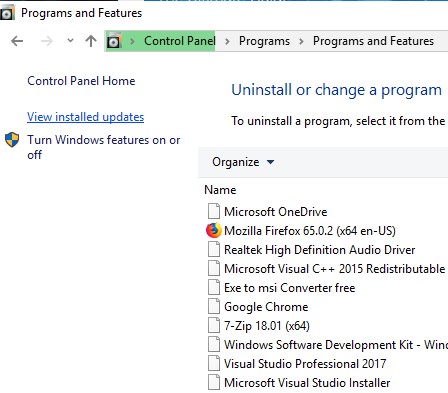
A list of all Windows and Office updates installed on your device will appear. Find the necessary update in the list (or, to be more precise, unnecessary :)), select it, click the Uninstall button. The uninstall update wizard starts.
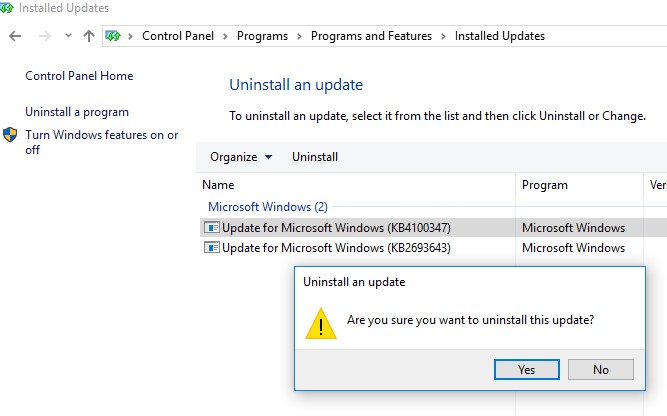
Click Yes when prompted if you want to uninstall this update.
And wait till it is uninstalled. After the update is removed, Windows may request a system restart.
How to Prevent (Block) a Specific Update from Installing in Windows 10?
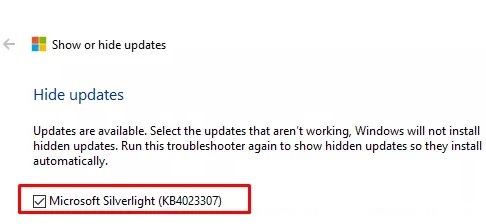
If your computer is configured to automatically receive Windows updates through Windows Update or WSUS, this update will most likely be installed on your computer again. But you can prevent the installation of a specific update by hiding (blocking) it. To do this, use the official tool Microsoft Show or Hide Updates https://support.microsoft.com/en-us/help/3073930/how-to-temporarily-prevent-a-driver-update-from-reinstalling-in-window
- Download and run the wushowhide.diagcab;
- Select the option Hide Updates;

- Select the update you want to hide and click Next;
- After that, this update won’t be installed in Windows automatically via Windows Update. You can remove the hidden update by selecting it in the Show hidden updates.

WUSA.exe: Removing Windows Updates via the Command Line
Windows updates can also be uninstalled from the command prompt. To do it, there is a built-in CLI tool wusa.exe (Windows Update Standalone Installer).
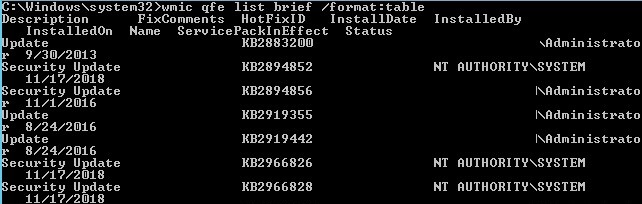
You can list all updates installed on a computer with the command:
wmic qfe list brief /format:table
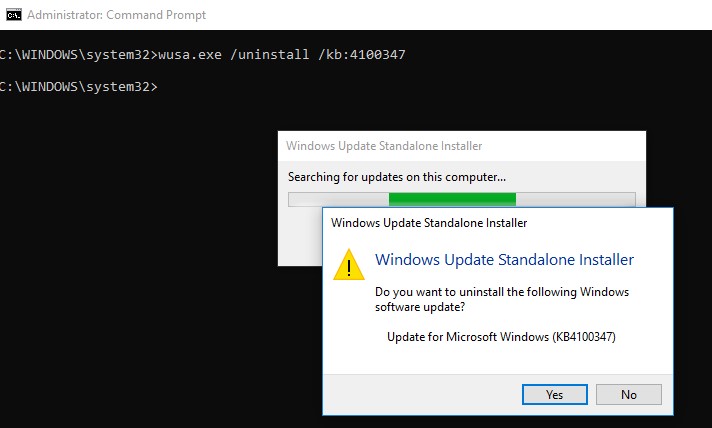
Using the following command, running as administrator, you can remove the specific update (KB 4100347):
wusa.exe /uninstall /kb:4100347
A user must confirm the removing of the update.
If the update has to be uninstalled in a quiet mode without a user request and notifying about of the subsequent system reboot, the command will look like that:
wusa.exe /quiet /uninstall /kb:4100347 /promptrestart
If you need to suppress the reboot request, use the command:
wusa.exe /quiet /uninstall /kb:4100347 /norestart
You can also remove the update from PowerShell using the PSWindowsUpdate module. The Remove-WindowsUpdate cmdlet is used:
Remove-WindowsUpdate -KBArticleID KB4100347 -NoRestart
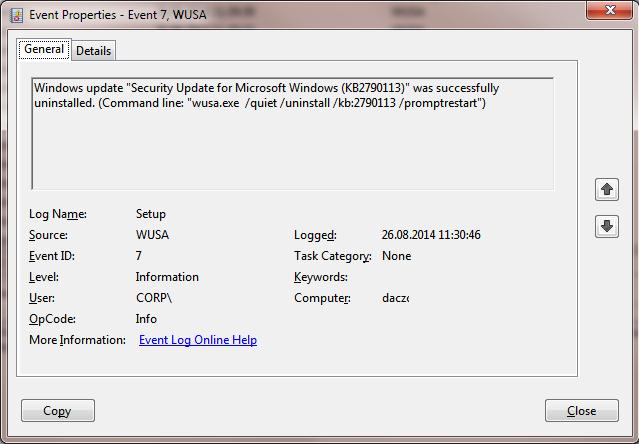
The Windows update uninstall event is recorded to the Setup log with the EventID 7 from the WUSA source:
Using PsExec you can uninstall an update on a remote computer, the command is as follows:
psexec.exe \\RemotePCName C:\Windows\System32\wusa.exe /quiet /uninstall /kb:4100347 /warnrestart:600
How to Uninstall a Windows Update using WSUS?
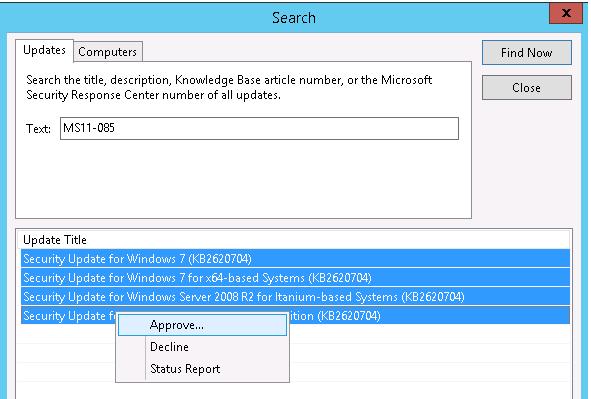
If a corporate WSUS server is used in your company to install updates on a domain computers and servers, you can remove the update approved for install using the Update Services management console. To do it, right-click the Updates branch and then click Search in the menu.
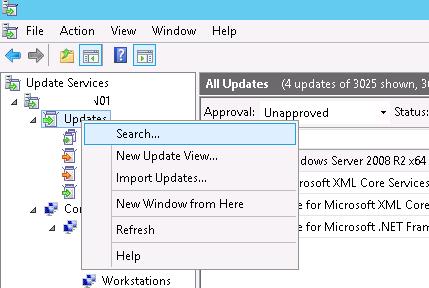
Specify the KB number or a security bulletin you need to find and click Find now. In the list containing the updates that have been found for different Windows versions, select the updates to be uninstalled and click Approve in the menu.
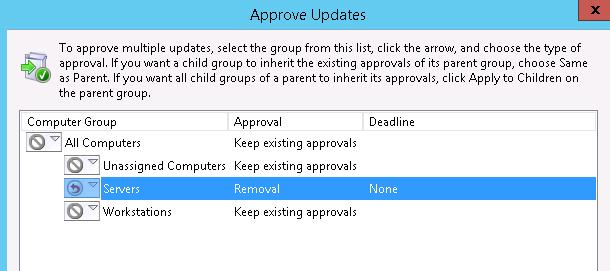
Then select the WSUS Target group you need and choose Approved for Removal in the drop-down list.
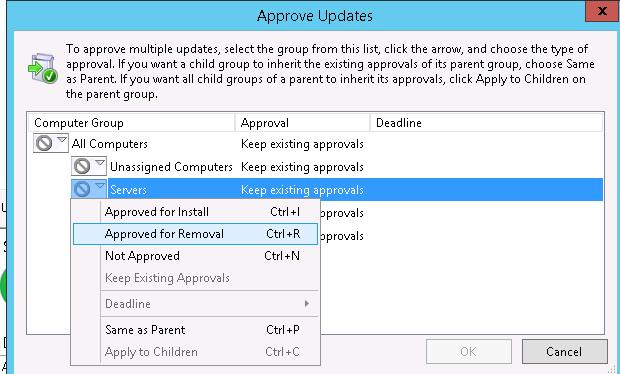
In our example, we want to uninstall update on a group of computers named Servers (more about WSUS GPO targeting).
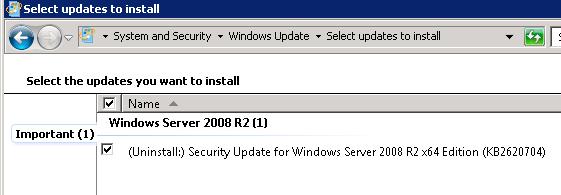
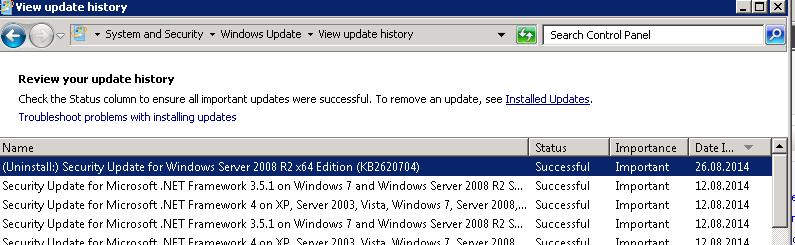
After updating data on the side of WSUS clients (which occurs on a schedule in accordance with the WSUS policy and the synchronization frequency, which is set by the Automatic Update detection frequency, or can be done manually by running wuauclt /detectnow ) , the corresponding update appears with the prefix (Uninstall:) in its name in the Windows Update panel.
After the update has been uninstalled, this event is displayed in Windows Update History.
Removing Windows Update Using the GPO
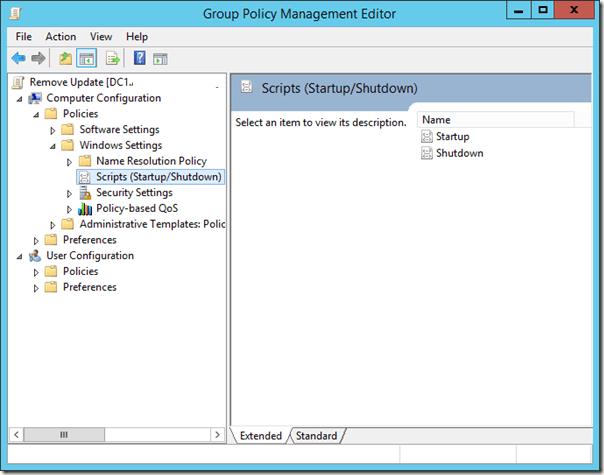
If you want to remove a specific update on multiple computers of Active Directory domain that doesn’t use WSUS, you can use Startup/Shutdown GPO scripts.
To do it, create a new GPO object linked to the necessary OU, AD site or computer group. Then create a new startup script with the wusa.exe command in the section Computer Configuration -> Policies -> Windows Settings -> Scripts (Startup/Shutdown).
You can also use PowerShell startup scripts to remove installed updates.
How To Uninstall Windows Updates When Computer Is Not Booting?
Sometimes it happens that you cannot remove an update directly from the Windows, since the OS simply not booting after installing the problematic update. In this case, you may have to boot the computer from the rescue or install boot disk and delete the updates via DISM (see the article “Computer Won’t Start After Windows Update”) or using the “Hotfix uninstall” utility from the MSDaRT.
So, we have covered common scenarios of how to uninstall updates on Windows computers.
Guide to install or uninstall Windows Subsystem for Linux on Windows 10 Anniversary Update and Creators Update
If you’re running Windows 10 Creators Update or later, please follow the Windows 10 installation instructions.
The following instructions are for users running Windows 10 Anniversary Update or Windows 10 Creators Update
Prior to Windows 10 Fall Creators Update (version 1709), WSL was released as a beta feature and installed a single Ubuntu instance when «Bash on Ubuntu on Windows» (or Bash.exe) was first run.
While you CAN use WSL on earlier Windows 10 releases, this beta «legacy distro» is now considered obsolete. We strongly encourage you to run the most recent version of Windows 10 available. Each new Windows 10 release includes many hundreds of fixes and improvements in WSL alone, allowing ever more Linux tools and apps to run correctly on WSL.
If you cannot upgrade to Fall Creators Update or later, follow the steps below to enable and use WSL:
Turn on Developer Mode To run WSL on Windows 10 Anniversary Update or Creators Update, you must enable Developer Mode:
Open Settings -> Update and Security -> For developers
Select the Developer Mode radio button 
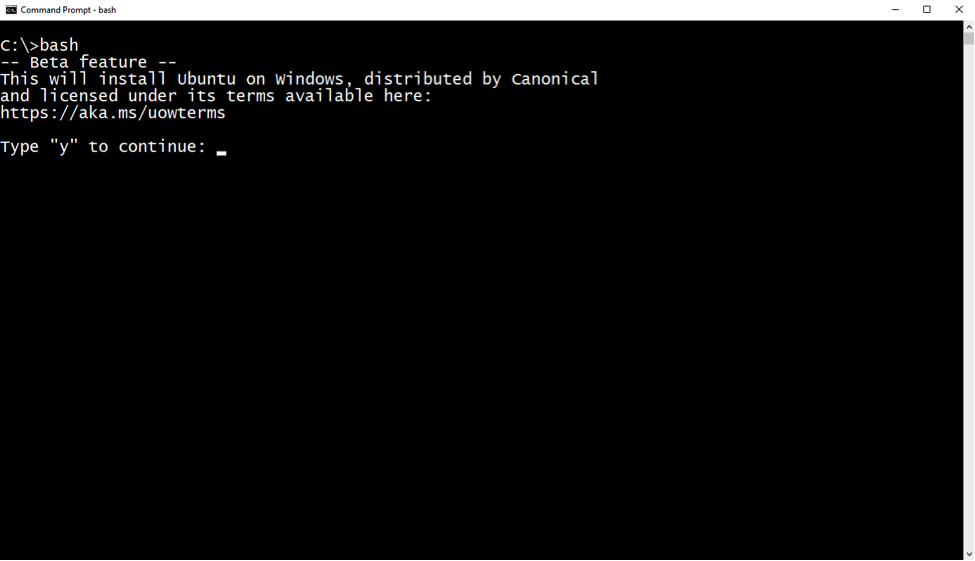
Open a command prompt. Type bash and hit enter
The first time you run Bash on Ubuntu on Windows, you’ll be prompted to accept Canonical’s license. Once accepted, WSL will download and install the Ubuntu instance onto your machine, and a «Bash on Ubuntu on Windows» shortcut will be added to your start menu.
The first time you run Bash on Ubuntu on Windows, you will be prompted to create a UNIX username and password. Follow the new distro instance instructions to complete your installation
Launch a new Ubuntu shell by either:
- Running bash from a command-prompt
- Clicking the start menu «Bash on Ubuntu on Windows» shortcut
Uninstalling/Removing the legacy distro
If you upgrade to Windows 10 Fall Creators Update from an earlier Windows 10 release upon which you installed WSL, your existing distro will remain intact. However, we STRONGLY encourage you to install a new Store-delivered distro ASAP, and migrate any necessary files, data, etc. from your legacy distro to your new distro.
To remove the legacy distro from your machine, run the following from a Command Line or PowerShell instance:
If you are not using Windows Version 1903 or higher, you may need to run wslconfig /u Legacy or lxrun /uninstall /full instead.
Manually deleting the legacy distro
If you wish, you can manually delete your legacy instance. This may be required if you encounter issues uninstalling the legacy distro using lxrun.exe , or are running Windows 10 Spring 2018 Update (or later) which do not ship with lxrun.exe .
To forcefully delete your legacy WSL distro, delete the %localappdata%\lxss\ folder (and all it’s sub-contents) using Windows’ File Explorer, or the command-line:
How to uninstall Windows update?
My desire is simple: I want to never ever ever ever receive any Windows update of any kind, ever again, under any circumstances, no matter how important it is. I do not wish for any Microsoft service to be able to communicate with my pc again.
How do I accomplish this?
I went a whole month without a computer because Windows update killed my SSD, and the people at ASUS who gave me a new one confirmed the update completely destroyed the drive beyond recovery.
This is not the first time that has happened. It has happened a dozen times between Windows XP and 10, and today I hit the reboot button by accident and it didn’t even tell me there were updates (I’ve taken to holding the power button to force shutdowns now to avoid this, but sometimes the habit to use the software button strikes). But it updated alright, and I involuntarily gambled on my computer’s integrity. Again.
Sick of it. This is why people pirate your ridiculously hostile piece of software, which I wouldn’t even be using if it weren’t for video games and other software I need that won’t run anywhere else.
So how do I completely disable updates, and block any and all communication between Microsoft’s servers and my pc?
I don’t want to be told I should install updates. I don’t care. I want it off, completely off, and I am prepared and willing to mess with the registry to this end.
![]()
Keeping your computer updated is important. This will improve the performance of your device and several bug fixes are released by Microsoft in each update that’s is why we recommend users to keep the default setting of Windows when it comes to updates and we’re not recommending user to stop or pause it, as well as uninstalling the Windows Update. To better assist you, kindly provide the answers to the following questions:
- Which build and version of Windows are you using? To check it, follow the steps on this link.
- What is the reason why you’d like to disable Windows Update?
- Are you experiencing any issues after Windows Update?
Regarding your query if there is another way to paused an update, you can check this article: Defer upgrades in Windows 10. Quality updates may get deferred for up to 30 days. Deferring upgrades will prevent you from getting the latest Windows features as soon as they’re available
Note: The option to defer updates is only available with Windows 10 Professional, Enterprise or Education edition.
Another way to manage updates in Windows 10 is setting your device to a metered connection. Wi-Fi and Ethernet connection can be set to a metered. Setting your device to a metered connection not only reduce your data usage but also stop Windows update to be installed automatically. We recommend that you check this article: Metered connections in Windows 10 for instruction on how to enable it.
In addition, you can also configure Windows Update services via Control Panel and under Administrative Tools, you can access Services. In the Services window, scroll down to Windows Update and turn off the process. To turn it off, right-click on the process, click on Properties and select Disabled from the drop-down list under Startup type. That will take care of Windows Updates not being installed on your machine. Kindly refer to the screenshot below:
Please post back if you have other questions.


