- How to Uninstall Ubuntu from Windows Dual Boot Safely
- Uninstall Ubuntu safely from Windows dual boot mode
- Part 1: Run a sanity check and make Windows as default boot manager
- Step 1: Access UEFI boot settings
- Step 2: Move Windows Boot Manager up the boot order
- Part 2: Deleting Linux partition on Windows
- Step 1: Go to disk management
- Step 2: Identify Linux partition
- Step 3: Delete Linux partition
- Step 4: Extend Windows partition
- Step 1:
- Step 2:
- Step 3:
- Step 4:
- Step 5:
- Step 6:
- Step 7:
- Step 8: If the trick in step 6 didn’t work
- Ubuntu Documentation
- Introduction
- Getting OS-Uninstaller
- 1st option : get a disk including OS-Uninstaller
- 2nd option : install OS-Uninstaller in Ubuntu
- Using OS-Uninstaller
- External Links
- How to Uninstall Ubuntu in a Windows 10 Dual-Boot System
- Delete The Linux Partition In Windows
- Remove the Grub Bootloader
- Overwrite the Linux Boot Loader with Windows Boot Loader
- What if You Don’t Have a Windows Installation CD or USB?
- Change Boot Order Using UEFI
How to Uninstall Ubuntu from Windows Dual Boot Safely
Last updated April 20, 2020 By Abhishek Prakash 187 Comments
Brief: This beginner’s guide shows you how to safely remove Ubuntu or any other Linux distribution from Windows dual boot.
Trust me, installing Ubuntu in dual boot with Windows is not that difficult a task. Similarly, removing Ubuntu from dual boot is also not that complicated.
In both cases, you need to take a bit of precautions with disk partitions. Having a Windows recovery and proper backups always helps.
In this tutorial, I am going to show you the steps for uninstalling Ubuntu from Windows dual boot. The steps should be equally valid for any other Linux distribution be it Linux Mint, Debian, Fedora, Arch etc.
Uninstall Ubuntu safely from Windows dual boot mode
The process is composed of two parts:
- Change the boot order in UEFI settings and give priority to Windows Boot Manager. You may also delete Grub entry from UEFI setting, if your system gives you this option. If that doesn’t work then you’ll have to repair boot with a bootable Windows disk.
- Deleting the Ubuntu partition from Windows.
As the last resort, you need to have a bootable Windows disk or recovery disk so that you can use it to repair the boot after removing Ubuntu (if needed).
Part 1: Run a sanity check and make Windows as default boot manager
I want you to have as few troubles as possible. And hence I recommend change the boot setting and make Windows boot manager as the default option to boot.
Let me explain a bit here. When you install Ubuntu or some other Linux, it adds Grub bootloader to your boot settings and makes it the default.
So, now your system has two boot loaders or boot manager (whatever you want to call it). Grub gives you option to boot into Ubuntu or Windows.

Windows boot manager lets you boot into Windows directly. And this is what you are going to use here.
Step 1: Access UEFI boot settings
Before you go on and delete the Linux partition, it will be a wise move to check if you can make Windows boot manager as the default boot option. This way, when you remove Linux, your boot process won’t be disturbed.
Access the UEFI settings from Windows. Search for UEFI and go to Change advanced startup options:

Click on Restart now:

On the blue screen next, select Troubleshoot:

Select Advanced Options next:

On the next screen, select UEFI Firmware Settings:

Hit restart button on the next screen:

Step 2: Move Windows Boot Manager up the boot order
Now your system will boot into UEFI settings. Now, the next screen will look different for different systems and manufacturers. You have to look for boot tab here.
On my Acer predator, it looks like the image below. Here, use arrow keys to select Windows Boot Manager and press F5 to move it up the order. Press F10 to save and exit.

Now, your system should boot straight into Windows. To verify, restart your system a couple of times and see if the system boots into Windows without showing the grub screen of Linux.
If that happens, you are good to go with the next step which is to delete the Linux partition and reclaim your disk space.
Part 2: Deleting Linux partition on Windows
Let’s see how to delete the Linux partition and extend your Windows disk with available freespace afterwards.
Step 1: Go to disk management
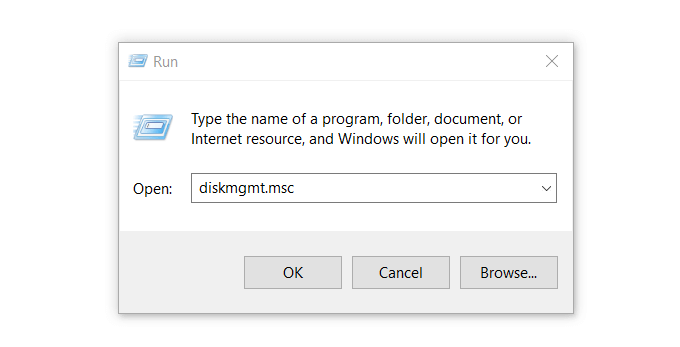
Log into Windows. Press Windows+R and type diskmgmt.msc into the dialog box. This will open the Windows disk management tool.

Step 2: Identify Linux partition
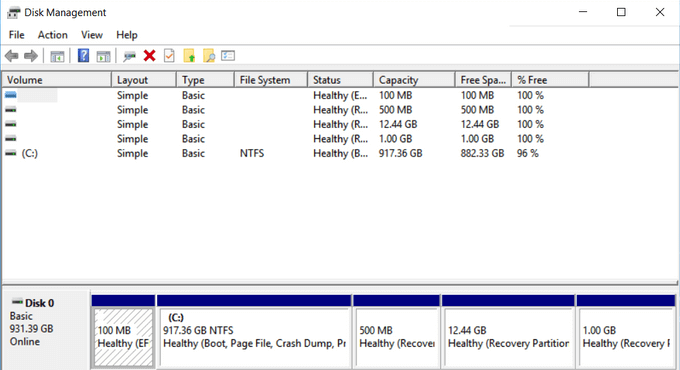
Since you installed Linux, it’ll be easy for you to recognize the Linux partition by its size.
Another hint for identifying the Linux partition is to look for those that don’t have a file system and drive number. Windows partitions are labeled with a drive number, such as C, D, E, etc., and usually use the NTFS or FAT file system.
As you can see, I have three Linux partitions here as I created root, swap and home separately when I installed Ubuntu.

Step 3: Delete Linux partition
Select the Linux partition(s), right click on them and opt for the Delete Volume option.

It will throw you a warning – just select Yes here.

Step 4: Extend Windows partition
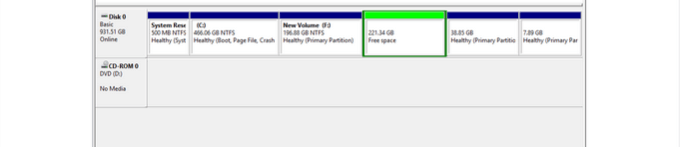
The deleted partition(s) will now be available as a chunk of free space. You can either extend the existing volume or create a new Windows partition from it.
I would suggest that you create a new drive (or volume or partition, whatever you want to call it) as this will be easier if you decide to dual boot Linux with Windows again.

After deleting the Linux partition, of your system boots into a broken Grub screen which shows a message like grub rescue error, you need to use Windows recovery disk and fix the Windows bootloader.
Step 1:
Put in the Windows installation disk and restart your computer. Press F10 or F12 at boot time to go into BIOS/UEFI and choose to boot from removable disk.

Step 2:
Choose to repair your computer:

Step 3:
Go for the Troubleshoot option here:

Step 4:
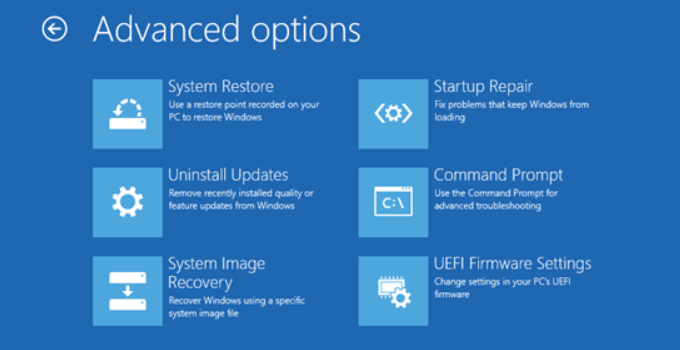
On the troubleshooting page, choose Advanced options:

Step 5:
Look for the command prompt option in here:

Step 6:
In the command line, type the following command to fix the Windows boot loader:
Normally, it works instantly. You don’t even have to wait for it.

Step 7:
Once it’s done, restart your computer and this time boot normally from the hard disk. You should be able to boot into Windows. If you still see a Grub rescue error, try the steps below.
Step 8: If the trick in step 6 didn’t work
If the command in step 6 didn’t work, try Automatic repair from the advanced troubleshooting options.

It will take some time to find the issue and then repair it.

Now if you reboot, you should go into Windows normally without seeing any Grub rescue error thingy.
I hope this guide helped you safely remove Ubuntu from Windows dual boot. Feel free to ask any questions or make a suggestion.
Like what you read? Please share it with others.
Ubuntu Documentation
Introduction
OS-Uninstaller is a small graphical tool to perform a clean and quick uninstall of any operating system (Windows, MacOS, Ubuntu, other Linux distribution..) of your computer.
Important: if you want to uninstall Wubi (Ubuntu installed INSIDE Windows), please follow this guide.
OS-Uninstaller is free software, licensed under GNU-GPL.

Getting OS-Uninstaller
1st option : get a disk including OS-Uninstaller
Download Boot-Repair-Disk. Then create a live-USB of it. Boot on it. A window (Boot-Repair) will appear, close it. Then launch OS-Uninstaller from the bottom-left menu.
2nd option : install OS-Uninstaller in Ubuntu
— boot your computer on a Ubuntu DVD or live-USB.
— choose «Try Ubuntu»
— open a new Terminal (Ctrl+Alt+T), then type:
— Press Enter, then type:
Using OS-Uninstaller
launch OS-Uninstaller (System->Administration->OS-Uninstaller menu if you use Gnome, or via the dash if you use Unity)

- A confirmation window will appear:

- Click «Apply» to start the removal
External Links
OS-Uninstaller (последним исправлял пользователь fitojb 2019-03-26 18:32:11)
The material on this wiki is available under a free license, see Copyright / License for details
You can contribute to this wiki, see Wiki Guide for details
How to Uninstall Ubuntu in a Windows 10 Dual-Boot System
It’s easy and you won’t lose any data
What do you do if you have installed Ubuntu on your PC alongside Windows but don’t want to use Linux anymore? You now have a Linux partition on your hard drive that is taking up space you want to use for your Windows folders and files.
This article will show you how to safely uninstall Ubuntu in Windows 10 dual boot without losing data or applications.
The first part of this process is to remove the Linux operating system. Keep in mind that this will also remove all your Ubuntu data and system files. Be sure to save anything you don’t want to delete somewhere else. The second part of the process is to change the Windows boot loader.
Before making any changes to your computer, you always want to back up your files. Even if you have only been using Linux for a short period, there will most likely be data you want to save.
Also, you want to back up all the critical data from your Windows partition. Use an external hard drive, cloud storage, or DVDs so that you don’t lose any data.
Make sure you have a USB or DVD of Windows. You can download a copy of Windows 10 from Microsoft.
Delete The Linux Partition In Windows
- Start by logging into Windows. Hold down the Windows key + R and type diskmgmt.msc to open the Windows disk management tool.
Linux partitions are differentiated from Windows because they don’t have a drive number and file system.
Windows partitions can be identified by the drive label such as C, D, and E. They are also usually FAT or NTFS files.
- To delete the Linux partitions, right-click on each one and choose Delete Volume.

- A warning will pop-up letting you know that you are trying to delete a partition that wasn’t created by Windows. Then, you will be asked if you want to delete it. Select Yes.
Deleting the partitions will free up space on your drive.
- If you have other Linux partitions, delete them in the same manner. Right-click on Free space and select Delete Partition. Then click Yes when the dialogue box pops up.
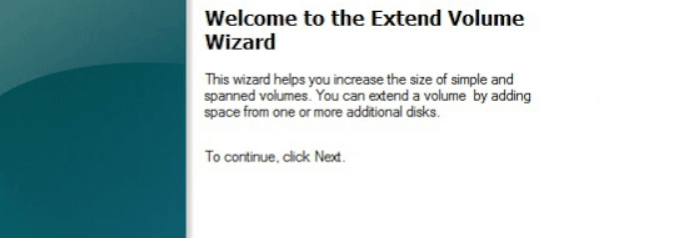
- Now the free space is changed to unallocated space. To expand your Windows partition to occupy the free space, right-click on the Unallocated space and choose Extend Volume from the dropdown options.
- The Extend Volume Wizard will then open. Click Next >Next >Finish.
After the process is complete, you will see only one volume meaning you have claimed all your disk space back to Windows.
Once you remove Linux partitions from your computer, the boot loader for Ubuntu is still there and needs to be removed as well. There are several ways to do this.
Remove the Grub Bootloader
- Go to the Windows Start menu and click on the power icon. Then press and hold down the Shift key and select Restart.
- Continue holding down the shift key until you see the Choose an option screen.
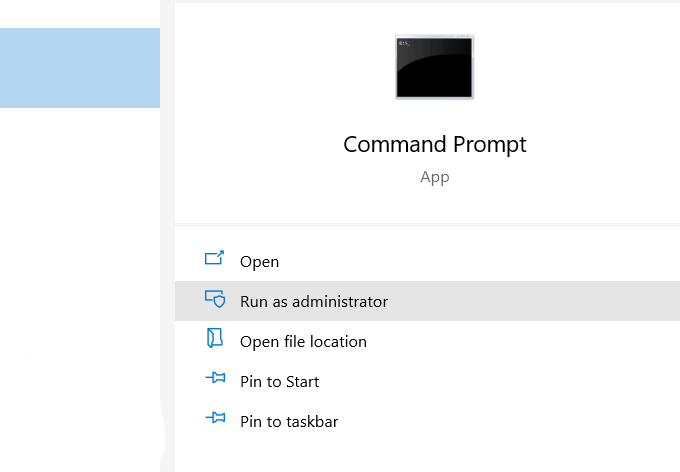
- Select the Troubleshoot option >Advanced options >Command Prompt. Choose your user account from the Command Prompt options and enter your password.
- This will open a command-line terminal. Type bootrec /fixmbr and hit Enter. See the message that the operation has completed successfully.
- Next type bootrec /fixboot >Enter. See the same message that the operation has completed successfully. Type another command bootrec /scanos >Enter. This command will scan all your disks to see if there are any instances of the Windows OS. The time it takes to complete depends upon your system specifications and the size and number of disks you have installed. When the scan is complete, you will see the Windows installations you have on your disk.
- To make Windows your primary boot OS, type the command bootrec /rebuildbcd >Enter.
- If you have multiple Windows installations, you will see a list of all of them and where they are stored on your drive. Type A >Enter to complete the process.
- To close the terminal, type exit >Enter. You have now successfully removed everything related to Ubuntu. Your PC will now boot directly to Windows.
Overwrite the Linux Boot Loader with Windows Boot Loader
- To overwrite the Linux boot loader with the Windows boot loader, insert the USB Windows Installer you downloaded above into your computer and restart it.
- After booting your system from the USB recovery disk, click on repair your computer.
- From the next screen, choose the Troubleshoot option.

- Choose Command Prompt from the next Advanced options screen.
- From the command prompt window, enter bootrec.exe /fixmbr. This will fix the Windows boot loader.
- Restarting your computer now will boot it from the hard drive. Windows will now work as it should, and Linux will no longer be on your system.
What if You Don’t Have a Windows Installation CD or USB?
You can still uninstall Ubuntu dual boot from Windows 10 or Ubuntu as explained below.
- From Windows 10, run the command prompt as Administrator.
- Run the command below to set the correct EFI executable as the default boot entry:
bcdedit /set “
- To see if the above command worked, reboot your computer. If successful, it should boot directly to Windows.
- To delete the partitions, follow the steps above, starting with typing diskmgmt.msc (the Delete the Linux Partition in Windows section)
Change Boot Order Using UEFI
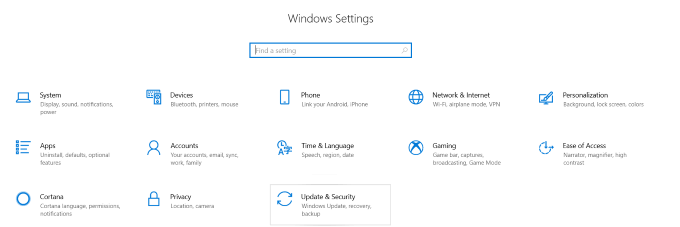
- You can change the UEFI boot order directly from the firmware (BIOS) settings. To access the BIOS from Windows 10, click on the Start button >Settings >Updates & security.
- On the left-hand column, click on Recovery. Under Advanced startup, click Restartnow.

- Choose Troubleshoot >Advanced options >UEFI Firmware Settings. On the UEFI Firmware Settings screen, click Restart. Your computer will then restart and load into the BIOS.

Uninstalling Ubuntu from Windows 10 dual boot is not difficult. You can follow one of the methods above to do so without losing any data.
David has a background in small business and lives in Australia. He is a WordPress and Ubuntu Developer who enjoys design, CSS and tech tool integration. Read David’s Full Bio


