- AkbarAhmed.com
- Engineering Leadership
- Uninstall Java from Ubuntu Linux
- Introduction
- Uninstall Java
- Uninstall OpenJDK (if installed)
- How To Uninstall JDK From Linux ?
- Uninstall Oracle JDK
- Uninstall Openjdk
- How to uninstall Java from Ubuntu
- How to check the type of Java on Linux (Ubuntu):
- How to identify the Java version on Linux (Ubuntu):
- How to switch versions of Java on Linux (Ubuntu):
- How to check the installation method of Java on Linux (Ubuntu):
- How to uninstall Java from Linux (Ubuntu):
- How to Uninstall (Oracle Java & openJDK) in Linux
- Why should we remove Java?
- 1) Checking current version of Java
- 2) Check if you have installed any other Java version
- 3) Checking Java installation method
- 3.a) Checking Java installation method on Debian/Ubuntu
- 3.b) Checking Java installation method on RPM based systems
- 4) Removing Java in Linux
- 4.a) Removing Java in Debian/Ubuntu
- 4.b) Removing Java in RPM based system
- 4.c) Uninstalling Oracle Java
- 5) Checking Java version
- Closing Notes
- Related Posts
- How to install Oracle Java (JDK/JRE) 8/11/12 in Linux?
- How to Enable Java plugin support on Firefox on Linux
- How To Install Oracle Java 7, 8 & 9 (JDK & JRE) on Debian Via Repository
- About Magesh Maruthamuthu
- 17 Comments on “How to Uninstall (Oracle Java & openJDK) in Linux”
AkbarAhmed.com
Engineering Leadership
Uninstall Java from Ubuntu Linux
Introduction
Hopefully you won’t need these instructions due to a botched install, but there may come a time where you need to uninstall a version of the JDK/JVM.
These instructions are for the Oracle JDK 1.7.0 Update 4 on Ubuntu 12.04 LTS. If you are using a different version of the JDK, then change the version numbers listed below.
I have also included instructions for removing the OpenJDK at the bottom of this post.
Uninstall Java
Let’s check the current setup before we uninstall Java.
The output from the command will be something like:
java — manual mode
link currently points to /usr/lib/jdk1.7.0_04/bin/java
/usr/lib/jdk1.7.0_04/bin/java — priority 1
/usr/lib/jvm/j2sdk1.6-oracle/jre/bin/java — priority 315
slave java.1.gz: /usr/lib/jvm/j2sdk1.6-oracle/man/man1/java.1.gz
/usr/lib/jvm/java-7-openjdk-amd64/jre/bin/java — priority 1051
slave java.1.gz: /usr/lib/jvm/java-7-openjdk-amd64/jre/man/man1/java.1.gz
Current ‘best’ version is ‘/usr/lib/jvm/java-7-openjdk-amd64/jre/bin/java’.
Next, we’ll remove each symlink to a Java binary from the Debian alternatives system. I have split the following commands onto multiple lines to ensure that they display correctly on this page. However, you can remove the \ and then type each command on one line in the terminal.
Let’s quickly verify that the commands above remove the symlinks.
You should no longer see 1.7.0 u04 for the version of any of the above commands.
IMPORTANT WARNING
You must type the next 2 commands perfectly to avoid permanently destroying your system. If you do this wrong, you could delete important system files, including those that are required by Ubuntu.
Output:
update-alternatives: error: no alternatives for java.
Output:
update-alternatives: error: no alternatives for javac.
Output:
update-alternatives: error: no alternatives for javaws.
Delete the line with JAVA_HOME
Uninstall OpenJDK (if installed)
First we’ll check which OpenJDK packages are installed.
Next, let’s uninstall OpenJDK related packages. Edit the list of packages below if you have additional or different OpenJDK packages installed.
Let’s check that all OpenJDK packages have been removed.
Источник
How To Uninstall JDK From Linux ?
This tutorial is written to help New Linux Users, who want to uninstall Java Development Kit (JDK) installed on their Linux. The tasks performed on Ubuntu 16.04, but this will also work on other Debian Based Linux like Linux Mint, Kali Linux, etc.
So, first of all, check the vendor of the JDK you have installed on your system, whether it is Oracle JDK or Openjdk. For that execute the following command in the terminal:
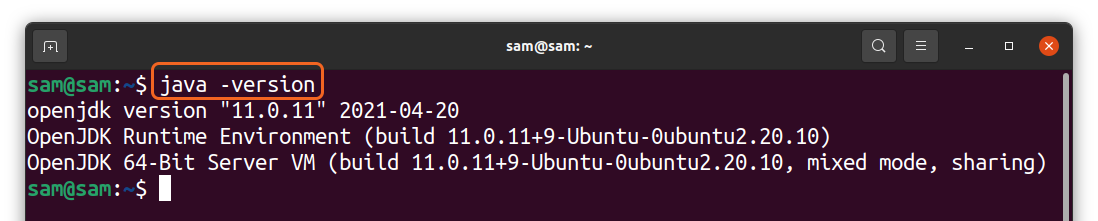
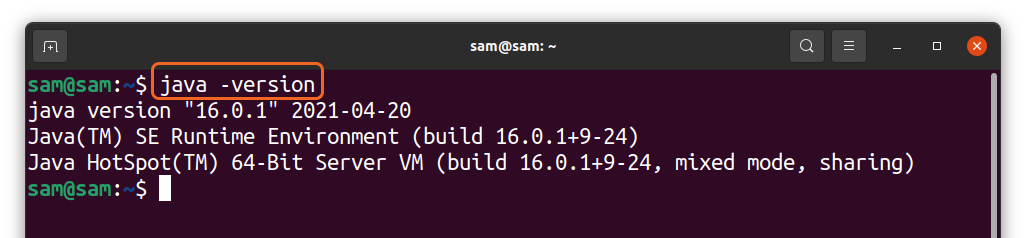
$ java -version
If you have Oracle JDK installed then you will get the following result:
Else if you have Openjdk installed then you will get the following result:
Now follow the instructions below according to the JDK you have installed.
Uninstall Oracle JDK
Remove The Link
First of all remove the alternatives by executing the following commands:
- $ sudo update-alternatives —remove «java» «/usr/lib/jvm/jdk[version]/bin/java»
- $ sudo update-alternatives —remove «javac» «/usr/lib/jvm/jdk[version]/bin/javac»
- $ sudo update-alternatives —remove «javaws» «/usr/lib/jvm/jdk[version]/jre/bin/javaws»
Note: Replace the [version] with any version number that’s contained in jdk folder’s name. For example: jdk1.8.0_131 .
Remove The Package
After removing link, remove the package inside /usr/lib/jvm/jdk[version] by executing following command:
$ sudo rm -r /usr/lib/jvm/jdk[version]
Uninstall Openjdk
If you want to remove Openjdk only, execute the following command on terminal:
$ sudo apt-get remove openjdk*
If you want to remove Openjdk along with dependencies, execute the following command on terminal:
$ sudo apt-get remove —auto-remove openjdk*
If you want to remove Openjdk and it’s configuration files, execute the following command on terminal:
$ sudo apt-get purge openjdk*
If you want to remove Openjdk along with dependencies and it’s configuration files, execute the following command on terminal:
$ sudo apt-get purge —auto-remove openjdk*
This is how you can uninstall JDK. Share this, if it is helpful to you and please report us if you found and error in this post. Thank you.
Источник
How to uninstall Java from Ubuntu
In many cases, you may need to remove java from your computer, such as installing the latest version of java or freeing up space from your machine. Installing Java on Ubuntu is pretty straightforward, but uninstalling it is a hard nut to crack for many folks. In this guide, we will learn how many versions of java are there, what distinguishes them, and how to erase them from your computer completely.
How to check the type of Java on Linux (Ubuntu):
Before erasing java from your device, the first check is to identify what type of java you have on your PC. If you have installed java just to run the java applications, it would most probably “Java Runtime Environment (JRE).” Or, if you have installed java for development purpose, then you may have one of the following:
The difference between “Open JDK” and “Oracle Java” is that the former is open-source, whereas the latter is license-based. Oracle Java is much better when it comes to performance and stability.
How to identify the Java version on Linux (Ubuntu):
Before uninstalling java from your PC, it is essential to know which version of java you have got. To check it launch terminal by pressing “ctrl+alt+t” and type the below-mentioned command:
The above command will also indicate whether the version of java is “Open JDK” or “Oracle JDK.”
Standard output if the version is “OpenJDK”:
Standard output if the version is “Oracle Java”:
If you don’t have any version of java on your machine, the standard output will display it and provide some commands to install it.
How to switch versions of Java on Linux (Ubuntu):
Interestingly, you can have more than one versions of java on your device, and you can check and switch any of them by using the command mentioned below:
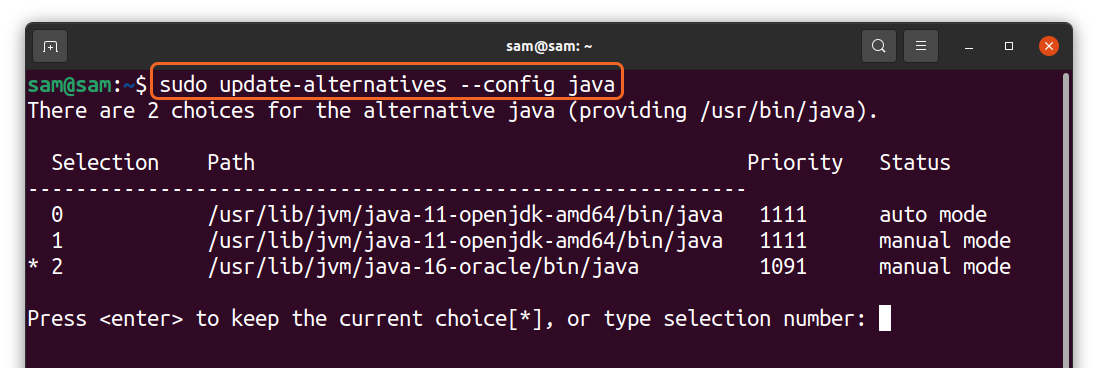
The above command is displaying the different versions of java I have on my PC. To switch, simply type the number and press “Enter.”
How to check the installation method of Java on Linux (Ubuntu):
In some cases, it is crucial to identify the method of installation of java. To check it, use the command:
For oracle java use:
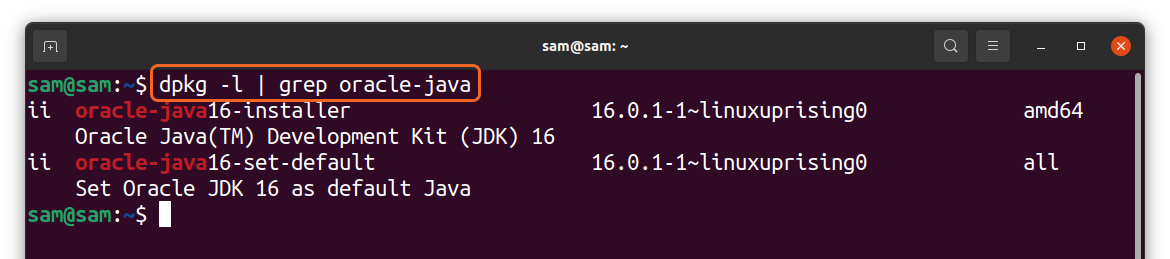
The above output will indicate whether the package is installed from an official repository or a third-party repository. The above screenshots are demonstrating that “Oracle Java” is installed using the third-party repository “Linux pricing,” whereas “OpenJDK” is installed using the official Ubuntu repository.
How to uninstall Java from Linux (Ubuntu):
In the above discussion, we learned that there are multiple versions of java; you can have all of them on your PC at a time and conveniently switch them. Various approaches can be used to delete java from ubuntu. To completely erase “OpenJDK,” use:
Источник
How to Uninstall (Oracle Java & openJDK) in Linux
Most of us believe that uninstalling Java is a difficult task in Linux, but it’s not as per my opinion, because I have installed Java on various distributions several times and removed it safely without any problems.
To do so, you need to check few things before removing JAVA.
In general, people install ‘Oracle Java’ or ‘openJDK’ depending on their need.
In this guide, we will show you how to uninstall/remove Java in Linux. By looking at the steps below, you will realize how easy it is.
Why should we remove Java?
You may need to uninstall Java from your system for below common reasons:
- You may need to install latest version due to application compatibility.
- You no longer need Java on your system
Refer the below link for installing Java on various Linux distributions.
1) Checking current version of Java
Installed Java version in Linux system can be verified using the following command. The below output shows that we have Oracle Java version “1.7.0_72” :
2) Check if you have installed any other Java version
For various reasons, some users might have installed multiple Java versions which can all be listed together using the ‘update-alternatives’ command as shown below.
As per the following output, we have installed three Java versions and ‘Oracle Java 7’ is the one that’s currently active on the system:
3) Checking Java installation method
Before uninstalling Java, you should find how Java was installed in the system. It could be installed using one of the below methods:
- Manual method
- From the rpm file
- Distribution repository or Third-party repository
As stated in the beginning of the article, user would have installed Oracle Java or openJDK.
- OpenJDK : Everybody uses distribution official repository to install openJDK.
- Oracle JAVA : User might use one of these methods viz. Manual or Third-party repository or RPM file.
3.a) Checking Java installation method on Debian/Ubuntu
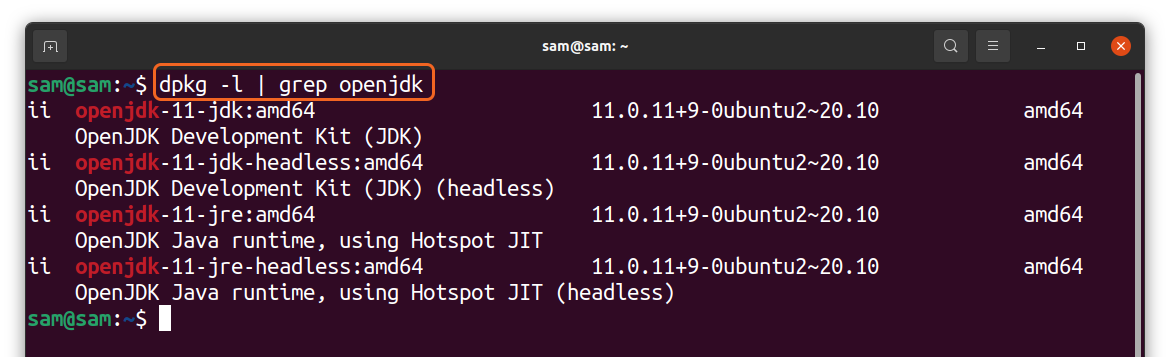
Use the below commands to check how JAVA was installed on an Ubuntu/Debian system. As per the below output, “OpenJDK 1.7.0_65” has been installed from the Ubuntu repository:
Feel free to double check whether “OpenJDK 1.7.0_65” was installed from the Ubuntu repository by running the below command, which in our case shows that it was installed from the Ubuntu official repository as shown below:
As per the below output, “Oracle Java 7” has been installed from third-party repository, namely «webupd8» :
Also, we can see that “Oracle JAVA 8” was installed using the manual method, as it is located under the ‘/opt’ directory, see below:
3.b) Checking Java installation method on RPM based systems
Use the below commands to find out how JAVA was installed on RPM based systems, such as RHEL, CentOS, Fedora and openSUSE. The following output shows that, “OpenJDK 1.7.0_71” was installed using the CentOS repository:
You can double check the above result by running the below command:
Also, the “Oracle Java 8” was installed manually using the RPM file as per the following output, because it doesn’t show the distribution version which was shown in the previous output:
4) Removing Java in Linux
Now that we have understood how to find out the installation method of JAVA on a Linux system, let’s proceed to understand how to remove/uninstall JAVA.
Uninstalling Oracle Java or openJDK can be done in multiple ways and you can use a suitable method as you see fit. This section summarizes some of those methods.
4.a) Removing Java in Debian/Ubuntu
You may need to run these commands based on section ‘3.a’ to uninstall ‘Oracle Java’ or ‘OpenJDK’ in Ubuntu/Debian systems:
4.b) Removing Java in RPM based system
You may need to run these commands based on section ‘3.b’ to uninstall ‘Oracle Java’ or ‘OpenJDK’ in Red Hat, CentOS, Fedora and openSUSE systems:
4.c) Uninstalling Oracle Java
Alternatively, Oracle Java can be removed from the Linux system using the ‘update-alternatives’ command as shown below.
(replace the word (version)with your Java version. DO java -version to get yours. So if your version is 1.8.0-92, you would type sudo update-alternatives –remove “java” “/usr/lib/jvm/jdk1.8.0-92/bin/java”)
Now, remove the corresponding JDK folder by executing the following command:
5) Checking Java version
At this stage, we have completely removed openJDK & Oracle Java from our system. If no Java version is installed on the system, you will get the following message:
Closing Notes
In this article, you learnt how to install ‘Oracle Java’ or ‘OpenJDK’ in various Linux distributions such as Ubuntu, Debian, RHEL, Fedora, CentOS and openSUSE.
If you found this article helpful, please do share with your friends and spread the knowledge. Please feel free to comment below if you have any queries/concerns. We will get back to you as soon as we can. Happy learning!
Related Posts
How to install Oracle Java (JDK/JRE) 8/11/12 in Linux?
October 25, 2017 January 16, 2020

How to Enable Java plugin support on Firefox on Linux
March 17, 2016 April 25, 2016
How To Install Oracle Java 7, 8 & 9 (JDK & JRE) on Debian Via Repository
February 9, 2016 February 8, 2016
About Magesh Maruthamuthu
Love to play with all Linux distribution
17 Comments on “How to Uninstall (Oracle Java & openJDK) in Linux”
im on kalilinux 2020.4 i installed java 11.0.9 and java jdk 8 u217
when i write java -version
lzh:permission denied java
it’s not about root there is another errorr help me plz
Can you share with us en exact error message that you are getting to understand more about it?
I see you don’t monetize your website, i think there is one opportunity to earn additional cash on your page,
search in google for: idol4jp makes money
Hi Magesh,
Please see my post here. How do I remove Java 7?
# java -version
If ‘java’ is not a typo you can use command-not-found to lookup the package that contains it, like this:
cnf java
linux-bi4s:
# update-alternatives –config java
update-alternatives: error: no alternatives for java
linux-bi4s:
# rpm -qa | grep java
timezone-java-2014h-1.1.noarch
java-1_7_0-openjdk-1.7.0.71-1.1.x86_64
libjavascriptcoregtk-1_0-0-2.4.6-1.4.x86_64
java-1_7_0-openjdk-headless-1.7.0.71-1.1.x86_64
libjavascriptcoregtk-3_0-0-2.4.6-1.4.x86_64
libjavascriptcoregtk-4_0-18-2.6.1-1.1.x86_64
java-binfmt-misc-1.4-4.1.3.x86_64
linux-bi4s:
# rpm -qa | grep jdk
java-1_7_0-openjdk-1.7.0.71-1.1.x86_64
java-1_7_0-openjdk-headless-1.7.0.71-1.1.x86_64
linux-bi4s:
# rpm -e java-1_7_0-openjdk-1.7.0.71-1.1.x86_64
error: Failed dependencies:
jre-64 > 1.5 is needed by (installed) libreoffice-writer-extensions-4.3.2.2-1.3.x86_64
jre-64 > 1.5 is needed by (installed) libreoffice-calc-extensions-4.3.2.2-1.3.x86_64
linux-bi4s:
Источник


