- PC, Mac & Linux Standalone build settings
- Installing the Unity Hub
- Installing the Unity Editor
- Adding existing instances of the Editor to the Hub
- Troubleshooting for Linux
- Support for Editor versions prior to 2017.1
- Using the Unity Installer to install the Unity Editor
- Platform development
- #define directives
- Platform #define directives
- Editor version #define directives
- Other #define directives
- Testing precompiled code
- Platform custom #defines
- Global custom #defines
PC, Mac & Linux Standalone build settings
The PC, Mac & Linux Standalone build settings contain options you can use to set up and begin the build process for your application on these platforms. It contains settings to create development builds A development build includes debug symbols and enables the Profiler. More info
See in Glossary as well as publishing your final build. To access the Build Settings window, go to File > Build Settings. Once you specify the build settings, select Build The process of compiling your project into a format that is ready to run on a specific platform or platforms. More info
See in Glossary to create your build, or select Build And Run to create and run your build on the platform you specify.
 Standalone Build Settings
The following table outlines the settings available for your build. These vary depending on the target operating system you choose.
| Setting | Description | |
|---|---|---|
| Target Platform | ||
| Windows | Build for Windows | |
| macOS X (Not available on Linux) | Build for macOS | |
| Linux (not available on Mac) | Build for Linux | |
| Architecture | Not available on macOS | |
| x86 | 32-bit CPU | |
| x86_64 | 64-bit CPU | |
| x86 + x86_64 (Universal) | All CPU devices for Linux | |
| Server Build | Enable this setting to build the Player for server use and with no visual elements (headless) without the need for any command line options. When you enable this setting, Unity builds managed scripts A piece of code that allows you to create your own Components, trigger game events, modify Component properties over time and respond to user input in any way you like. More info See in Glossary with the UNITY_SERVER define, which means you can write server-specific code for your application. You can also build to the Windows version as a console application to access stdin and stdout . Unity logs go to stdout by default. | |
| Copy PDB files(Windows only) | Enable this setting to include Microsoft program database (.pdb) files in the built Standalone Player. .pdb files contain application debugging information that is you can use to debug your application. Copying .pdb files might increase the size of your Player, so you should disable this setting for builds that are intended for publishing. This setting is disabled by default. | |
| Create Visual Studio Solution(Windows only) | Enable this setting to generate Visual Studio Solution files for your Project, so you can build your final executable in Visual Studio. | |
| Create Xcode Project (Mac Only) | Enable this setting to generate an Xcode project so you can build your final application bundle in Xcode. Xcode has built-in support for code signing and uploading the application to the Mac App Store. | |
| Development Build | Enable this setting to include scripting debug symbols and include the Profiler A window that helps you to optimize your game. It shows how much time is spent in the various areas of your game. For example, it can report the percentage of time spent rendering, animating or in your game logic. More info See in Glossary in your build. When you enable this setting, the DEVELOPMENT_BUILD scripting define is set. You should use this option when you want to test your application. | |
| Autoconnect profiler | Requires Development Build option to be enabled. When you enable this setting, the Unity Profiler automatically connects to your build. | |
| Deep Profiling Support | Requires Development Build option to be enabled. Deep Profiling Support enables the Unity Profiler to record more detailed data by instrumenting every function call. Enabling Deep Profiling might slow down script execution. | |
| Script debugging | Requires Development Build option to be enabled. When you enable this setting, Unity adds debugging symbols to your script code. | |
| Scripts Only Build | Requires Development Build option to be enabled. When you enable this setting, you can rebuild only the scripts for your application while leaving data files intact from a build you have previously executed. Script only builds significantly improves iteration times if you are only changing the code in your application. You need to build the whole Project once before you can use this setting. | |
For information on minimum requirements for build targets see documentation on Player System Requirements.
Источник
Installing the Unity Hub
The Unity Hub is a management tool that you can use to manage all of your Unity Projects and installations. Use the Hub to manage multiple installations of the Unity Editor along with their associated components, create new Projects, and open existing Projects.
To install the Unity Hub for Windows, macOS, and Linux visit Download Unity on the Unity website.
Unity officially supports the following Linux distributions:
Note: If Unity Hub fails to launch while you are using Linux, you might need to give UnityHub.AppImage executable permissions. To do this:
- Open your terminal.
- Go to the directory where UnityHub.AppImage is. This will be the Unity Hub directory.
- Run chmod +x UnityHub.AppImage .
To install and use the Unity Editor, you must have a Unity Developer Network (UDN) account. If you already have an account, sign in, choose your licenses type, and proceed to the Installing the Unity Editor section.
If you do not have an account, follow the prompts to create one. You can choose to create a Unity ID or use one of the social sign-ins. For more information on accounts and subscriptions, see Unity Organizations.
Installing the Unity Editor
To install the Editor:
Click the Installs tab. The default install locations are:
Note: If you want to change the default installation location, follow these steps:
From the top right corner of the Hub window, click the Gear icon.
In the Editor Folder Location dialog box, enter the new installation location and click Done.
Click the Add button and select a specific version of the Editor.
 Hub install screen
Click the Next button and select the modules you want to install with the Editor. If you don’t install a component now, you can add it later if you need to. When you’ve selected all the modules you need, click Done.
 Modules install
If you are installing multiple Editor versions, the first installation starts as soon as the download is complete. Other selected versions download simultaneously and queue to start when the current installation finishes.
The Hub displays the installation location of each Editor under the corresponding version label.
To add modules to an Editor, locate its files, or uninstall it, click the three dots next to that Editor version.
 Modifying an existing Editor install
Adding existing instances of the Editor to the Hub
You can add instances of the Editor to the Hub that you installed outside of the Hub.
Click the Installs tab.
Click the Locate button to find existing installations of the Editor.
In the file dialog, navigate to the location of the Editor installation and select the Unity executable. On MacOS this is Unity.app. On Windows this is Unity.exe.
On Windows, the typical location of the Unity.exe is:
On macOS, the typical location of the Unity.app is:
On Linux, the typical location of the Unity executable file is:
Click the Select Editor button.
To remove the Editor from the Hub, click the three dots next to the Editor version. Removing an Editor that you added in this manner does not uninstall it or modify it in any way.
Troubleshooting for Linux
If Unity fails to start, you might need to install a missing dependency In the context of the Package Manager, a dependency is a specific package version (expressed in the form package_name@package_version ) that a project or another package requires in order to work. Projects and packages use the dependencies attribute in their manifests to define the set of packages they require. For projects, these are considered direct dependencies; for packages, these are indirect, or transitive, dependencies. More info
See in Glossary . On Ubuntu-based distributions, use:
On CentOS, you might need to install the mesa-libGLU dependency. Use:
Support for Editor versions prior to 2017.1
Sign-in status is not shared for pre–2017.1 versions of the Editor opened through the Hub. Performing tasks such as Manage License, Open Project, Create Project, and Sign in opens the Unity Launcher instead of the Hub.
If you attempt to use the Unity Hub to open an Editor version 5 or earlier and you do not have an appropriate license file, the Editor will hang on the splash screen.
To avoid this issue, run the Editor directly, external to the Unity Hub, and the Editor will load correctly even if the license file is not detected.
Using the Unity Installer to install the Unity Editor
The Unity installer is a small executable program (approximately 1 MB in size) that lets you select which components of the Unity Editor you want to download and install.
To install previous versions of the Unity Editor using the Installer, visit the Unity download archive. The archive page provides Unity Installer download links for all released versions of the Editor.
For additional information on installing the Editor using the Installer, see the 2018.3 version of the Unity Manual.
- Hub design updated in Unity 2019.1 NewIn20191
- Linux now available from the Hub in Unity 2019.1 onwards
Источник
Platform development

Before starting out with the Unity Editor, you might want to familiarize yourself with the platforms that you can create your projects in. Unity supports most of the leading desktop, web, and mobile platforms as follows:
- Windows, macOS, and Linux
- tvOS
- iOS Apple’s mobile operating system. More info
See in Glossary - Android
- WebGL A JavaScript API that renders 2D and 3D graphics in a web browser. The Unity WebGL build option allows Unity to publish content as JavaScript programs which use HTML5 technologies and the WebGL rendering API to run Unity content in a web browser. More info
See in Glossary - Lumin
Note: If you are a developer with access to Closed platforms Includes platforms that require confidentiality and legal agreements with the platform provider for using their developer tools and hardware. Note that these platforms are not open to development prior to an established relationship with the operator. For example, PlayStation, Game Core for Xbox, Nintendo, and so on.
See in Glossary , you may see more platform options when you download and register your preferred platform setup. For further information, see Platform Module Installation. and Unity forums.
For a full list of platforms that Unity supports as well as the system requirements for these platforms, see documentation on System Requirements.
Источник
#define directives
Platform #define directives
Unity’s Platform Dependent Compilation feature consists of some preprocessor directives that let you partition your scripts A piece of code that allows you to create your own Components, trigger game events, modify Component properties over time and respond to user input in any way you like. More info
See in Glossary to compile and execute a section of code exclusively for one of the supported platforms.
You can run this code within the Unity Editor, so you can compile the code specifically for your target platform and test it in the Editor.
The platform #define directives that Unity supports for your scripts are as follows:
| Define | Function |
|---|---|
| UNITY_EDITOR | #define directive to call Unity Editor scripts from your game code. |
| UNITY_EDITOR_WIN | #define directive for Editor code on Windows. |
| UNITY_EDITOR_OSX | #define directive for Editor code on Mac OS X. |
| UNITY_EDITOR_LINUX | #define directive for Editor code on Linux. |
| UNITY_STANDALONE_OSX | #define directive to compile or execute code specifically for Mac OS X (including Universal, PPC and Intel architectures). |
| UNITY_STANDALONE_WIN | #define directive for compiling/executing code specifically for Windows standalone applications. |
| UNITY_STANDALONE_LINUX | #define directive for compiling/executing code specifically for Linux standalone applications. |
| UNITY_STANDALONE | #define directive for compiling/executing code for any standalone platform (Mac OS X, Windows or Linux). |
| UNITY_WII | #define directive for compiling/executing code for the Wii console. |
| UNITY_IOS | #define directive for compiling/executing code for the iOS platform. |
| UNITY_IPHONE | Deprecated. Use UNITY_IOS instead. |
| UNITY_ANDROID | #define directive for the Android platform. |
| UNITY_PS4 | #define directive for running PlayStation 4 code. |
| UNITY_XBOXONE | #define directive for executing Xbox One code. |
| UNITY_LUMIN | #define directive for the Magic Leap OS platform. You can also use PLATFORM_LUMIN. |
| UNITY_TIZEN | #define directive for the Tizen platform. |
| UNITY_TVOS | #define directive for the Apple TV platform. |
| UNITY_WSA | #define directive for Universal Windows Platform An IAP feature that supports Microsoft’s In App Purchase simulator, which allows you to test IAP purchase flows on devices before publishing your application. More info See in Glossary . Additionally, NETFX_CORE is defined when compiling C# files against .NET Core and using .NET scripting backend A framework that powers scripting in Unity. Unity supports three different scripting backends depending on target platform: Mono, .NET and IL2CPP. Universal Windows Platform, however, supports only two: .NET and IL2CPP. More info See in Glossary . |
| UNITY_WSA_10_0 | #define directive for Universal Windows Platform. Additionally WINDOWS_UWP is defined when compiling C# files against .NET Core. |
| UNITY_WINRT | Same as UNITY_WSA. |
| UNITY_WINRT_10_0 | Equivalent to UNITY_WSA_10_0 |
| UNITY_WEBGL | #define directive for WebGL A JavaScript API that renders 2D and 3D graphics in a web browser. The Unity WebGL build option allows Unity to publish content as JavaScript programs which use HTML5 technologies and the WebGL rendering API to run Unity content in a web browser. More info See in Glossary . |
| UNITY_FACEBOOK | #define directive for the Facebook platform (WebGL or Windows standalone). |
| UNITY_ANALYTICS | #define directive for calling Unity Analytics Abbreviation of Unity Analytics See in Glossary methods from your game code. Version 5.2 and above. |
| UNITY_ASSERTIONS | #define directive for assertions control process. |
| UNITY_64 | #define directive for 64-bit platforms. |
Editor version #define directives
You can also compile code selectively. The options available depend on the version of the Editor that you are working on. Given a version number X.Y.Z (for example, 2.6.0), Unity exposes three global #define directives in the following formats: UNITY_X, UNITY_X_Y and UNITY_X_Y_Z.
Here is an example of #define directives exposed in Unity 5.0.1:
| Define | Function |
|---|---|
| UNITY_5 | #define directive for the release version of Unity 5, exposed in every 5.X.Y release. |
| UNITY_5_0 | #define directive for the major version of Unity 5.0, exposed in every 5.0.Z release. |
| UNITY_5_0_1 | #define directive for the minor version of Unity 5.0.1. |
Starting from Unity 5.3.4, you can compile code selectively based on the earliest version of Unity required to compile or execute a given portion of code. Given the same version format as above (X.Y.Z), Unity exposes one global #define in the format UNITY_X_Y_OR_NEWER, that can be used for this purpose.
Other #define directives
The supported #define directives are:
| Define | Function |
|---|---|
| CSHARP_7_3_OR_NEWER | Defined when building scripts with support for C# 7.3 or newer. |
| ENABLE_MONO | Scripting backend #define for Mono. |
| ENABLE_IL2CPP | Scripting backend #define for IL2CPP A Unity-developed scripting back-end which you can use as an alternative to Mono when building projects for some platforms. More info See in Glossary . |
| NET_2_0 | Defined when building scripts against .NET 2.0 API compatibility level on Mono and IL2CPP. |
| NET_2_0_SUBSET | Defined when building scripts against .NET 2.0 Subset API compatibility level on Mono and IL2CPP. |
| NET_LEGACY | Defined when building scripts against .NET 2.0 or .NET 2.0 Subset API compatibility level on Mono and IL2CPP. |
| NET_4_6 | Defined when building scripts against .NET 4.x API compatibility level on Mono and IL2CPP. |
| NET_STANDARD_2_0 | Defined when building scripts against .NET Standard 2.0 API compatibility level on Mono and IL2CPP. |
| ENABLE_WINMD_SUPPORT | Defined when Windows Runtime support is enabled on IL2CPP. See Windows Runtime Support for more details. |
| ENABLE_INPUT_SYSTEM | Defined when the Input System package is enabled in Player Settings Settings that let you set various player-specific options for the final game built by Unity. More info See in Glossary . |
| ENABLE_LEGACY_INPUT_MANAGER | Defined when the legacy Input Manager Settings where you can define all the different input axes, buttons and controls for your project. More info See in Glossary is enabled in Player Settings. |
| UNITY_SERVER | Defined when the Server Build setting is enabled in Build Settings |
You use the DEVELOPMENT_BUILD #define to identify whether your script is running in a player which was built with the “ Development Build A development build includes debug symbols and enables the Profiler. More info
See in Glossary ” option enabled.
You can also compile code selectively depending on the scripting back-end.
Testing precompiled code
Below is an example of how to use the precompiled code. It prints a message that depends on the platform you have selected for your target build.
First of all, select the platform you want to test your code against by going to File > Build Settings. This displays the Build Settings window; select your target platform from here.
 Build Settings window with PC, Mac & Linux selected as the target platforms
Select the platform you want to test your precompiled code against and click Switch Platform to tell Unity which platform you are targeting.
Create a script and copy/paste the following code:
To test the code, click Play Mode. Confirm that the code works by checking for the relevant message in the Unity console, depending on which platform you selected — for example, if you choose iOS Apple’s mobile operating system. More info
See in Glossary , the message “Iphone” is set to appear in the console.
In C# you can use a CONDITIONAL attribute which is a more clean, less error-prone way of stripping out functions. See ConditionalAttribute Class for more information. Note that common Unity callbacks (ex. Start(), Update(), LateUpdate(), FixedUpdate(), Awake()) are not affected by this attribute because they are called directly from the engine and, for performance reasons, it does not take them into account.
In addition to the basic #if compiler directive, you can also use a multiway test in C#:
Platform custom #defines
It is also possible to add to the built-in selection of #define directives by supplying your own. Open the Other Settings panel of the Player settings and navigate to the Scripting Define Symbols text box.
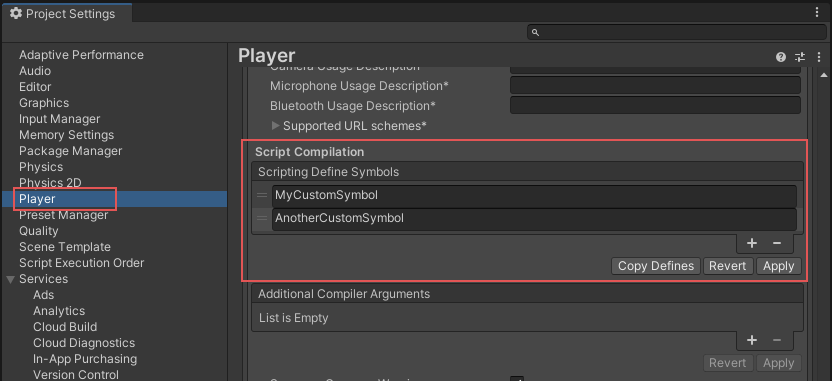
Enter the names of the symbols you want to define for that particular platform, separated by semicolons. These symbols can then be used as the conditions for #if directives, just like the built-in ones.
Global custom #defines
You can define your own preprocessor directives to control which code gets included when compiling. To do this you must add a text file with the extra directives to the Assets Any media or data that can be used in your game or project. An asset may come from a file created outside of Unity, such as a 3D Model, an audio file or an image. You can also create some asset types in Unity, such as an Animator Controller, an Audio Mixer or a Render Texture. More info
See in Glossary folder. The name of the file depends on the language you are using. The extension is .rsp:
| C# (player and editor scripts) |
As an example, if you include the single line -define:UNITY_DEBUG in your mcs.rsp file, the #define directive UNITY_DEBUG exists as a global #define for C# scripts, except for Editor scripts.
Every time you make changes to .rsp files, you need to recompile in order for them to be effective. You can do this by updating or reimporting a single script (.js or .cs) file.
Note: If you want to modify only global #define directives, use Scripting Define Symbols in Player settings, because this covers all the compilers. If you choose the .rsp files instead, you need to provide one file for every compiler Unity uses.
The use of .rsp files is described in the ‘Help’ section of the mcs application, which is included in the Editor installation folder. You can get more information by running mcs -help .
Note that the .rsp file needs to match the compiler being invoked. For example:
Источник


