- Editor Windows
- Derive From EditorWindow
- Showing the window
- Implementing Your Window’s GUI
- Создание и Использование Скриптов
- Создание скриптов
- Структура файла скрипта
- Управление игровым объектом
- Окна редактора (Editor Windows)
- Вывод из EditorWindow
- Отображение окна
- Реализация интерфейса вашего окна
- Editor
- Success!
- Submission failed
- Description
- Properties
- Public Methods
- Protected Methods
- Static Methods
- Messages
- Events
- Inherited Members
- Properties
- Public Methods
- Static Methods
- Operators
- Messages
Editor Windows
You can create any number of custom windows in your app. These behave just like the Inspector A Unity window that displays information about the currently selected GameObject, asset or project settings, allowing you to inspect and edit the values. More info
See in Glossary , Scene A Scene contains the environments and menus of your game. Think of each unique Scene file as a unique level. In each Scene, you place your environments, obstacles, and decorations, essentially designing and building your game in pieces. More info
See in Glossary or any other built-in ones. This is a great way to add a user interface to a sub-system for your game.
 Custom Editor Interface by Serious Games Interactive used for scripting cutscene actions
Making a custom Editor Window involves the following simple steps:
- Create a script that derives from EditorWindow.
- Use code to trigger the window to display itself.
- Implement the GUI code for your tool.
Derive From EditorWindow
In order to make your Editor Window, your script must be stored inside a folder called “Editor”. Make a class in this script that derives from EditorWindow. Then write your GUI controls in the inner OnGUI function.
MyWindow.js — placed in a folder called ‘Editor’ within your project.
Showing the window
In order to show the window on screen, make a menu item that displays it. This is done by creating a function which is activated by the MenuItem property.
The default behavior in Unity is to recycle windows (so selecting the menu item again would show existing windows. This is done by using the function EditorWindow.GetWindow Like this:
Showing the MyWindow
This will create a standard, dockable editor window that saves its position between invocations, can be used in custom layouts, etc. To have more control over what gets created, you can use GetWindowWithRect
Implementing Your Window’s GUI
The actual contents of the window are rendered by implementing the OnGUI function. You can use the same UnityGUI classes you use for your ingame GUI (GUI and GUILayout). In addition we provide some additional GUI controls, located in the editor-only classes EditorGUI and EditorGUILayout. These classes add to the controls already available in the normal classes, so you can mix and match at will.
The following C# code shows how you can add GUI elements to your custom EditorWindow:
This example results in a window which looks like this:
 Custom Editor Window created using supplied example.
For more info, take a look at the example and documentation on the EditorWindow page.
Создание и Использование Скриптов
Поведение игровых объектов контролируется с помощью компонентов ( Components ), которые присоединяются к ним. Несмотря на то, что встроенные компоненты Unity могут быть очень разносторонними, вскоре вы обнаружите, что вам нужно выйти за пределы их возможностей, чтобы реализовать ваши собственные особенности геймплея. Unity позволяет вам создавать свои компоненты, используя скрипты . Они позволяют активировать игровые события, изменять параметры компонентов, и отвечать на ввод пользователя каким вам угодно способом.
Unity изначально поддерживает три языка программирования:
- C# (произносится как Си-шарп), стандартный в отрасли язык подобный Java или C++;
- UnityScript, язык, разработанный специально для использования в Unity по образцу JavaScript;
В дополнение к этим, с Unity могут быть использованы многие другие языки семейства .NET, если они могут компилировать совместимые DLL — см. эту страницу для получения подробностей.
Изучение искусства программирования и использования этих языкам выходит за рамки данного введения. Однако есть множество книг, обучающих материалов и ресурсов для изучения программирования в среде Unity. Посетите Обучающий раздел на нашем сайте для получения подробной информации.
Создание скриптов
В отличии от других ассетов, скрипты обычно создаются непосредственно в Unity. Вы можете создать скрипт используя меню Create в левом верхнем углу панели Project или выбрав Assets > Create > C# Script (или JavaScript/Boo скрипт) в главном меню.
Новый скрипт будет создан в папке, которую вы выбрали в панели Project. Имя нового скрипта будет выделено, предлагая вам ввести новое имя.
Лучше ввести новое имя скрипта сразу после создания чем изменять его потом. Имя, которое вы введете будет использовано, чтобы создать начальный текст в скрипте, как описано ниже.
Структура файла скрипта
После двойного щелчка на скрипте в Unity, он будет открыт в текстовом редакторе. По умолчанию Unity будет использовать MonoDevelop, но вы можете выбрать любой редактор из панели External Tools в настройках Unity.
Содержимое файла будет выглядеть примерно так:
Скрипт взаимодействует с внутренними механизмами Unity за счет создания класса, наследованного от встроенного класса, называемого MonoBehaviour . Вы можете думать о классе как о своего рода плане для создания нового типа компонента, который может быть прикреплен к игровому объекту. Каждый раз, когда вы присоединяете скриптовый компонент к игровому объекту, создается новый экземпляр объекта, определенный планом. Имя класса берется из имени, которое вы указали при создании файла. Имя класса и имя файла должны быть одинаковыми, для того, чтобы скриптовый компонент мог быть присоединен к игровому объекту.
Основные вещи, достойные внимания, это две функции, определенные внутри класса. Функция Update — это место для размещения кода, который будет обрабатывать обновление кадра для игрового объекта. Это может быть движение, срабатывание действий и ответная реакция на ввод пользователя, в основном всё, что должно быть обработано с течением времени во игровом процессе. Чтобы позволить функции Update выполнять свою работу, часто бывает полезно инициализировать переменные, считать свойства и осуществить связь с другими игровыми объектами до того, как будут совершены какие-либо действия. Функция Start будет вызвана Unity до начала игрового процесса (т.е. до первого вызова функции Update), и это идеальное место для выполнения инициализации.
Заметка для опытных программистов: вы можете быть удивлены, что инициализация объекта выполняется не в функции-конструкторе. Это потому, что создание объектов обрабатывается редактором и происходит не в начале игрового процесса, как вы могли бы ожидать. Если вы попытаетесь определить конструктор для скриптового компонента, он будет мешать нормальной работе Unity и может вызвать серьезные проблемы с проектом.
A UnityScript script works a bit differently to C# script:
Здесь функции Start и Update имеют такое же значение, но класс не объявлен явно. Предполагается, что скрипт сам по себе определяет класс; он будет неявно производным от MonoBehaviour и получит своё имя от имени файла скриптового ассета.
Управление игровым объектом
Как было сказано ранее, скрипт определяет только план компонента и, таким образом, никакой его код не будет активирован до тех пор, пока экземпляр скрипта не будет присоединен к игровому объекту. Вы можете прикрепить скрипт перетаскиванием ассета скрипта на игровой объект в панели Hierarchy или через окно Inspector выбранного игрового объекта. Имеется также подменю Scripts в меню Component, которое содержит все скрипты, доступные в проекте, включая те, которые вы создали сами. Экземпляр скрипта выглядит так же, как и другие компоненты в окне Inspector:-

После присоединения скрипт начнет работать, когда вы нажмете Play и запустите игру. Вы можете проверить это добавив следующий код в функцию Start:-
Окна редактора (Editor Windows)
Вы можете создать любое количество пользовательских окон в вашем приложении. Они ведут себя точно так же как и инспектор, Scene View или любое другое встроенное окно. Это отличный способ добавить интерфейс в подсистему вашей игры.
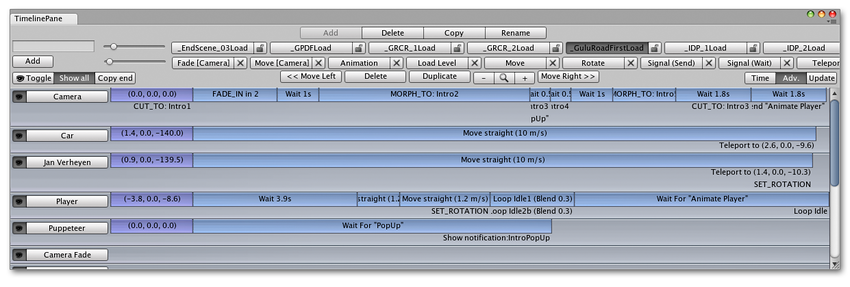 Пользовательский интерфейс редактора за авторством Serious Games Interactive, используемый для скриптинга событий кат-сцен
Создание пользовательского окна редактора (Editor Window) включает в себя следующие шаги:
- Создание скрипта, являющегося производным от EditorWindow.
- Использование кода для включения отображения окна.
- Реализация кода интерфейса для вашего инструмента.
Вывод из EditorWindow
Для того, чтобы сделать своё окно редактора, ваш скрипт должен храниться внутри папки, названной “Editor”. Создайте в этом скрипте класс, который будет производным от EditorWindow. Затем пропишите ваши элементы управления интерфейса во внутренней OnGUI функции.
MyWindow.js — помещается в папку ‘Editor’ внутри вашего проекта.
Отображение окна
Для того, чтобы отобразить окно на экране, создайте элемент меню, который отображает его. Это делается созданием функции, которая активируется при помощи MenuItem property.
Стандартным поведением в Unity будет использование различных окон, закрывая одни и открывая другие (таким образом, повторный выбор элемента меню покажет существующие окна. Это выполняется используя функцию EditorWindow.GetWindow. Вот так:
Отображение окна MyWindow
Это создаст стандартное закрепляемое окно редактора, которое сохраняет свою позицию между вызовами, может быть использовано в пользовательских лейаутах и т.д. Чтобы получить больше контроля над тем, что создаётся, вы можете использовать GetWindowWithRect.
Реализация интерфейса вашего окна
Само содержимое окна рендерится при реализации функции OnGUI. Вы можете использовать те же UnityGUI классы, что используете для игрового интерфейса ( GUI и GUILayout ). В дополнение мы предоставляем некоторые дополнительные элементы управления интерфейса, расположенные в editor-only (только для редактора) классах EditorGUI и EditorGUILayout . Эти классы добавляют элементы управления уже доступные в обычных классах, так что вы можете совмещать и комбинировать как захотите.
Следующий С# код показывает, как вы можете добавлять элементы интерфейса для вашего пользовательского окна редактора (EditorWindow):
В итоге этот пример создаёт окно, которые выглядит вот так:
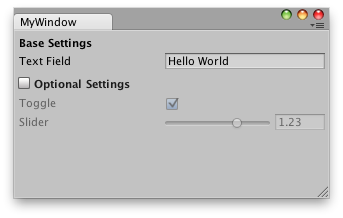 Пользовательское окно редактора, созданное при помощи предоставленного примера.
Для дополнительной информации изучите примеры и документацию на странице EditorWindow.
Editor
class in UnityEditor
Success!
Thank you for helping us improve the quality of Unity Documentation. Although we cannot accept all submissions, we do read each suggested change from our users and will make updates where applicable.
Submission failed
For some reason your suggested change could not be submitted. Please try again in a few minutes. And thank you for taking the time to help us improve the quality of Unity Documentation.
Description
Derive from this base class to create a custom inspector or editor for your custom object.
For example, use a custom editor to change the appearance of the script in the Inspector.
You can attach the Editor to a custom component by using the CustomEditor attribute.
There are multiple ways to design custom Editors. If you want the Editor to support multi-object editing, you can use the CanEditMultipleObjects attribute. Instead of modifying script variables directly, it’s advantageous to use the SerializedObject and SerializedProperty system to edit them, since this automatically handles multi-object editing, undo, and Prefab overrides. If this approach is used a user can select multiple assets in the hierarchy window and change the values for all of them at once.
You can either use UIElements to build your custom UI or you can use IMGUI. To create a custom inspector using UIElements, you have to override the Editor.CreateInspectorGUI on the Editor class. To create a custom inspector using IMGUI, you have to override the Editor.OnInspectorGUI on the Editor class. If you use UIElements and have Editor.CreateInspectorGUI overwritten, any existing IMGUI implementation using Editor.OnInspectorGUI on the same Editor will be ignored.
Here’s an example of a custom inspector:

Custom editor in the Inspector.
The following example defines the layout of a custom inspector in uxml. The definition loads as a resource and the VisualTreeAsset.CloneTree method puts the hierarchy in a VisualElement object.
The InspectorWindow will instantiate an InspectorElement containing the custom inspector. The InspectorElement will call Bind on the custom inspector binding it to the MyPlayer object.
UIElements automatically updates the UI when data changes and vice-versa. To bind data and automatically update data and UI, set values for the «binding-path» attributes.
Styling of the inspector is done in uss.
Here’s an example of a custom inspector using IMGUI and multi-selection:
If automatic handling of multi-object editing, undo, and Prefab overrides is not needed, the script variables can be modified directly by the editor without using the SerializedObject and SerializedProperty system, as in the IMGUI example below.
Properties
| serializedObject | A SerializedObject representing the object or objects being inspected. |
| target | The object being inspected. |
| targets | An array of all the object being inspected. |
Public Methods
| CreateInspectorGUI | Implement this method to make a custom UIElements inspector. |
| DrawDefaultInspector | Draws the built-in inspector. |
| DrawHeader | Call this function to draw the header of the editor. |
| DrawPreview | The first entry point for Preview Drawing. |
| GetInfoString | Implement this method to show asset information on top of the asset preview. |
| GetPreviewTitle | Override this method if you want to change the label of the Preview area. |
| HasPreviewGUI | Override this method in subclasses if you implement OnPreviewGUI. |
| OnInspectorGUI | Implement this function to make a custom inspector. |
| OnInteractivePreviewGUI | Implement to create your own interactive custom preview. Interactive custom previews are used in the preview area of the inspector and the object selector. |
| OnPreviewGUI | Implement to create your own custom preview for the preview area of the inspector, the headers of the primary editor, and the object selector. |
| OnPreviewSettings | Override this method if you want to show custom controls in the preview header. |
| RenderStaticPreview | Override this method if you want to render a static preview. |
| Repaint | Redraw any inspectors that shows this editor. |
| RequiresConstantRepaint | Checks if this editor requires constant repaints in its current state. |
| UseDefaultMargins | Override this method in subclasses to return false if you don’t want default margins. |
Protected Methods
| ShouldHideOpenButton | Returns the visibility setting of the «open» button in the Inspector. |
Static Methods
| CreateCachedEditor | On return previousEditor is an editor for targetObject or targetObjects. The function either returns if the editor is already tracking the objects, or destroys the previous editor and creates a new one. |
| CreateCachedEditorWithContext | Creates a cached editor using a context object. |
| CreateEditor | Make a custom editor for targetObject or targetObjects. |
| CreateEditorWithContext | Make a custom editor for targetObject or targetObjects with a context object. |
| DrawFoldoutInspector | Draws the inspector GUI with a foldout header for target. |
Messages
| HasFrameBounds | Validates whether custom bounds can be calculated for this editor. |
| OnGetFrameBounds | Gets custom bounds for the target of this editor. |
| OnSceneGUI | Enables the Editor to handle an event in the Scene view. |
Events
| finishedDefaultHeaderGUI | An event raised while drawing the header of the Inspector window, after the default header items have been drawn. |
Inherited Members
Properties
| hideFlags | Should the object be hidden, saved with the Scene or modifiable by the user? |
| name | The name of the object. |
Public Methods
| GetInstanceID | Returns the instance id of the object. |
| ToString | Returns the name of the object. |
Static Methods
| Destroy | Removes a GameObject, component or asset. |
| DestroyImmediate | Destroys the object obj immediately. You are strongly recommended to use Destroy instead. |
| DontDestroyOnLoad | Do not destroy the target Object when loading a new Scene. |
| FindObjectOfType | Returns the first active loaded object of Type type. |
| FindObjectsOfType | Gets a list of all loaded objects of Type type. |
| Instantiate | Clones the object original and returns the clone. |
| CreateInstance | Creates an instance of a scriptable object. |
Operators
| bool | Does the object exist? |
| operator != | Compares if two objects refer to a different object. |
| operator == | Compares two object references to see if they refer to the same object. |
Messages
| Awake | This function is called when the ScriptableObject script is started. |
| OnDestroy | This function is called when the scriptable object will be destroyed. |
| OnDisable | This function is called when the scriptable object goes out of scope. |
| OnEnable | This function is called when the object is loaded. |
| OnValidate | This function is called when the script is loaded or a value is changed in the Inspector (Called in the editor only). |
| Reset | Reset to default values. |
Is something described here not working as you expect it to? It might be a Known Issue. Please check with the Issue Tracker at issuetracker.unity3d.com.
Copyright © 2020 Unity Technologies. Publication Date: 2021-04-11.


