- How to unmount a volume in Windows
- Drive letters and mounted volumes
- What happens when a volume is unmounted?
- Example scenario: secondary volume is full
- Unmount a volume with Disk Management
- Mount the volume again later
- Mount or Unmount VHD or VHDX File in Windows 10
- What are VHD and VHDX files
- Virtual disk types
- To Mount a VHD or VHDX File in Windows 10,
- Mount a VHD or VHDX File using Disk Management
- Mount a VHD or VHDX File with PowerShell
- Mount a VHD or VHDX File with DiskPart
- To Unmount a VHD File in Windows 10,
- Unmount a VHD File with DiskPart
- Unmount a VHD File with PowerShell in Windows 10
- About Sergey Tkachenko
- How to mount drive on Windows 10
- How to mount drive on Windows 10
- Mount drive with Disk Management
- Mount drive with mountvol
- Mount drive with DiskPart
- How to unmount drive on Windows 10
- Unmount drive with Disk Management
- Unmount drive with mountvol
- Unmount drive with DiskPart
- More Windows 10 resources
- Add the best VR headset to your Microsoft Flight Simulator experience
- The Dell XPS 15 is our choice for best 15-inch laptop
- Halo: MCC’s live service elements make it better, not worse
- These are the best PC sticks when you’re on the move
How to unmount a volume in Windows
If you want to take one of your drives offline, you can unmount it. In Windows, mounting and unmounting a volume is accomplished by changing the volume’s drive letter assignment.
Drive letters and mounted volumes
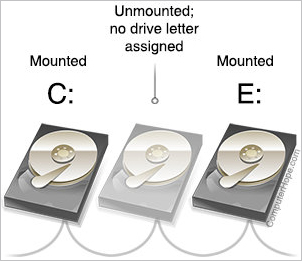
In Windows, volumes are mounted as drive letters and include drive partitions, removable disks, optical drives, external hard drives, and network drives. For instance, you probably have a partition on your HDD or SSD mounted to the C: drive letter, which contains your Windows operating system. You may have a DVD drive mounted at D: or E:, and perhaps a secondary HDD or SSD mounted at a letter as well.
Anything with a drive letter is «mounted»: the operating system has made the volume’s filesystem available for reading and writing by the user programs and operating system. When a volume is not mounted, its data cannot be accessed or altered by conventional means.
The process of changing a drive from mounted to not mounted is called unmounting. Let’s look at a scenario where this operation can be useful, and how it can be done.
The following example is performed using Windows 10, but these instructions should also work for Windows 8.1, Windows 7, and Windows XP.
What happens when a volume is unmounted?
When a volume is unmounted, its drive letter is unassigned and may be used by another storage device. While unmounted, the volume’s file system is inaccessible by regular reads and writes.
Example scenario: secondary volume is full
In this scenario, you have a single HDD inside a laptop computer. The drive contains two NTFS partitions, mounted as Windows volumes:
- C:, which contains the operating system and all user programs and documents
- D:, which contains automatically created backups of critical files in C:
You can view how much free space you have on your mounted volumes if you open File Explorer (press Win + E), and choose This PC.

The D: drive is 100% full — it has no more free space. That’s OK in this case, though, because the backups it contains are complete and up-to-date. In this scenario, you know you won’t need to make another backup for a few weeks, so nothing on the volume needs to change before then.
However, you’re experiencing a problem. Because the partition is very full, Windows 10 continuously notifies you that D: is low on disk space:
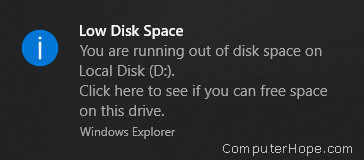
There’s no way to selectively disable this warning for individual partitions. The notifications can be disabled only by modifying the registry — but even then, the notifications cannot be selectively turned off.
If you unmount the volume, these notifications stop.
Unmount a volume with Disk Management
Disk Management is part of your Windows 10 system software. It allows you to make low-level changes to your storage devices. It can create volumes, resize them, and delete them. Here, you’ll use it to unmount a volume.
To unmount a volume:
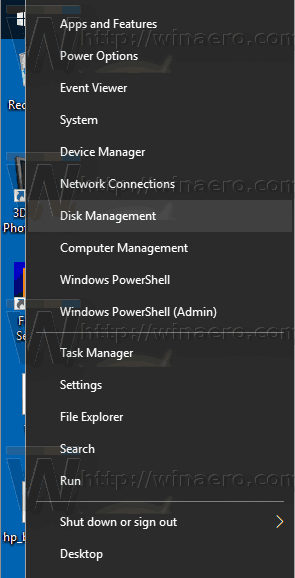
- Open Disk Management. From your Start menu, choose Windows Administrative Tools, then Computer Management. Then, under Storage, choose Disk Management.
- Or, press Win + X (hold down the Windows Key and press X), and choose Disk Management.

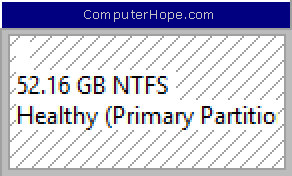
- In Disk Management, locate the block that represents the volume you want to unmount. The blocks are labeled with volume information, including the drive letter. Right-click the volume, and choose Change Drive Letter and Paths.

- Select the volume’s drive letter, and click Remove.

- You’ll receive a warning, and the prompt «Are you sure you want to remove this drive letter?» Choose Yes.

- If any of your programs are currently using the volume, you’ll receive an additional warning, «The volume is currently in use… Do you want to continue?». Now is a good time to close any programs that are using the volume. If you choose Yes, Windows requires a restart before the volume is fully unmounted.

- You’ll be returned to Disk Management, and you can see that the partition no longer has a drive letter.
The partition is now protected from accidental writes, and is effectively frozen. As a benefit, the «Low Disk Space» notifications will no longer pop up (incessantly) for a partition you have intentionally filled with data.
Mount the volume again later
In the scenario above, you would mount the volume again when moving the data to a removable disk, for instance.
You can re-mount an unmounted volume at any time in Disk Manager.
- Right-click the unmounted volume and choose Change Drive Letter and Paths.

- Click Add. Choose Assign the following drive letter, then pick a letter from the selector on the right. When you’re done, click OK.
Mount or Unmount VHD or VHDX File in Windows 10
How to Mount or Unmount a VHD or VHDX File in Windows 10
Windows 10 allows mounting a VHD file (*.vhd or *.vhdx), so it appears under its own drive letter in the This PC folder. By default, you can mount such a file by double-clicking on it in File Explorer if your account has administrative privileges. Here are a number of alternative methods you can use to mount a VHD file you may find useful.
Windows 10 supports virtual drives natively. It is able to recognize and use ISO, VHD and VHDX files. For ISO files, Windows 10 creates a virtual disk drive. For VHD and VHDX files, Windows 10 creates a new drive accessible via the This PC folder in File Explorer. Also, these files can be used in Hyper-V machines.
What are VHD and VHDX files
The Virtual Hard Disk (VHD) file format allows encapsulation of the hard disk into an individual file for use by the operating system as a virtual disk in all the same ways physical hard disks are used. These virtual disks are capable of hosting native file systems (NTFS, FAT, exFAT, and UDFS) while supporting standard disk and file operations. The maximum size of a VHD file is 2,040 GB.
VHDX is a new version of the VHD format which has a much larger storage capacity than the older VHD format. It also provides data corruption protection during power failures and optimizes structural alignments of dynamic and differencing disks to prevent performance degradation on new, large-sector physical disks. It supports for virtual hard disk storage capacity of up to 64 TB.
Virtual disk types
Windows 10 supports two virtual disk types:
- Fixed—The VHD image file is pre-allocated on the backing store for the maximum size requested.
- Expandable—Also known as «dynamic», «dynamically expandable», and «sparse», the VHD image file uses only as much space on the backing store as needed to store the actual data the virtual disk currently contains. When creating this type of virtual disk, the VHD API does not test for free space on the physical disk based on the maximum size requested, therefore it is possible to successfully create a dynamic virtual disk with a maximum size larger than the available physical disk free space.
There are number of methods you can use to create a VHD file. I’ve reviewed them all in the following blog post: Create a New VHD or VHDX File in Windows 10.
Assuming that you have a VHD file, let’s review the methods you can use to mount it.
To Mount a VHD or VHDX File in Windows 10,
- Open File Explorer.
- Browse for the VHD file you want to mount.
- Double-click on it.
- Alternatively, right-click on it and select Mount from the context menu.
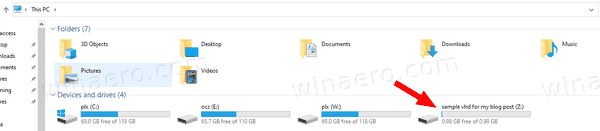
- This will directly mount the VHD(X) file in your system.
This is most known method of mounting VHD files in Windows 10. Here are the number of lesser known alternatives.
Mount a VHD or VHDX File using Disk Management
- Press the Win + X keys together the keyboard.
- From the menu, select Disk Management.

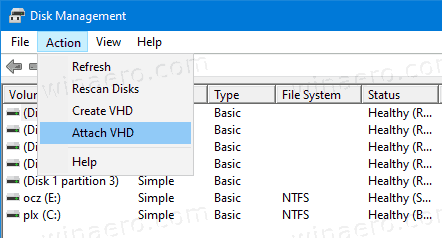
- In Disk Management, select Action > Attach VHD.
- Browse for you VHD file and click OK. Do not check the «read only» option if you want to perform some data modifications for the VHD file.
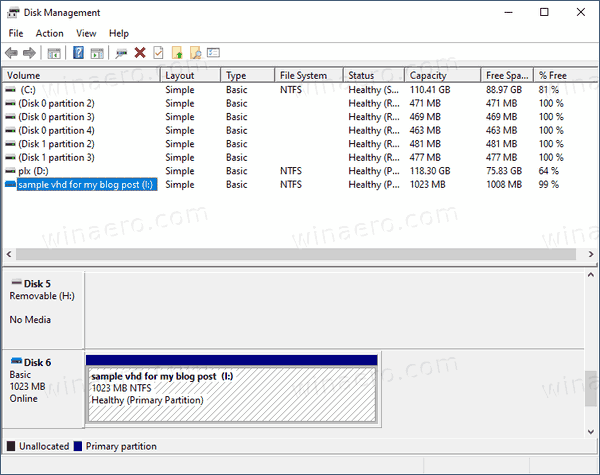
- The VHD file will appear as a new drive in the list.

Also, you can use PowerShell to mount a drive.
Note: These PowerShell commands work only when the Hyper-V feature is enabled.
Mount a VHD or VHDX File with PowerShell
- Open PowerShell as Administrator.
- Execute the following command: Mount-VHD -Path «Full\path\to\vhd\file» .
- Substitute Full\path\to\vhd\file with the actual full path of the .vhd or .vhdx file you want to mount.
- The disk is now mounted.
Alternatively, the classic console tool DiskPart can be used to mount a VHD file. Here we go.
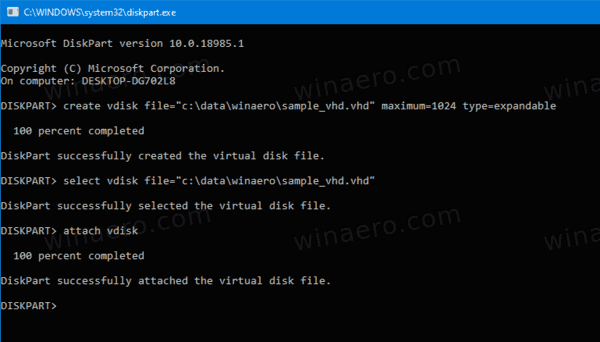
Mount a VHD or VHDX File with DiskPart
- Press Win + R shortcut keys on the keyboard to open the Run dialog.
- Type diskpart into the Run box and hit the Enter key. Confirm the UAC prompt.
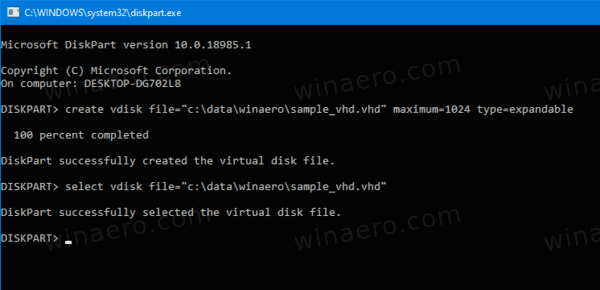
- In the diskpart prompt, type and run the command select vdisk file=»Full path of .vhd or .vhdx location» .
- Type and run the command attach vdisk .
- The disk is now attached to the system.
Similarly, you can use the GUI and console tools mentioned above to dismount a VHD file.
To Unmount a VHD File in Windows 10,
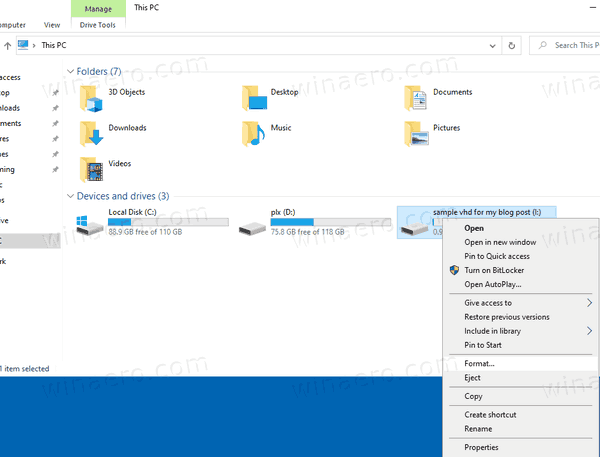
- In File Explorer > This PC, right-click on your VHD and select ‘Eject’ from the context menu.
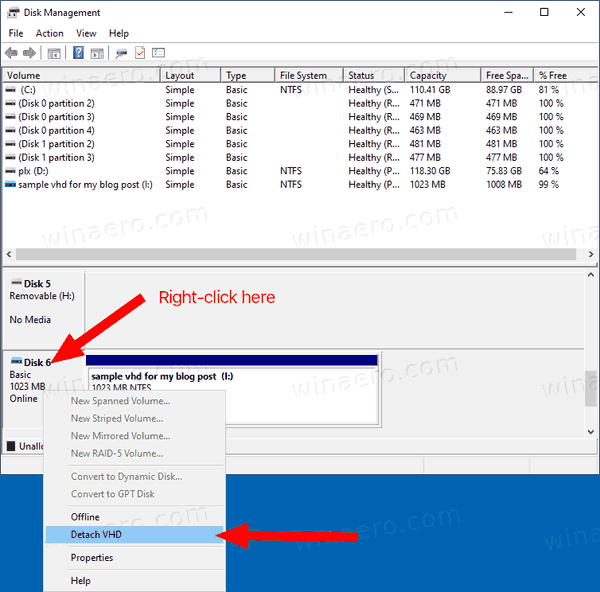
- In Disk Management, right-click on the drive and select Detach VHD from the context menu.
- Finally, just reboot your PC! All the mounted VHD files will be detached (except for those that you have enabled to auto-mount at startup).
For the console tools, let’s review both DiskPart and PowerShell in detail.
Unmount a VHD File with DiskPart
- Press Win + R shortcut keys on the keyboard to open the Run dialog.
- Type diskpart into the Run box and hit the Enter key. Confirm the UAC prompt.
- In the diskpart prompt, type and run the command select vdisk file=»Full path of .vhd or .vhdx location» .
- Type and run the command deattach vdisk .
- You are done.

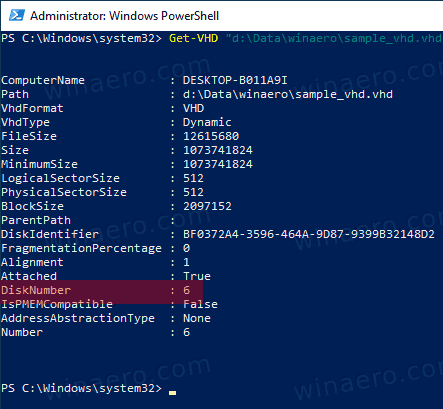
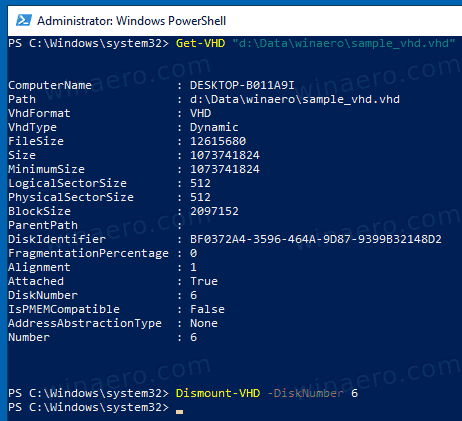
For the PowerShell, the sequence involves two new cmdlets, Get-VHD and Dismount-VHD .
Unmount a VHD File with PowerShell in Windows 10
- Open PowerShell as Administrator.
- Execute the following command: Get-VHD -Path «Full\path\to\vhd\file» .
- Substitute Full\path\to\vhd\file with the actual full path of the .vhd or .vhdx file you want to dismount.
- Note the DiskNumber line value from the output of the command above. E.g. DiskNumber 6 6 .
- Now, issue the following command to unmount it: Dismount-VHD -DiskNumber .
- Substitute in the command above with disk number you have noted.
Articles of interest:
Winaero greatly relies on your support. You can help the site keep bringing you interesting and useful content and software by using these options:
Share this post
About Sergey Tkachenko
Sergey Tkachenko is a software developer from Russia who started Winaero back in 2011. On this blog, Sergey is writing about everything connected to Microsoft, Windows and popular software. Follow him on Telegram, Twitter, and YouTube.
How to mount drive on Windows 10
 Source: Windows Central
Although Windows 10 can automatically mount a drive, the ability to mount and unmount a drive manually can come in handy in many scenarios. For example, when the system does not automatically assign a drive letter upon connecting a new storage device. You formatted a drive using commands, and you did not specify a mount point. Or you need to unmount a device’s storage to make it permanently inaccessible to users.
Whatever the reason it might be, Windows 10 allows you to quickly mount or unmount a drive using a graphical interface with Disk Management or with command-line using the mountvol and DiskPart tools in Command Prompt.
In this Windows 10 guide, we will walk through the steps to mount and unmount a drive (or volume) using the Disk Management graphical console and mountvol and DiskPart command-line tools available with Command Prompt.
How to mount drive on Windows 10
On Windows 10, when you mount a drive manually, you will create a mount point with a drive letter that will make the storage available to users and allow the system to automatically mount the drive with the same drive letter.
You can complete this process in at least three ways with the Disk Management console and the mountvol and DiskPart command-line tools.
Mount drive with Disk Management
To use Disk Management to mount a drive on Windows 10, use these steps:
- Open Start.
- Search for Create and format hard disks partitions and click the top result to open Disk Management.
Right-click the drive and select the Change Drive Letter and Path option.
 Source: Windows Central
Click the Add button.
Source: Windows Central
Select the Assign the following drive letter option.
 Source: Windows Central
Use the drop-down menu and select one of the available letters.
Quick tip: When assigning a letter manually, it’s best to start with the last available letter to have a point of reference to determine if the volume was mounted manually or automatically.
Once you complete the steps, the drive will mount and appear in the system to store data.
Mount drive with mountvol
To use mountvol to mount a drive, use these steps:
- Open Start.
- Search for Command Prompt, right-click the top result, and select the Run as administrator option.
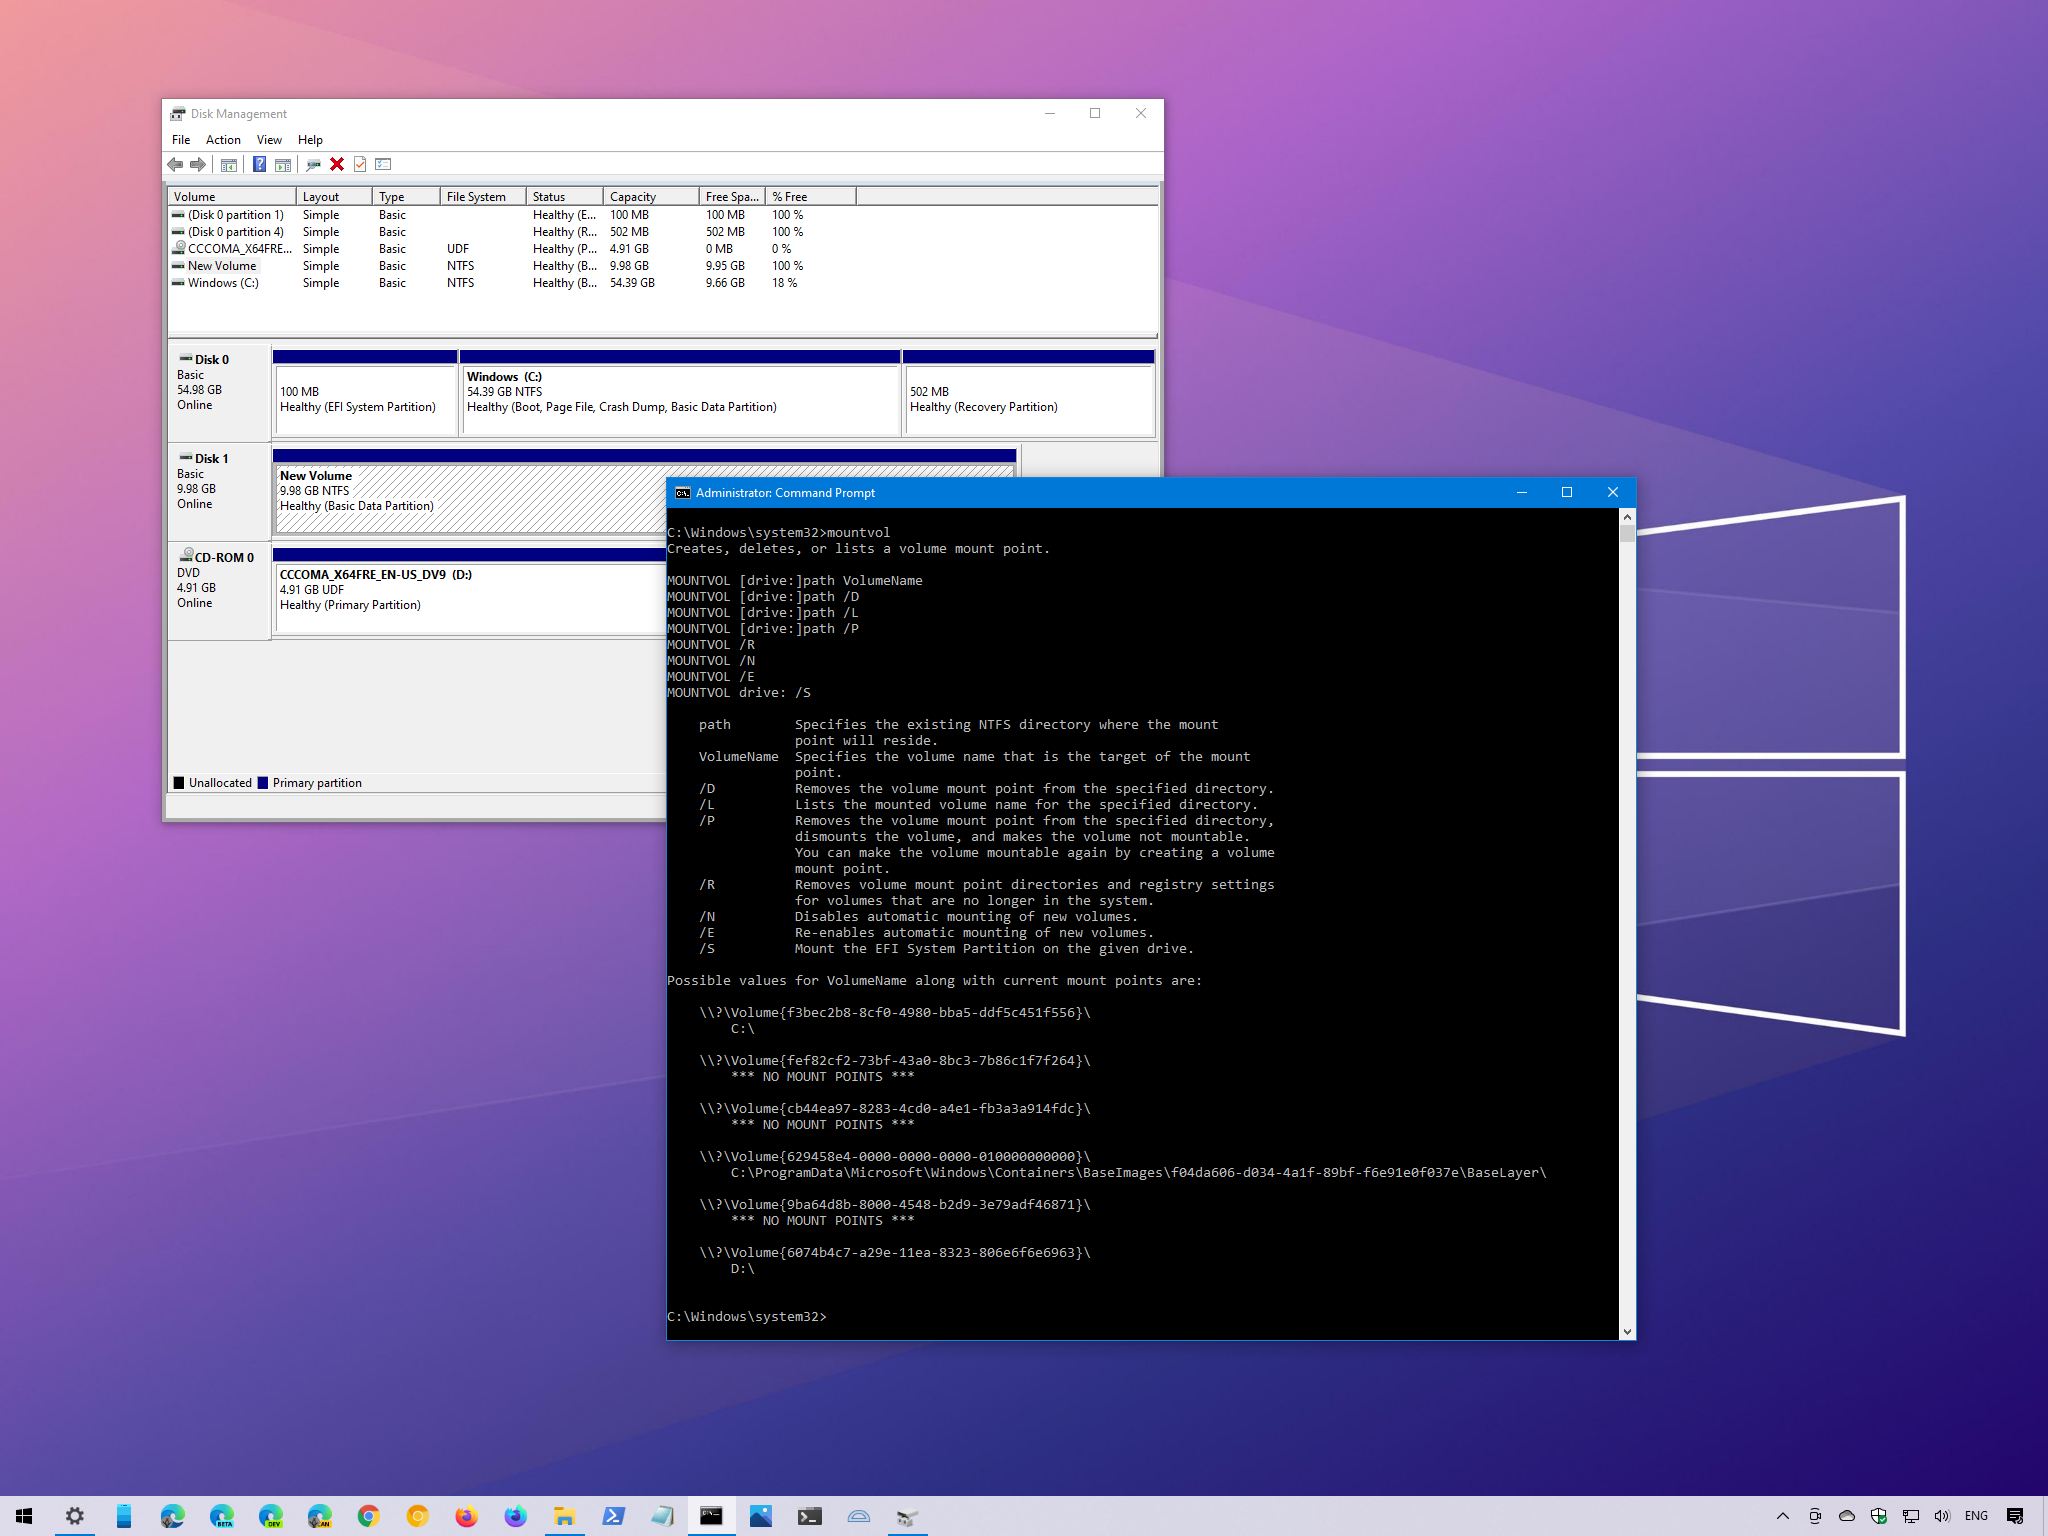
Type the following command to list all the available mount points and press Enter:
![]() Source: Windows Central
Source: Windows Central
Select the mount point path to copy the information to the clipboard.
Quick note: Usually, the volume may or may not be listed with the «Not mountable until a volume mount point is created» label. If you cannot identify the volume, then use the Disk Management console instead.
Type the following command to mount the volume and press Enter:
mountvol DRIVE-LETTER:\ VOLUME-NAME
In the command, make sure to replace DRIVE-LETTER and VOLUME-NAME with the appropriate information.
For example, this command mounts the \\?\Volume
 Source: Windows Central
After you complete the steps, the volume will be accessible through File Explorer and across the experience.
Mount drive with DiskPart
Alternatively, you can also accomplish the task using DiskPart with these steps:
- Open Start.
- Search for Command Prompt, right-click the top result, and select the** Run as administrator** option.
Type the following command to start the tool and press Enter:
Type the following command to list all the available volumes and press Enter:
Type the following command to select the drive and press Enter:
select volume VOLUME-NUMBER
In the command, replace VOLUME-NUMBER with the number of the drive (volume) you want to mount.
For example, this command selects volume number four:
select volume 4
Source: Windows Central
Type the following command to mount the drive on Windows 10 and press Enter:
assign letter DRIVE-LETTER
In the command, replace DRIVE-LETTER with the letter you want to mount and access the storage.
For example, this command mounts the drive and assigns the e drive letter:
assign letter e
How to unmount drive on Windows 10
When you unmount a drive manually, you will remove the mount point making the storage inaccessible. Also, the system will no longer try to mount it automatically. If you want to make the drive mountable again, you will need to revert the changes (see above steps).
If you want to unmount a drive, you can also use the same Disk Management, mountvol, and DiskPart tools.
Unmount drive with Disk Management
To unmount a drive with Disk Management, use these steps:
- Open Start.
- Search for Create and format hard disks partitions and click the top result to open Disk Management.
Right-click the drive and select the Change Drive Letter and Path option.
Source: Windows Central
Click the Remove button.
Source: Windows Central
Once you complete the steps, the drive will no longer be accessible on Windows 10.
Unmount drive with mountvol
To dismount a drive (or volume) with mountvol, use these steps:
- Open Start.
- Search for Command Prompt, right-click the top result, and select the Run as administrator option.
Type the following command to list all the available mount points and press Enter:
Source: Windows Central
Type the following command to dismount a drive and press Enter:
mountvol DRIVE-LETTER:\ /p
In the command, make sure to change DRIVE-LETTER with the correct drive letter of the mount point you are trying to dismount.
For example, this command unmounts the e:\ mount point:
Source: Windows Central
Quick note: The /p option will unmount the drive and remove the drive letter. The tool also offers the /d option, but it is only meant to remove mount points individually.
After you complete the steps, the mount points will be removed, making the storage inaccessible to users.
Unmount drive with DiskPart
You can also dismount a drive with DiskPart using these steps:
- Open Start.
- Search for Command Prompt, right-click the top result, and select the** Run as administrator** option.
Type the following command to start the tool and press Enter:
Type the following command to list all the available volumes and press Enter:
Type the following command to select the drive and press Enter:
select volume VOLUME-NUMBER
In the command, replace VOLUME-NUMBER with the number of the drive (volume) you want to mount.
For example, this command selects volume number four:
select volume 4
Source: Windows Central
Type the following command to unmount the drive on Windows 10 and press Enter:
remove letter DRIVE-LETTER
In the command, replace DRIVE-LETTER with the letter of the storage you want to unmount.
For example, this command dismounts the e drive:
remove letter e
Also, do not confuse mounting a drive with mounting a drive as a folder, which is something different. You can use these instructions to mount a drive as a folder.
More Windows 10 resources
For more helpful articles, coverage, and answers to common questions about Windows 10, visit the following resources:
![]()
Add the best VR headset to your Microsoft Flight Simulator experience
Microsoft Flight Simulator is an impressive game on a standard 2D monitor, but have you experienced it within VR? Grab one of these headsets and take off.
![]()
The Dell XPS 15 is our choice for best 15-inch laptop
For a lot of people, a 15-inch laptop is a perfect size that offers enough screen for multitasking, and in a lot of cases, some extra performance from powerful hardware. We’ve rounded up the best of the best at this size.
![]()
Halo: MCC’s live service elements make it better, not worse
Halo: The Master Chief Collection is more popular than ever, but some fans don’t agree with the live service approach 343 Industries has taken with it. Here’s why those elements are, at the end of the day, great for the game and for Halo overall.
![]()
These are the best PC sticks when you’re on the move
Instant computer — just add a screen. That’s the general idea behind the ultra-portable PC, but it can be hard to know which one you want. Relax, we have you covered!


