- Assets and Packages
- Overview of the asset and package system used in Unreal Engine 4.
- Asset Naming
- Renaming and Moving Assets
- Asset Management
- Minimizing Source Control Contention
- Copying Assets to Other Projects
- Asset Packs
- Unreal Engine 4 для Windows
- Releasing Your Project
- Creating a release versioned project with cooked content for distribution.
- Project
- Build
- Package
- Deploy
- UEngine.Ru
- Запаковка проектов
- Запаковка проекта
- Запуск проекта
- Распространение
- Дополнительные настройки
- Запаковка контента
Assets and Packages
Overview of the asset and package system used in Unreal Engine 4.
An Asset is a piece of content for an Unreal Engine project, and can be thought of as a UObject serialized to a file. In the Content Browser‘s Sources Panel, you can display the Asset Tree by clicking the Show/Hide Sources and Collections button.
The Asset Tree displays a list of folders in your content directories where .uasset files reside.
Clicking on a folder in the Asset Tree shows you all the Assets found in that folder and its subfolders.
Right-clicking on a folder shows you a list of actions you can do to that folder and Assets in the folder or its subfolders. You can add new folders to the Asset Tree via this context menu.
It is recommended that you move Assets from within the Content Browser. This is because references to Assets include the full directory path to the Asset. If you move an Asset, its path will change. You can move Asset files between folders outside of the Unreal Editor, but do not expect references to remain intact.
Level (.umap) files are not affected by this restriction.
For more information on using the Content Browser to move, rename, add, and delete Assets, see Working with Assets .
Asset Naming
The user names an Asset when importing or creating it. The Asset’s path is directly associated with the Asset’s location on disk. The folder in which the Asset is created or imported automatically sets this path. For example, a path of Content/Characters/MyCharacter would save to /UE4/MyProject/Content/Characters/MyCharacter.MyCharacter.uasset.
Renaming and Moving Assets
An Asset can be renamed in the Editor by selecting it in the Content Browser, then left-clicking on its name or pressing the F2 key. Assets can be moved or copied to different folders by being selected and dragged in the Content Browser. When renamed or moved in this way, other Assets that refer to the renamed or moved Asset will be updated appropriately, and an invisible Redirector will be left in place of the original Asset. Redirectors can be cleaned up by right-clicking in the Content Browser and selecting Fix Up Redirectors in Folder. All Assets that referenced a Redirector will point to the Asset in its new location, then remove the Redirector. Note that you need to resave the Assets. You can delete Assets within the Content Browser, either by using the option in the context menu on the Asset, or by selecting the Asset and pressing the Delete key. If an Asset is referenced by other Assets, a menu displays asking which existing Asset (if any) should be used in place of the deleted one.

Right-clicking on a folder or anywhere in the Sources Panel of the Content Browser provides access to the Fix Up Redirectors in Folder option.
Moving or renaming Assets should be done in the Content Browser. If you rename, move, or delete an Asset file outside of the Editor, such as via your operating system’s file explorer, any Assets referencing the affected Asset will fail to find it, even if it still exists in the project.
References to Assets contain the path in the reference. For example: Blueprint’/MyProject/Content/Characters/MyCharacter.MyCharacter’.
Asset Management
Unreal Engine generally loads and unloads Assets automatically by Unreal Engine. However, there are cases where taking more direct control over the process can result in significant performance improvements, such as reduction or elimination of redundant load times, and removal of hitches during gameplay. For detailed information about managing Asset loading and unloading, see the Asset Management page. When deploying a project, Assets are «cooked» (converted to final, binary formats dependent on the Asset type and target platform) and can be separated into multiple .pak files for distribution. For information on these processes, see Cooking and Chunking .
Minimizing Source Control Contention
When a workflow includes package files that each contain several Assets, source-control contention can be an issue. A workflow that instead supports and encourages creating many individual Asset files means that each Asset can be checked out individually. This reduces source-control contention and bottlenecks in workflow.
Additionally, sync time in content management systems is faster with individual Asset files than with packages containing multiple Assets, because a change to a single Asset requires only one file update.
In Unreal Editor, Assets are stored in .uasset files, each of which typically contains only a single Asset. Each Asset reference contains a directory-style path that uniquely identifies any Asset in the game.
Assets are created (or imported) in the Content Browser. For information about creating Assets, see Working with Content . For information about working with the Content Browser, see Content Browser .
Copying Assets to Other Projects
You can use the Migrate Tool in the Content Browser to create a copy of an Asset (and any dependent Assets) for use in another project.
For more information about the Migrate Tool, see Migrating Assets .
Asset Packs
If you have downloaded Asset packs through the Launcher, you can add the entire contents of the pack to your project (whether it is open or closed) without needing to open it or migrate specific Assets.
To add an Asset pack to your project:
Find the Asset pack in your Vault which is located at the bottom of the Library tab.

Click Add to Project.
Select your project in the list that appears.

Click Add to Project.
All of the content will be inside a folder named after the Asset pack you added.
Unreal Engine 4 для Windows
Unreal Engine 4 — бесплатно распространяемый профессиональный игровой движок, позволяющий разрабатывать игры для большинства операционных систем, положенный в основу легендарных 3D-шутеров вселенной Unreal выпущенных компанией Epic Games. С помощью встроенной системы визуального скриптинга можно создавать как отдельные модели, так и целые игровые уровни практически без написания программного кода.
Разработка первых версий Unreal Engine началась за три года до того, как первая игра серии Unreal увидела свет и продолжается и в наши дни, с каждой версией увеличивая функционал и качество графики. Движок поддерживает несколько популярных систем рендеринга и воспроизведения звука, а так же имеет модули для голосового проговаривания текста и распознавания речи. Поддержка сетевых технологий, включая GameSpy, Windows Live, Xbox Live и некоторых других, позволяет создавать многопользовательские игры с одновременным подключением до 64 клиентов, что позволило применять его в ММОРПГ подобным Lineage II.
Несмотря на возможность создания игры «с нуля», многие разработчики используют возможности импорта Unreal Engine 4, которые позволяют скачивать, приобретать и использовать различные виды готовых объектов, которые могут быть как отдельными моделями футуристического оружия, так и детально проработанным мегаполисом, который можно поместить в собственное рабочее пространство.
Значительное увеличение комьюнити произошло в 2015 году, когда разработчики объявили о возможности бесплатно скачивать Unreal Engine 4 и использовать в проектах. Единственное условие — выплата роялти в размере 5% от стоимости игры, когда проект начнёт зарабатывать более 3000$ за квартал, фактически сделало движок бесплатным для энтузиастов и небольших разработчиков.
Releasing Your Project
Creating a release versioned project with cooked content for distribution.
Once your game is complete, you can package a release version for distribution. Whether you go through the Project Launcher in the editor or the Project Launcher tab in Unreal Frontend, the steps are the same for packaging a release-versioned project. However, depending on if you are creating a Windows game and need to create your own installer, shipping a mobile project, or targeting another platform, the steps you take with the finished packaged content will be different.
This is an example of packaging a 1.0 release of ShooterGame, aimed at Windows 64-bit, localized in English.
Open the Project Launcher, either within Unreal Editor or using Unreal Frontend.

Create a new Custom Launch Profile using the + button.

Set a name and description for your profile.
There are a number of settings for the release process.
Project
You can set the specific project to use, or use Any Project to patch the current project.
Build
Set the build configuration to Shipping.
Optionally, expand Advanced Settings if you need to build UAT as part of the release.
Select By the Book as the cooking method in the dropdown menu.
Check the boxes for all platforms you would like to cook content for. In this example for Windows testing, we have selected WindowsNoEditor.
Check the boxes for all cultures to cook localizations for.
Check the boxes for which maps to cook.
In Release/DLC/Patching Settings:
Check the Create a release version of the game for distribution. checkbox.
Enter a version number for this release.
Expand Advanced Settings and make sure the following options are enabled, as well as any others you need for your specific project’s distribution method:
Save packages without versions
Store all content in a single file (UnrealPak)
Also under Advanced Settings, set the cooker configuration to Shipping.
Package
Set the build to Package & store locally.
Deploy
Set the build to Do Not Deploy.
Once you have set all the above settings, navigate back to the main profile window using the Back button in the top right corner.

Click on the launch icon next to your Release profile.

The project launcher will go through the building, cooking, and packaging process. This may take some time depending on the complexity of your project.

Once the operation is complete, close the window or click on Done. You can test the patch now with the steps below.

Save the asset registry and pak file from [ProjectName]\Releases[ReleaseVersion][Platform] . In this example, this is ShooterGame\Releases\1.0\WindowsNoEditor .
The asset registry and pak file will be needed for any future patches or DLC to check against.
On Windows, you can test running the project from [ProjectName]\Saved\StagedBuilds\WindowsNoEditor .
While Steam will allow you to upload full packages of your game and do the updating process for you, using release versions as outlined here is still the recommended practice when distributing through Steam. This will make the process smoother if you decide to add additional supported platforms or distribution methods later on.
UEngine.Ru
Русскоязычное сообщество Unreal Engine 4

Запаковка проектов
Перед тем, как распространять свой проект пользователям, он должен быть правильно скомпилирован и запакован для быстрого и корректного запуска.
Подготовка проекта состоит из нескольких шагов. Для начала это компиляция кода для корректного запуска, после чего проходит запаковка контента, из которого и состояит игра. Этот контент запаковывается, в основном, под конкретную платформу на которой будет запущен проект. После всего этого останется останется подготовить проект для удобного использования и запуска, например установщик Windows.
В File меню вы сможете найти подменю под названием Package Project. Этот раздел отвечает за подготовку и запаковку вашего проекта для тестирования и распространения. Так же в этом разделе имеются дополнительные настройки запаковки.
После выбора нужной платформы, редактор Unreal Engine 4 начнет компиляцию кода, запаковку контента и подготовку проекта для дистрибутации или тестирования. Процесс может занимать очень долгое время, если в вашем проекте содержится большое количество контента(модели, звуки, карты и т.п.).
Запаковка проекта
Что бы запаковать ваш проект под конкретную платформу, выберете File > Package Project > [Имя платформы] в редакторе UE4.

Вам будет предложено выбрать путь, куда будет помещен ваш проект, а затем начнется процесс запаковки проекта.
Процесс запаковки проходит в фоновом режиме, поэтому возможность использовать редактор остается. В нижнем правом углу будет показываться индикатор, который означает, что ваш проект запаковывается.

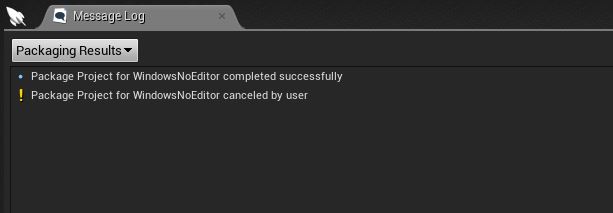
Данное окно позволяет прервать процесс в случае необходимости, а так же позволяет открыть окно логов. Окно будет открыто как отдельное окно, в котором будет подробно описан процесс компиляции. В случае ошибки, в данном окне можно посмотреть, на каком моменте и по какой причине был прерван процесс запаковки.

Для менее опытных пользователей, самые важные сообщения, такие как предупреждения или ошибки, можно посмотреть в отдельном окне Message Log.
Запуск проекта
После того, как проект был успешно запакован и подготовлен, вы можете найти его и запустить по пути, который был выбран перед процессом запаковки.
Для каждой платформы, исполняемые файлы для запуска могут различаться. Таким образом для Windows будет файл .exe, а для Android — .apk

| Конфигурация | Название EXE | Расположение |
| Development | [Имя проекта].exe | [Путь]WindowsNoEditor[Имя проекта]BinariesWin64 |
| Shipping | [Имя проекта]-Win32-Shipping.exe.exe | [Путь]WindowsNoEditor[Имя проекта]BinariesWin32 |
Распространение
Дополнительные настройки
Дополнительные настройки можно найти в File > Package Project > Packaging Settings в главном меню редактора UE4.
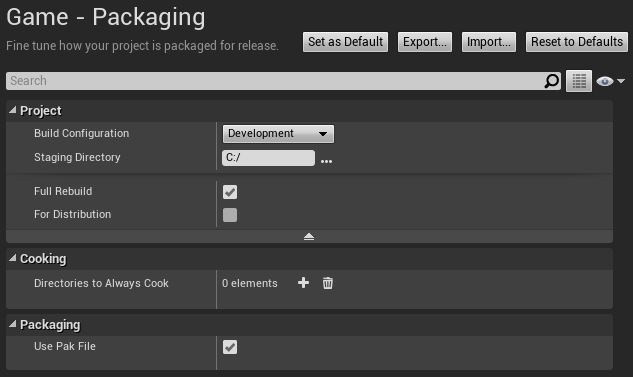
| Build Configuration | Конфигурация проекта. Для отладки режим Debug. Для тестирования больше подойдет режим Development. Для финального распространения — режим Shipping. |
| Staging Directory | Директория, которая будет содержать запакованный проект. Будет автоматически обновлено при выборе другого пути перед запаковкой. |
| Full Rebuild | Определяет, будет ли скомпилирован весь код, или же только измененная часть(Выкл). Это может ускорить время запаковки. При подготовки проекта к распространению(режим Shipping) убедитесь, что данная опция включена, что бы не пропустить ничего лишнего при запаковке. |
| Use Pak File | Определяет, запаковывать ли весь контент в один файл(.pak) для более удобного распространения, или же хранить контент в индивидуальных файлах(Выкл). |
Запаковка контента
При обновлении вашего контента, вам может не понадобится перекомпилировать весь проект для того, что бы запустить его и проверить. Вместо этого, в UE4 существует возможность запаковать только сам контент на нужную платформу. Сделать это можно через File > Cook Content > [Платформа].


