- Как я могу обновиться до более новой версии Git, используя apt-get?
- How to Update Git
- How to Check the Current Git Version?
- How to Update Git
- Update Git on Linux
- Update Git on Windows
- Update Git on Mac
- How to Install Latest Git Version on Ubuntu
- Install latest Git on Ubuntu-based Linux distributions
- Configure Git [Recommended for developers]
- About Abhishek Prakash
- 1.5 Getting Started — Installing Git
- Installing Git
- Installing on Linux
- Installing on macOS
- Installing on Windows
- Installing from Source
Как я могу обновиться до более новой версии Git, используя apt-get?
Я только что установил новую машину с Ubuntu Oneiric 11.10 и затем запустил
Теперь, если я запускаю, git —version это говорит мне, что у меня есть, git version 1.7.5.4 но на моей локальной машине у меня гораздо новее git version 1.7.9.2
Я знаю, что могу установить из исходного кода, чтобы получить новейшую версию, но я подумал, что было бы неплохо использовать как можно больше менеджера пакетов, чтобы все было стандартизировано.
Так можно ли использовать, apt-get чтобы получить более новую версию git , и как правильно это сделать?
У вас есть несколько вариантов:
- Либо подождите, пока нужная версия появится в используемом вами хранилище.
- Скомпилируйте свою версию и создайте deb .
- Найдите репозиторий, в котором указана версия, необходимая для вашей версии вашего дистрибутива (например, Git PPA ).
- Если вам не нужна какая-либо особенность новой версии, оставайтесь со старой.
Если в используемых вами репозиториях доступна более новая версия, то apt-get update && apt-get upgrade (как пользователь root) обновляется до последней доступной версии.
Для тех, кто не знает, что такое PPA, ссылка
Вот команды, которые вам нужно выполнить, если вы просто хотите сделать это:
По состоянию на декабрь 2018 года я получил git 2.20.1 таким образом, тогда как версия в репозиториях Ubuntu Xenial была 2.7.4.
Если ваша система не имеет add-apt-repository , вы можете установить его через:
Источник
How to Update Git
Git is a version control system that allows multiple developers to work on the same project while tracking changes and revisions. Keeping Git up to date brings you the latest features and usability improvements.
In this tutorial, you will learn how to update to the latest version of Git on Linux, Windows, and macOS.

- A system running Linux, Windows, or macOS
- An installed version of Git
- Access to the terminal window (Linux, macOS) or command prompt (Windows)
- An account with administrator-level privileges
How to Check the Current Git Version?
To check the current version of Git, use the following command:
This command works on all operating systems. This example uses Windows:

How to Update Git
Below, we list different ways you can update your version of Git, depending on the operating system you are using. Skip to the section applicable for your machine.
Update Git on Linux
Note: To update Git on a Linux machine, use the appropriate package manager. When working with Git on CentOS, use a package manager such as yum or pacman .
This example shows how to update Git on Ubuntu.
Start by updating the system packages with the following command:
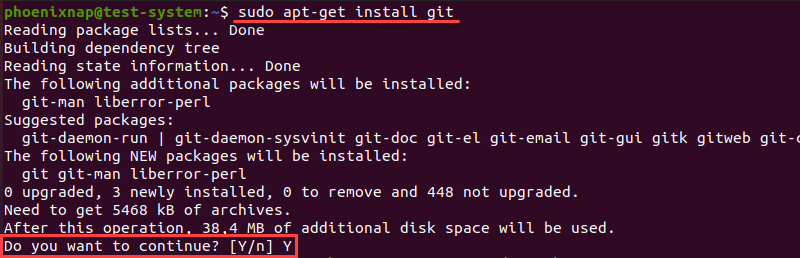
Update Git by using:
When prompted, type Y and press Enter to confirm the installation.
To verify the installation has completed, check the Git version one more time:

Another way to update Git on Linux is to install it from scratch using the original source code. Check out our guide to installing Git on Ubuntu for details.
Update Git on Windows
The method you use to update Git on Windows depends on the version of Git you are currently running.
For versions prior to 2.14.1, uninstall Git from your system and install a copy of the latest version from scratch. Check out our guide to installing Git on Windows for more details.
For versions from 2.14.2 to 2.16.1, use the following command in your command prompt:
For versions 2.16.1 on, update Git with:

The output above appears when you are running the latest Git version.
Update Git on Mac
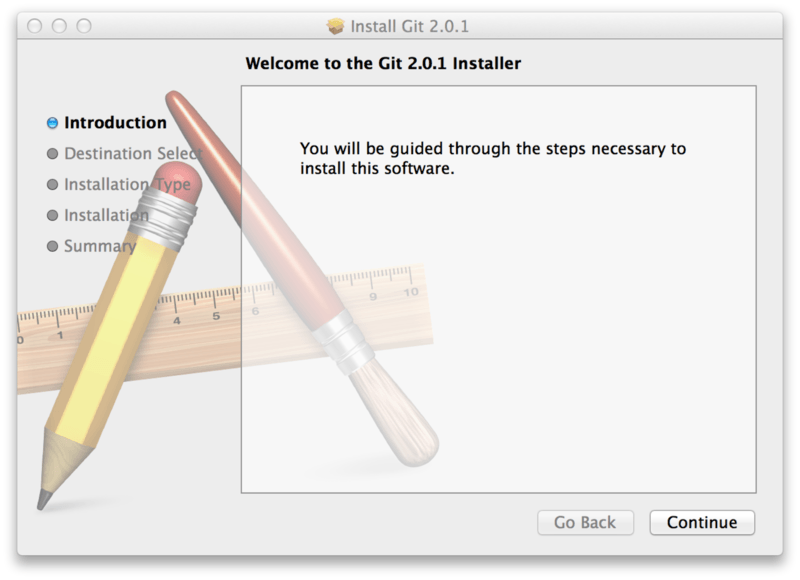
The easiest way to update Git on Mac is to use the official installer. Download the installation file from the Git website. Run the installation and follow the install wizard to update Git to the latest version.
Note: Using the install wizard to update Git overwrites the current installation.
Another method is to update Git using Homebrew. If you don’t have Homebrew already, install it by using:
Update Homebrew to make sure you have the latest installation packages:
Install the latest version of Git with Homebrew:
If you already have Git installed using Homebrew, update to the latest version with:
Check the current Git version to confirm the update:
Note: If checking the Git version after updating results in an output that includes (Apple Git-101) , your system is still running the default Apple version of Git instead of the official one. Change your local path to the Homebrew version of Git to fix this issue:
export PATH=/usr/local/bin:$PATH
After following this tutorial, you should have a fully updated version of Git installed on a Linux, Windows, or macOS machine.
Take a look at our Git Commands Cheat Sheet for a comprehensive primer on working with Git. If you come across a Git merge conflict, make sure to read our article How to Resolve Merge Conflicts in Git.
Источник
How to Install Latest Git Version on Ubuntu
Last updated October 29, 2020 By Abhishek Prakash 16 Comments
Installing Git on Ubuntu is very easy. It is available in the main repository of Ubuntu and you can install it using the apt command like this:
There is only a slight little problem (which might not be a problem at all) and that is the version of Git it installs.
On an LTS system, the software stability is of upmost importance this is why Ubuntu 18.04 and other distributions often provide older but stable version of a software that is well tested with the distribution release.
This is why when you check the Git version, you’ll see that it installs a version which is older than the current Git version available on Git project’s website:
At the time of writing this tutorial, the version available on its website is 2.25. So how do you install the latest Git on Ubuntu then?
Install latest Git on Ubuntu-based Linux distributions

One way would be to install from source code. That cool, old school method is not everyone’s cup of tea. Thankfully, there is a PPA available from Ubuntu Git Maintainers team that you can use to easily install the latest stable Git version.
Even if you had installed Git using apt previously, it will get updated to the latest stable version.
The beauty of using PPA is that if there is a new stable version of Git released, you’ll get it with the system updates. Just update Ubuntu to get the latest Git stable version.
Did you know that Git version control system was created by none other than Linux creator Linus Torvalds?
Configure Git [Recommended for developers]
If you have installed Git for development purposes, you’ll soon start cloning repos, make your changes and commit your change.
If you try to commit your code, you may see a ‘Please tell me who you are’ error like this:
This is because you haven’t configured Git with your personal information which is mandatory.
As the error already hints, you can set up global Git configuration like this:
You can check the Git configuration with this command:
It should show an output like this:
This configuration is stored in
/.gitconfig file. You may also change it manually to change the configuration.
In the end…
I hope this quick little tutorial helped you to install Git on Ubuntu. With the PPA, you easily get the latest Git version.
If you have any questions or suggestions, please feel free to ask in the comment section. A quick ‘thank you’ is also welcomed 🙂
Like what you read? Please share it with others.
Filed Under: Tutorial Tagged With: Ubuntu
About Abhishek Prakash
Creator of It’s FOSS. An ardent Linux user & open source promoter. Huge fan of classic detective mysteries ranging from Agatha Christie and Sherlock Holmes to Detective Columbo & Ellery Queen. Also a movie buff with a soft corner for film noir.
You are welcome
Great information on getting the latest version of Git installed on Ubuntu 20.04. Thanks for the help!
Glad you liked it, Mel.
What a cool article! Thank you very much!
I dropped Windows7 shortly after it was published and have been with Ubuntu flavors since. Started on the ‘Net circa 1980, and have found that your site stands out as very informative and presented so the “layman” can understand. Many Kudos to you and your staff.
However, I have encountered a bit of a problem when I enter the following:
@Trek-1:
$ sudo add-apt-repository ppa:git-core/ppa
sudo: /usr/bin/sudo must be owned by uid 0 and have the setuid bit set
Is there a way to rectify the above …. I would really like to have CPUFetch working …. :-))
My Mom was a huge fan of Agatha Christie as well. I’m sure that it’s much easier these days, but back when I was a kid (born 1970), I remember her collection of every single one of her books. To put it in perspective, she had to actually go to Australia to complete her collection!
Anyway, my name is Michael and I’m writing to ask for your help. I have Git 2.8.0 installed, and I am trying to install 2.9.5 which have a .gz and an .xz installed to /Downloads folder, but can not figure out how to install either one of the compressed files. I have tried make, configure, and every combination of the two, and I keep getting the strangest error messages.
Currently Running Kubuntu 20.10 Groovy Gorilla.
You downloaded the compressed file, you should extract them and see what it contains.
Anyway, unless you really need the newest version, I wouldn’t recommend installing Git (or any other software) from the source code. Manually handling the software like this will be a pain and you’ll have to do it again for a new version. This is why Linux has package management so that one can easily install and update the software.
Источник
1.5 Getting Started — Installing Git
Installing Git
Before you start using Git, you have to make it available on your computer. Even if it’s already installed, it’s probably a good idea to update to the latest version. You can either install it as a package or via another installer, or download the source code and compile it yourself.
This book was written using Git version 2.8.0. Though most of the commands we use should work even in ancient versions of Git, some of them might not or might act slightly differently if you’re using an older version. Since Git is quite excellent at preserving backwards compatibility, any version after 2.8 should work just fine.
Installing on Linux
If you want to install the basic Git tools on Linux via a binary installer, you can generally do so through the package management tool that comes with your distribution. If you’re on Fedora (or any closely-related RPM-based distribution, such as RHEL or CentOS), you can use dnf :
If you’re on a Debian-based distribution, such as Ubuntu, try apt :
For more options, there are instructions for installing on several different Unix distributions on the Git website, at https://git-scm.com/download/linux.
Installing on macOS
There are several ways to install Git on a Mac. The easiest is probably to install the Xcode Command Line Tools. On Mavericks (10.9) or above you can do this simply by trying to run git from the Terminal the very first time.
If you don’t have it installed already, it will prompt you to install it.
If you want a more up to date version, you can also install it via a binary installer. A macOS Git installer is maintained and available for download at the Git website, at https://git-scm.com/download/mac.
Installing on Windows
There are also a few ways to install Git on Windows. The most official build is available for download on the Git website. Just go to https://git-scm.com/download/win and the download will start automatically. Note that this is a project called Git for Windows, which is separate from Git itself; for more information on it, go to https://gitforwindows.org.
To get an automated installation you can use the Git Chocolatey package. Note that the Chocolatey package is community maintained.
Installing from Source
Some people may instead find it useful to install Git from source, because you’ll get the most recent version. The binary installers tend to be a bit behind, though as Git has matured in recent years, this has made less of a difference.
If you do want to install Git from source, you need to have the following libraries that Git depends on: autotools, curl, zlib, openssl, expat, and libiconv. For example, if you’re on a system that has dnf (such as Fedora) or apt-get (such as a Debian-based system), you can use one of these commands to install the minimal dependencies for compiling and installing the Git binaries:
In order to be able to add the documentation in various formats (doc, html, info), these additional dependencies are required:
Users of RHEL and RHEL-derivatives like CentOS and Scientific Linux will have to enable the EPEL repository to download the docbook2X package.
If you’re using a Debian-based distribution (Debian/Ubuntu/Ubuntu-derivatives), you also need the install-info package:
If you’re using a RPM-based distribution (Fedora/RHEL/RHEL-derivatives), you also need the getopt package (which is already installed on a Debian-based distro):
Additionally, if you’re using Fedora/RHEL/RHEL-derivatives, you need to do this:
due to binary name differences.
When you have all the necessary dependencies, you can go ahead and grab the latest tagged release tarball from several places. You can get it via the kernel.org site, at https://www.kernel.org/pub/software/scm/git, or the mirror on the GitHub website, at https://github.com/git/git/releases. It’s generally a little clearer what the latest version is on the GitHub page, but the kernel.org page also has release signatures if you want to verify your download.
Then, compile and install:
After this is done, you can also get Git via Git itself for updates:
Источник


