- How To Update macOS Using Command Line Software Update Tool
- Procedure to update macOS using command
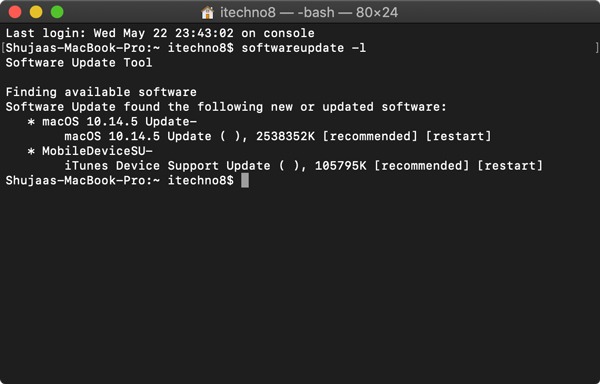
- How do I find all available updates on macOS?
- How do I install specified update?
- A note about dealing with update names with white spaces
- How do I see software download and update progress?
- How do I just download update but not install on my system?
- How do I apply all recommended updates?
- Updating Mac using the Terminal app
- Turn on or off automatic background check
- Command line macOS update reportedly faster, allows use of Mac while updating
- How to Update macOS Using a Simple Terminal Command
- How to Update macOS From the Command Line
- 🚃 Как обновить Mac с помощью терминала
How To Update macOS Using Command Line Software Update Tool
H ow do I install software updates from the command line tool on my Apple macOS / OS X computer? How can I remotely update my Apple computer by just sshing into a system? Is there is something like apt-get command or yum command for Apple macOS/OS X?
You need to use the softwareupdate command to checks for new and updated versions of your software based on information about your Apple Mac computer and current software. This command requires admin authentication for all commands i.e. you need to run it using sudo tool. In this tutorial you will learn how to install software updates from the bash command line on a macOS/OS X.
| Tutorial details | |
|---|---|
| Difficulty level | Easy |
| Root privileges | Yes |
| Requirements | Apple macOS or OS X with Terminal application |
| Est. reading time | 3 minutes |
Procedure to update macOS using command
- Open the terminal application on your macOS (Applications > Utilities > Terminal)
- Check for macOS update using the
softwareupdate -l - Note down available updates names.
- Install new updates on macOS using the following command:
sudo softwareupdate -i update_pkg_name
Let us see how to update macOS using a terminal command in details.
How do I find all available updates on macOS?
Open the terminal app and type the following commands. Type the following command:
softwareupdate -l
OR
softwareupdate —list
Sample outputs:
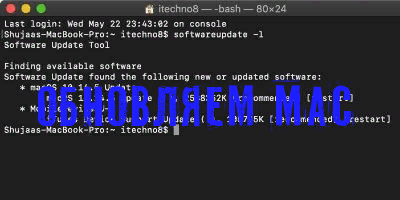
Fig.01: List all available updates
- RAWCameraUpdate6.17-6.17 is software available to update also know as the identifier.
- 6.17 is version number
- 7455k download size
- Please note that updates that need a restart are marked with [restart].
How do I install specified update?
To install update called ‘RAWCameraUpdate6.17-6.17’, enter:
sudo softwareupdate -i RAWCameraUpdate6.17-6.17
Sample outputs:
A note about dealing with update names with white spaces
Some update names may include spaces, enclose the update name using a single quote character as follows:
sudo softwareupdate -i ‘OS X El Capitan Update-10.11.1’
How do I see software download and update progress?
Pass the -v option as follows:
sudo softwareupdate -vi RAWCameraUpdate6.17-6.17
OR
sudo softwareupdate -v -i iTunesXPatch-12.3.1
Sample outputs:
How do I just download update but not install on my system?
Use the following syntax:
sudo softwareupdate -d nameHere
sudo softwareupdate -d iTunesXPatch-12.3.1
To cancel a download, enter:
sudo softwareupdate -e
How do I apply all recommended updates?
All updates that are recommended for your system:
sudo softwareupdate -r
Updating Mac using the Terminal app
To install all updates that are applicable to your system, enter:
sudo softwareupdate -i -a
Install all but make sure you ignore ‘JavaForOSX’ updates:
sudo softwareupdate —ignore JavaForOSX
To clear the list ignored updates, enter:
sudo softwareupdate —reset-ignored
Turn on or off automatic background check
Turn on Automatic check:
sudo softwareupdate —schedule on
Automatic check is off:
sudo softwareupdate —schedule off
To see info on all options, type:
man softwareupdate
softwareupdate -h
Here is what I see:
Источник
Command line macOS update reportedly faster, allows use of Mac while updating
— Jul. 20th 2017 4:39 am PT
If you get fed up watching the progress bar crawl along when updating your Mac to a new version of macOS, a Reddit thread has a useful hint to speed things up: using a Terminal command instead …
Updating macOS through the App Store can take a very long time — for me it’s typically around 30 mins of rebooting and waiting. macOS has a built in softwareupdate utility, which is much faster. It also allows you to use your Mac while it updates (the updates seem to be applied while it’s powered on, and the reboot takes much less time than if it’s triggered by an App Store update).
To give a rough time estimate, it took around 10 mins to install the latest version of macOS 12.6 just now, and my MacBook Pro was only unusable for about 2 mins while it rebooted.
The original post suggested using a couple of command lines to perform the update:
The first checks for updates, and the second installs them. You then need to reboot when prompted.
But others in the thread suggested ways to further increase the efficiency of the process.
You could do “sudo softwareupdate -ia;sudo reboot” so they execute one after another. That way you really can walk away.
sudo softwareupdate -ia && sudo reboot
The reboot will then only happen if the first command succeeds. If it fails the reboot won’t happen and you’ll be able to see the errors.
Edit: Even even better:
sudo sh -c “softwareupdate -ia && reboot”
With my first example, if the software update takes a long-ish time, the timeout for sudo asking for a password will expire, and the sudo reboot will sit waiting for your password.
The 2nd version wraps both commands into a mini shell script, with a single sudo, so there’s no second sudo to possibly time out.
As with any software update, always ensure you have an up-to-date backup first.
Of course, no Reddit OS thread is complete without the obligatory editor wars, so you’ll be reassured to know that participants waste no time in debating the merits of vim versus nano …
FTC: We use income earning auto affiliate links. More.
Источник
How to Update macOS Using a Simple Terminal Command
 If you’re sick of waiting for the progress bar to complete every time you reboot after a macOS software update, then you’ll be pleased to learn there’s another way to update your Mac that could potentially reduce your downtime.
The process involves a simple Terminal command, and allows you to continue using your Mac as the update downloads and the initial software installation takes place in the background. In our tests, we found that this method was capable of shaving off several minutes of idle time during installation restarts, but that the time-saving depends on the machine and the update in question.
Users with older Macs in particular will likely appreciate this tip, as it saves having to fire up the Mac App Store altogether, which can be slow-going and sometimes even downright unresponsive. Read on to find out how it’s done.
How to Update macOS From the Command Line
Before following these steps, ensure you have a full backup of your system, which should be par for the course when performing any update. Note that the following procedure only lists stock Apple system updates (iTunes, Photos, printer drivers the like), but not updates for other Apple apps that aren’t installed with macOS (Xcode, for instance), and not third-party updates from the Mac App Store.
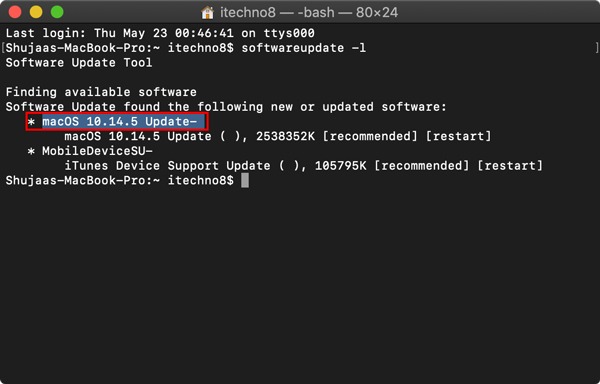
- To update macOS from the command line, first launch Terminal, which can be found in the Applications/Utilities folder. This will open a Terminal window and a command prompt for you to begin typing.
Input the following command and press Enter: softwareupdate -l![]()
Now let’s take a look at the command’s output. Available updates always appear as items in a list. In our example, only one update is available at this time, but every item follows the same format, as shown:
![]()
The asterisked line denotes the individual software update package that’s available for your Mac to download. This line is also known as the identifier.
![]()
The second line offers a more detailed description of the update, including the version number (usually in brackets) and the download file size in kilobytes. [Recommended] means the update is recommended for all users, and [restart] indicates that your Mac needs to reboot for installation to complete.
To download and install a specific update in the list, use the following format, but replacing NAME with the update’s identifier:
softwareupdate -i NAME
softwareupdate —install NAME
Note that if the package name you’re trying to install has spaces in it, you’ll need to enclose the whole thing in single quotes. So for example:
softwareupdate —install ‘macOS High Sierra 10.13.3 Supplemental Update-‘
Also, be alert for spaces at the end of the package names. If present, they also need to be included within the quotes.
Moving on, to download a specific update for your system without also installing it then and there, you can use:
softwareupdate -d NAME
Updates downloaded in this way can be subsequently installed with the same -i or —install command above, or even through the Mac App Store. These updates are downloaded to a folder located in /Library/Updates, but they aren’t designed to be installed by double-clicking the packages in that directory. You’ll need to use the —install command or visit the Mac App Store to actually initiate the install.
Lastly, to download and install all available updates for your system, type the command:
softwareupdate -i -a
Using these commands, you’ll be able to leave the update to download and continue to install in the background while you get on with other things. All being well, Terminal will eventually prompt you to restart your machine manually so that the full installation procedure can complete. (Note that the softwareupdate utility requires admin authentication for all commands except the -l or -list command. If you run softwareupdate as a normal admin user, you will be prompted for a password where required.)
![]()
As some users will no doubt be aware, there are several additional options that can be used in conjunction with the softwareupdate utility. For example, -schedule on/off enables/disables your Mac’s scheduled background check for updates. More adventurous readers can use man softwareupdate and softwareupdate -h for a summary list of commands.
Источник
🚃 Как обновить Mac с помощью терминала
Большинство из нас привыкли обновлять программное обеспечение Mac (macOS) с помощью Mac App Store
Это традиционный способ сделать это.
Однако есть и другой способ обновления macOS: использование терминала.
Использование этого метода для обновления вашего Mac может сэкономить время и упростить задачу, тем более что Mac App Store, как известно, лагает в старых устройствах.
Многие пользователи также сообщают, что обновления загружаются и устанавливаются быстрее при установке с использованием терминала, так что это еще одно очевидное преимущество.
Если вы используете несколько компьютеров Mac, подключенных к серверу, вы можете просто запустить скрипт или установить обновление удаленно, не пытаясь получить доступ к каждому устройству по отдельности.
Для пользователей MacOS Mojave или более поздних версий обновления программного обеспечения были перенесены в Системные настройки, но метод с использованием терминала также все еще доступен.
Этот метод использует кучу команд, которые позволяют Терминалу искать любые доступные обновления для вашей конкретной системы и устанавливать их.
Ниже мы подробно описали весь метод, чтобы вам было проще, поэтому давайте начнем.
Примечание. Поскольку обновление программного обеспечения в любой системе является основной функцией, вам потребуется пароль администратора для выполнения любых загрузок и установок с использованием Терминала.
1. Откройте терминал на вашем Mac. Вы можете сделать это, выполнив поиск с помощью Spotlight или зайдя в «Приложения -> Утилиты -> Терминал» в Finder.
2. Введите следующую команду и нажмите Enter:
Система будет искать на серверах Apple любые доступные обновления для вашей системы.
Если доступных обновлений нет, отобразится «Нет доступных обновлений».
Однако в случае доступных обновлений Терминал отобразит список этих обновлений вместе с размером файла обновления.
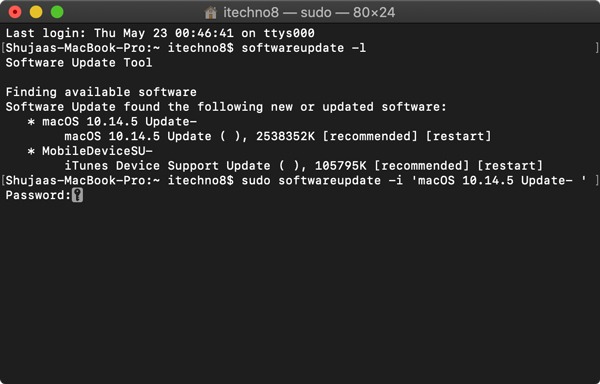
3. Теперь, чтобы загрузить и установить конкретное обновление, используйте:
Здесь замените NAME на конкретное обновление, которое вы хотите загрузить и установить.
Например, если вы хотите установить обновление macOS 10.14.5, введите sudo softwareupdate -i ‘macOS 10.14.5 Update- ‘ .
Совет: название обновления, также называемое идентификатором, – это имя, написанное рядом со звездой / маркером, как показано ниже.
Необходимо убедиться, что вы ввели точный идентификатор для обновления, которое нужно загрузить и установить.
Также будьте осторожны с любыми пробелами / звездочками, присутствующими в конце идентификатора, как в случае с обновлением, выделенным ниже.

Если вы хотите установить все доступные обновления, просто используйте следующую команду:
Команда -a просто указывает Терминалу установить все обновления.
Поскольку обе эти команды являются командами sudo, вам нужно будет ввести пароль администратора, когда будет предложено ввести пароль.
Выбранные вами обновления начнут загружаться и автоматически начнут установку после загрузки.
К сожалению, нет традиционного индикатора выполнения.
Вместо этого Терминал будет обновлять все с каждым шагом с помощью текстовых записей.
В случае, если вы устанавливаете обновление, которое требует перезагрузки вашего компьютера, система сообщит вам об этом.
Просто введите свой пароль, и Терминал автоматически перезагрузит ваш Mac.
Вы можете использовать этот метод для загрузки обновлений macOS и обновлений основных приложений Apple, но, к сожалению, вы все еще ограничены Mac App Store или разделом «Обновление программного обеспечения» в Системных настройках, чтобы установить любое другое стороннее приложение на ваш Mac.
Вы предпочитаете использовать Mac App Store или Терминал для установки обновлений на свой Mac? Дайте нам знать в комментариях ниже!
Источник


