- Обновление macOS на компьютере Mac
- Revive or restore an Intel-based Mac with Apple Configurator 2
- What does a revive do to your Mac?
- What does a restore do to your Mac?
- Before you begin
- How the revive and restore processes work
- Step 1: Connect the Mac computers
- Step 3: Revive the firmware
- Step 4: Restore the firmware and erase all data
- Как обновить Mac до macOS Mojave?
- Можно установить macOS Mojave на Ваш ноутбук?
- Модели, совместимые с последней прошивкой:
- Резервная копия Mac.
- Приступаем к загрузке macOS.
- Завершающий этап установки.
- Автоматическое обновление системы.
Обновление macOS на компьютере Mac
Используйте функцию «Обновление ПО», чтобы установить обновления для macOS, в том числе для встроенных приложений, таких как Safari.
- В меню Apple () в углу экрана выберите «Системные настройки».
- Нажмите «Обновление ПО».
- Нажмите «Обновить сейчас» или «Обновление ПО».
- «Обновить сейчас»: последние обновления установленной версии. Например, узнайте об обновлениях macOS Big Sur.
- «Обновление ПО»: новая основная версия с новым именем, например macOS Big Sur. Узнайте о последнем обновлении macOS или о старых версиях macOS, которые все еще доступны.

Если возникают проблемы с поиском или установкой обновлений:
- Если в меню «Обновление ПО» отображается сообщение о том, что на компьютере Mac установлена последняя версия ПО, это значит, что обновлена macOS и все устанавливаемые ею приложения, в том числе Safari, «Сообщения», «Почта», «Музыка», «Фото», FaceTime, «Календарь» и «Книги».
- Если вы хотите обновить приложения, загруженные из App Store, используйте App Store для получения обновлений.
- Если вы хотите обновить устройство iOS, узнайте, как обновить iPhone, iPad или iPod touch.
- Если на компьютере Mac отсутствует функция «Обновление ПО», используйте App Store для получения обновлений.
- Если при установке обновления произошла ошибка, узнайте, как устранить проблемы при установке.
Источник
Revive or restore an Intel-based Mac with Apple Configurator 2
In very rare circumstances, such as a power failure during a macOS update or upgrade, a Mac may become unresponsive and so the firmware must be revived or restored.
Important: First try reviving the computer. If that fails or if you can’t start the Mac from the startup volume, recoveryOS, or Internet Recovery, you must restore the firmware and erase the internal flash storage.
What does a revive do to your Mac?
A revive updates the firmware on the Apple T2 Security Chip. A revive is designed to not make any changes to the startup volume, the user’s data volume, or any other volumes. User data may be retained if recoverable.
What does a restore do to your Mac?
A restore updates the firmware and erases recoveryOS and macOS on your internal storage. When this process is complete, any data on any internal volumes is unrecoverable.
You must restore the firmware and erase the internal flash storage if:
Reviving the firmware was unsuccessful
You can’t start the Mac from the startup volume, recoveryOS, or Internet Recovery
Before you begin
These revive and restore instructions cover the following Intel-based Mac computers with an Apple T2 Security Chip:
MacBook Pro (13-inch, 2020, Four Thunderbolt 3 Ports)
MacBook Pro (13-inch, 2020, Two Thunderbolt 3 Ports)
MacBook Pro (13-inch, 2019, Four Thunderbolt 3 Ports)
MacBook Pro (13-inch, 2019, Two Thunderbolt 3 Ports)
MacBook Pro (13-inch, 2018, Four Thunderbolt 3 Ports)
MacBook Pro (16-inch, 2019)
MacBook Pro (15-inch, 2019)
MacBook Pro (15-inch, 2018)
MacBook Air (Retina, 13-inch, 2020)
MacBook Air (Retina, 13-inch, 2019)
MacBook Air (Retina, 13-inch, 2018)
Make sure you have:
The latest version of Apple Configurator 2 installed on a Mac running macOS 10.15.6 or later
You may need to configure your web proxy or firewall ports to allow all network traffic from Apple devices to Apple’s network 17.0.0.0/8. For more information on the ports used by Apple products, see the Apple Support article Use Apple products on enterprise networks. For more information on whether your network uses a web proxy or firewall, consult your router manual or your internet provider.
A supported USB-C to USB-C charge cable, such as the one sold by Apple (may not be available in all countries or regions) or a supported USB-A to USB-C cable
The USB-C cable must support both power and data. Thunderbolt 3 cables aren’t supported.
How the revive and restore processes work
The revive and restore processes involve the following steps:
Step 1. Plug the Mac computers together with a supported USB-C cable, locate Apple Configurator 2 in the Applications folder or in Launchpad, then launch Apple Configurator 2 on the first Mac.
Step 2. Restart the second Mac using a special key sequence. The key varies according to the type of Mac you want to revive or restore.
Step 3. Use Apple Configurator 2 to revive the Mac.
Step 4. If a revive is unsuccessful, you can use Apple Configurator 2 to restore the Mac.
Step 1: Connect the Mac computers
1. Make sure your first Mac is plugged into a power source and started.
Important: Don’t launch Apple Configurator 2 until after you have connected both Mac computers with the USB-C cable.
2. Plug in the USB-C cable (along with any adapters needed) and connect the two Mac computers.
Step 2: Prepare the Mac you want to revive or restore:
If reviving or restoring an iMac (2020) or iMac Pro (2017):
1. Disconnect the iMac Pro or iMac from power.
2. Plug the USB-C cable into the Thunderbolt port closest to the Ethernet port.
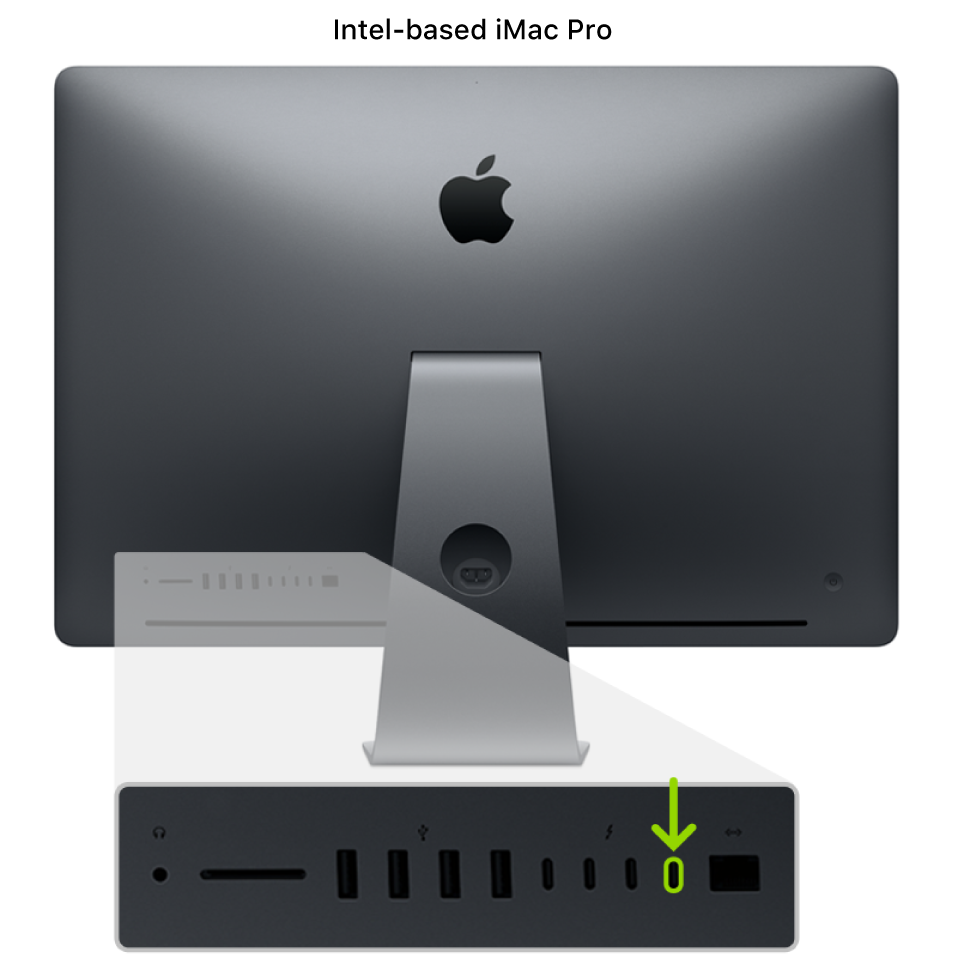
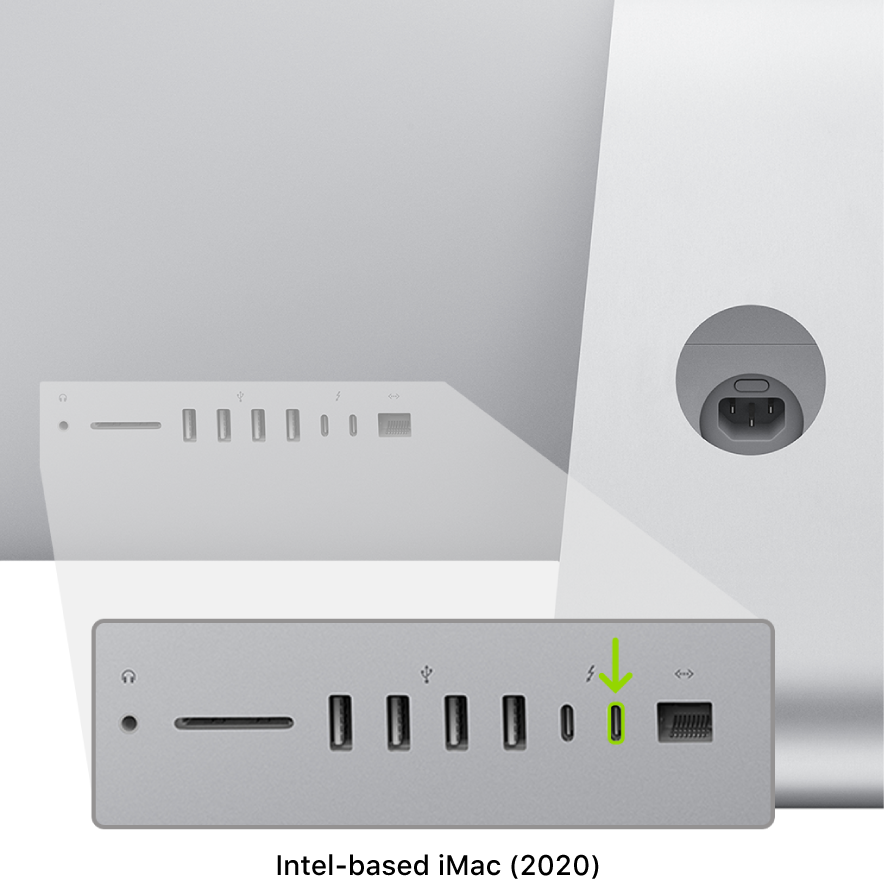
3. While holding down the power button, connect the iMac Pro or iMac to power and continue to hold the power button for about 3 seconds.
Note: You won’t see any screen activity from the iMac Pro or iMac you are trying to revive or restore.
If reviving or restoring a Mac mini (2018):
1. Connect a monitor to your Mac mini (so you can see when the process is complete).
2. Disconnect the Mac mini from power for at least 10 seconds.
3. Plug the USB-C cable into the Thunderbolt port closest to the HDMI port.
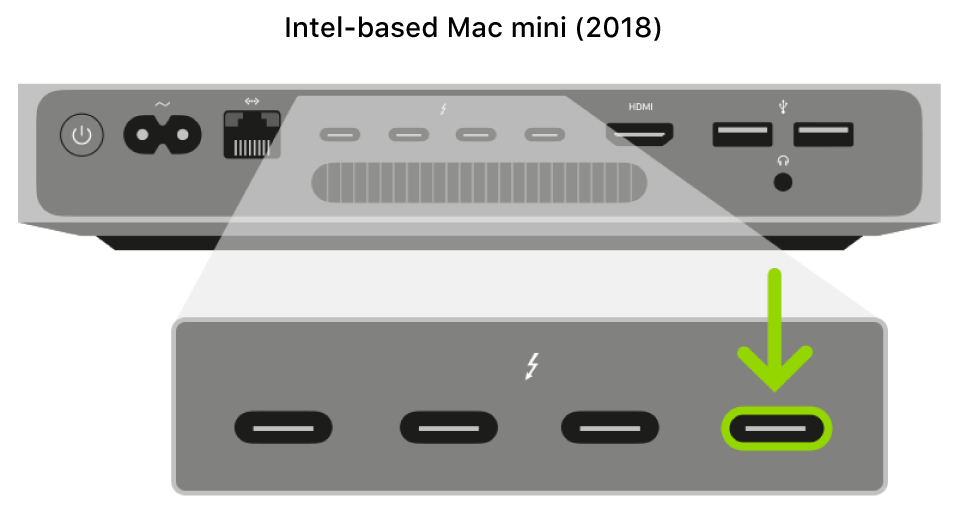
4. While holding down the power button, connect the Mac mini to power and continue to hold the power button for about 3 seconds.
Note: You won’t see any screen activity from the Mac mini you are trying to revive or restore.
If reviving or restoring an Intel-based Apple notebook computer:
1. Press the Sleep/Wake button for about 5 seconds to shut down the Apple notebook computer.
2. Plug the USB-C cable into the front Thunderbolt port on the left side of the Apple notebook computer.
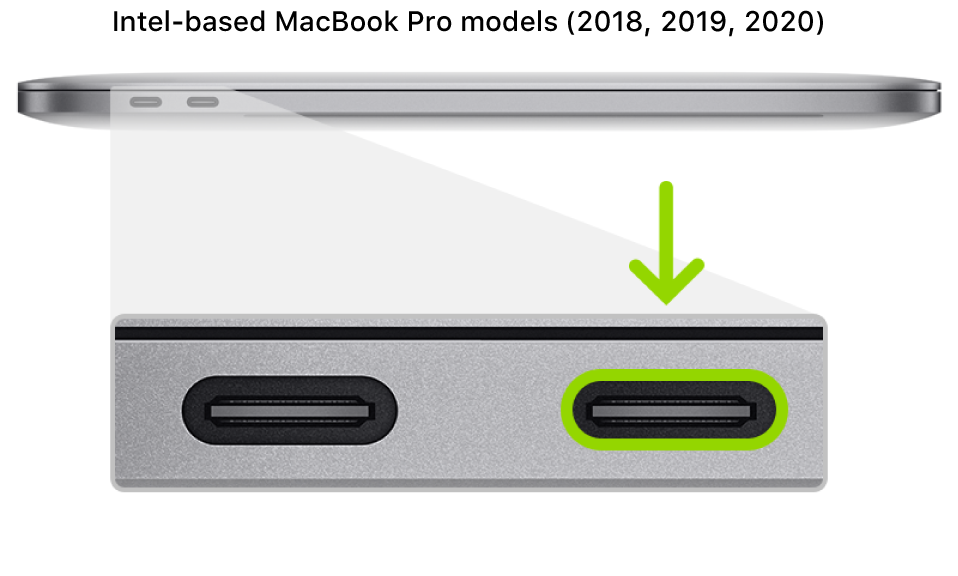
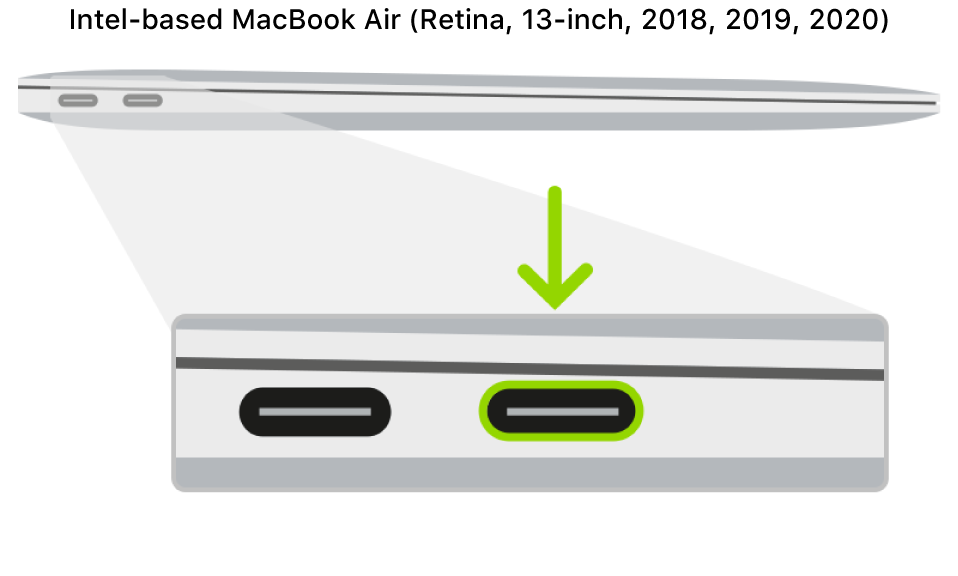
3. While holding down the power button, at the same time press all three of the following keys for about 10 seconds:
The right Shift key
The left Option key
The left Control key
Note: You won’t see any screen activity from the Apple notebook computer you are trying to revive or restore.
If reviving or restoring a Mac Pro (2019):
You need to revive the firmware in a Mac Pro if the light turns amber and flashes the following sequence in under 4 seconds: three short flashes, three long flashes, and three short flashes again. For more information, see the Apple Support article Mac Pro (2019) status indicator light behavior.
1. Connect a monitor to your Mac Pro (so you can see when the process is complete).
2. Disconnect the Mac Pro from power, then do one of the following:
For the desktop Mac Pro , plug the USB-C cable into the Thunderbolt port farthest away from the power button.
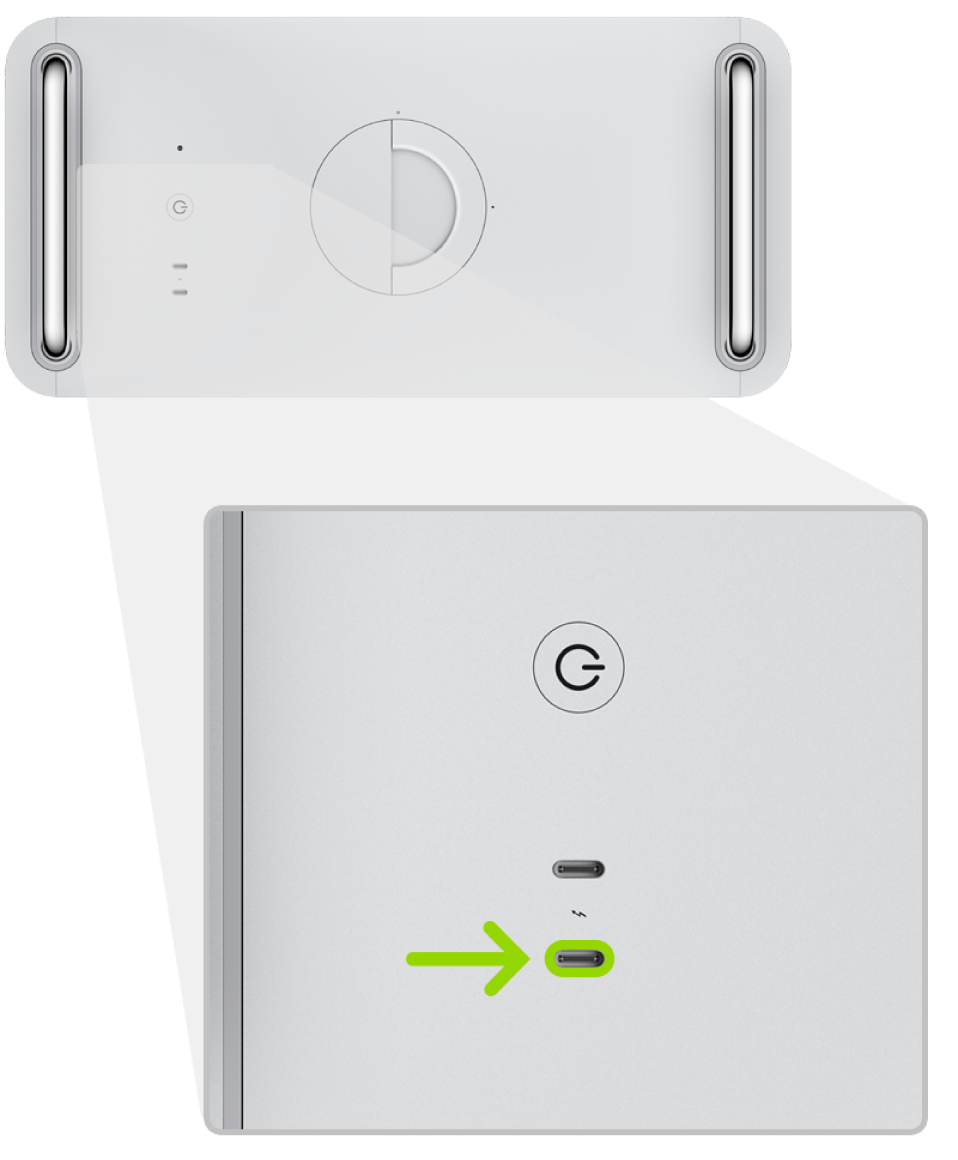
For the rack mount Mac Pro , plug the USB-C cable into the Thunderbolt port closest to the power button.
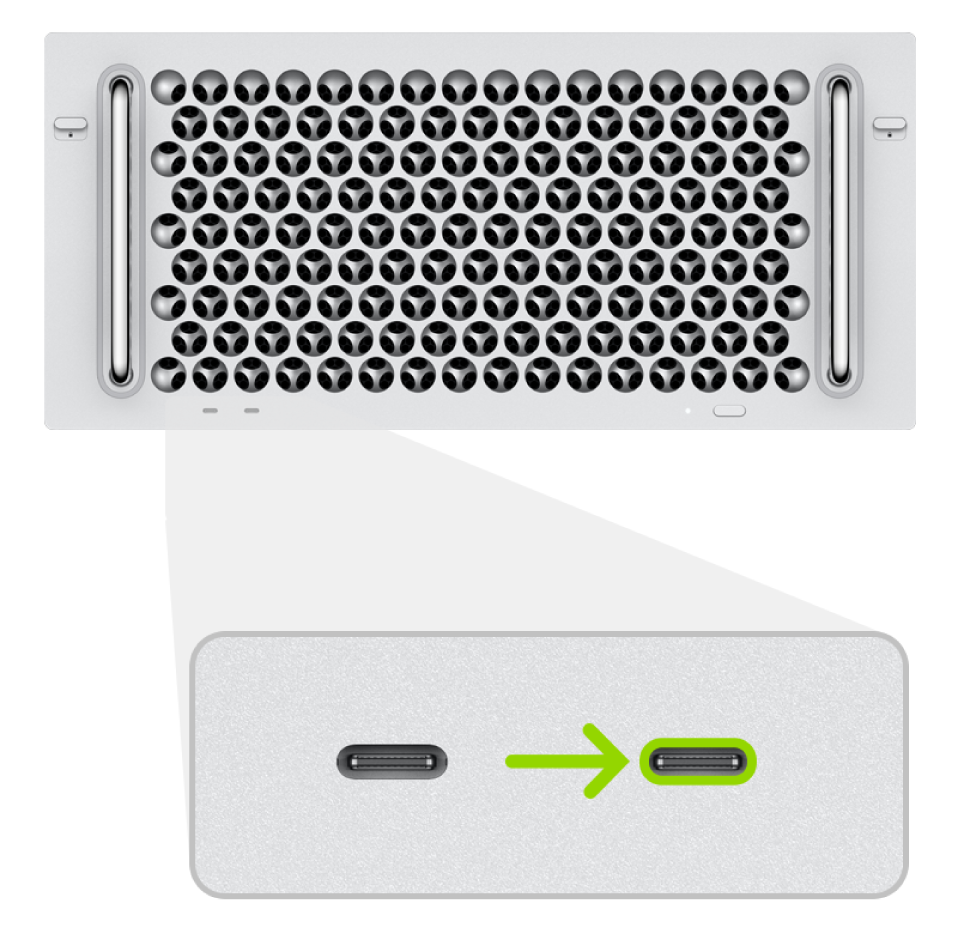
3. While holding down the power button, connect the Mac Pro to power and continue to hold the power button for about 3 seconds.
Note: You won’t see any screen activity from the Mac Pro you are trying to revive or restore.
Step 3: Revive the firmware
In the Apple Configurator 2  window on the first Mac, select the DFU icon of the Mac whose chip firmware you want to revive.
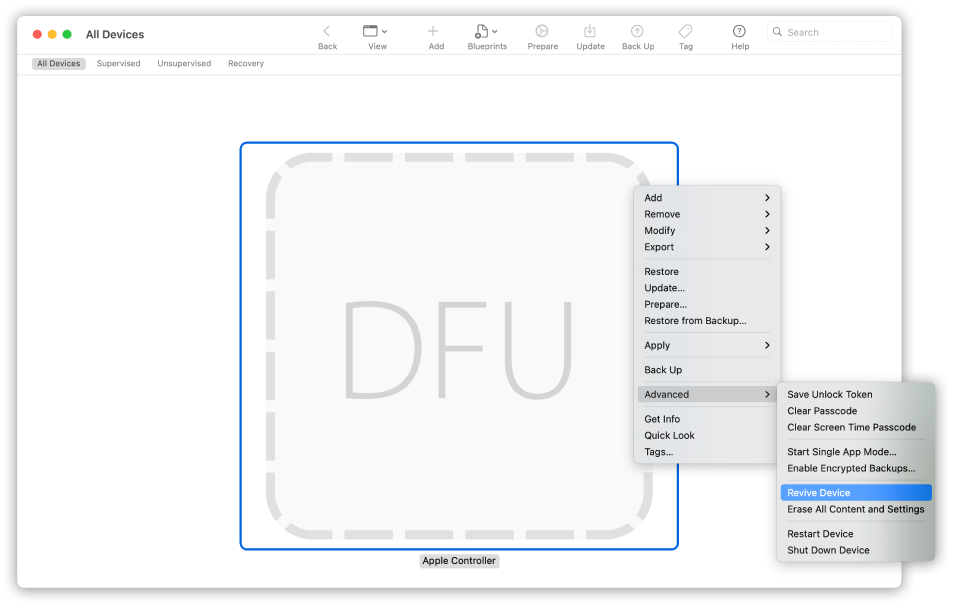
Do one of the following:
Choose Actions > Advanced > Revive Device, then click Revive.
Control-click the selected DFU icon, then choose Advanced > Revive Device, then click Revive.
Note: If you lose power to either Mac during this process, begin the revive process again.
Wait for the process to complete. During this process, an Apple logo will appear and disappear on the second Mac.
After the process successfully completes, your Mac will reboot.
Note: If the revive was unsuccessful, proceed to step 4.
If necessary, use recoveryOS to reinstall macOS.
Quit Apple Configurator 2 on the first Mac, then unplug any cables and adapters.
Step 4: Restore the firmware and erase all data
In the Apple Configurator 2 window on the first Mac, select the DFU icon of the Mac to be restored.
Do one of the following:
Choose Actions > Restore, then click Restore.
Control-click the selected DFU icon, then choose Actions > Restore, then click Restore.
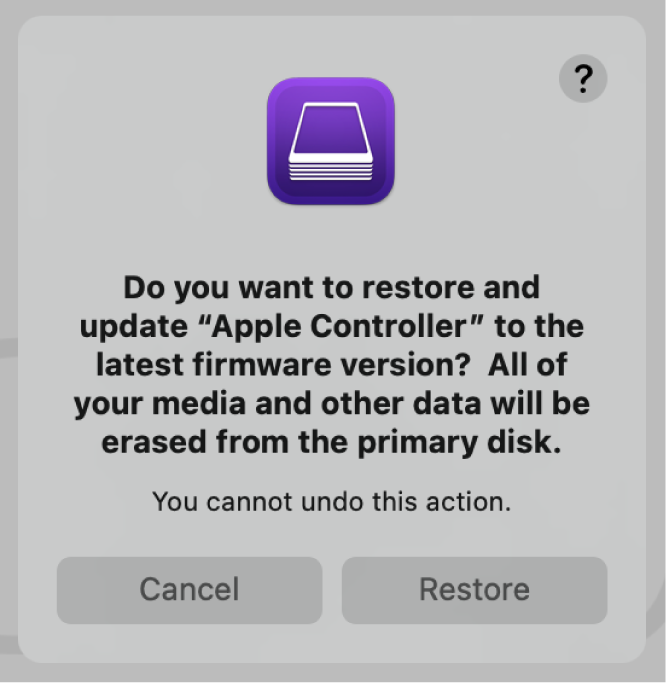 The restore confirmation dialog.
Note: If you lose power to either Mac during this process, begin the restore process again.
Wait for the process to complete. During this process, an Apple logo will appear and disappear on the second Mac.
After the process completes, your Mac will restart.
After the Mac restarts, press Shift-Option-Command-R at startup (Internet Recovery) to install the macOS that came with your Mac, or the closest version still available.
See the Apple Support article How to reinstall macOS.
Quit Apple Configurator 2 and unplug any adapters and cables.
Источник
Как обновить Mac до macOS Mojave?

Совсем недавно вышла последняя версия обновления для моделей Mac. Давайте рассмотрим, как же обновить Ваши устройства до macOS Mojave. Что несёт в себе данная прошивка? При установке mojave Вы получите множество дополнительных функций, которых не было раньше. Разработчики значительно улучшили систему для того, чтобы Вам было комфортнее работать на ноутбуках. Добавлен «тёмный режим», благодаря которому легче выполнять работу. С помощью функции «стеки» система автоматически распределит файлы. Скриншоты экрана выполнять теперь намного легче. В App Store Вы найдете хорошие программы для этого. Главная приятная новость в том, что сейчас можно обновить систему бесплатно и быстро. О том, как это сделать, читайте ниже.

Можно установить macOS Mojave на Ваш ноутбук?
Для начала запуска операционной системы, проверьте, совместима ли она с Вашим устройством.
Модели, совместимые с последней прошивкой:
- MacBook Air, версия с 2012 года;
- MacBook Pro, версия с 2012 года;
- Mac mini, версия с 2012 года;
- iMac, версия с 2012 года;
- iMac Pro – все модели.
- Mac Pro (2013 г, середины 2010 г. и 2012 г.)
Также на Вашем ноутбуке необходимо свободное место: 2 ГБ памяти и 12,5 ГБ на диске. Скачивание mojave возможно на устройства Apple с OS X Mountain Lion или более поздней версии.
Для того, чтобы узнать нужные параметры, просто зайдите в пункт меню о Mac и посмотрите модель, и количество свободного места на диске.
Резервная копия Mac.
Перед началом скачивания необходимо сохранить резервную копию Вашего устройства, чтобы не потерять хранящиеся на нем данные. Это сделать достаточно легко, благодаря программе Time Machine или другими доступными способами.
Приступаем к загрузке macOS.
Для скачивания прошивки Вам потребуется хороший интернет, поэтому проверьте подключение перед обновлением macOS. Далее перейдите по ссылке, скачайте приложение macOS Mojave и нажмите кнопку «Загрузить».
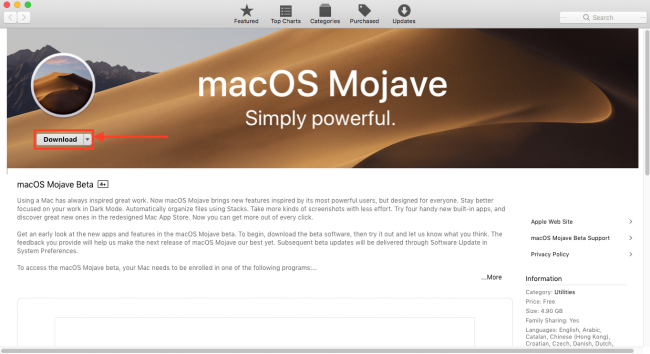
Начнется автоматическое скачивание программы, нажмите кнопку «продолжить» и следуйте подсказкам на экране. Загрузка может занять долгое время, поэтому Вы можете запустить её вечером, чтобы она завершилась под утро. Программа может запросить Ваши данные при запуске приложения. Для этого введите Ваш пароль и имя администратора, которые Вы используете для входа в Mac, и нажмите «Разрешить добавление».
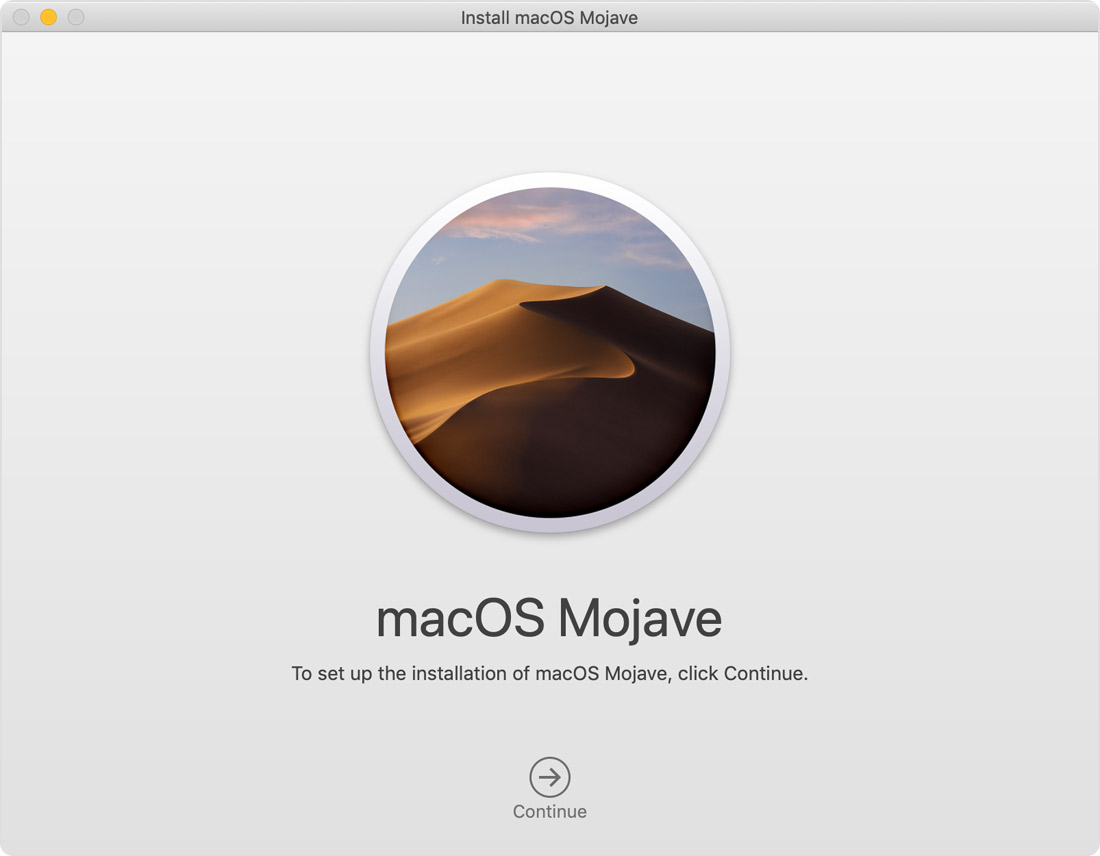
Завершающий этап установки.
При запуске приложения не закрывайте крышку Вашего ноутбука и не переводите его в режим сна. Во время обновления, устройство может перезагружаться и показывать процент загрузки или же не отображать никакую информацию.
После завершения установки, Вы будете получать уведомления о наличии обновлений для прошивки.
Автоматическое обновление системы.
При использовании OS X El Capitan 10.11.5 или поздние версии у Вас есть возможность загрузить обновление в фоновом режиме. При условии, что в настройках App Store задана автоматическая загрузка вышедших обновлений. Система пришлет Вам оповещение, что можно осуществить загрузку Mojave. Нажав кнопку установки, загрузка начнётся автоматически. Если Вы не готовы к обновлению, Вы просто можете скрыть оповещение и приступить к загрузке в удобное для Вас время. Когда будете готовы, зайдите в папку «Программы» и нажмите на файл «Установка macOS Mojave». Всё достаточно просто.

Произведите обновление системы для получения классных функций, чтобы использовать свой ноутбук максимально эффективно. Следуйте нашим советам и устанавливайте macOS Mojave быстро и безопасно.
У вас есть MacВook или iMac? Специально для вас мы создали онлайн-марафон по настройке полезных сервисов на Mac: узнайте за 8 простых занятий, как быстро настроить Apple ID, iCloud и другие сервисы на Mac , обезопасить свои пользовательские данные, оптимизировать хранилище iCloud и пр.
- Это быстро: вам не придется искать в Ютубе инструкции по настройке.
- Это просто: вы увидите каждый шаг на экране, с подсказками на понятном языке.
- Это удобно: вы получите полезные навыки, не вставая с удобного кресла.
Источник


