- Обновление Windows Server 2008 R2 до Windows Server 2012 R2 Upgrade Windows Server 2008 R2 to Windows Server 2012 R2
- Подготовка к обновлению на месте Before you begin your in-place upgrade
- Сбор данных To collect your info
- Выполнение обновления To perform the upgrade
- Действия по завершении обновления After your upgrade is done
- Проверка успешности обновления To make sure your upgrade was successful
- Дальнейшие действия Next steps
- Upgrade install windows and keep files settings and applications
- Рекомендации по обновлению и переносу Windows Windows upgrade and migration considerations
- Переход с предыдущей версии Windows Upgrade from a previous version of Windows
- Перенос файлов и параметров Migrate files and settings
- Миграция с помощью средства переноса данных Windows Migrate with Windows Easy Transfer
- Миграция с помощью средства миграции пользовательской области Migrate with the User State Migration Tool
- Рекомендации по обновлению и миграции Upgrade and migration considerations
- Совместимость приложений Application compatibility
- Модернизация многоязыкового образа Windows Multilingual Windows image upgrades
- ErrorHandler. cmd Errorhandler.cmd
- Миграция ACL для диска данных Data drive ACL migration
- Windows 10 Upgrade – You can’t keep Windows settings, personal files, and apps because you’re installing an edition of Windows that’s different than the one you’re currently using.
- Replies (13)
Обновление Windows Server 2008 R2 до Windows Server 2012 R2 Upgrade Windows Server 2008 R2 to Windows Server 2012 R2
Если вы хотите сохранить существующее оборудование и все роли сервера, которые вы настроили, без сжатия сервера, необходимо выполнить обновление на месте. If you want to keep the same hardware and all the server roles you’ve already set up without flattening the server, you’ll want to do an in-place upgrade. При обновлении на месте вы переходите с более старой версии операционной системы на более новую, сохраняя свои параметры, роли сервера и данные. An in-place upgrade allows you to go from an older operating system to a newer one, while keeping your settings, server roles, and data intact. Эта статья поможет вам перейти с Windows Server 2008 R2 на Windows Server 2012 R2. This article helps you to move from Windows Server 2008 R2 to Windows Server 2012 R2.
Чтобы выполнить обновление до Windows Server 2019, сначала используйте сведения из этой статьи, чтобы выполнить обновление до Windows Server 2012 R2, а затем выполнить обновление с Windows Server 2012 R2 до Windows Server 2019. To upgrade to Windows Server 2019, use this topic first to upgrade to Windows Server 2012 R2, and then upgrade from Windows Server 2012 R2 to Windows Server 2019.
Подготовка к обновлению на месте Before you begin your in-place upgrade
Перед началом обновления Windows Server рекомендуется выполнить сбор данных с устройств для диагностики и устранения неполадок. Before you start your Windows Server upgrade, we recommend that you collect some information from your devices, for diagnostic and troubleshooting purposes. Так как эти сведения предназначены для использования только в случае сбоя обновления, необходимо убедиться в том, что вы храните информацию в расположении, доступ к которому можно получить с вашего устройства. Because this information is intended for use only if your upgrade fails, you must make sure that you store the information somewhere that you can get to it off of your device.
Сбор данных To collect your info
Откройте командную строку, перейдите в c:\Windows\system32 , а затем введите systeminfo.exe. Open a command prompt, go to c:\Windows\system32 , and then type systeminfo.exe.
Скопируйте, вставьте и сохраните полученные сведения о системе в любом расположении на устройстве. Copy, paste, and store the resulting system information somewhere off of your device.
Введите ipconfig /all в командной строке, а затем скопируйте и вставьте полученные сведения о конфигурации в то же расположение, что и ранее. Type ipconfig /all into the command prompt, and then copy and paste the resulting configuration information into the same location as above.
Откройте редактор реестра, перейдите в куст HKEY_LOCAL_MACHINE\SOFTWARE\Microsoft\WindowsNT\CurrentVersion, а затем скопируйте и вставьте значения BuildLabEx (версия) и EditionID (выпуск) для Windows Server в то же расположение, что и выше. Open the Registry Editor, go to the HKEY_LOCAL_MACHINE\SOFTWARE\Microsoft\WindowsNT\CurrentVersion hive, and then copy and paste the Windows Server BuildLabEx (version) and EditionID (edition) into the same location as above.
После получения всех данных, относящихся к Windows Server, мы настоятельно рекомендуем создать резервную копию операционной системы, приложений и виртуальных машин. After you’ve collected all of your Windows Server-related information, we highly recommend that you backup your operating system, apps, and virtual machines. Кроме того, необходимо завершить работу, выполнить быструю миграцию или динамическую миграцию всех виртуальных машин, выполняющихся в данный момент на сервере. You must also Shut down, Quick migrate, or Live migrate any virtual machines currently running on the server. Во время обновления на месте виртуальные машины не могут работать. You can’t have any virtual machines running during the in-place upgrade.
Выполнение обновления To perform the upgrade
Убедитесь, что значение BuildLabEx указывает, что используется Windows Server 2008 R2. Make sure the BuildLabEx value says you’re running Windows Server 2008 R2.
Найдите установочный носитель Windows Server 2012 R2 и выберите setup.exe. Locate the Windows Server 2012 R2 Setup media, and then select setup.exe.
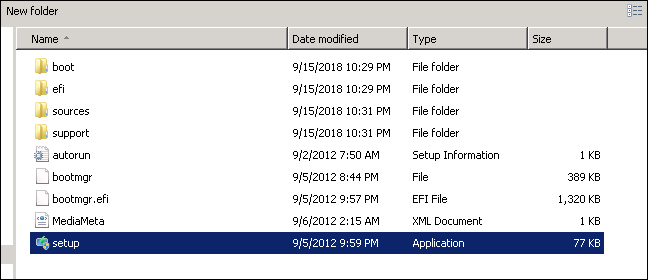
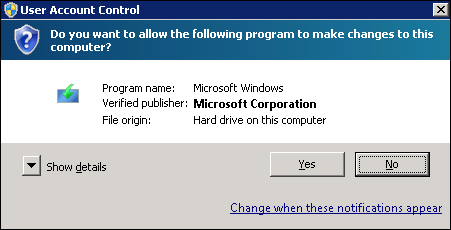
Выберите Да, чтобы начать процесс установки. Select Yes to start the setup process.
На экране Windows Server 2012 R2 выберите Установить сейчас. On the Windows Server 2012 R2 screen, select Install now.
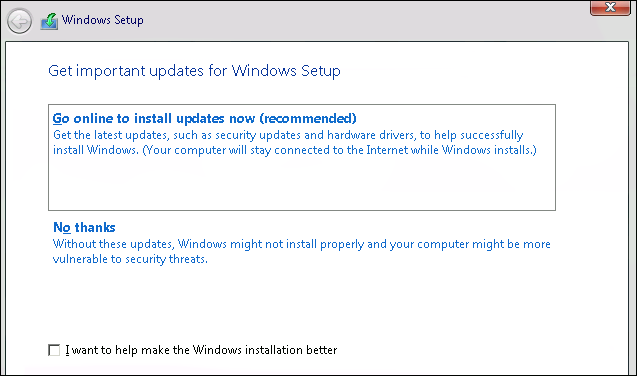
Для устройств, подключенных к Интернету, выберите Установить обновления из Интернета (рекомендуется) . For internet-connected devices, select Go online to install updates now (recommended).
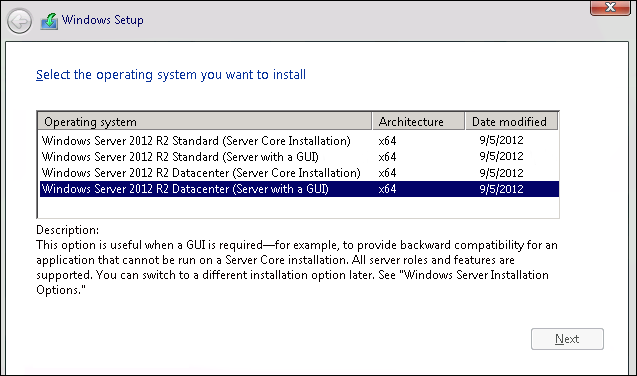
Выберите выпуск Windows Server 2012 R2, который требуется установить, а затем нажмите кнопку Далее. Select the Windows Server 2012 R2 edition you want to install, and then select Next.
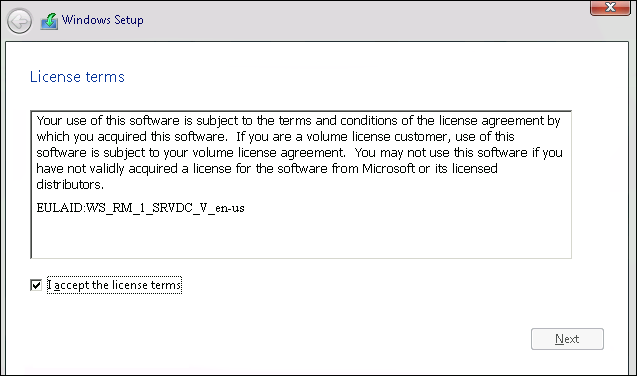
Выберите Я принимаю условия лицензии, чтобы принять условия лицензионного соглашения, исходя из вашего канала распространения (например, розничная, многократная, OEM, ODM версия и т. д.), а затем нажмите кнопку Далее. Select I accept the license terms to accept the terms of your licensing agreement, based on your distribution channel (such as, Retail, Volume License, OEM, ODM, and so on), and then select Next.
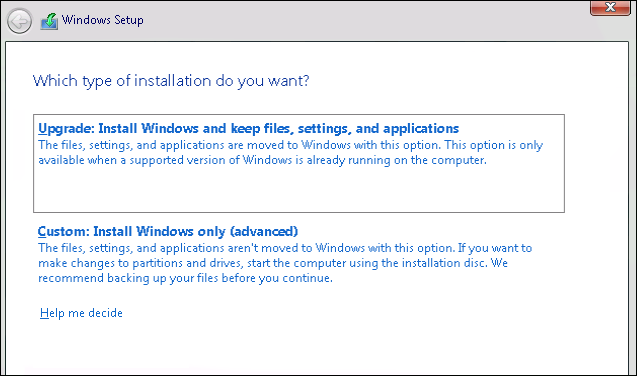
Выберите Upgrade: Install Windows and keep files, settings, and applications (Обновление: установить Windows и сохранить файлы, настройки и приложения), чтобы выбрать обновление на месте. Select Upgrade: Install Windows and keep files, settings, and applications to choose to do an in-place upgrade.
Программа установки напоминает вам, что вы должны убедиться, что ваши приложения совместимы с Windows Server 2012 R2, используя информацию из статьи Установка и обновление Windows Server, а затем нажмите кнопку Далее. Setup reminds you to make sure your apps are compatible with Windows Server 2012 R2, using the information in the Windows Server installation and upgrade article, and then select Next.

Если отображается страница с уведомлением о том, что обновление не рекомендуется, можно проигнорировать его и нажать кнопку Подтвердить. If you see a page that tells you upgrade isn’t recommended, you can ignore it and select Confirm. Она предназначена для того, чтобы предлагать чистую установку, но это не обязательно. It was put in place to prompt for clean installations, but it isn’t necessary.

Начнется обновление на месте, в котором отображается окно Обновление Windows с информацией о ходе выполнения. The in-place upgrade starts, showing you the Upgrading Windows screen with its progress. После завершения обновления сервер перезапустится. After the upgrade finishes, your server will restart.
Действия по завершении обновления After your upgrade is done
После завершения обновления необходимо убедиться, что обновление до Windows Server 2012 R2 прошло успешно. After your upgrade completes, you must make sure the upgrade to Windows Server 2012 R2 was successful.
Проверка успешности обновления To make sure your upgrade was successful
Откройте редактор реестра, перейдите в куст HKEY_LOCAL_MACHINE\SOFTWARE\Microsoft\WindowsNT\CurrentVersion и просмотрите запись ProductName. Open the Registry Editor, go to the HKEY_LOCAL_MACHINE\SOFTWARE\Microsoft\WindowsNT\CurrentVersion hive, and view the ProductName. Вы должны увидеть выпуск Windows Server 2012 R2, например Windows Server 2012 R2 Datacenter. You should see your edition of Windows Server 2012 R2, for example Windows Server 2012 R2 Datacenter.
Убедитесь, что все приложения работают, и что подключения клиентов к приложениям выполняются успешно. Make sure all of your applications are running and that your client connections to the applications are successful.
Если вы считаете, что во время обновления возникли проблемы, скопируйте и создайте архив каталога %SystemRoot%\Panther (обычно C:\Windows\Panther ) и обратитесь в службу поддержки Майкрософт. If you think something might have gone wrong during your upgrade, copy and zip the %SystemRoot%\Panther (usually C:\Windows\Panther ) directory and contact Microsoft support.
Дальнейшие действия Next steps
Вы можете выполнить обновление на месте для перехода с версии Windows Server 2012 R2 на Windows Server 2019. You can perform one more upgrade to go from Windows Server 2012 R2 to Windows Server 2019. Подробные инструкции см. в статье Upgrade Windows Server 2012 R2 to Windows Server 2019 (Обновление Windows Server 2012 R2 до Windows Server 2019). For detailed instructions, see Upgrade Windows Server 2012 R2 to Windows Server 2019.
Upgrade install windows and keep files settings and applications
Рекомендации по обновлению и переносу Windows Windows upgrade and migration considerations
Файлы и параметры приложений можно переносить на новое оборудование, работающее под управлением операционной системы Windows®, или они могут поддерживаться при обновлении операционной системы на одном и том же компьютере. Files and application settings can be migrated to new hardware running the Windows® operating system, or they can be maintained during an operating system upgrade on the same computer. В этой статье кратко описаны инструменты Microsoft®, с помощью которых можно перемещать файлы и параметры между установками, а также специальные моменты, которые необходимо выполнить для обновления или миграции. This topic summarizes the Microsoft® tools you can use to move files and settings between installations in addition to special considerations for performing an upgrade or migration.
Переход с предыдущей версии Windows Upgrade from a previous version of Windows
Вы можете перейти с более ранней версии Windows, что означает, что вы можете установить новую версию Windows, сохранив приложения, файлы и параметры так, как они находились в предыдущей версии Windows. You can upgrade from an earlier version of Windows, which means you can install the new version of Windows and retain your applications, files, and settings as they were in your previous version of Windows. Если вы решили выполнить выборочную установку Windows вместо обновления, ваши приложения и параметры не будут сохранены. If you decide to perform a custom installation of Windows instead of an upgrade, your applications and settings will not be maintained. Ваши личные файлы и все файлы и каталоги Windows будут перемещены в папку Windows. old. Your personal files, and all Windows files and directories, will be moved to a Windows.old folder. Вы можете получить доступ к своим данным в папке Windows. old после завершения работы WindowsSetup. You can access your data in the Windows.old folder after WindowsSetup is complete.
Перенос файлов и параметров Migrate files and settings
Средства миграции доступны для перемещения параметров с одного компьютера под управлением Windows на другой. Migration tools are available to transfer settings from one computer that is running Windows to another. Эти средства переносят только параметры программы, а не сами программы. These tools transfer only the program settings, not the programs themselves.
Дополнительные сведения о совместимости приложений можно найти в наборе средств для обеспечения совместимости приложений (ACT). For more information about application compatibility, see the Application Compatibility Toolkit (ACT).
Средство миграции пользовательской среды (USMT) 10.0 — это приложение, предназначенное для администраторов, которые выполняют крупномасштабные автоматические развертывания. The User State Migration Tool (USMT)10.0 is an application intended for administrators who are performing large-scale automated deployments. Для развертывания на небольшое количество компьютеров или для индивидуально настроенных развертываний можно использовать WindowsEasyную передачу. For deployment to a small number of computers or for individually customized deployments, you can use WindowsEasy Transfer.
Миграция с помощью средства переноса данных Windows Migrate with Windows Easy Transfer
WindowsEasy Transfer — это мастер по переносу файлов и параметров с одного компьютера под управлением Windows на другой. WindowsEasy Transfer is a software wizard for transferring files and settings from one computer that is running Windows to another. Оно помогает выбрать, что нужно сделать, чтобы перейти на новый компьютер, указать способ переноса и выполнить передачу. It helps you select what to move to your new computer, enables you to set which migration method to use, and then performs the transfer. После завершения переноса WindowsEasy в отчете о передаче, а также список программ, которые можно установить на новом компьютере, а также ссылки на другие программы, которые могут потребоваться загрузить. When the transfer has completed, WindowsEasy Transfer Reports shows you what was transferred and provides a list of programs you might want to install on your new computer, in addition to links to other programs you might want to download.
С помощью функции пересылки WindowsEasy можно передавать файлы и параметры в сетевую папке, USB-накопителе (UFD) или кабеле Easy Transfer. With WindowsEasy Transfer, files and settings can be transferred using a network share, a USB flash drive (UFD), or the Easy Transfer cable. Однако вы не можете использовать стандартный кабель USB для переноса файлов и параметров с помощью передачи WindowsEasy. However, you cannot use a regular universal serial bus (USB) cable to transfer files and settings with WindowsEasy Transfer. Кабель средства переноса можно приобрести в Интернете, у изготовителя компьютера или в магазине бытовой электроники. An Easy Transfer cable can be purchased on the Web, from your computer manufacturer, or at an electronics store.
Средство переноса данных Windows недоступно в Windows 10. Windows Easy Transfer is not available in Windows 10.
Миграция с помощью средства миграции пользовательской области Migrate with the User State Migration Tool
С помощью USMT вы можете автоматизировать миграцию во время крупных развертываний операционной системы Windows. You can use USMT to automate migration during large deployments of the Windows operating system. Средство USMT использует настраиваемые файлы правил миграции (XML), чтобы точно контролировать, какие учетные записи пользователей, пользовательские файлы, параметры операционной системы и параметры приложений переносятся и как они переносятся. USMT uses configurable migration rule (.xml) files to control exactly which user accounts, user files, operating system settings, and application settings are migrated and how they are migrated. Вы можете использовать USMT как для параллельных миграций, так и для того, чтобы при обновлении только операционной системы выполнялось замещение одной части оборудования либо была выполнена миграция (или Обновление). You can use USMT for both side-by-side migrations, where one piece of hardware is being replaced, or wipe-and-load (or refresh) migrations, when only the operating system is being upgraded.
Рекомендации по обновлению и миграции Upgrade and migration considerations
Если вы выполняете обновление или переход на новую версию Windows, необходимо учитывать перечисленные ниже проблемы и замечания. Whether you are upgrading or migrating to a new version of Windows, you must be aware of the following issues and considerations:
Совместимость приложений Application compatibility
Дополнительные сведения о совместимости приложений в Windows можно найти в разделе Использование готовности к обновлению для управления обновлениями Windows. For more information about application compatibility in Windows, see Use Upgrade Readiness to manage Windows upgrades.
Модернизация многоязыкового образа Windows Multilingual Windows image upgrades
При использовании многоязычных обновлений для Windows обновления на разных языках не поддерживаются USMT. When performing multilingual Windows upgrades, cross-language upgrades are not supported by USMT. Если вы обновляете или переносите операционную систему с несколькими установленными языковыми пакетами, вы можете выполнить обновление или миграцию только на стандартный язык ПОЛЬЗОВАТЕЛЬСКОГО интерфейса. If you are upgrading or migrating an operating system with multiple language packs installed, you can upgrade or migrate only to the system default user interface (UI) language. Например, если по умолчанию используется английский язык, но у вас установлен пакет для испанского языка, вы можете выполнить обновление или переход только на английский. For example, if English is the default but you have a Spanish language pack installed, you can upgrade or migrate only to English.
Если вы используете одноязыковый образ Windows, соответствующий стандартному языку пользовательского интерфейса операционной системы на вашем компьютере, миграция будет работать. If you are using a single-language Windows image that matches the system default UI language of your multilingual operating system, the migration will work. Тем не менее все языковые пакеты будут удалены, и вам придется повторно установить их после завершения обновления. However, all of the language packs will be removed, and you will have to reinstall them after the upgrade is completed.
ErrorHandler. cmd Errorhandler.cmd
Если вы планируете использовать ErrorHandler. cmd, то при переходе с более ранней версии Windows необходимо скопировать этот файл в каталог%WINDIR%\Setup\Scripts в старой установке. When upgrading from an earlier version of Windows, if you intend to use Errorhandler.cmd, you must copy this file into the %WINDIR%\Setup\Scripts directory on the old installation. Это гарантирует, что при возникновении ошибок на этапе нижнего уровня в WindowsSetup выполняется выполнение команд в ErrorHandler. cmd. This makes sure that if there are errors during the down-level phase of WindowsSetup, the commands in Errorhandler.cmd will run.
Миграция ACL для диска данных Data drive ACL migration
На этапе настройки WindowsSetup корневой список управления доступом (ACL) на дисках, отформатированных для NTFS, не имеющих операционной системы, будет изменен на формат Default ACL WindowsXP. During the configuration pass of WindowsSetup, the root access control list (ACL) on drives formatted for NTFS that do not appear to have an operating system will be changed to the default WindowsXP ACL format. Списки ACL на этих дисках изменяются, чтобы разрешить пользователям, прошедшим проверку подлинности, изменять доступ к папкам и файлам. The ACLs on these drives are changed to enable authenticated users to modify access on folders and files.
Изменение ACL может повлиять на производительность WindowsSetup, если используемые по умолчанию ACL WindowsXP применяются к разделу с большим объемом данных. Changing the ACLs may affect the performance of WindowsSetup if the default WindowsXP ACLs are applied to a partition with a large amount of data. Из-за этих проблем с производительностью вы можете изменить следующий параметр реестра, чтобы отключить эту функцию: Because of these performance concerns, you can change the following registry value to disable this feature:
Эта функция недоступна, если значение этого раздела реестра существует и настроено на 1 . This feature is disabled if this registry key value exists and is configured to 1 .
Windows 10 Upgrade – You can’t keep Windows settings, personal files, and apps because you’re installing an edition of Windows that’s different than the one you’re currently using.
I have successfully upgraded 3 Windows 8.1 Pro Computers to Windows 10 Pro with no problems but I am now running into an issue where the upgrade is now posting the following error
If I proceed with the Nothing option to do a clean install, another window opens up mentioning it is ready to install Windows 10 Home.
The computer in question is clearly a Windows 8.1 Pro machine and there are currently no available updates for the machine.
Is there a registry fix I need to perform on the machine or an error on your end?
I also tried the Windows MediaCreationTool download and attempted the upgrade from a USB but am running into the same error.
Please advise as soon as possible.
Replies (13)
* Please try a lower page number.
* Please enter only numbers.
* Please try a lower page number.
* Please enter only numbers.
Has the bit architecture changed?
Did this solve your problem?
Sorry this didn’t help.
Great! Thanks for marking this as the answer.
How satisfied are you with this reply?
Thanks for your feedback, it helps us improve the site.
How satisfied are you with this response?
Thanks for your feedback.
the bit architecture has always been 64 bit.
Did this solve your problem?
Sorry this didn’t help.
Great! Thanks for marking this as the answer.
How satisfied are you with this reply?
Thanks for your feedback, it helps us improve the site.
How satisfied are you with this response?
Thanks for your feedback.
Wonder why no other reply’s?
Did this solve your problem?
Sorry this didn’t help.
Great! Thanks for marking this as the answer.
How satisfied are you with this reply?
Thanks for your feedback, it helps us improve the site.
How satisfied are you with this response?
Thanks for your feedback.
It has been a few days and I have yet to receive any other replies. I was able to get one of them upgraded properly by removing Java but am having no luck with 2 others. If it helps, the machines in question are Lenovo T540p and haveven Windows 8.1 Pro on them.
I would really prefer to not have to clean install W10 Pro on several machines when it’s already worked fine to upgrade 3 of them.
6 people were helped by this reply
Did this solve your problem?
Sorry this didn’t help.
Great! Thanks for marking this as the answer.
How satisfied are you with this reply?
Thanks for your feedback, it helps us improve the site.
How satisfied are you with this response?
Thanks for your feedback.
I not sure why you can’t change the setting to keep personal files. Or why it wants to load Windows 10 Home. Call that number in my last post and go to tech support. No other member on Microsoft community wants to put in.
Did this solve your problem?
Sorry this didn’t help.
Great! Thanks for marking this as the answer.
How satisfied are you with this reply?
Thanks for your feedback, it helps us improve the site.
How satisfied are you with this response?
Thanks for your feedback.
I have Windows 8.1 64 Pro with Media Center on my desktop. I understand I can upgrade to Windows 10 Pro without any problem and I’ll lose the Media Center but I am getting the same error at the heading of this discussion. Up to that point in the setup I was never presented with any options about which edition I wanted to upgrade to. I assumed that when checking my system the upgrading process would automatically detect my version and select the appropriate one to upgrade. I have only one language installed, English and one Region, US.
The blue Upgrade Window doesn’t show which edition I am upgrading to. The heading says simply “Windows 10 Setup.” I do have the little Windows 10 icon on my Toolbar and when I check on my Upgrade Status, it says that I will get a notification when Windows 10 is ready for me, but if I haven’t received the notification to upgrade by the July deadline, I may have to keep my desktop running with Windows 8.1 while my laptop were upgraded to Windows 10 without any trouble at all. Microsoft is not making it easy if I wish to upgrade now without waiting.
Did this solve your problem?
Sorry this didn’t help.
Great! Thanks for marking this as the answer.
How satisfied are you with this reply?
Thanks for your feedback, it helps us improve the site.


