- Upgrade Windows 10 Home to Windows 10 Pro
- Схемы обновления до Windows 10 Windows 10 upgrade paths
- Схемы обновления Upgrade paths
- How to Upgrade or Block Windows 10 1809 (Redstone 5, October) Immediately
- Want to Install 1809 October 2018 update immediately without waiting?
- How to Block the Windows 10 Redstone 5 (October 2018 Update) Version 1809, from Installing ?
- Service Trick to Block 1809 Upgrade
- Local Group Policy Editor to Stop Windows 10 1809 Upgrade
- Branch Readiness Level Tip to Block Redstone 5 Upgrade
- The Registry Tip to Block October 2018 Upgrade
- Wushowhide Trick to Hide 1809 Upgrade
Upgrade Windows 10 Home to Windows 10 Pro
Before upgrading to Windows 10 Pro, make sure your device is up to date and running the most recent version of Windows 10 Home. For more info about how to keep your PC updated, see Windows Update: FAQ.
To upgrade from Windows 10 Home to Windows 10 Pro and activate your device, you’ll need a valid product key or a digital license for Windows 10 Pro.
Note: If you don’t have a product key or a digital license, you can buy Windows 10 Pro from Microsoft Store. Select the Start button, select Settings > Update & Security > Activation , and then select Go to Microsoft Store. From here, you can also see how much this upgrade will cost.
Open Activation settings
Use the following chart to determine which activation method you’ll use:
If you got Windows 10 by.
Upgrading to Windows 10 for free from an eligible device running a genuine copy of Windows 7 or Windows 8.1.
Buying a Windows 10 Pro upgrade from the Microsoft Store app and successfully activated Windows 10.
Being a Windows Insider and upgrading to the newest Windows 10 Insider Preview build on an eligible device that was running an activated earlier version of Windows and Windows 10 Preview.
Buying genuine Windows 10 from the Microsoft Store app.
Buying a copy of Windows 10 from an authorized retailer.
Find it on a label inside the Windows 10 box. A digital license will be given to your device for Windows 10 based on the valid product key you entered.
If you bought your PC from a manufacturer, the manufacturer, not Microsoft, must provide a product key.
Buying a digital copy of Windows 10 from an authorized retailer.
Find it in the confirmation email you received after buying Windows 10 or in a digital locker accessible through the retailer’s website.
A digital license will be given to your device for Windows 10 based on the valid product key you entered.
Having a Volume Licensing agreement for Windows 10 or MSDN subscription.
It is available through the web portal for your program.
Buying a new or refurbished device running Windows 10.
It is preinstalled on your device, included with the device packaging, or included as a card or on the Certificate of Authenticity (COA) attached to the device.
If you bought a refurbished PC, the refurbisher, not Microsoft, must provide you a product key.
Find it in the confirmation email that contains the order history.
If you’re ready to upgrade, select one of the following headings to get started:
To upgrade, select the Start button, then select Settings > Update & Security > Activation .
Open Activation settings
If you have a digital license for Windows 10 Pro, and Windows 10 Home is currently activated on your device, you’ll see one of two messages when you select Go to Microsoft Store:
If you see Install, select the button to install Windows 10 Pro.
If you see Buy, you may need to purchase a Windows 10 Pro license. Or, try to sign in to Microsoft Store with the Microsoft account that was used to purchase the Pro license. Then, follow the instructions to install Windows 10.
If you have a digital license for Windows 10 Pro, but Windows 10 Home isn’t activated on your device, select Troubleshoot and then follow the instructions to upgrade to Windows 10 Pro.
Select the Start button, then select Settings > Update & Security > Activation .
Select Change product key, and then enter the 25-character Windows 10 Pro product key.
Select Next to start the upgrade to Windows 10 Pro.
Having issues with activation after your upgrade?
See the following for more help activating your valid product key or digital license for Windows 10 Pro:
Схемы обновления до Windows 10 Windows 10 upgrade paths
Относится к: Applies to
- Windows 10 Windows 10
- Windows 10 Mobile Windows 10 Mobile
Схемы обновления Upgrade paths
В этом разделе приведены возможные схемы обновления до Windows 10. This topic provides a summary of available upgrade paths to Windows 10. Выполнить обновление до Windows 10 можно с Windows 7 или более поздней версии операционной системы. You can upgrade to Windows 10 from Windows 7 or a later operating system. Это относится в том числе к обновлению с одного выпуска Windows 10 до более позднего выпуска Windows 10. This includes upgrading from one release of Windows 10 to later release of Windows 10. Также поддерживается миграция между выпусками Windows 10 разной полноты (Корпоративная, Домашняя и т.п.) в пределах одного и того же хронологического выпуска. Migrating from one edition of Windows 10 to a different edition of the same release is also supported.
Если вы также мигрируете в другое издание Windows, см. обновление windows 10 edition. If you are also migrating to a different edition of Windows, see Windows 10 edition upgrade. Методы и поддерживаемые пути описаны на этой странице для изменения выпуска Windows. Methods and supported paths are described on this page to change the edition of Windows. Эти методы требуют ввода лицензии или ключа продукта для нового выпуска Windows перед началом процесса обновления. These methods require that you input a license or product key for the new Windows edition prior to starting the upgrade process. Понижение версии также поддерживается для некоторых путей, но обратите внимание, что приложения и параметры не поддерживаются при понижении версии Windows. Edition downgrade is also supported for some paths, but please note that applications and settings are not maintained when the Windows edition is downgraded.
Обновление версии Windows 10. Вы можете напрямую обновить любую полугодовую версию канала Windows 10 до более новой, поддерживаемой полугодовой версии канала Windows 10, даже если она включает пропуск версий. Windows 10 version upgrade: You can directly upgrade any semi-annual channel version of Windows 10 to a newer, supported semi-annual channel version of Windows 10, even if it involves skipping versions. Работайте с представителем учетной записи, если текущая версия Windows не поддерживается. Work with your account representative if your current version of Windows is out of support. Сведения о доступности и обслуживании см. в листе фактов жизненного цикла Windows. See the Windows lifecycle fact sheet for availability and service information.
Windows 10 LTSC или LTSB: из-за изменения названий версии продуктов, для которых отображается имя Windows 10 LTSB, будут заменены на Windows 10 LTSC в последующих обновлений. Windows 10 LTSC/LTSB: Due to naming changes, product versions that display Windows 10 LTSB will be replaced with Windows 10 LTSC in subsequent feature updates. Термин LTSC используется здесь для указания всех версий с долгосрочным обслуживанием. The term LTSC is used here to refer to all long term servicing versions.
Обновление с Windows 7, Windows 8.1 или Windows 10 полугодовых каналов до Windows 10 LTSC не поддерживается. In-place upgrade from Windows 7, Windows 8.1, or Windows 10 semi-annual channel to Windows 10 LTSC is not supported. Примечание. Для Windows 10 LTSC 2015 этот путь обновления не блокировался. Note: Windows 10 LTSC 2015 did not block this upgrade path. Эта проблема исправлена в выпуске Windows 10 LTSC 2016, в котором теперь доступны только варианта установки: только с данными и чистая установка. This was corrected in the Windows 10 LTSC 2016 release, which will now only allow data-only and clean install options. Можно обновить Windows 10 LTSC до Windows 10 Semi-Annual Channel, если обновление осуществляется до той же или более новой версии сборки. You can upgrade from Windows 10 LTSC to Windows 10 semi-annual channel, provided that you upgrade to the same or a newer build version. Например, Windows 10 Корпоративная 2016 с долгосрочным обслуживанием можно обновить до Windows 10 Корпоративная версии 1607 или более поздней версии. For example, Windows 10 Enterprise 2016 LTSB can be upgraded to Windows 10 Enterprise version 1607 or later. Обновление поддерживается с помощью процесса обновления на месте (с помощью установки Windows). Upgrade is supported using the in-place upgrade process (using Windows setup). Для сохраняемой программы необходимо использовать переключатель Ключ продукта. You will need to use the Product Key switch if you want to keep your apps. Если вы не используете переключатель, параметр «Сохранить личные файлы и приложения» будет серым. Командная строка будет setup.exe/pkey xxxxx-xxxxx-xxxxx-xxxxxx,используясоответствующий ключ продукта Windows 10 SAC. If you don’t use the switch the option ‘Keep personal files and apps’ will be grayed out. The command line would be setup.exe /pkey xxxxx-xxxxx-xxxxx-xxxxx-xxxxx, using your relevant Windows 10 SAC product key. Например, при использовании KMS командная строка будет setup.exe/pkey NPPR9-FWDCX-D2C8J-H872K-2YT43. For example, if using a KMS, the command line would be setup.exe /pkey NPPR9-FWDCX-D2C8J-H872K-2YT43.
Windows N/KN: SkUs Windows «N» и «KN» (выпуски без функций, связанных со средствами массовой информации) следуют тем же путям обновления, которые показаны ниже. Windows N/KN: Windows «N» and «KN» SKUs (editions without media-related functionality) follow the same upgrade paths shown below. Если выпуск до обновления и выпуск после обновления разных типов (как, например, при обновлении с Windows 8.1 Профессиональная N до Windows 10 Pro), в процессе обновления личные данные будут сохранены, однако приложения и параметры будут удалены. If the pre-upgrade and post-upgrade editions are not the same type (e.g. Windows 8.1 Pro N to Windows 10 Pro), personal data will be kept but applications and settings will be removed during the upgrade process.
Windows 8.0. Не удается обновиться непосредственно с Windows 8.0 до Windows 10. Windows 8.0: You cannot upgrade directly from Windows 8.0 to Windows 10. Чтобы обновить Windows 8.0, сначала необходимо установить обновление Windows 8.1. To upgrade from Windows 8.0, you must first install the Windows 8.1 update.
✔ = Поддерживается полное обновление, включая личные данные, параметры и приложения. ✔ = Full upgrade is supported including personal data, settings, and applications.
D = переход на менее полный выпуск; личные данные сохраняются, приложения и параметры удаляются. D = Edition downgrade; personal data is maintained, applications and settings are removed.
How to Upgrade or Block Windows 10 1809 (Redstone 5, October) Immediately
With Windows 10, update and upgrade are important. Security problems can creep in instantaneously. Speed is another factor to be taken care of. Lack of features in the previous version is also another reason for upgrade.
Keeping these things in mind, you have to make sure your Windows 10 system is always the best. In Windows 7 these updates would automatically download. Based upon the preference given, they would notify you to install or done without fail.
Table of Contents
Want to Install 1809 October 2018 update immediately without waiting?
There is much curiosity whenever a new Windows 10 update is released. But with 1 billion devices in near reach, you will not be able to upgrade to 1809 version ASAP. It may take weeks to months to roll to the new update.
There are certain pros and cons in upgrading to the new version. As with the earlier OS upgrades, there were lot of issues like keyboard, mic not working, BSOD errors, audio problems and many others. Sometimes the updates seem to hang in the middle with not able to enter the system again.
But Microsoft leader Satya Nadella made sure that the new upgrades are without much faults. Also if you observe in many tech forums, there are not many issues related to 1809.
So if you decide to upgrade to Redmond 5 Build, to experience the new features it brings without much waiting, you can do the following.
As on today, the page has been updated to download the October 2018 update. If you are already on 1803 version and Windows 10 Pro, it will ask you to install the Windows10Upgrade9252.exe Update assistant. It is about 5.8 MB size.
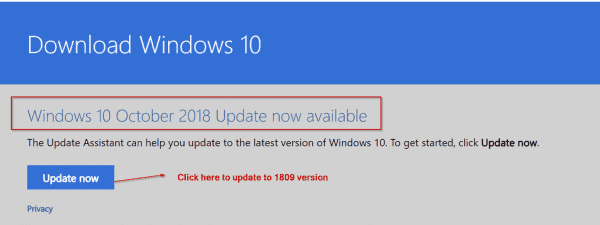
Once you give permission to install it, a pop-up will show whether you want to update or not. Click the “Update now” button if you want to proceed. Then the rest of the process is same, as like before updates.
In the next article, I’ll let you know what are the new features in 1809 version.
But the option to stop Windows updates from downloading and installing automatically was direct. In Windows 10, the clever “developers” have forced the updates on you, with the block option, not noticeable very easily.
There are two things, as reason, for you to block Windows 10 upgrade.
- The amount of time taken to do the update. It may take an hour, two or more than that based upon your system configuration and internet speed.
- What if the updates, hang after 45% or 55% ? You have to recover for whatever error code the Windows 10 throws up or reinstall from start again!
So in any case, if you think you should freeze your Windows 10 updates from installing in future, there are several solutions.
How to Block the Windows 10 Redstone 5 (October 2018 Update) Version 1809, from Installing ?
From Oct 1st onwards, Microsoft starts to push the default upgrade of 1809 to your computers. If you are on 1703 or 1709 version, there are different ways to differ this upgrade. But if you have already made a switch to the 1803 (Redstone 4 or April Creators Update), you can disable the upgrade permanently or temporarily based upon your needs.
Service Trick to Block 1809 Upgrade
The way to stop Windows 10 installing any new updates holds good for upgrade also. As we all know that there is a service called “Windows Update”. The function of this process is to do the following –
Enables the detection, download, and installation of updates for Windows and other programs. If this service is disabled, users of this computer will not be able to use Windows Update or its automatic updating feature, and programs will not be able to use the Windows Update Agent (WUA) API.
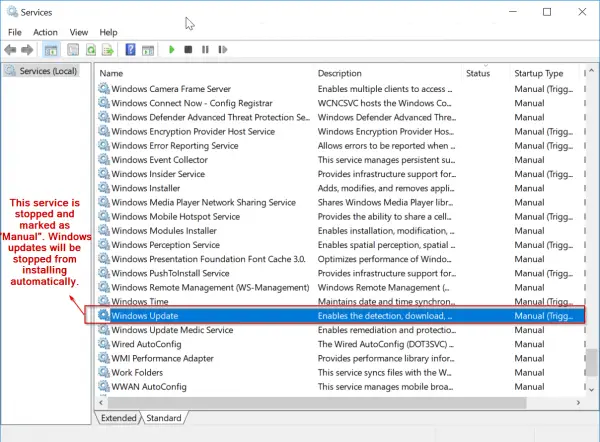
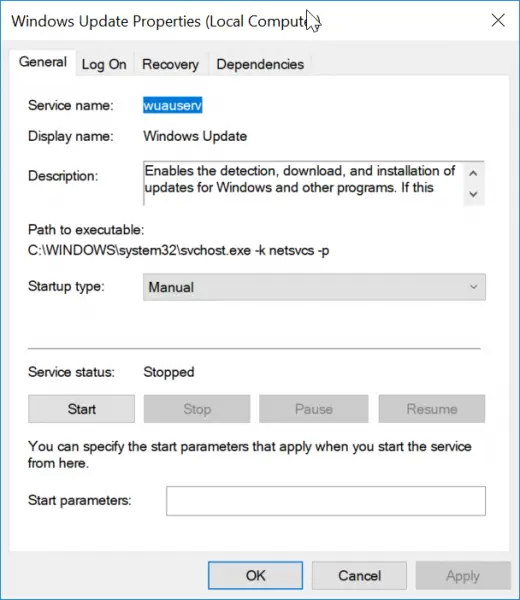
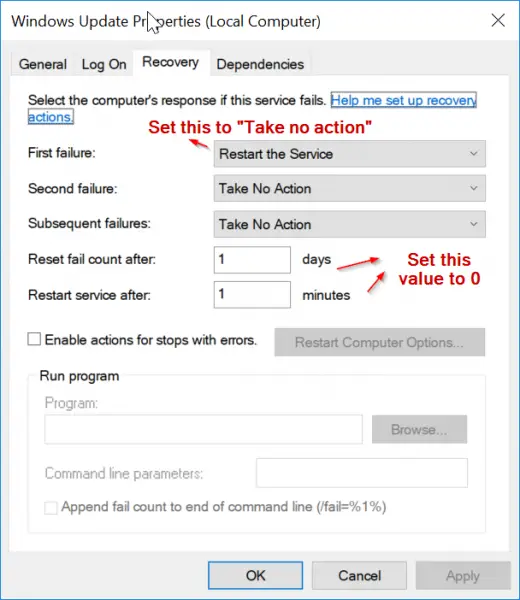
So if you make the “Startup type” of the service as either “Manual” or “Disabled”, this program doesn’t kick in whenever there are new updates. Before that you have to “Stop” the service.
But the downside is that it will not install any other updates also including Office and Windows security updates.
If you want to be doubly sure that this trick works perfectly, you can also make one another service “Startup type” in a similar fashion. Background Intelligent Transfer service (BITS) is also related to installing new updates and making an upgrade to the new version.
Transfers files in the background using idle network bandwidth. If the service is disabled, then any applications that depend on BITS, such as Windows Update or MSN Explorer, will be unable to automatically download programs and other information.
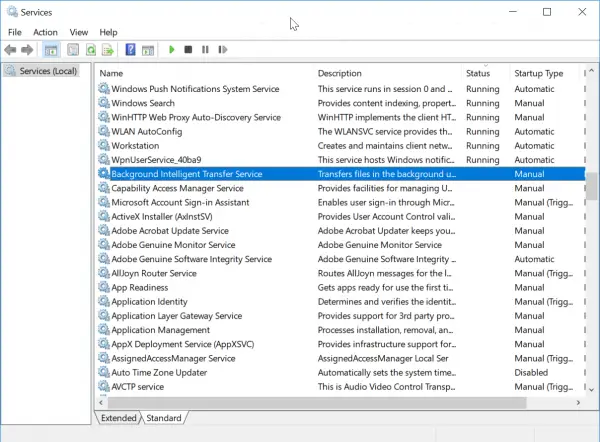
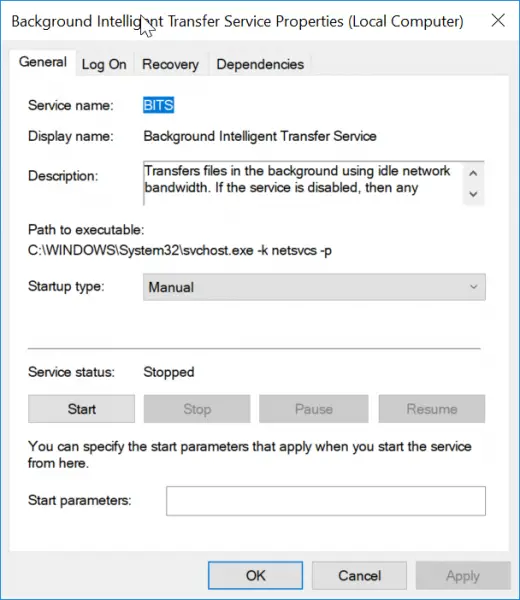
You may not be able to set this as “Manual”. Even if you make it as “Automatic (Delayed Start)”, it starts when Windows 10 boots up. The best option to fulfill your needs is to make it “Disabled”.
The above tip is a crude method of stopping the 1809 upgrade.
But there is a better and smarter way of deferring your upgrade. Read along to know other tricks.
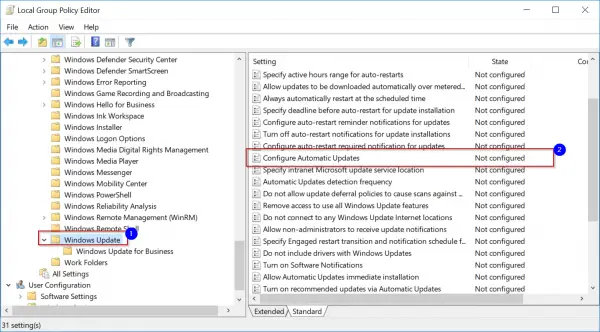
Local Group Policy Editor to Stop Windows 10 1809 Upgrade
This is another trick which will work permanently, unless removed manually. It not only stops the upgrade, but other updates also. So this must be used cautiously. Though it blocks the updates automatically, if you have the “Windows Update” service running, then the upgrade can be done manually.
- Type gpedit.msc in the Run box, by pressing Win + R at the same time.
- Navigate to the following path.
- Computer Configuration\Administrative Templates\Windows Components\Windows Update
- I think this works for both Home and Pro users. But you need to have Administrator privileges, to do this trick.
- Once you reach the above item, click on the right side – Configure Automatic Updates policy.
- Click the Disabled option to prevent this policy from running again.
- Then click Apply and OK buttons.
Sometimes the above option may not work or necessary privileges are there to perform this operation. In that case, you can try this other trick.
- Using the Local Group Policy editor path as above, double-click the option.
- Make the Policy as “Enabled“.
- There are number of options available now.
- 2 – Notify for download and auto install.
- 3 – Auto download and notify for install.
- 4 – Auto download and schedule the install.
- 5 – Allow local admin to choose setting.
4. Select the “2” option.
5. This will notify of the “1809” upgrade and any other security updates before downloading.
6. Also you can decide when to install them.
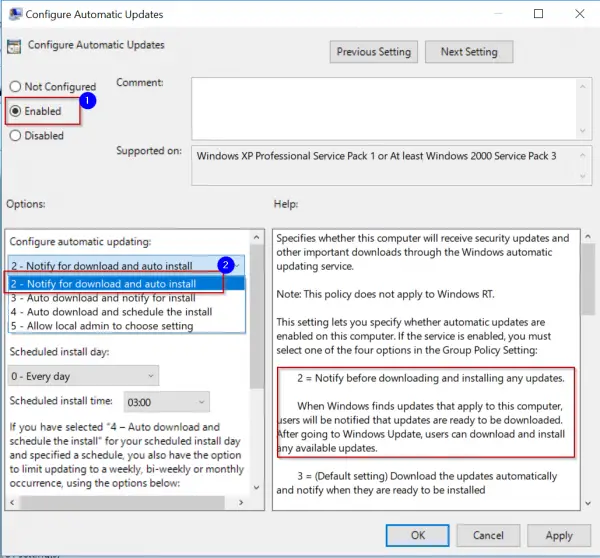
Once you see this notification, you can install the 1809 update manually by going to Settings > Update & Security > Windows Update. You can revert the changes at any time, by changing the above policy option from “Enabled” to “Not Configured“.
Branch Readiness Level Tip to Block Redstone 5 Upgrade
In this method, you can make use of the “Update & Security” option in Windows Settings. On the left-hand side you have “Windows Update”. Click it. Then on the right hand side, click on “Advanced options”.

Another window opens. Here you have the option to “Pause Updates” if you are on 1803 or April Creators update version. Switch this option to “On”. With this feature on Windows 10 Pro, you can
Temporarily pause updates from being installed on this device for up to 35 days. When updates resume, this device will need to get the latest updates before it can be paused again.

As we know 1809 October update is ready to be pushed from 1st Oct onwards for regular users. So you can utilize this little tweak on Sept 29th or 30th, so you have 35 days to see if the new version is stable or not.
Then it automatically installs the latest updates, before you can pause again. So this is like a half-knife from stopping the Redstone 5 build version.
Just below the above option, there is another setting that says –
- Choose when updates are installed.
Here you can set the branch readiness level to –
Don’t choose the other option that says “Semi-Annual Channel (Targeted)” which is on , by default.
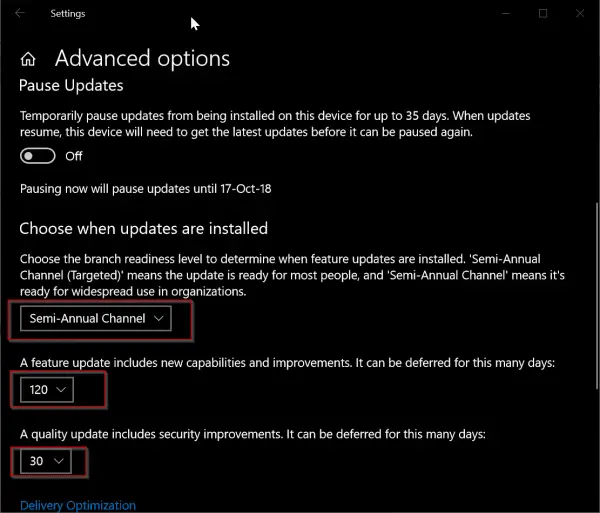
Then just below it, there are two settings –
- A feature update includes new capabilities and improvements. It can be deferred for this many days:
- A quality update includes security improvements. It can be deferred for this many days.
Since 1809 is a feature update, you can set it something like 120 days, which will defer the October upgrade till 4 more months. I think you can leave the default setting of quality update as it is, which is generally “0” days.
There is also a small note below this setting which embraces the “cruelty” of Microsoft. It tries to install Windows 10 new updates, without taking user acceptance into purview. This was lot easier in Windows 7 or Vista.
Note: Windows Update might update itself automatically first when checking for other updates.
And then it says –
Configure automatic device setup after an update under the Privacy section in “Sign-in” options.
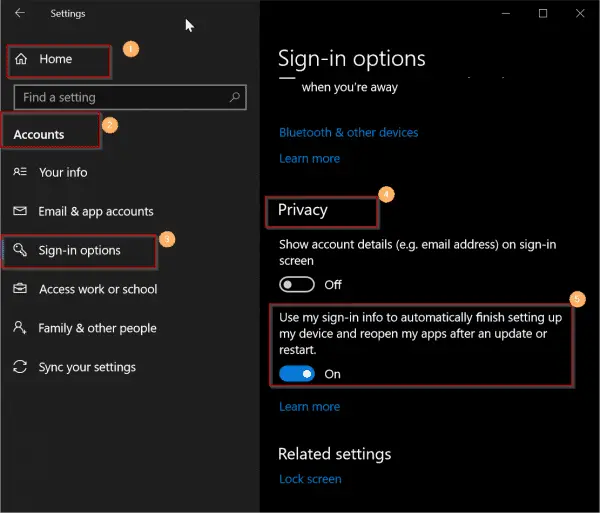
So in case Windows 10 has done the upgrade, make sure that option is set to “On”, so it can use the sign-in information automatically. Otherwise, your system might hang up in the middle.
The Registry Tip to Block October 2018 Upgrade
If you are a Windows 10 Home user, then the above trick may not be available on your list.
But don’t dishearten!
With the help of Registry Editor you can block the Octorber 2018 upgrade.
- Press Win+R and type “regedit”.
- Open the following item in it.
- HKEY_LOCAL_MACHINE\SOFTWARE\Microsoft\WindowsUpdate\UX\Settings
- Under this you have to create the following keys.
- BranchReadinessLevel
- DeferFeatureUpdatesPeriodInDays
- DeferQualityUpdatesPeriodInDays
- For all the above keys, you have to choose the “Base” as “Decimal“.
- For “BranchReadinessLevel”, you can set a value 10 or 20. To enter the value data, you need to double click the value name. A data value of 10 means “Semi-Annual Channel (Targeted)” and 20 means “Semi-Annual Channel“.
- For “DeferFeatureUpdatesPeriodInDays” you can set any value from 0 to 365 days. (It means you can defer the upgrade until 1 year).
- For “DeferQualityUpdatesPeriodInDays” you can set in the same range. (But this is not preferred, as it will also defer any security updates other than 1809 upgrade related).
As a Pro user, you have the luxury of these keys being created automatically, once you set the options in Windows Update & Security settings.
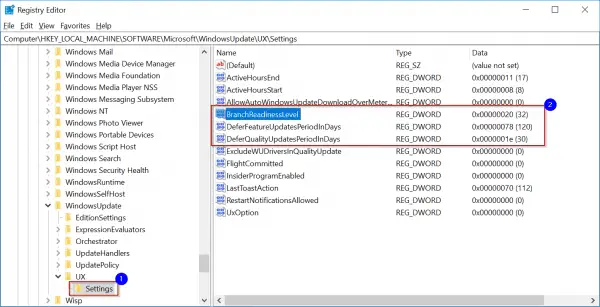
To create any new value, you can right-click an empty area and select New > DWORD (32-bit) value. You can choose the Decimal option while selecting the base.
During the navigation of the path, if you don’t find any item like “UX”, simply click the parent folder and do New > key and create the missing key.
Wushowhide Trick to Hide 1809 Upgrade
An alternative tweak which would temporarily prevent a driver update from reinstalling in Windows 10 can also be used to defer the 1809 update. As we know with latest features and fixes, Win 10 also provides the latest updates to your drivers. These are automatically installed.
But in some cases, the driver update can temporarily cause issues. In such a case, you can prevent the problematic driver from reinstalling again when the next Windows Updates are installed.
This trick can be used to solve our problem.
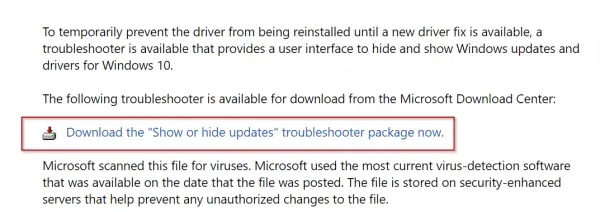
Step 1 : Download Microsoft’s Wushowhide tool by going to KB 3073930 page.
Step 2: For this you can click on the link that says “Download the ‘Show or hide updates’ troubleshooter package now“.
Step 3: Move it to a convenient location.
Step 4: Double-click on Wushowhide.diagcab to run it.
Step 5: It will run for long time. When it comes out of the process, click on the link with the label “Hide Updates”.
Step 6: This will show all the “hidden updates” , Microsoft pushes to your computer.
Step 7. If the “Feature update to Windows 10, Version 1809” (something like that) is visible and checked, just uncheck it.
Step 8: If this troubleshooting tool successfully worked, your upgrade/update/patch will be hidden.
Step 9 : You will see a “Troubleshooting has completed” dialog. Then beside the “1809” update you can see that it is marked as “Problems found”. It means you have successfully completed your hack to prevent the 1809 upgrade.


