- How To Post To Instagram From PC or Mac
- Wondering how to post to Instagram from a PC or Mac computer? You’re in the right place…
- How To Post On Instagram From Computer
- Post On Instagram From PC or Mac With Scheduling Tools
- Hopper HQ
- Plan your social media posts.
- How to upload photos to Instagram from a PC
- Upload photos to Instagram from a PC with these quick tricks
- Method 1: Vivaldi
- Method 2: BlueStacks App Player
- How to Post Photo & Video on Instagram from PC?
- Upload video to Instagram from PC
- 5 ways to post on Instagram from computer
- 2. Install Instagram Desktop (A Chrome’s extension)
- 3. change Developer Tools (or User-Agent on Safari)
- 4. Install Bluestacks
- 5. Use Facebook Creator Studio
- How to edit Instagram post from mobile & PC?
- When to post on Instagram?
- How to save Instagram photos on pc?
How To Post To Instagram From PC or Mac
Wondering how to post to Instagram from a PC or Mac computer? You’re in the right place…
To the dismay of people all over the world, Instagram does not allow us to upload photos or videos to our profiles from your desktop or laptop.
This is an intentional move from Instagram to encourage mobile use of the app and engagement with other users. However, for many photographers, influencers, and businesses whose content has been taken or filmed on a camera, the task of sending everything from desktop to phone to post manually can be very time-consuming!
Luckily, there are a few ways around this issue using third-party tools or clever desktop hacks. We’ve compiled lots of info from the web about how to post to Instagram from any computer, PC, or Mac, and put it into this handy guide!
How To Post On Instagram From Computer
There are 4 ways to use a laptop or desktop computer (PC or Mac) to post photos and videos on Instagram.
- Scheduling Tools
- Hopper HQ
- Changing Browser User-Agent
- Chrome
- Safari
- Third-Party Tools
- Bluestacks
- Deskgram
- Uplet (Mac only)
- Other
- Facebook Creator Studio
Post On Instagram From PC or Mac With Scheduling Tools
The easiest way to post to Instagram from PC or Mac is with a scheduling tool. This offers similar features to the instant services detailed below, but also allows you to bulk upload and schedule your photos and videos to post in the future. Scheduling Instagram content saves heaps of time, and allows teams and individuals to be extra organized when planning what to post and when!
вђВ Check out our How To Schedule Instagram Posts guide here вђ
Hopper HQ
Using Hopper HQ, you can post photos and videos to Instagram from your desktop with ease and can choose between sending them instantly or scheduling for the future. Here’s how it works:
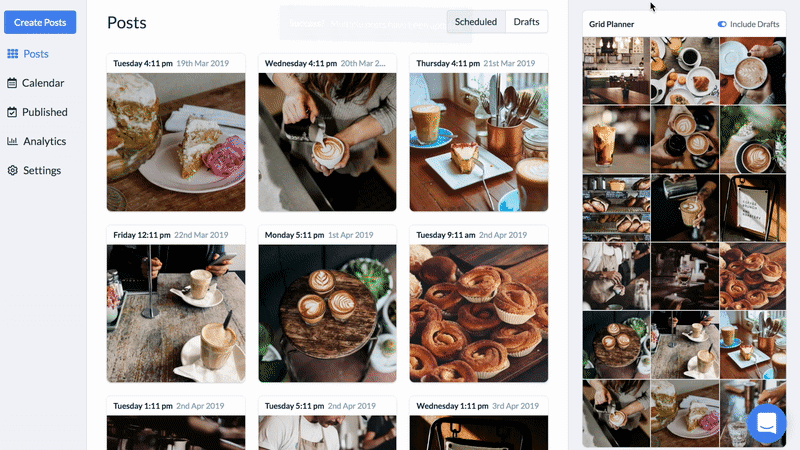
- When you make an account with Hopper HQ and log in to your dashboard, you are greeted with all of your current scheduled posts in the order they are going to publish. As well as this, with the Grid Planner you can see how all of your scheduled posts will look on your Instagram profile once they’ve been published, allowing you to easily plan a great feed aesthetic…
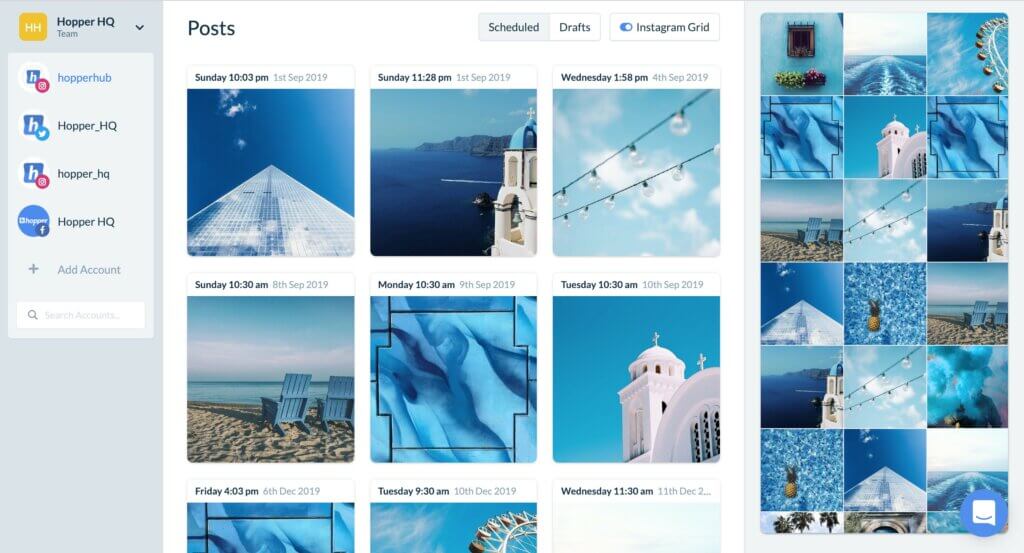 The Hopper HQ dashboard and grid planner allow you to plan and manage all your Instagram content in one place.
By clicking on ‘Create Posts’ in the top left corner, you are taken to a window where you are able to upload 50 photos or videos at once. To post to Instagram from PC or Mac with Hopper HQ, you’re able to upload files from your device, Dropbox, Google Drive, Google Photos, Box, URL or web search. This is very handy if you work collaboratively on cloud file sharing sites and want to post to Instagram from your desktop.
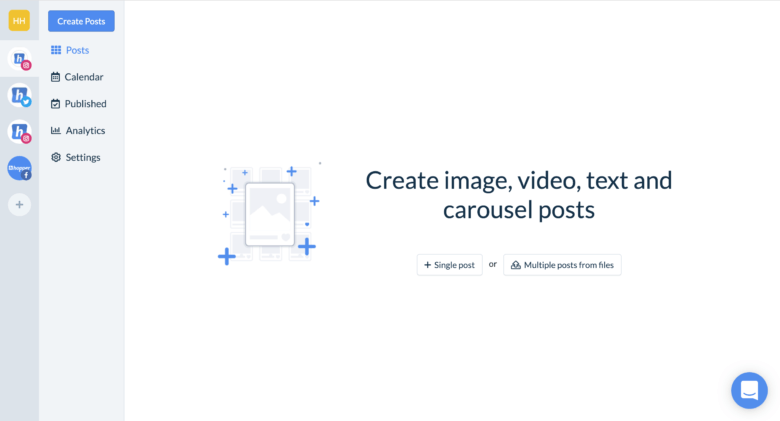 Bulk upload up to 50 photos and videos from multiple sources including Google Drive and Dropbox.
If your images are not the correct size for Instagram, you will see an alert and be taken to the photo editor. Here you can crop your photo with Hopper HQ’s easy pre-set dimensions for portrait and landscape photos, as well as apply any filters or edits.
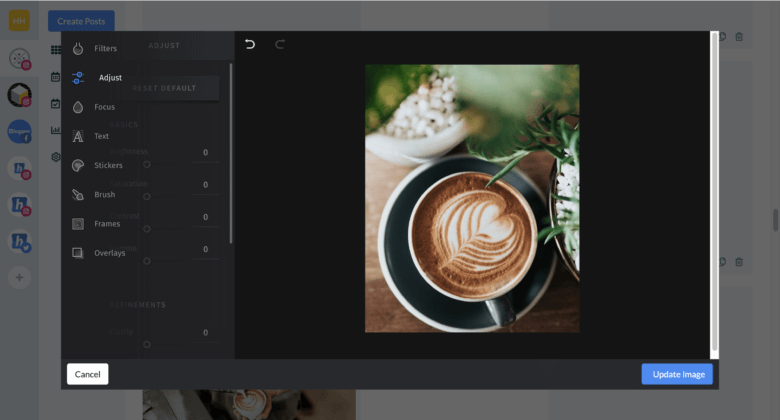 Edit your posts for Instagram with Hopper HQ image editor.
Once you’ve made any edits, you can write captions for all of your uploads (including emojis) as well as the first comments for your hashtags. You then have the choice to ‘Post Now’, schedule a time, or save as a draft (a handy feature if you’re working in a team). If you decide you want to post the same photo to another Instagram account, or even a Facebook or Twitter page, you can easily add accounts to the right-hand side of the post using the plus icon.
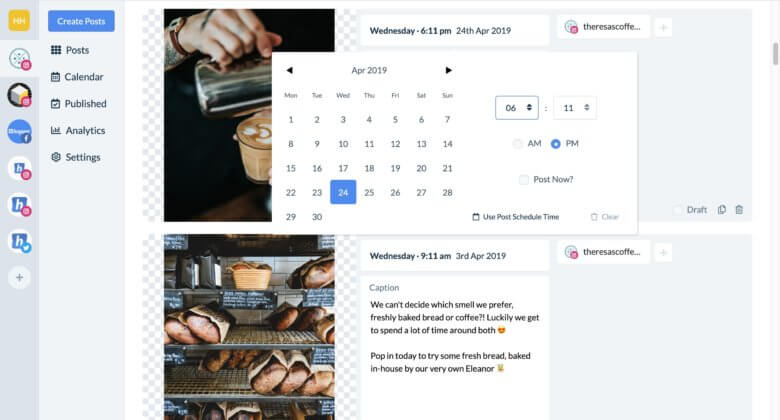 Schedule your Instagram posts with captions and first comments in advance on Hopper HQ.
Hopper HQ also has a calendar view to easily keep track of your posting consistency, as well as user-friendlyВ AnalyticsВ to monitor the success of your content and inform you of your audience demographics!
 The drag and drop calendar on Hopper HQ.
Plan your social media posts.
Visually plan your posts. Drag and drop everywhere.
How to upload photos to Instagram from a PC
By Cat Ellis 26 January 2021
Upload photos to Instagram from a PC with these quick tricks

You might be surprised to find out that you can actually upload to Instagram from PC. And, it’s quite a useful trick to know, since you can take advantage of a free photo editor to make your adjustments instead of dealing with frustrating mobile apps.
Whether you’re using the official Windows 10 app or Instagram’s website, it’s remarkably hard to upload to Instagram from PC. Not to mention, macOS doesn’t have an Instagram app.
It’s annoying, especially if you take the perfect photo with a digital camera instead of a smartphone and want to spruce it up with a desktop app before posting to Instagram.
Luckily, we have a few tricks to get around this obstacle and upload to Instagram from PC or Mac. It just takes grabbing some free software.

Method 1: Vivaldi
1. Get Vivaldi
The super-customizable web browser Vivaldi offers the quickest and easiest way to upload photos to Instagram from a PC or Mac. It does this by running the mobile version of Instagram’s website in a web panel.
Download and install Vivaldi, then either run through the wizard to import bookmarks and set your preferences, or click ‘Skip all’ and continue with the browser’s default settings.
2. Create a web panel
Navigate to www.instagram.com, then click the plus icon (Add Web Panel) on the left-hand side of the browser interface. The URL will be filled in automatically, so all you have to do is click the plus again.
The mobile version of Instagram will now appear in a sidebar on the left-hand side of the browser, and will stay there as you browse other sites. Log into your account, then resize the sidebar until the mobile site fits in comfortably.
3. Upload to Instagram
Click the plus icon at the bottom of the website to choose a photo from your PC or Mac, apply filters, add a caption and tags, and upload it to your account.
Method 2: BlueStacks App Player
1. Get BlueStacks App Player
The Instagram app for Android is superb, and you can run it on your desktop using free Android emulator BlueStacks App Player, enabling you to upload photos to Instagram from your PC or Mac.
Download and install BlueStacks, then wait a few minutes while the engine starts for the first time. Dismiss the tutorial using the cross at the top right, make sure the correct language is selected and tap the arrow button.
2. Log into your Google account
Click ‘Continue’, then log in using your Google account. Review the terms of service and, if you agree, click ‘OK’.
The next checkboxes are completely optional; if you’re only using BlueStacks to upload to Instagram, feel free to uncheck them all. Click the Next arrow, then enter your name (it’ll only be used to personalize some apps).
3. Install the Instagram app
You’ll now see a version of the Google Play Store. Search for Instagram (the search bar is in the top right), select the official app when it appears and click Install. The app will request access to information including your contacts and location. If that’s OK with you, click ‘Accept’.
After a moment, the Instagram icon will appear under the My Apps tab. Click it once to launch it.
4. Upload, apply filters and share
BlueStacks will change to the size and shape of a vertically-oriented smartphone. Sign into your Instagram account with your usual details (the login link is at the bottom). Your Instagram feed will appear as it would on a phone.
Click the plus icon at the bottom, then select ‘Gallery’. Click the ‘Gallery’ drop-down menu at the top left and select ‘Other’, then click ‘Pick from Windows’. Find the photo you want to upload, select it and click ‘Open’.
You can now crop the picture, add filters and a caption, and share it with your followers via all the usual social networks.
How to Post Photo & Video on Instagram from PC?
There are different ways to post on Instagram from pc including installing the Instagram app, browser extension of desktop for Instagram, Facebook creator studio, third-party apps like Bluestacks, and social media management tools to upload multiple photos to Instagram from the computer or laptop.

Nowadays, many Instagram users are looking for growing their account using Instagram automation or any tools to perform better on Instagram. You may wonder if you can upload pictures or videos to Instagram from pc to post faster or do not use your mobile to transfer desktop videos. Yes, you can post to Instagram from a computer or your laptop easily and quickly.
To post on Instagram from a computer or laptop, there are five ways for both Mac and Windows users. Scroll down to see the instruction of each method.
- Download the Instagram app
- Using the Instagram desktop (a chrome extension)
- Developer tools on a browser
- Bluestacks
- Facebook creator studio
Though you cannot post carousals (multiple pictures) from some of them, for example, Facebook Creator Studio or Chrome’s Extension. Scroll down and find what instruction best suits you.
Upload video to Instagram from PC
Many of you may looking for an app or extension to upload video to Instagram from laptop. You can follow these steps (I also added tutorial pictures).
#1 Method
Creator studio is the best tool to post short and long videos on Instagram from a PC. To do so, you can both log in with Instagram or Facebook if you have connected your account to Facebook.
To post video on Instagram from desktop:
- Go to https://business.facebook.com/creatorstudio/
- Click Instagramlogin
- Enter the login info
- From the dashboard, select Create Post on the top left (blue color button)
- Scroll down to see Add content and click.
- Select the video from your laptop or computer
- Wait until is %100 uploaded
- Write the caption (optional)
- Click the Publish button on the bottom right.
 Post video on Instagram from PC with Facebook creator studio
#2 Method
The other method is adding a desktop for the Instagram chrome extension.
- Go to Instagram for desktop
- Click Add to Chrome
- Login to your Instagram account (you must login before using extension)
- Click on the D icon on top menu on Chrome
- Click on upload video
- Select your video (less than 1 minute long)
- Add descriptions and click post
5 ways to post on Instagram from computer
Here I would list 5 general ways to post on Instagram from pc but notice that you choose based on your operation system of Mac iOS or Windows.
1. Download the Instagram App
Use these methods on the laptop because you need to enable access to the camera and microphone. It is also possible to use this method if your personal computer (PC) is connected to the camera and microphone. If not, and you must use PC, scroll down and go for other methods.
To download and use the Instagram app:
- Go to Microsoft Store (Windows only) to get the Instagram app for free
- Launch the app and enter login info

- Click on the camera icon on the top left

- Enable access to the camera and microphone from the control panel. Select a picture or video from the laptop. Open the picture or video, click Next, and Share.

*You should sign in to Microsoft account on windows before launching the app. Access Microsoft account through control panel>User Account.
2. Install Instagram Desktop (A Chrome’s extension)
This way works for both Mac and Windows users.
Chrome-extension of Desktop for Instagram is a very simple way to upload to Instagram from PC. However, you are not able to post multiple pictures, which is possible through other methods, I explain in a second.
*This method works for both Windows and iOS users.
- Search Google for Desktop for Instagram – Google Chrome. Click on Add to Chrome and Click Add Extension

- Select the Instagram icon on top menu and enter the login info
- choose + icon on feed. Select a photo or a video and open it

- Edit it as you require and Click Next and Share! Done!

3. change Developer Tools (or User-Agent on Safari)
In this method, you change some settings on a browser and convert the PC screen mode to a mobile one. This way is the same for both Windows and Mac users.
- Log in to your Instagram account from Chrome. Click on the Three Dots Icon>More Tools>Developer Tools

- Select the Mobile Icon on top menu. Change the respective mode to any mobile size (iPhone 6/7/8). Refresh the page!
- Choose the + icon and select a photo or video

- Open the file from the computer or laptop.
- Click Next and Share.


4. Install Bluestacks
It is easy and simple to install.
- Download, Install and open Bluestacks app on your computer. Search for the Instagram app inside Bluestacks, and install the Instagram app.

- Enter your login info and Open the app from Bluestacks.

- If required, send security code through the Instagram email address, and log in.

- Click on the + icon on the Instagram feed.

- Click On Gallery, and Go to Other.

- To upload photos to your Bluestacks gallery, click on pick from windows (you should first upload the photos to Bluestacks, then share them on Instagram).

- Back to the Instagram app from Bluestacks and select + icon and select pictures from Bluestacks gallery

- Edit photos as you need and click done

- Write the caption, tag people, or locations. Click Share!

5. Use Facebook Creator Studio
To use this method, you should go to the Facebook Business website first, and log in with a Facebook account.

- Click on Instagram Icon, on the top and click on connect youraccount and enter your Instagram login info.

Once you logged in, there are two different parts. Click on Instagram, and you can see published, archived, or scheduled posts.
Click on + icon and select photos or videos from computer

Write the caption (160 characters) and publish it! Done.
How to edit Instagram post from mobile & PC?
Sometimes it might happen for you to update an Instagram post or add extra information to it. Fortunately, Instagram would allow you to edit the post, but you can only edit the captions, and you are not able to edit the photos or videos (for example, if you are going to replace the image).
To edit a post (video or photo) on Instagram, follow these steps:
- Open the Instagram app on your mobile phone or PC*
- Go to your profile
- Find the post you are going to edit
- Tap or click on the three-dot just on the top right of the post
- Tap or click on Edit
- Replace the text or write a new one
- Click or tap Done.
*if you are going to use Instagram on PC, go to the top and follow the given instruction.
When to post on Instagram?
The best way to see when to post on Instagram is to use Instagram for business. if you are running a personal account simply from Instagram setting on the app (on the top right of the profile), switch it to a creator or business account.
Once your followers exceed 100, Instagram would give you the insight which is good to have an overview of the account.
After switching the account to a business or creator one, to find the best time to post on Instagram follow these steps:
- Open the Instagram app and go to the profile
- Tap on the three-lined icon
- Tap on the insight
- Tap on the audience and scroll down
- Find the days and hours
This is a reliable source to see when your audiences are active. So, the more users are online, the better they would engage with your posts. Find the most engaging time and post your photos and videos at that time.

How to save Instagram photos on pc?
The simplest way to save or download Instagram photos and videos is to use the Instagram Desktop extension on chrome. It’s free and easy to install. Once you install it and you open it on your pc, it will give you the option to download each photo or video you want.
Just open the post and click on the cloud icon on the top left of the post. Choose the folder or place on the pc and click Done.


