- Создаем установочную USB флешку с Windows Server 2016
- Установочная USB флешка для UEFI системы
- Установочная флешка c таблицей разделов MBR для BIOS и UEFI архитектур
- Размер файла Install.wim более 4 Гб
- Tutorial: Create Windows Server 2016 Bootable USB from ISO to Install OS
- Need to create Server 2016 bootable USB for OS installation
- Steps to create Windows Server 2016 bootable USB from ISO
- Further reading: create portable Server 2016 bootable USB
- Steps to create a portable Windows Server (2016) USB drive
- Final Words
- Создание загрузочного USB-устройства флэш-памяти Create a Bootable USB Flash Drive
- Создание загрузочного USB-устройства флэш-памяти To create a bootable USB flash drive
Создаем установочную USB флешку с Windows Server 2016
Конечно, что самый простой и интуитивный способ создать загрузочную USB флешку для установки Windows Server 2016 на физический сервер – воспользоваться утилитой Windows USB/DVD Download Tool. Данная утилита позволяет записать имеющийся *.iso образ Windows на USB флешку/диск и сделать его загрузочным. Однако, она форматирует флешку в файловую систему NTFS, загрузка с которой не поддерживается на UEFI системах и пригодна такая флешка только для установки Windows только на BIOS системах. В данной статье мы покажем, как без использования сторонних утилит создать установочную флешку с дистрибутивом Windows Server 2016.
В зависимости от архитектуры сервера UEFI / BIOS нужно воспользоваться одним из следующих способов создания установочной флешки.
Важно. При выполнении данной инструкции нужно быть внимательным, проверять пути к дискам и номера дисков, в противном случае, можно случайно отформатировать диск с данными. USB флешка будет отформатирована в любом случае, и данные на ней удалены.
Установочная USB флешка для UEFI системы
В том случае, если флешка будет использоваться для загрузки и установки Windows Server 2016 на сервере с поддержкой UEFI, на загрузочную флешку накладываются следующие требования:
- Минимальный размер USB флешки – 8 Гб
- Тип таблицы разделов флешки – GPT
- Файловая системе — FAT32
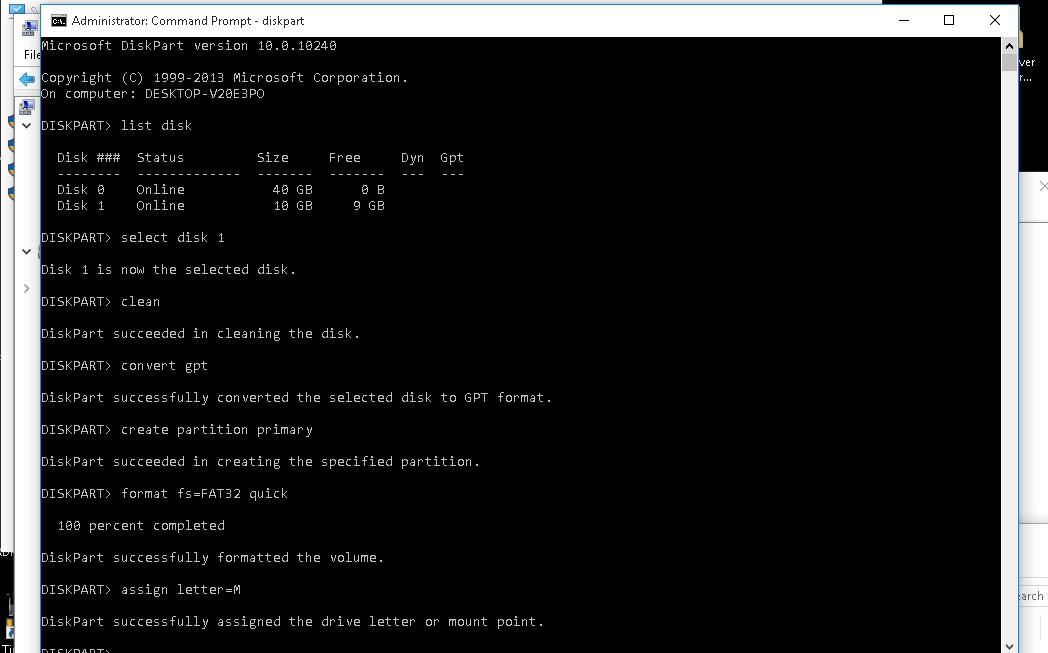
Итак, подключите USB флешку к компьютеру (в нашем примере это ПК с Windows 10), откройте командную строку с правами администратора, выполните команду DISKPART, в контексте которой выполните следующие команды:
Выведем список дисков, моем случае USB флешка имеет номер диска 1. Выберем ее.
Очистим содержимое флешки.
Преобразуем таблицу разделов в GPT:
Создадим новый раздел (размер не должен превышать 16 Гб):
create partition primary
Совет. Если размер USB флешки более чем 16 Гб, нужно создать раздел, размером до 16Гб:
create partition primary size=16000
Отформатируем раздел в ФС FAT32:
format fs=FAT32 quick
Назначим новому разделу букву диска:
Осталось завершить сеанс diskpart:
Скопируем файлы дистрибутива со смонтированного iso образа Windows Server 2016 на флешку (предполагаем, что iso образ смонтирован с буквой диска E:\).
xcopy e:\* m:\ /H /F /E
Установочная флешка c таблицей разделов MBR для BIOS и UEFI архитектур
Возможно создать установочную флешку с Windows Server 2016 с таблицей разделов MBR для BIOS и UEFI системе. К USB драйву предъявляются следующие требования:
- Минимальный размер USB флешки – 8 Гб
- Тип таблицы разделов– MBR
- Файловая системе — FAT32
Также запустите сессию diskpart и последовательно выполните команды:
Список дисков в системе:
Выбираем USB диск (в моем примере, Disk 1):
Создадим новый раздел размером не более 16 Гб. Если размер флешки меньше 16 Гб:
create partition primary
create partition primary size=16000
Отформатируем флешку в файловой системе FAT32:
format fs=FAT32 quick
Сделаем раздел активным и назначим букву диска M:
active
assign letter=M

Завершим работу diskpart командой exit и скопируем файлы дистрибутива на флешку:
xcopy e:\* m:\ /H /F /E
Размер файла Install.wim более 4 Гб
В том случае, если размер файла Install.wim более 4Гб, скопировать такой файл на флешку не получится, т.к. максимальный размер файла на файловой системе ограничен 4 Гб. В данной ситуации придется разбить wim файл на несколько более мелких файлов с помощью DISM:
dism /Split-Image /ImageFile:e:\sources\install.wim /SWMFile:m:\sources\install.swm /FileSize:4096
Примечание. Инструкции для создания загрузочных USB флешек для разных версия Windows:
Tutorial: Create Windows Server 2016 Bootable USB from ISO to Install OS
No matter you want to create Windows Server 2016 bootable USB from ISO for OS installation, or create a portable Windows Server 2016 bootable USB drive, here you can find the step-by-step guide.

By Emily  / Last Updated March 17, 2021
Need to create Server 2016 bootable USB for OS installation
When you get a Netbook or a small form-factor computer that does come with a DVD for installing Windows Server 2016, you can download the Windows Server 2016 ISO from Microsoft official website, with which to create a bootable USB Windows setup media. Then you can install a new Server on your computer via that bootable USB drive.
Compared with installation DVD or CD, the Windows Server 2016 bootable USB drive is more portable to take everywhere, so that you can perform the OS installation more conveniently.
Steps to create Windows Server 2016 bootable USB from ISO
To make Windows Server 2016 bootable USB from ISO files, the first and foremost thing is to download the ISO files. If you have done that, you can use the DiskPart.exe tool to create a bootable USB Windows Server setup media.
Before proceeding, please note:
в‘ All data on the USB drive will be wiped out during the process, so you can back up required files in advance.
в‘ЎEnsure the USB drive has sufficient disk space to hold the Windows Server 2016 installation files. Usually, 8GB is enough.
Step 1. Insert the USB device to your computer and ensure it is detected by OS successfully.
Step 2. Click «Start» button, input «cmd» in the search box, right click the program and choose «Run as Administrator» option.
Step 3. In the subsequent Command Prompt window, type «diskpart» and press «Enter» to launch the DiskPart tool. Next execute all the below commands in turn.
list disk
select disk #: # is the disk number of the target USB drive.
clean
create partition primary
select partition 1
format fs=ntfs quick
active: set the selected partition active
assign letter= r or other available letter
Importance:
To create UEFI bootable USB Server 2016, you should type “format fs=fat32 quick” to format the USB as FAT32 rather than as NTFS. But for FAT32 file system, you need to notice that you cannot copy the files over 4GB to it due to the FAT32 based partition limitation. To solve it, you can split the vim file into smaller files by running the command: “dism /Split-Image /ImageFile:h:\sources\install.wim /SWMFile:r:\sources\install.swm /FileSize:4096”.
Then type “Exit” to leave the Diskpart command environment.
Step 4. Find the Windows Server setup ISO in your computer and double click on it to mount the ISO.
Step 5. Copy the entire contents of the mounted ISO drive to your bootable USB flash drive.
Step 6. Now, back to the Command Prompt window again and run the following command “H:cd\boot\ bootsect.exe /nt60 r” to build the boot sector code in the specified partition. (H:\ is the drive letter of the mounted Windows ISO and r:\ is the destination USB drive letter)
Further reading: create portable Server 2016 bootable USB
Now you know how to create Windows Server 2016 bootable USB drive from ISO to install OS on another computer. But what if you want to create bootable USB for a portable Windows Server 2016 USB, and then you can take your own familiar OS anywhere conveniently instead of carrying a heavy laptop? Then you can refer to the following content.
Steps to create a portable Windows Server (2016) USB drive
To create Windows 10 or Windows 8 bootable USB as portable Windows, you can use «Windows To Go» feature offered by Microsoft itself. But for creating Windows Server bootable USB stick, you need to turn to a third-party tool called AOMEI Partition Assistant Server since Microsoft does not offer such a feature for Windows Server.
This software not only allows you to install Windows Server 2003, 2008 (R2), 2012 (R2), 2016, 2019 to an external hard drive as a portable Windows Server but also enables you to install Windows 10/8/7 onto a USB drive as portable Windows USB. Moreover, it supports creating Windows Server to Go with either ISO image files, or the current system.
Attention: please prepare an empty USB 2.0 or 3.0 flash drive (the latter will perform faster).
If you have Windows Server 2016 ISO image, you can take the below steps to create Windows Server bootable drive using ISO.
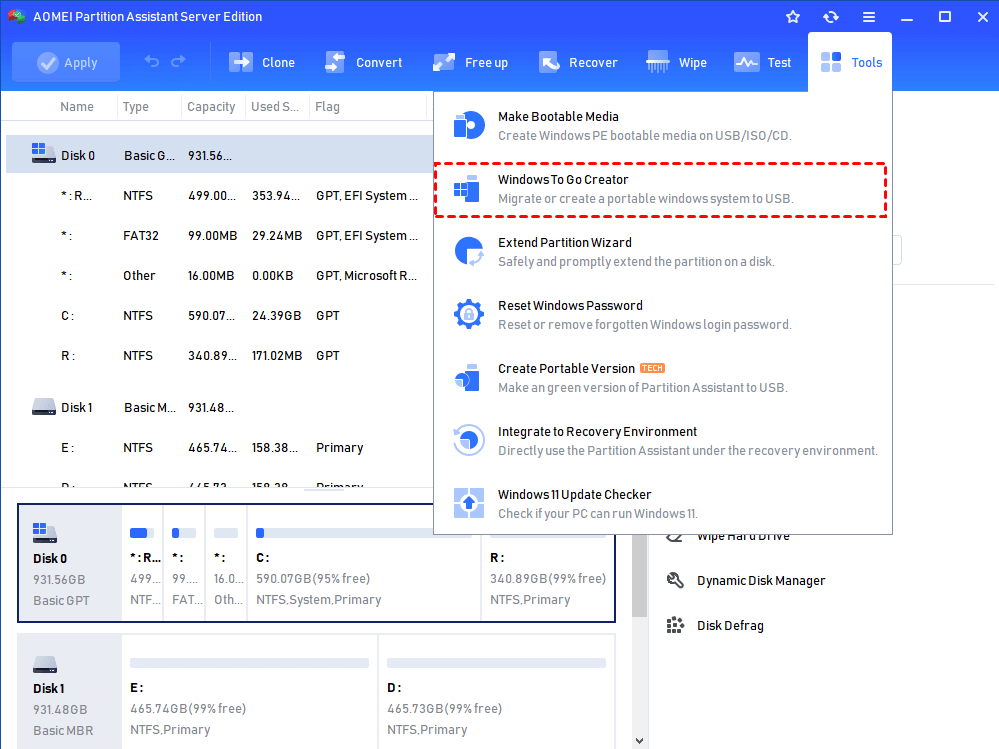
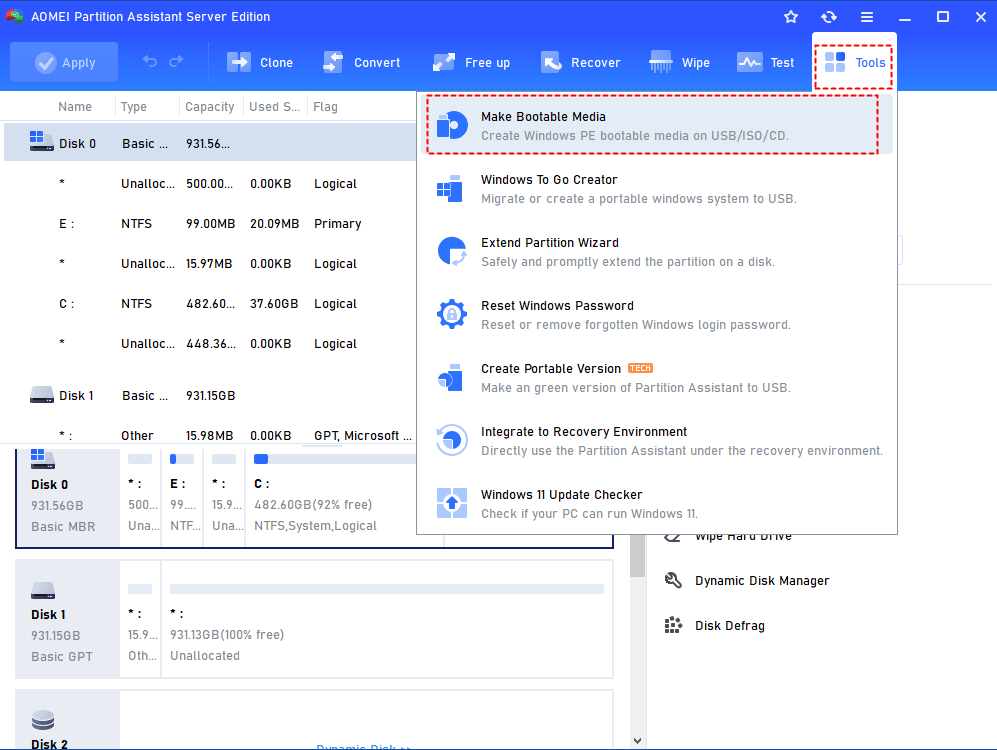
Step 1. Run the software and click «All Tools» and «Windows To Go Creator».
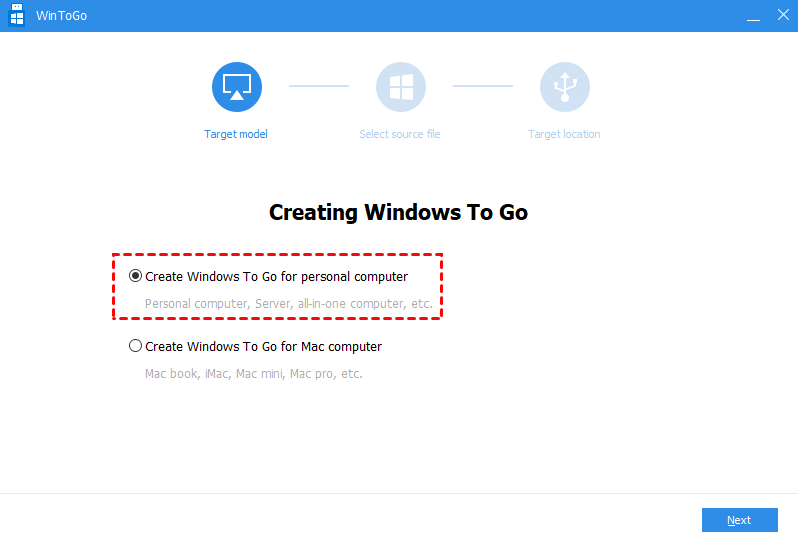
Step 2. In this window, choose the first way «Create Windows To Go for personal computer» and click «Next».
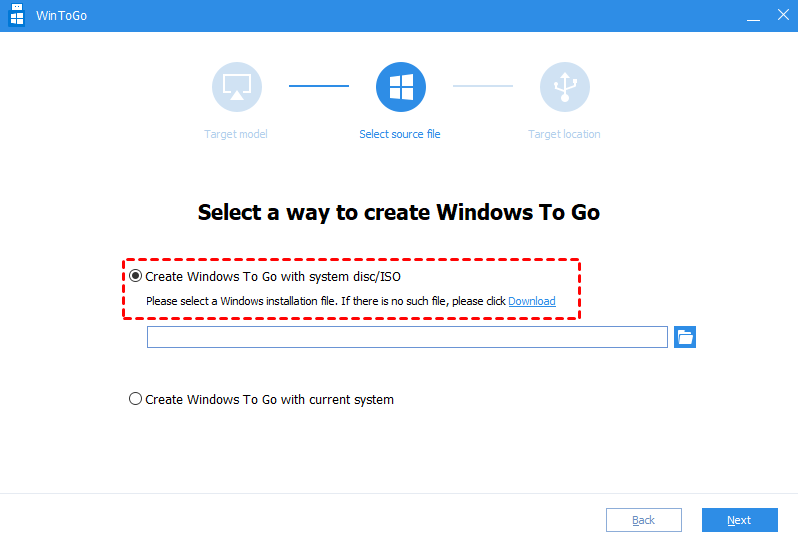
Step 3. Choose «Create Windows To Go with system disc/ISO» and select the Windows Server 2016 ISO files. Then click on «Next».

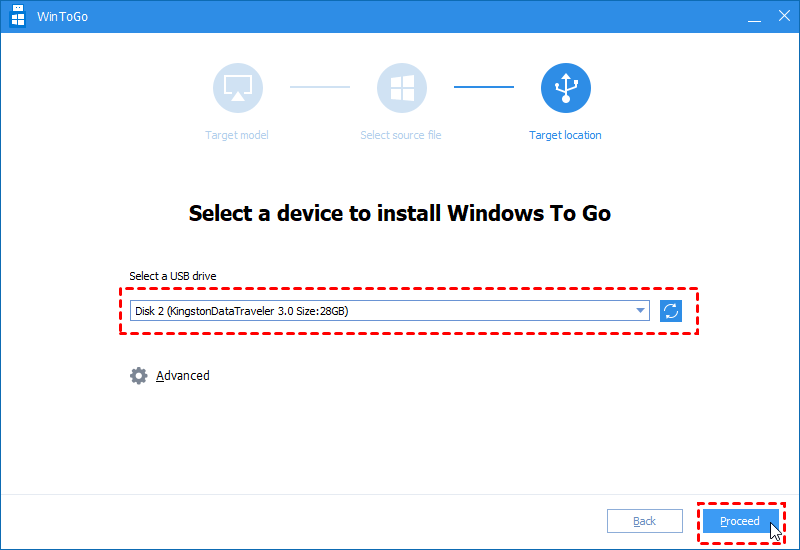
Step 3. Now, choose the right USB drive. If your USB drive does not appear, refresh it and try again.
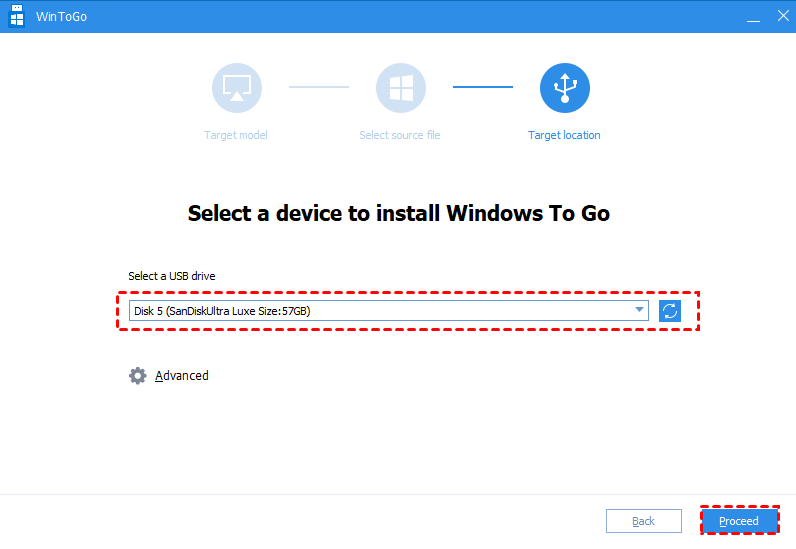
Step 4. Click «Proceed» to start the process.
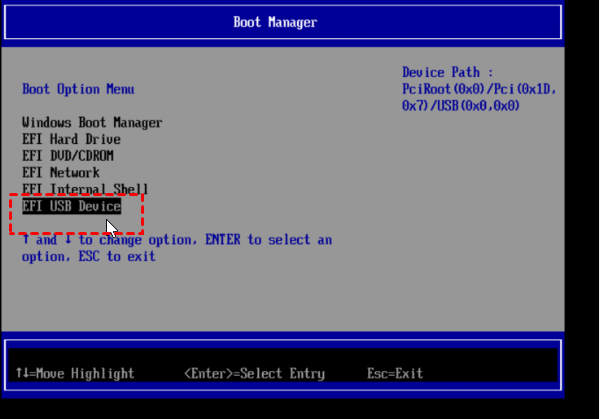
If the Windows installation files are not available, you can select the second method in Step 3 to create Windows to Go with the current system, which is much easier and more convenient. After the Server 2016 bootable USB is created, you can insert it into the target computer, restart it and change boot order in BIOS to boot computer from the destination USB drive.
вќ¤вќ¤вќ¤
If your Windows Server cannot boot as normal due to damaged MBR, system disk errors, etc, you can also use this software to make a bootable Windows Server USB for repairing Server boot issue by rebuilding MBR, checking and fixing OS partition errors from BIOS.
Final Words
In this article, you can get all the necessary information on how to create Windows Server 2016 bootable USB for your specific purpose. As a versatile disk manager tool, AOMEI Partition Assistant Server is also able to move Windows Server to new hard drive (SSD/HDD), copy entire Server hard disk to another disk, convert system disk between MBR and GPT partition table without deleting partition/losing data, allocating free space from one partition to another and more.
To enjoy those amazing disk management functions on unlimited Servers/PCs within one company with only one license, you can try AOMEI Partition Assistant Unlimited.
Создание загрузочного USB-устройства флэш-памяти Create a Bootable USB Flash Drive
Область применения: Windows Server 2016 Essentials, Windows Server 2012 R2 Essentials, Windows Server 2012 Essentials Applies To: Windows Server 2016 Essentials, Windows Server 2012 R2 Essentials, Windows Server 2012 Essentials
Вы можете создать загрузочный USB-накопитель, который будет использоваться для развертывания Windows Server Essentials. You can create a bootable USB flash drive to use to deploy Windows Server Essentials. Первым этапом является подготовка USB-устройства флэш-памяти с помощью служебной программы командной строки DiskPart. The first step is to prepare the USB flash drive by using DiskPart, which is a command-line utility. Сведения о DiskPart см. в статье Параметры командной строки DiskPart. For information about DiskPart, see DiskPart Command-Line Options.
Сведения о создании загрузочного флэш-накопителя USB для использования при восстановлении или переустановке Windows на компьютере вместо сервера см. в разделе Создание диска восстановления. To create a bootable USB flash drive for use in recovering or reinstalling Windows on a PC instead of a server, see Create a recovery drive.
Дополнительные сценарии, в которых вам может понадобиться создание или использование загрузочного USB-устройства флэш-памяти, см. в следующих темах: For additional scenarios in which you may want to create or use a bootable USB flash drive, see the following topics:
Создание загрузочного USB-устройства флэш-памяти To create a bootable USB flash drive
Вставьте USB-устройство флэш-памяти в работающий компьютер. Insert a USB flash drive into a running computer.
Откройте окно командной строки с правами администратора. Open a Command Prompt window as an administrator.
Введите diskpart . Type diskpart .
В открывшемся новом окне командной строки введите list disk , чтобы указать номер загрузочного USB-устройства флэш-памяти или букву диска, затем нажмите клавишу ВВОД. In the new command line window that opens, to determine the USB flash drive number or drive letter, at the command prompt, type list disk , and then click ENTER. Команда list disk отображает все диски компьютера. The list disk command displays all the disks on the computer. Запишите номер диска или букву диска USB-устройства флэш-памяти. Note the drive number or drive letter of the USB flash drive.
В командной строке введите select disk , где X — номер диска или букву диска USB-устройства флэш-памяти, а затем нажмите клавишу ВВОД. At the command prompt, type select disk , where X is the drive number or drive letter of the USB flash drive, and then click ENTER.
Введите clean и нажмите клавишу ВВОД. Type clean , and the click ENTER. Эта команда удаляет все данные с USB-устройства флэш-памяти. This command deletes all data from the USB flash drive.
Чтобы создать новый основной раздел на USB-устройстве флэш-памяти, введите create partition primary , и нажмите клавишу ВВОД. To create a new primary partition on the USB flash drive, type create partition primary , and then click ENTER.
Чтобы выбрать созданный раздел, введите select partition 1 и нажмите клавишу ВВОД. To select the partition that you just created, type select partition 1 , and then click ENTER.
Чтобы отформатировать раздел, введите format fs=ntfs quick и нажмите клавишу ВВОД. To format the partition, type format fs=ntfs quick , and then click ENTER.
Если серверная платформа поддерживает Единый интерфейс EFI (UEFI), следует отформатировать USB-устройство флэш-памяти в файловой системе FAT32, а в NTFS. If your server platform supports Unified Extensible Firmware Interface (UEFI), you should format the USB flash drive as FAT32 rather than as NTFS. Чтобы отформатировать раздел в файловой системе FAT32, введите format fs=fat32 quick и нажмите клавишу ВВОД. To format the partition as FAT32, type format fs=fat32 quick , and then click ENTER.
Введите active и нажмите клавишу ВВОД. Type active , and then click ENTER.
Введите exit и нажмите клавишу ВВОД. Type exit , and then click ENTER.
После завершения подготовки настраиваемого образа сохраните его в корневом каталоге USB-устройства флэш-памяти. When you finish preparing your custom image, save it to the root of the USB flash drive.


