- About USB on Mac computers
- USB port types and names
- USB specifications
- Get the best performance from your USB devices
- Learn more
- Identify the ports on your Mac
- Thunderbolt / USB 4
- Thunderbolt 3
- Thunderbolt
- Mini DisplayPort
- Ethernet
- FireWire
- SD card
- Audio
- Power
- Learn more
- How to Make a Windows 10 USB Using Your Mac — Build a Bootable ISO From Your Mac’s Terminal
- Quincy Larson
- Step 1: Download the Windows 10 ISO file
- Step 2: Insert your USB storage drive into your Mac
- Step 3: Use the diskutil command to identify which drive your USB is mounted on
- Step 4: Format your USB Drive to work with Windows
- Step 5: Use hdiutil to mount the Windows 10 folder and prepare it for transfer.
- Step 6: Copy the Windows 10 ISO over to your USB Drive
- Step 7: Put your USB into your new PC and start loading Windows
- Quincy Larson
About USB on Mac computers
Learn about the types and features of USB ports on your Mac.
USB port types and names
USB (Universal Serial Bus) is an industry standard for connecting computers and other devices. It’s available with many types of ports, and each type has a unique shape. On Mac, USB is available with these ports, depending on your Mac model:
Type USB-A ports are commonly called USB, USB 2, or USB 3 ports, depending on the USB specification they support. They aren’t reversible, so a USB-A connector plugs into the port only when oriented correctly.
Type USB-C ports are available on Mac as standard USB-C ports, Thunderbolt 3 ports, and Thunderbolt / USB 4 ports. They all look the same, and the connector plugs into the port in either orientation.
Learn more about identifying the ports on your Mac, as well as the adapters and cables you can use to connect older devices to type USB-C ports.
USB specifications
USB specifications are important primarily when you want the most speed and power for your USB device, or your device needs more power or is using too much power. Every USB port supports a particular USB specification, which determines the port’s maximum data-transfer rate (speed) and power delivery when used with a USB cable and device that meets or exceeds that specification.
| USB specifications on Mac | Data transfer | Power delivery |
|---|---|---|
| USB 4 | Up to 10 Gbps | Up to 15W at 5V |
| USB 3.1 Gen 2 Also known as USB 3.2 Gen 2 | Up to 10 Gbps | Up to 15W at 5V |
| USB 3.1 Gen 1 Also known as USB 3.2 Gen 1 or USB 3 | Up to 5 Gbps | Up to 900 mA at 5V |
| USB 2.0 | Up to 480 Mbps | Up to 500 mA at 5V |
| USB 1.1 | Up to 12 Mbps | Up to 500 mA at 5V |
To learn which specification is supported by a type USB-A or type USB-C port on your Mac model:
- Choose Apple menu > About This Mac, click Support, then click Specifications.
- Check the System Information app for more details, including about USB devices connected to USB ports on your Mac. Select USB in the sidebar, then select a USB bus on the right.

Get the best performance from your USB devices
USB specifications all work with each other, but speed and power are limited by the cable or device that uses the earliest specification. For example, if you connect a USB 3 device to USB 2 port, your device is limited to USB 2 speeds, and it can’t draw more power from the port than can be delivered over USB 2. In other words, to get the best performance, make sure that the USB port on your Mac and the USB cable to your device meet or exceed the USB specification of the device itself.
If your Mac doesn’t recognize a USB device after you plug it into your Mac:
- Check all connections: Unplug the device from your Mac, then plug it back in, and make sure that all cables and adapters are securely connected at both ends. Test with another cable or adapter, if available.
- Plug the device directly into your Mac instead of a USB hub or other device, and if necessary test with a different USB port on your Mac or device.
- Some devices need their own software, such as drivers or firmware. Others work without additional software. Check with the maker of your device, and install all available Apple software updates as well.
- If your device came with an AC power adapter, use it. Some devices can be powered by the USB port on your Mac. Others need more power than your Mac can provide.
- Restart your Mac.
Learn more
- USB 3 devices can create wireless interference that affects Wi-Fi and Bluetooth devices. Learn how to resolve Wi-Fi and Bluetooth issues caused by wireless interference.
- Mac notebook computers with USB-C, Thunderbolt 3, or Thunderbolt / USB 4 can charge over that port using a compatible USB-C power adapter and cable.
Information about products not manufactured by Apple, or independent websites not controlled or tested by Apple, is provided without recommendation or endorsement. Apple assumes no responsibility with regard to the selection, performance, or use of third-party websites or products. Apple makes no representations regarding third-party website accuracy or reliability. Contact the vendor for additional information.
Identify the ports on your Mac
If you’re not sure which port to use with your external display, hard drive, camera, printer, iPhone, iPad, or other device, the port shapes and symbols in this guide should help.
Information about these and other types of Mac ports is in the specifications for your Mac: Choose Apple menu > About This Mac, click Support, then click Specifications. Or check your Mac user guide.
Thunderbolt / USB 4
These Mac models have Thunderbolt / USB 4 ports:
Use these ports with displays and other devices that connect using either a Thunderbolt 3 cable or USB-C cable. You can also connect a USB-C power adapter and cable to charge your notebook computer. If you have a device that doesn’t connect to this port, you might be able to use an adapter to connect it.
Thunderbolt 3
These Mac models have Thunderbolt 3 ports:
- iMac (Retina 5K, 27-inch, 2020)
- iMac (Retina 5K, 27-inch, 2019)
- iMac (Retina 4K, 21.5-inch, 2019)
- iMac (Retina 5K, 27-inch, 2017)
- iMac (Retina 4K, 21.5-inch, 2017)
- iMac (21.5-inch, 2017)
- iMac Pro
- Mac Pro (2019)
- Mac Pro (Rack, 2019)
- Mac mini (2018)
- MacBook Air (Retina, 13-inch, 2020)
- MacBook Air (Retina, 13-inch, 2019)
- MacBook Air (Retina, 13-inch, 2018)
- MacBook Pro (13-inch, 2020, Two Thunderbolt 3 ports)
- MacBook Pro (13-inch, 2020, Four Thunderbolt 3 ports)
- MacBook Pro (16-inch, 2019)
- MacBook Pro (13-inch, 2019, Two Thunderbolt 3 ports)
- MacBook Pro (15-inch, 2019)
- MacBook Pro (13-inch, 2019, Four Thunderbolt 3 ports)
- MacBook Pro (15-inch, 2018)
- MacBook Pro (13-inch, 2018, Four Thunderbolt 3 ports)
- MacBook Pro (15-inch, 2017)
- MacBook Pro (13-inch, 2017, Four Thunderbolt 3 ports)
- MacBook Pro (13-inch, 2017, Two Thunderbolt 3 ports)
- MacBook Pro (15-inch, 2016)
- MacBook Pro (13-inch, 2016, Four Thunderbolt 3 ports)
- MacBook Pro (13-inch, 2016, Two Thunderbolt 3 ports)
Use these ports with displays and other devices that connect using either a Thunderbolt 3 cable or USB-C cable. You can also connect a USB-C power adapter and cable to charge your notebook computer. If you have a device that doesn’t connect to this port, you might be able to use an adapter to connect it.

If your Mac notebook or desktop computer has more than one port like this, each port supports Thunderbolt 3 and USB-C.
MacBook models introduced in 2015 or later have a single USB-C port. This port doesn’t support Thunderbolt devices.
Use this port with displays and other devices that connect using a USB-C cable. You can also connect a USB-C power adapter and cable to charge your notebook computer. If you have a device that doesn’t connect to this port, you might be able to use an adapter to connect it.

If your Mac has only one port like this, it’s a MacBook that supports USB-C but not Thunderbolt.
Thunderbolt
These Mac models have Thunderbolt or Thunderbolt 2 ports:
- MacBook Pro introduced in 2011 through 2015
- MacBook Air introduced in 2011 through 2017
- Mac mini introduced in 2011 through 2014
- iMac introduced in 2011 through 2015
- Mac Pro introduced in 2013
Use these ports with displays and other devices that connect using a Thunderbolt cable.
Thunderbolt and Thunderbolt 2 are not the same as Mini DisplayPort . They have the same shape, but use different symbols on the cable and port. However, this port does support Mini DisplayPort for video output, so you can use a Mini DisplayPort cable to connect a Mini DisplayPort display.
Mini DisplayPort
These Mac models have Mini DisplayPort:
- MacBook Pro introduced in late 2008 through 2010
- MacBook Air introduced in late 2008 through 2010
- Mac mini introduced in 2009 and 2010
- iMac introduced in 2009 and 2010
- Mac Pro introduced in 2009 through 2012
Use this port with displays that connect using a Mini DisplayPort cable.
Mini DisplayPort is not the same as Thunderbolt or Thunderbolt 2 . They have the same shape, but use different symbols on the cable and port.
Use these ports with devices that connect using a USB-A cable. USB ports are sometimes known by the USB specification of the port, such as USB 2 or USB 3.

Use HDMI with displays and TVs that connect using an HDMI cable.
Ethernet
Use Ethernet with networks and devices that connect using an Ethernet (RJ45) cable.
FireWire
| FireWire 400 | FireWire 800 |
Use FireWire with devices that connect using a FireWire 400 or FireWire 800 cable.
SD card
Use the SD card slot with SD, SDHC, SDXC, MMC, and UHS-II media cards, such as those used by digital cameras.
Audio
Use Audio-Out — or — with headphones, speakers, and other audio-output devices that connect using an audio cable that has a 3.5 mm (1/8 inch) audio jack.
Use Audio-In with a microphone or other audio-input device that connects using an audio cable that has a 3.5 mm (1/8 inch) audio jack.
Power
Use the power port , if available, to connect your computer to AC power using a MagSafe cable or adapter. This port isn’t available on newer Mac notebook computers, which use Thunderbolt 3 or USB-C for power and charging. Learn more about power adapters and cables for Mac notebook computers.
Learn more
Information about products not manufactured by Apple, or independent websites not controlled or tested by Apple, is provided without recommendation or endorsement. Apple assumes no responsibility with regard to the selection, performance, or use of third-party websites or products. Apple makes no representations regarding third-party website accuracy or reliability. Contact the vendor for additional information.
How to Make a Windows 10 USB Using Your Mac — Build a Bootable ISO From Your Mac’s Terminal

Quincy Larson

Most new PCs don’t come with DVD drives anymore. So it can be a pain to install Windows on a new computer.
Luckily, Microsoft makes a tool that you can use to install Windows from a USB storage drive (or «thumbdrive» as they are often called).
But what if you don’t have a second PC for setting up that USB storage drive in the first place?
In this tutorial we’ll show you how you can set this up from a Mac.
Step 1: Download the Windows 10 ISO file
You can download the ISO file straight from Windows. That’s right — everything we’re going to do here is 100% legal and sanctioned by Microsoft.
If you want an English-language version of the latest update of Windows 10, you can download the ISO here.
If you have a relatively new computer, you probably want the 64-bit version. If you’re not sure, go with the 32-bit version to be safe.
If you want a non-English-language version of Windows, or want to get an older update version, download the ISO here instead.
Step 2: Insert your USB storage drive into your Mac
The ISO file is only about 5 gigabytes, but I recommend you use a USB drive with at least 16 gigabytes of space just in case Windows needs more space during the installation process.
I bought a 32 gigabyte USB drive at Walmart for only $3, so this shouldn’t be very expensive.
Stick your USB drive into your Mac. Then open your terminal. You can do this using MacOS Spotlight by pressing both the ⌘ and Space bar at the same time, then typing «terminal» and hitting enter.
Don’t be intimidated by the command line interface. I’m going to tell you exactly which commands to enter.
Step 3: Use the diskutil command to identify which drive your USB is mounted on
Open Mac Spotlight using the ⌘ + space keyboard shortcut. Then type the word «terminal» and select Terminal from the dropdown list.
Paste the following command into your terminal and hit enter:
You will see output like this (note — your Mac’s terminal may be black text on a white background if you haven’t customized it).
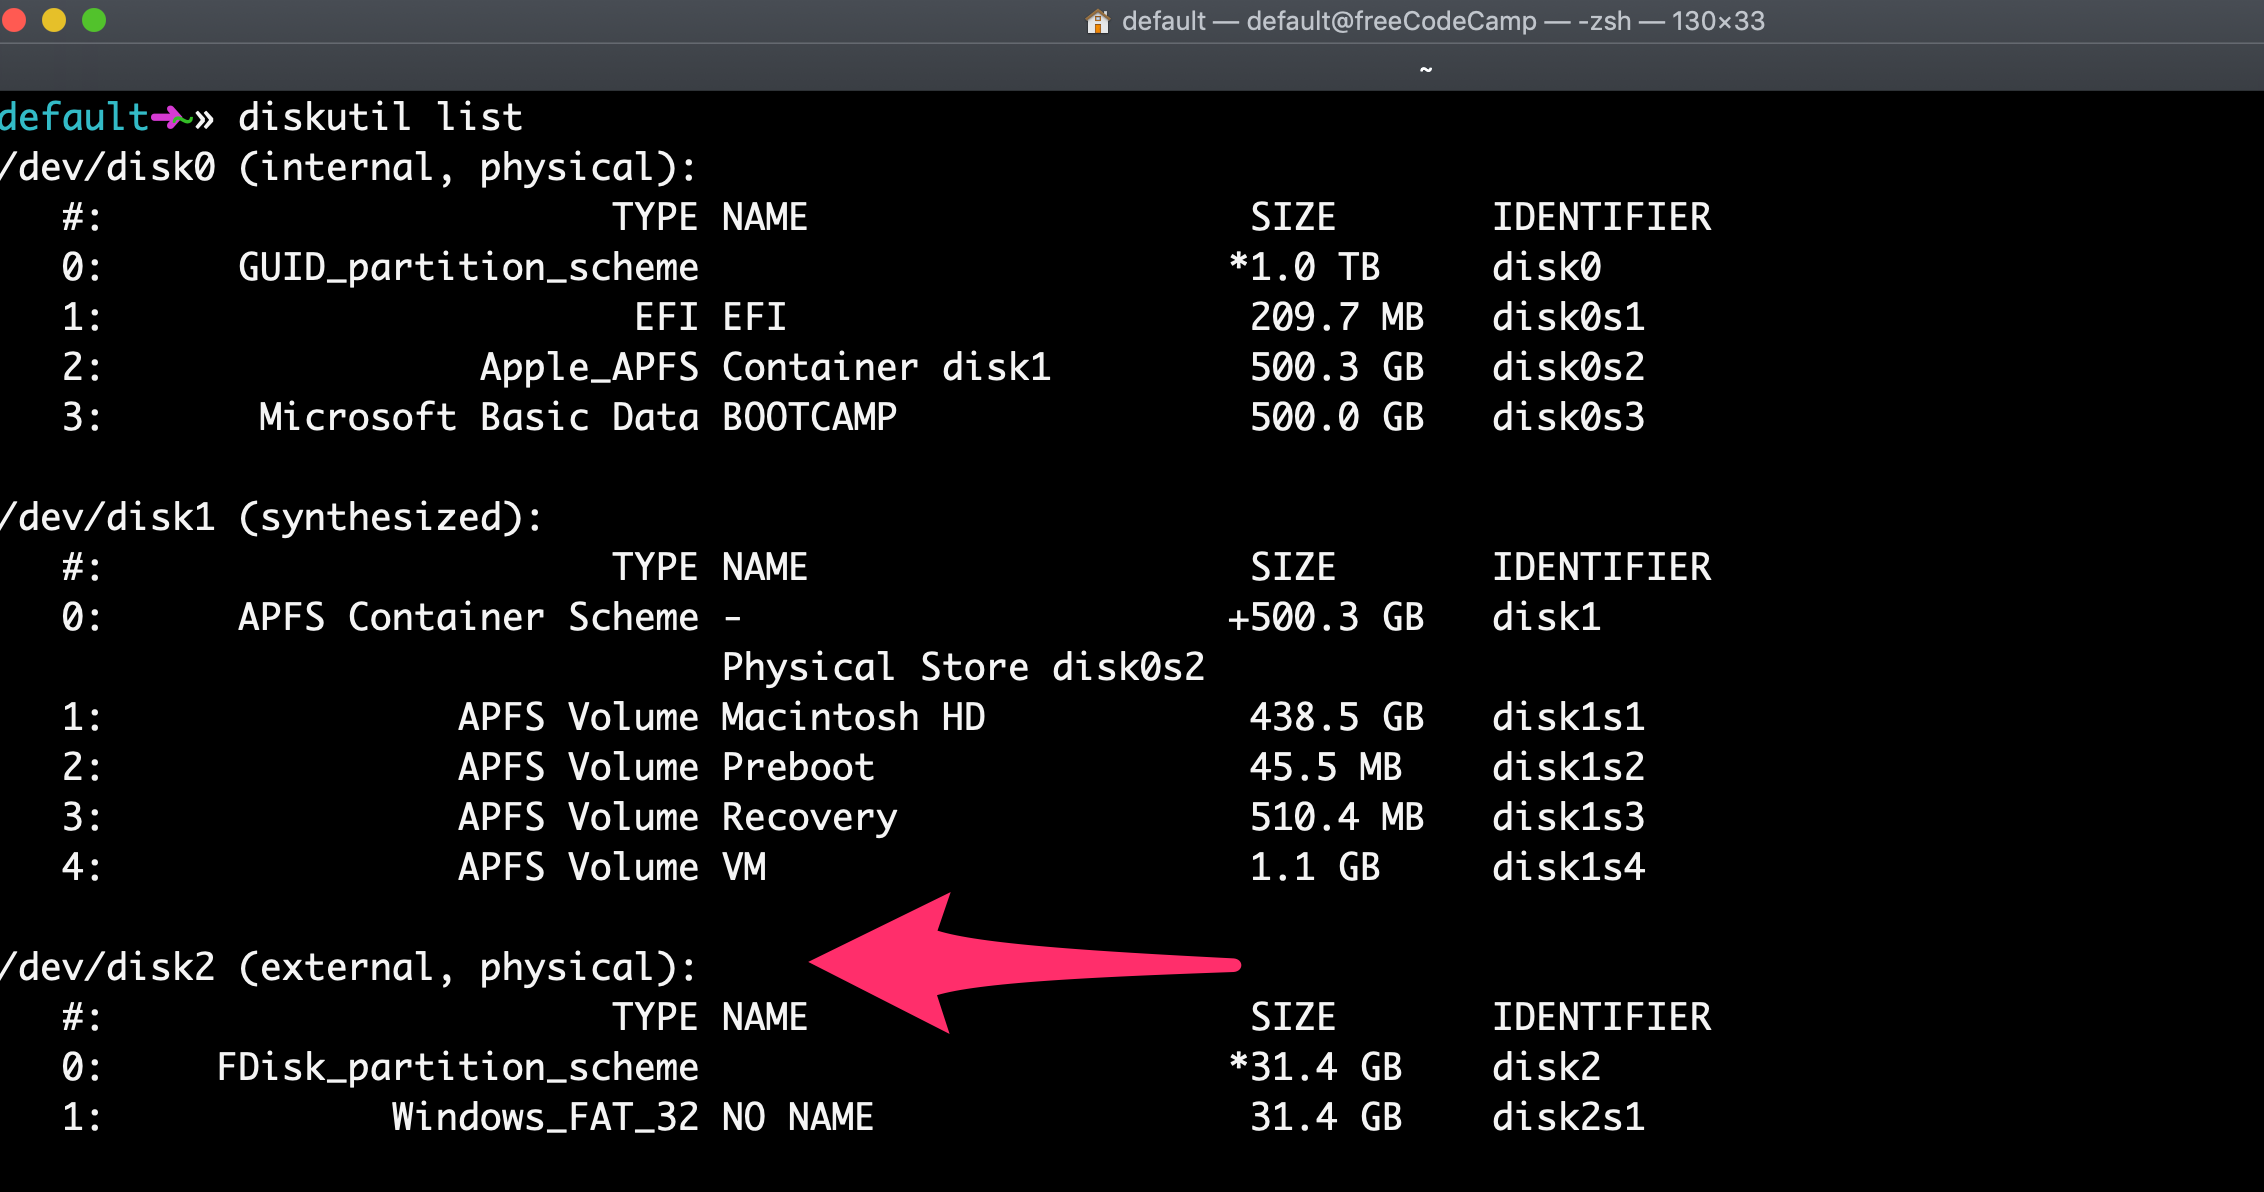
Copy the text I point to here. It will probably be something like
Step 4: Format your USB Drive to work with Windows
Next format your USB drive to Windows FAT32 format. This is a format that Windows 10 will recognize.
Note that you should replace the disk2 with the name of the your drive from step 3 if it wasn’t disk2 . (It may be disk3 or disk4 ).
Run this command using the correct disk number for your USB:
diskutil eraseDisk MS-DOS «WIN10» GPT /dev/disk2
Then you’ll see terminal output like this.
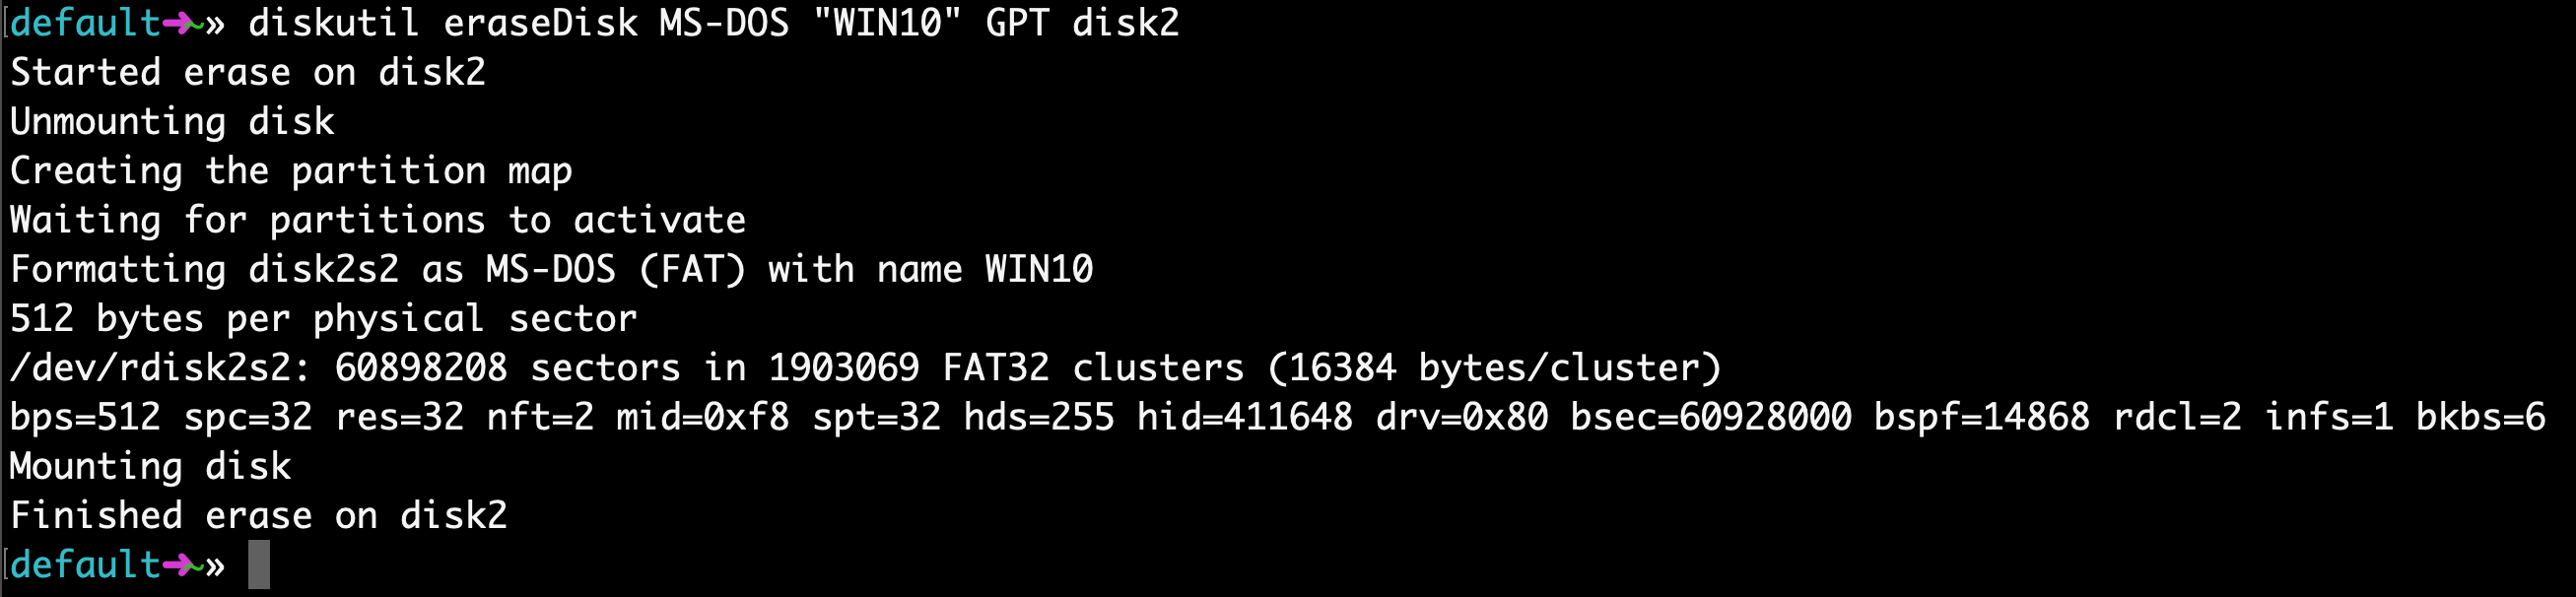
This will probably only take about 20 seconds on a newer computer, but may take longer on an older computer.
Note that for some hardware, you may instead need to run this command, which uses the MBR format for partitioning instead of GPT. Come back and try this command if step 7 fails, then redo steps 5, 6, and 7:
Step 5: Use hdiutil to mount the Windows 10 folder and prepare it for transfer.
Now we’re going to prep our downloaded ISO file so we can copy it over to our USB drive.
You will need to check where your downloaded Windows 10 ISO file is and use that. But your file is probably located in your
/Downloads folder with a name of Win10_1903_V1_English_x64.iso .
Step 6: Copy the Windows 10 ISO over to your USB Drive
Update April 2020: One of the files in the Windows 10 ISO – install.wim – is now too large to copy over to a FAT-32 formatted USB drive. So I’ll show you how to copy it over separately.
Thank you to @alexlubbock for coming up with this workaround.
First run this command to copy over everything but that file:
rsync -vha —exclude=sources/install.wim /Volumes/CCCOMA_X64FRE_EN-US_DV9/* /Volumes/WIN10
Then run this command to install Homebrew (if you don’t have it installed on your Mac yet):
/usr/bin/ruby -e «$(curl -fsSL https://raw.githubusercontent.com/Homebrew/install/master/install)»
Then use Homebrew to install a tool called wimlib with this terminal command:
brew install wimlib
Then go ahead and create the directory that you’re going to write the files into:
Then run this command. Note that this process may take several hours, you may see 0% progress until it finishes. Don’t abort it. It will use wimlib to split the install.wim file into 2 files less than 4 GB each (I use 3.8 GB in the following command), then copy them over to your USB:
wimlib-imagex split /Volumes/CCCOMA_X64FRE_EN-US_DV9/sources/install.wim /Volumes/WIN10/sources/install.swm 3800
Once that’s done, you can eject your USB from your Mac inside Finder. Note that Windows will automatically rejoin these files later when you’re installing.
Step 7: Put your USB into your new PC and start loading Windows
Congratulations — your computer now should boot directly from your USB drive. If it doesn’t, you may need to check your new PC’s BIOS and change the boot order to boot from your USB drive.
Windows will pop up a screen and start the installation process.
Enjoy your new PC, and your newly-installed copy of Windows.
Quincy Larson
The teacher who founded freeCodeCamp.org.
If you read this far, tweet to the author to show them you care. Tweet a thanks
Learn to code for free. freeCodeCamp’s open source curriculum has helped more than 40,000 people get jobs as developers. Get started
freeCodeCamp is a donor-supported tax-exempt 501(c)(3) nonprofit organization (United States Federal Tax Identification Number: 82-0779546)
Our mission: to help people learn to code for free. We accomplish this by creating thousands of videos, articles, and interactive coding lessons — all freely available to the public. We also have thousands of freeCodeCamp study groups around the world.
Donations to freeCodeCamp go toward our education initiatives, and help pay for servers, services, and staff.


