- Question: Q: How To Use A Generic USB Ethernet Adapter RD9700 On Mac OS X 10.14.2
- Как заставить работать на MacOS High Sierra любой USB — Ethernet адаптер
- Итак, у вас MacOS High Sierra (или более ранняя версия MacOS) и USB — Ethernet адаптер, вот что нужно сделать, чтобы USB появился в списке сетевых интерфейсов:
- How To Use A Generic USB Ethernet Adapter RD9700 On Mac OS X
- How to install drivers for the RD9700 on Mac OS X
- LAN and Wireless
- 44 files
- LucyRTL8125Ethernet
- Kext for BCM4322 100% ok Big Sur & Catalina Opencore/Clover
- AtherosE2200Ethernet
- IO80211Family modif
- BCM5722D.kext
- BCM5722D
- Atheros installer for macOS Mojave and Catalina
- Драйвера для сетевого оборудования под Mac OS X
Question: Q: How To Use A Generic USB Ethernet Adapter RD9700 On Mac OS X 10.14.2
Having an issue with a Generic USB Ethernet Adapter RD9700, I found this link:
In case this link disappear, the content is:
Step 1: Unplug your USB adapter.
Step 2: Restart your Mac by clicking the Apple logo in the top-left corner and then Restart. As soon as your machine restarts, you’ll hear the Apple chime. Hold down CMD + R immediately after hearing the chime to boot in to Recovery Mode.
You can release CMD + R once you see the Apple logo and a progress bar.
Step 3: From the top bar, select Utilities and then Terminal.
Step 4: In the terminal window, you need to type the follow and then hit enter: csrutil disable . You may be prompted for your Administrator password.
Step 5: Now from the top bar, click the Apple Logo and then Restart.
Step 6: Your Mac should now restart back in to the normal operating mode. It’s time to install the drivers. Click here to download:
the zip file and extract it to your Desktop.
Step 7: Install the RD9700 driver located in the x86_64 folder and then restart your Mac again.
Step 8: Once your Mac has rebooted, open Terminal and enter the following then press the Enter key: sudo kextload /System/Library/Extensions/USBCDEthernet.kext .
Step 9: Reboot again.
Step 10: Now plug-in your USB Ethernet Adapter with a live ethernet cable.
Step 11: Open System Preferences and go to Network.
Step 12: Press the + button in the bottom right and select USB 2.0 10/100M Ethernet Adapter and then click Add.
Personally, I got an issue with Step 8 (the command failed) but after Step 10 the adapter worked and still works fine!
Источник
Как заставить работать на MacOS High Sierra любой USB — Ethernet адаптер
Мой основной компьютер — старенький MacBook Air, у которого имеется один разъём Thunderbolt, который я обычно использую для демонстрации картинки на внешних устройствах. Но дома иногда играю в офисную PS4 или же через сервис Playkey в какие-то очень крутые игры, которые бы мой компьютер просто бы не потянул. Это удобно, он не гудит вентиляторами, просто удалённо подключается к устройству и отображает что там происходит.
И тут я столкнулся с первой проблемой — пинг. Чем он меньше, тем лучше приходит картинка и управление персонажем. Решить проблему удалось довольно просто, у меня в хозяйстве был адаптер с Эппловского Thunderbolt в Ethernet и подключив компьютер к розетке в кабинете (наконец-то она пригодилась!), проблема перестала существовать. Скорость домашнего интернета вполне достаточна, оказалось что играть можно вообще без проблем. Вторая проблема всплыла из первой. Дома у меня стоит внешний монитор ViewSonic, который хоть и не блещет картинкой, но явно имеет больший размер экрана. Оказалось, что подключить его некуда. Пришлось рассмотреть разные варианты USB перехоников (а на самом деле сетевых карт), которые есть на рынке. В итоге остановился на адаптере Orico UTJ-U2, мало того что у меня уже было несколько разных гаджетов этого производителя, так на AliExpress показали что он уже есть в России и пообещали доставить за 2 дня.

И не обманули. Реально доставили за дня и при этом цена было в районе 500 рублей, так ещё его и курьер привёз прямо домой в подмосковье. Чудеса, не понимаю как им это удаётся. Но речь не об этом. Дальше предстояло настроить его для работы с Mac и тут встала проблема: драйвера производителя, которые я скачал с сайта, никак не давали устройству появиться в списке сетевых устройств. Вообще ничего не было связанного с USB в списке сетевых устройств.
Порыскав по сети и перепробовав большое количество разны советов, перезагрузок и всего такого удалось найти решение. С удовольствием делюсь им, возможно вам тоже когда-то пригодится.
Итак, у вас MacOS High Sierra (или более ранняя версия MacOS) и USB — Ethernet адаптер, вот что нужно сделать, чтобы USB появился в списке сетевых интерфейсов:
- Удалите всё что уже ставили или делали со своим Mac в поисках решения до этой инструкции.
- Отключите на USB-Ethernet адаптер от компьютера и перезагрузите его.
- После перезагрузки зажмите CMD и R одновременно, пока компьютер не перейдёт в Safe mode. Дождитесь пока всё прогрузится.
- В верхнем меню выберите «Utilities» и далее «Terminal».
- В терминале напишите csrutil disable .
- После выполнения команды нажмите на и перезагрузите компьютер.
- После перезагрузки компьютера, установите стандартные USB-Ethernet драйвера для MacOS и перезагрузите компьютер.
- После перезагрузки откройте terminal (написать в поиске) и напишите там (скопируйте отсюда) sudo kextload /System/Library/Extensions/USBCDCEthernet.kext и выполните команду,
- Вновь перезагрузите компьютер.
- После этого подключайте ваш USB-Ethernet адаптер к компьютеру.
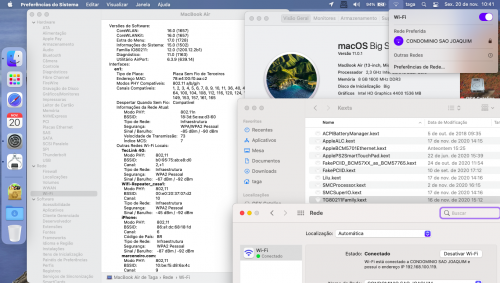
- Открывайте Настройки / System Preferences… > Network и нажимайте + где у вас уже появился USB Ethernet.
- Добавляете тип подключения и наслаждаетесь совершённым!
Вот как всё должно выглядеть в случае успешной настройки.
Источник
How To Use A Generic USB Ethernet Adapter RD9700 On Mac OS X

The generic USB Ethernet Adapter equivalent to Apple’s pricey £25 option is called the RD9700. Since it’s generic, and made in China – the support you are likely to receive after purchasing it for a few quid on eBay or Amazon is going to be below your expectations.
Unless you’re a pro user, it is likely Apple’s restrictions on USB-to-Ethernet adapters on the Mac will make using your RD9700 difficult. Fear not, we have a solution. Though it’s a little long it has been tested and confirmed working on all flavours of OS X from 10.4 onwards!

How to install drivers for the RD9700 on Mac OS X
You’ll need to start by uninstalling any drivers you have previously installed. Depending on what you’ve tried – this will vary from user to use – so please to make sure you uninstall and earlier drivers that may conflict with this tutorial.
This tutorial was tested with the following USB Ethernet Adapter:
Name: USB 2.0 10/100M Ethernet Adapter
BSD Name: en3
Product ID: 0x9700
Vendor ID: 0x0fe6
Version: 1.01
Speed: Up to 12Mb/sec
Location ID: 0xfa130000/6
Current Available (mA): 500
Current Required (mA): 120
Step 1: Unplug your USB adapter.
Step 2: Restart your Mac by clicking the Apple logo in the top-left corner and then Restart. As soon as your machine restarts, you’ll hear the Apple chime. Hold down CMD + R immediately after hearing the chime to boot in to Recovery Mode.
You can release CMD + R once you see the Apple logo and a progress bar.
Step 3: From the top bar, select Utilities and then Terminal.
Step 4: In the terminal window, you need to type the follow and then hit enter: csrutil disable . You may be prompted for your Administrator password.
Step 5: Now from the top bar, click the Apple Logo and then Restart.
Step 6: Your Mac should now restart back in to the normal operating mode. It’s time to install the drivers. Click here to download the zip file and extract it to your Desktop.
Step 7: Install the RD9700 driver located in the x86_64 folder and then restart your Mac again.
Step 8: Once your Mac has rebooted, open Terminal and enter the following then press the Enter key: sudo kextload /System/Library/Extensions/USBCDEthernet.kext .
Step 9: Reboot again.
Step 10: Now plug-in your USB Ethernet Adapter with a live ethernet cable. Open System Preferences and go to Network.
Step 11: Press the + button in the bottom right and select USB 2.0 10/100M Ethernet Adapter and then click Add.
Step 12: Disconnect from WiFi and you should notice your network connect still works through the RD9700 Ethernet Adapter. In addition, you will be able to share internet using the RD9700 too.
Источник
LAN and Wireless
44 files

Open source driver for the Realtek RTL8111/8168 family.
New Driver for Realtek RTL8111
Anybody who is looking for a add-on network card with Realtek NIC might want to consider the Delock 89357. This card is equipped with a RTL8111E-VL (chipset 16) which is known to work perfectly with my driver because this chipset is my primary test device.
Updated May 6
LucyRTL8125Ethernet
Updated April 29
Kext for BCM4322 100% ok Big Sur & Catalina Opencore/Clover
BCM4322 100% ok Big Sur & Catalina Opencore/Clover
Submitted November 20, 2020

AtherosE2200Ethernet
Updated November 14, 2020
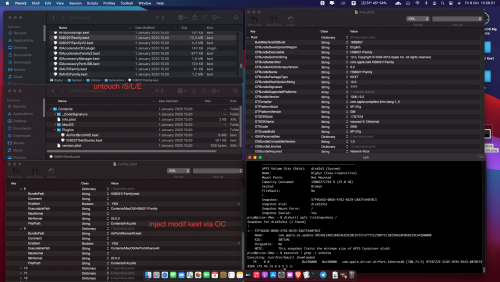
IO80211Family modif
Modified IO80211Family.kext especially who use device based on Atheros40 (the idea came from CtlnaAHCIPort.kext) so we don’t need to touch /S/L/E just inject via OpenCore, and we can running Big SUr without open Sealed (no need remove/delete vanilla IO80211Family.kext in /S/L/E)
I’m not try in Mojave or Catalina but I’m sure is worked too
1. just put 2 kext HS80211Family.kext & AirPortAtheros40.kext . /OC/Kexts and make sure inject via config.plist
do not inject IO80211NetBooter in the plist (must do research so i leave there in plugin), I remove IO80211NetBooter from plugin so as not to confuse
see my pict below just add 2 value
2. you can add value manually VendorID in IONameMatch (atheros40) if your ID not present
3. refer to @MaLd0n guide in olarila for working Wifi Atheros AR9565, AR9462, AR9463, AR9485
here is the modification (no need injector)
AR9565 AirPortAtheros40-9565.kext.zip
AR9462 AirPortAtheros40-9462.kext.zip
AR9463 AirPortAtheros40-9463.kext.zip
AR9485 AirPortAtheros40-9485.kext.zip
Additional : Fake Locale & Country Code
Use this kext WifiLocFix.kext.zip to fix Locale & Country Code (Fake AirPort Location Interface)
You can change it inside WifiLocFix.ket depend on your location
and don’t forget to inject in your config.plist
Card Type: AirPort Extreme (0x168C, 0x3112)
Firmware Version: Atheros 9380: 4.0.74.0-P2P
MAC Address: XXXXXXXXXXXXXX
Locale: ETSI
Country Code: ID
Supported PHY Modes: 802.11 a/b/g/n
Supported Channels: 1, 2, 3, 4, 5, 6, 7, 8, 9, 10, 11, 12, 13, 36, 40, 44, 48, 52, 56, 60, 64
Wake On Wireless: Supported
Status: Connected
Updated October 14, 2020
BCM5722D.kext
Recompiled v2.3.6 sources in fat-binary mode (Xcode 3.2.6, SDK 10.6, Target OS X 10.6). Fully supported in 32bit and/or 64bit mode under all OS X/macOS versions from Mac OS X Snow Leopard 10.6 to macOS Catalina 10.15.
Tested on Dell Latitude D630 and D830, both fitted with Broadcom BCM5755M Gigabit Ethernet cards (14e4:1673).
Edits:
Nov 16th, 2018: updated description to confirm support up to macOS Mojave 10.14 Jan 11th, 2019: updated description to confirm support up to macOS Catalina 10.15
Updated June 5, 2020

BCM5722D
Updated May 19, 2020
Atheros installer for macOS Mojave and Catalina
Please read me:
Ever since macOS Mojave came out (I mean the first DP) Apple removed the support for Atheros based WiFi Adapters from the IO80211Family.kext, so to fix it we need to add the AirPortAtheros40.kext to the Extensions manually.
After each clean install the AirPortAtheros40.kext needs to be installed and after clean installing Mojave DPs after few times I decides to create this app to save some time.
How to use it:
This application will install the missing AirPortAtheros40.kext into /System/Library/Extensions and after the installation is done and once you reboot your computer the Atheros based WiFi adapters will be enabled.
The installation is the first step of the process and it is fast but the next steps which are repairing the permission on /System/Library/Extensions and rebuilding the system caches might take a while so please wait until you were asked to reboot your computer.
I’m using a TP-Link WDN4800 with an Atheros chipset and it works on other similar hardware.
If this app helped you please consider donating; any amount is appreciated.
Источник
Драйвера для сетевого оборудования под Mac OS X
Вы обладаете возможностью скачать драйвера сетевого оборудования любой марки. Ниже они представлены.
Выберите название марки Вашего сетевого оборудования и перейдите далее, чтобы скачать драйвера для сетевого оборудования под Mac OS X.


Вы можете воспользоваться механизмом быстрого поиска и скачать драйвера для сетевого оборудования под Mac OS X значительно быстрее.
Для этого выберите один из вариантов быстрого поиска, который Вам наиболее удобен и понятем и заполните соответствующую форму.
Скачать драйвер сетевого оборудования для Mac OS X можно на этом сайте. Ежедневно над сайтом ведется работа, чтобы предоставить возможность быстро находить, загружать и устанавливать драйвера для сетевого оборудования под Ваш Mac OS X.
Mac OS X мощная и удобная операционная система компании Apple. Вполне естественным выглядит стремление практически всех производителей сетевого оборудования выпускать специальный драйвер сетевого оборудования для Mac OS X, достигая этим максимальной совместимости сетевого оборудования.
Источник


