How to create a Universal Windows 7 installation DVD or USB Flash Drive
Technical Level : Intermediate
With one DVD or USB Flash Drive you can install or re-install any version of Windows that you have a valid product key for.
This comes in handy if you have multiple computers and no longer have the recovery media or your recovery partition is damaged.
Note: Windows 7 Starter edition is only available in 32Bit, so if you need a ‘Starter edition’ installation DVD or USB Flash drive, you need to download the Windows 7 Ultimate 32Bit .ISO file.
Notice: As of February 6th, 2015 the links to the various versions of Windows 7 listed in step #1 below are no longer functioning, as an alternative (as long as you have your product key) you can use the link to Microsoft’s Software Recovery web page:
Please be aware that this link often fails to provide the correct language download for your product key.
( Only 2 of 3 keys I entered returned the proper «English» language option). If you experience this issue then try the following alternative:
As an alternative read this Wiki article on how to create your own ISO file
After you create your own ISO file you can skip steps #1 and #2 and begin at step #3.
Step by Step guide:
1) Download the Windows 7 Ultimate 32 or 64Bit .ISO file.
Note: The default download location to your computer is: C:\Users\User account name\Downloads
a) If you want to create a 32Bit universal installation DVD download this file:
SHA1 Hash value: 65fce0f445d9bf7e78e43f17e441e08c63722657
b) If you want to create a 64Bit universal installation DVD download this file:
SHA1 Hash value: 36ae90defbad9d9539e649b193ae573b77a71c83
2) Verify the .ISO file downloaded is not corrupt by validating the SHA1 hash value is correct.
A utility named ‘HashCalc’ which checks the file and returns a SHA1 value that should match the value listed in step 1a or 1b if the download is not corrupt.
b) Launch HashCalc and navigate to the location of the .iso file you downloaded.
c) Remove all check marks from the list of HashCalc options except for SHA1.
d) Click the ‘Calculate’ button and wait for the SHA1 string of numbers and letters to be displayed.
e) Compare the string of numbers and letters displayed in HashCalc with the SHA1 value listed in step #1 above. The entire string must match from beginning to end, if it does not match then the .ISO file you downloaded is corrupt and you must try the download link again.
3) Download, install and run the ‘ei.cfg’ utility.
I choose the default location for the download.
a) Extract the contents of the eicfg_removal_utility.zip file to a destination of your choice.
Start by double clicking on the .zip file and then double click on the eicfg_remover.exe file.
Click the ‘Extract all’ button and browse to a location where you want the zip file extracted to. Then click on the ‘Extract’ button.
A standard folder with the name: eicfg_removal_utility will be created.
b) Open the ‘eicfg_removal_utility’ folder and click on the ‘eicfg_remover.exe’ file and click the ‘Run’ button.
c) Navigate to the folder where the Windows 7 .ISO file is located and click on the .iso file to select it.
d) Click the ‘Open’ button to disable ei.cfg located inside the .iso file. Finally click the ‘OK’ button to exit the eicfg utility.
What does eicfg do:
From the eicfg ‘Readme.txt’ file:
“This works by toggling the deletion bit in the UDF file table, which instructs the operating system to ignore the file and to treat it as if it does not exist. By not physically removing the file, this eliminates the need to rebuild the ISO, and makes this sort of fast, un-intrusive patching possible. This also makes it possible to reverse the patch and to restore the image to its original state, if so desired.”
In short you do not need to manually edit the contents of the Windows 7 .ISO file you downloaded.
Now that you have modified the .ISO file using the eicfg utility, the next step is to use the modified .ISO to create a universal Windows 7 installation DVD.
4) Create the universal Windows 7 installation DVD or USB Flash drive:
To create a Windows 7 installation flash drive read the following:
Windows 7 USB/DVD download tool
How to create a bootable Windows 7 USB flash drive
To create a Windows 7 installation DVD perform steps a through g:
a) Download http://download.cnet.com/ImgBurn/3001-2646_4-10847481.html?hlndr=1 and install ImgBurn (current version 2.5.8.0) to create a bootable Windows 7 installation DVD.
Notes:
a) If you created your own .ISO file using the instructions in the Wiki article titled «Create your own ISO file from a Windows 7 installation DVD» then ImgBurn is already installed and need not be re-installed.
b) Windows 7 does have built in software that allows you to create an installation DVD but it does not offer any control over the burn speed: http://windows.microsoft.com/en-us/windows7/burn-a-cd-or-dvd-from-an-iso-file
Choose the “Custom Installation (advanced)” option and remove the check mark to eliminate unwanted options.
b) Next start ImgBurn, 2 windows will open. The lower window (ImgBurn Log) displays the status of your DVD creation. The top window is where you select what action you want to perform. Choose the “Write Image file to disc” option.
c) Next navigate to the ‘Source’ (.ISO file) location.
d) Set the ‘Write Speed’ to either 2 or 4X (or the lowest speed your DVD supports, which may be 8X) to insure a good burn and then insert high quality DVD+R media into your DVD drive. The ‘Verify’ box should be checked by default. Wait for the status located in the lower left corner to display ‘Ready’.
e) Click on the Blue ImgBurn arrow to start the creation of your DVD. At a 4X write speed the creation of the DVD should take about 10 minutes.
f) Check the ImgBurn log in the lower Window for the ‘Finalizing’ disk task to compete, the DVD tray will open and close quickly and the ‘Verification’ process begins. Time to complete verification is about 5 minutes.
g) Upon successfully completion remove the DVD and insert it into a labeled paper or plastic sleeve. Then close out / exit the ImgBurn utility.
There is a guide published by NeoSmart which also shows the steps you need to perform and some trouble shooting tips: https://neosmart.net/wiki/burning-iso-images-with-imgburn/
5) Install Windows using your newly created installation DVD.
a) Verify that the boot order in your BIOS is set to boot from the DVD first and then 2nd in the list should be your disk drive.
b) Power up your computer and quickly insert Windows 7 installation DVD you created into your DVD drive. Press any key when prompted to do so, and in a few seconds Windows 7 will start loading files.
c) Now select the ‘Language to install’, ‘Time and currency format’ and the ‘Keyboard or input method’ options. Then click the ‘Next’ button to continue.
d) Choose / click on the ‘Install Now’ option to install Windows 7.
e) Select the operating system you want to install:
You will see the list of versions you have to choose from.
Move the mouse cursor or use the Up /Down arrow key to select the Windows 7 version that you want to install then click next.
(Note: Windows 7 Starter is only available when installing a 32Bit edition of Windows)
As a reminder, if your product key is for Windows 7 Home Premium then you cannot select a higher (Professional) or lesser (Home Basic) version of Windows as your product key will only activate Home Premium. The version you install must be for the product key you have!
f) Click ‘Next’ to proceed with the installation.
Read and accept the license terms.
g) Click ‘Next’ to continue with and complete the installation of Windows 7.
Was this article helpful?
Sorry this didn’t help.
Great! Thanks for your feedback.
How satisfied are you with this article?
Thanks for your feedback, it helps us improve the site.
How satisfied are you with this article?
Thanks for your feedback.
Comments (10)
15 people found this comment helpful
Was this comment helpful?
Sorry this didn’t help.
Great! Thanks for your feedback.
How satisfied are you with this comment?
Thanks for your feedback, it helps us improve the site.
How satisfied are you with this comment?
Thanks for your feedback.
Solution found. After creating the bootable USB using Windows 7 USB/DVD download tool, delete the following file: X:\sources\ei.cfg (where X:\ is your USB flash drive). Then during install it will let you pick which version of Windows 7 you want to install.
12 people found this comment helpful
Was this comment helpful?
Sorry this didn’t help.
Great! Thanks for your feedback.
How satisfied are you with this comment?
Thanks for your feedback, it helps us improve the site.
How satisfied are you with this comment?
Thanks for your feedback.
Step 1a; the download link is broken.
The Page or File You Requested Could Not Be Provided
Was this comment helpful?
Sorry this didn’t help.
Great! Thanks for your feedback.
How satisfied are you with this comment?
Thanks for your feedback, it helps us improve the site.
How satisfied are you with this comment?
Thanks for your feedback.
There is a notice I included in the Wiki on Feb. 6th about this problem, It reads as follows:
Notice: As of February 6th, 2015 the links to the various versions of Windows 7 listed in step #1 below are no longer functioning, this may or may not be a temporary condition, as an alternative (as long as you have your product key) you can use the link to Microsoft’s Software Recovery web page: http://www.microsoft.com/en-us/software-recovery
Note: You may receive a notice to contact the PC manufacture if you have an OEM key that came with your computer, but it can’t hurt to try.
After you verify your product key below, you will download a disc image (ISO file) and use it to create a bootable USB or DVD. After the ISO file has been downloaded start at step #2 below.
2 people found this comment helpful
Was this comment helpful?
Sorry this didn’t help.
Great! Thanks for your feedback.
How satisfied are you with this comment?
Thanks for your feedback, it helps us improve the site.
How satisfied are you with this comment?
Thanks for your feedback.
![]()
3 people found this comment helpful
Was this comment helpful?
Sorry this didn’t help.
Great! Thanks for your feedback.
How satisfied are you with this comment?
Thanks for your feedback, it helps us improve the site.
How satisfied are you with this comment?
Thanks for your feedback.
![]()
One benefit of using a USB flash drive to install from, is that it is write-enabled at all times. So once you have written the ISO file to a USB flash drive, and you are at the initial setup screen, press Shift+F10 to drop to the command prompt. Then, you can use diskpart and issue the list volume command to figure out what drive letter your USB flash drive has been assigned. Look for «removable drive». Exit out of diskpart, and switch over to that drive letter. Then cd down to the sources folder and issue del ei.cfg to remove the file. Exit out of command prompt and click the big Install button to proceed with the installation as you normally would. You will be prompted now to select your Windows edition.
Note: This will not work if you are using a DVD disc to install from. In that case you have to remove the file beforehand, using the «deletion bit» trick as described in this article, or extract the ISO file and remove the file, then build a modified ISO file and write that to the DVD disc. You will need dedicated software for extracting and building ISO files.
6 people found this comment helpful
Was this comment helpful?
Sorry this didn’t help.
Great! Thanks for your feedback.
How satisfied are you with this comment?
Thanks for your feedback, it helps us improve the site.
How satisfied are you with this comment?
Thanks for your feedback.
![]()
You said you «created bootable USB using Windows 7 USB/DVD download tool». This is why it did not work for you. If you read the readme.txt file for the utility, or if you just refer to it in the quote above, you can see that it says «works by toggling the deletion bit in the UDF file table» . Well. a bootable USB flash drive uses NTFS file system, not UDF. Universal Disk Format is commonly used for DVD discs. Bootable Windows USB flash drives commonly use NTFS, and bootable Linux drives commonly use FAT32. So go ahead and write that ISO file to a DVD-R or a DVD-RW and you will see that it works.
I just tested and verified this. The utility modified 4 bytes in my original ISO file (so it’s really a 32 bit change, not 1 bit, or 4 bit at very least). The SHA-1 value of the original file should not match the SHA-1 value of the modified ISO file. If they match, then you’re not doing it right. But the SHA-1 value of the modified file should match to that of a second copy, or third copy, or forth copy. of course. it doesn’t matter how many times you do it, the result should be the same. But of course, only UDF and DVD discs count. Not USB flash drives and NTFS.
How to install Windows 10 on a USB flash drive as portable Windows 10?
Is there a way to install windows 10 to onto a USB flash drive? I basically want to use a 128 GB USB stick to run Windows 10, so that I can just plug it in to a pc and boot into a preinstalled version of Windows 10. Is that possible? Thanks!
Many people want to install Windows 10 onto a USB flash drive. Unfortunately, Windows Installer does not allow you to install it to a USB flash drive. Is there a way to install windows 10 to onto a USB flash drive? Yes, here you will find instructions on how to install any version of Windows 10 onto a USB flash drive and run Windows 10 from the USB flash drive. After the installation is complete, you can install programs and copy files to the USB drive, then you can take the Windows 10 To Go USB flash drive to anywhere you want to go and use it on any computer, whether it is a Legacy BIOS or UEFI computer.
Tutorial to install Windows 10 on a USB flash drive with WinToUSB.
Step 1. Connect the USB flash drive to the computer.
Step 2. Download and install WinToUSB, then run it as administrator.
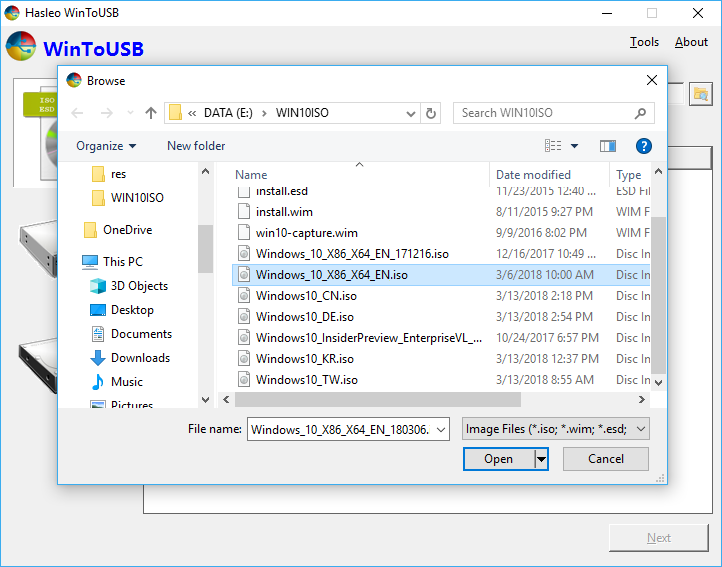
Step 3. Click the button, then click the button and select the Windows 10 installation ISO file from the open dialog box.
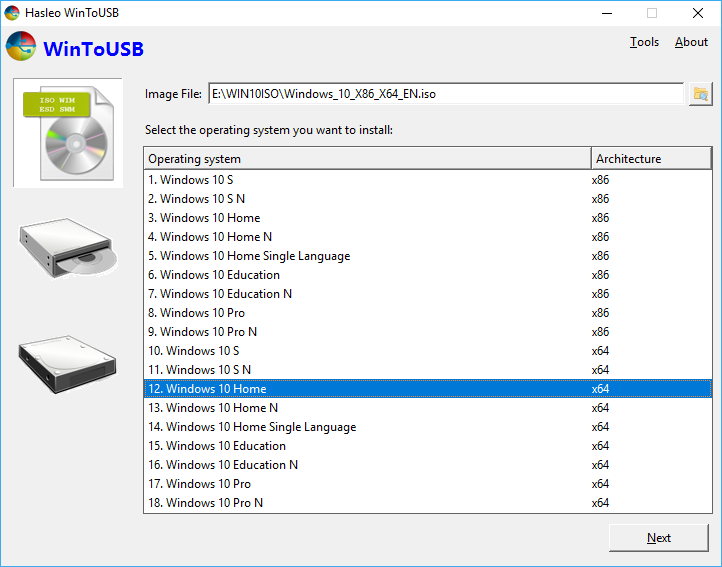
Step 4. WinToUSB scans for and lists installable operating systems in the Windows 10 installation ISO. Please select the edition of Windows you want to install, then click «Next».
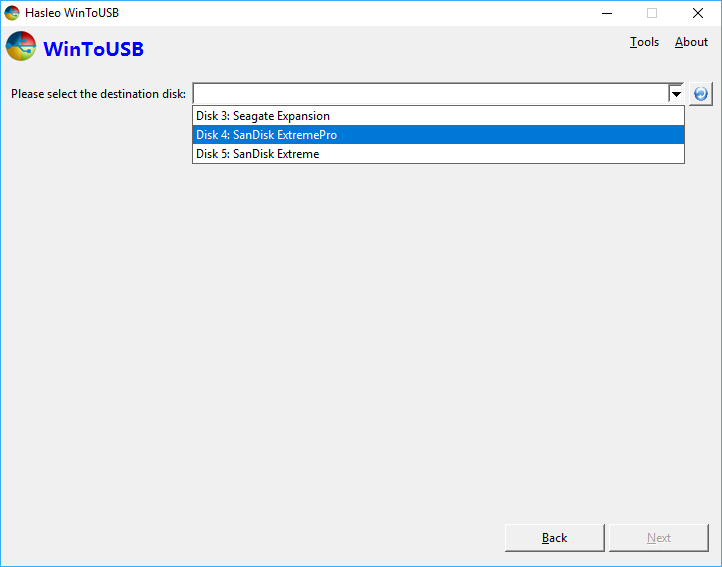
Step 5. Select the USB flash drive in the drop-down list. If the USB drive is not correctly recognized by WinToUSB, you need to click the button for the program to recognize the USB drive.
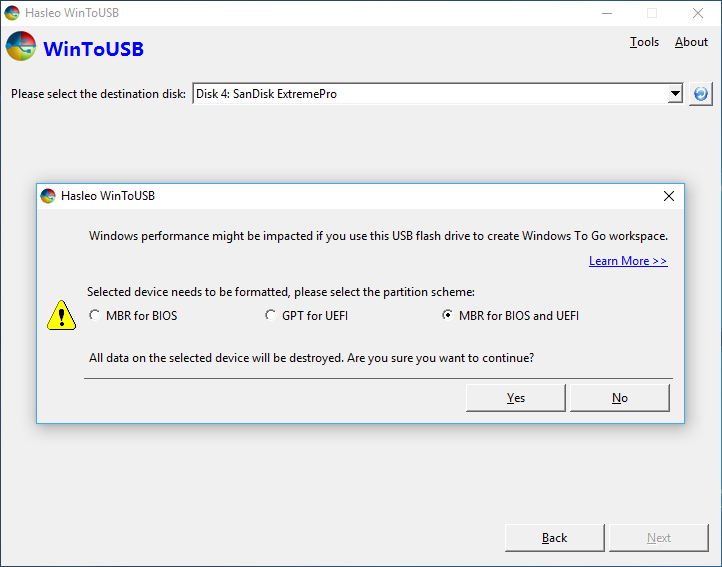
Step 6. After you select the USB drive, a pop-up will appear asking you if you want to format it to continue, tick the «MBR for BIOS and UEFI» checkbox, then click «Yes».
Step 7. After clicking «Yes», WinToUSB begins formatting. Please wait until that format operation is complete.
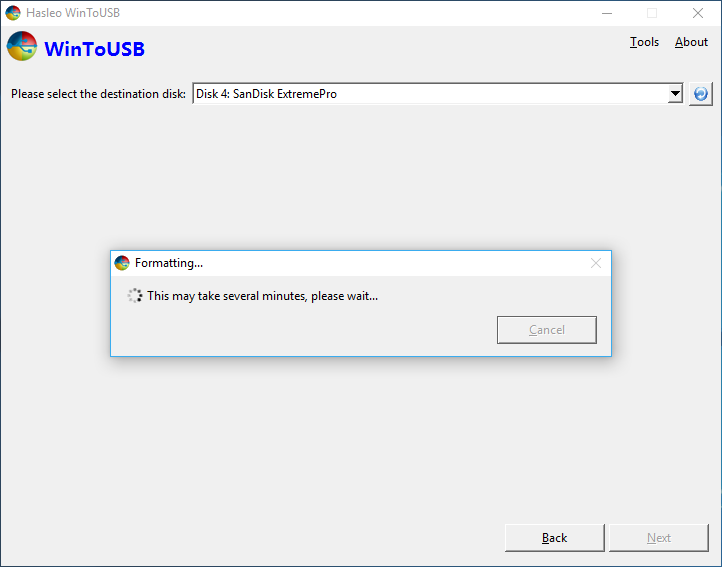
Step 8. After successfully formated the USB drive, select the installation mode, then click «Next».
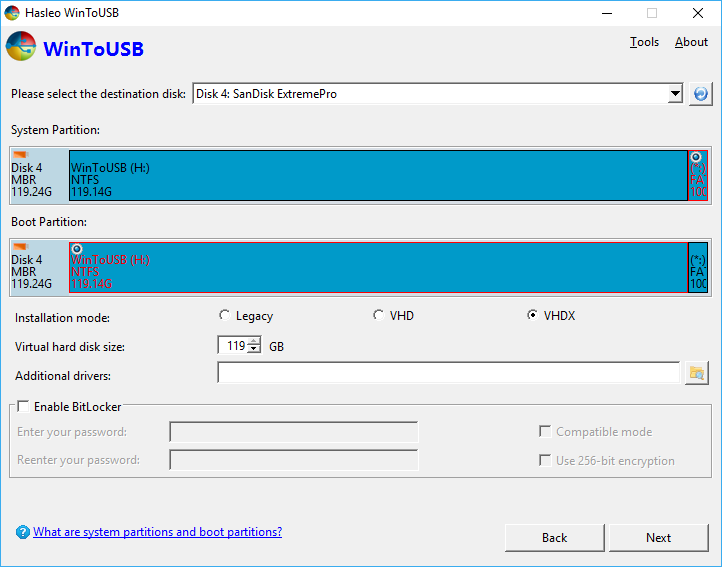
Step 9. After clicking «Next», WinToUSB begins installing Windows 10 to the USB drive.
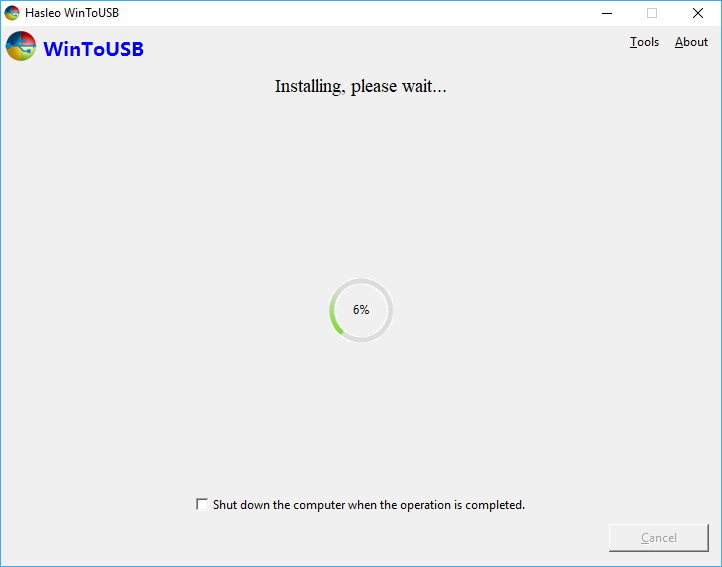
Step 10. It takes some time to install. After installation restart the computer and change BIOS to boot from your USB drive.
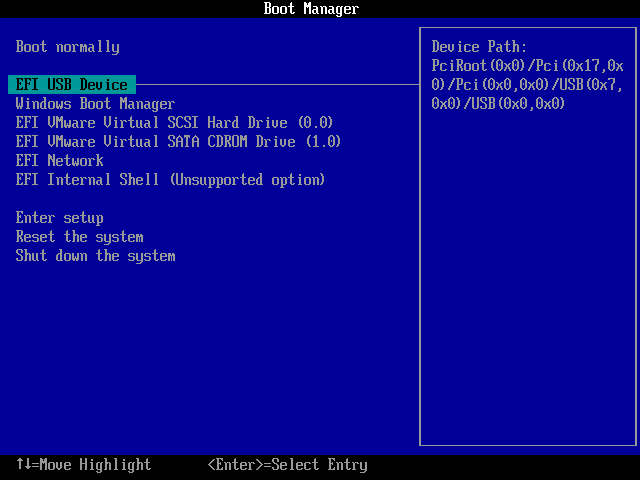
Step 11. Windows 10 normal installation starts up and you have to complete all the installation steps. After that, you can install programs, copy files, etc.
Follow these simple steps, you can create a Windows 10 To Go on a USB flash drive easily.


