- About USB on Mac computers
- USB specifications
- If a USB device is slow or not recognized
- Question: Q: Plug and Play?
- All replies
- Simple Plug n Play USB Audio Device for OS X
- beelzebozo
- Plug & Play 9+
- Etter Studio GmbH
- Designed for iPad
- Screenshots
- Description
- What’s New
- Ratings and Reviews
- I NEED MORE
- I love it.
- This game was.
- Plug and Play и не каких сложностей
- Суть технологии PnP
- Немного истории
- Принцип работы технологии PnP
- Заключение
About USB on Mac computers
USB is available with type A (USB-A) and type C (USB-C) ports, depending on the Mac model.
USB type A ports have this shape and may also be called USB, USB 2, or USB 3 ports, depending on the USB specification supported.
USB type C ports have this shape and are available on Mac as USB 3, Thunderbolt 3, or Thunderbolt / USB 4 ports.
Learn more about identifying the ports on your Mac. If the cable from your USB device doesn’t fit in the USB port on your Mac, learn about adapters you can use.
USB specifications
The specification of a USB port determines the maximum data-transfer rate (speed) and power delivered by the port. This is important primarily when you want the most speed for your USB device, or when your USB device needs more power than it’s getting.
To learn which specification a USB port on your Mac supports, choose Apple menu > About This Mac, click Support, then click Specifications. You can also use System Information to get more detail, including about USB devices directly connected to your Mac.
| USB specifications on Mac | Data transfer | Power delivery |
|---|---|---|
| USB 4 | Up to 40 Gbps | Up to 100W at 20V |
| USB 3 (USB 3.1 Gen 2) | Up to 10 Gbps | Up to 15W at 5V |
| USB 3 (USB 3.1 Gen 1) | Up to 5 Gbps | Up to 900 mA at 5V |
| USB 2 | Up to 480 Mbps | Up to 500 mA at 5V |
| USB 1.1 | Up to 12 Mbps | Up to 500 mA at 5V |
If a USB device is slow or not recognized
USB specifications all work with each other, but data-transfer speed and power are limited by the cable or device that uses the earliest specification. For example, if you connect a USB 3 device to a USB 2 port, your device is limited to USB 2 speed and power.
- Make sure that the USB port on your Mac and the USB cable used by your device both meet or exceed the USB specification of the device itself.
- Plug your device directly into your Mac instead of a USB hub or other device.
- If your USB device came with an AC power adapter, you should probably use it. Your device might need more power than the port it’s plugged into can provide.
- Update the software on your Mac. Also check with the manufacturer of your USB device for firmware or other software updates. Then restart your Mac.
Information about products not manufactured by Apple, or independent websites not controlled or tested by Apple, is provided without recommendation or endorsement. Apple assumes no responsibility with regard to the selection, performance, or use of third-party websites or products. Apple makes no representations regarding third-party website accuracy or reliability. Contact the vendor for additional information.
Источник
Question: Q: Plug and Play?
Ibook G$, Mac OS X (10.3.6)
Posted on Jun 15, 2007 7:09 AM
All replies
Loading page content
Page content loaded
Have you tried opening iPhoto and seeing if it allows you to import images from the camera?
Jun 15, 2007 7:42 AM
So-called Plug-n-Play technology has existed in Mac OS since System 8, I think. I know it existed in OS 9, and all versions of OS X. The trick here is this funky Vivitar camera. The camera probably runs in PTP mode, which identifies itself as an imaging device, so we need to make sure that your camera, while hooked up, is turned on, and is in the proper mode for transferring photos to a computer.
I don’t have any direct experience with Vivitar cameras, but the usual way seems to be this process:
1. Connect camera to computer
2. Turn on camera in «Camera» mode
3. Switch camera to «View» mode
Either at step 2 or step 3, the camera should either notify you that you’re in disk mode, or the screen should go blank while the rest of the camera is still on. iPhoto ought to launch, then no problems.
However, if this camera does not use any pre-existing USB profiles (IE: USB HID, USB Mass Storage, etc.) and uses its own proprietary protocol, you’re likely up a creek. I would then advise looking into a decent Canon camera. If you want something simple, HP cameras aren’t bad, but you get little control over advanced features (like exposure and shutter controls).
Источник
Simple Plug n Play USB Audio Device for OS X

beelzebozo
Super Moderator
One of the last optimization steps in patching your CustoMac is to get audio working, however it can be a bit tricky. By now, we know that Realtek audio is the best built-in option for OS X. MultiBeast contains a slew of ALC audio kexts that contain support for several variants of Realtek audio CODEC. On the flipside, some motherboard manufacturers opt to not use Realtek audio and choose to go with VIA audio CODEC. The problem with VIA is that it is not exactly as compatible as Realtek, and normally requires installing VodoooHDA. The problem with VoodooHDA is that it can cause issues such as kernel panics and may not always work correctly. You may also have to install different versions until you find the right one; this is not exactly desirable. Another downside is that many people have complained about audio stuttering with flash video playback with VoodooHDA paired with VIA audio. I have also experienced this with my first ASUS CustoMac build and have tried to find a viable fix without having to add on another piece of hardware. I did find a fix by getting a rather inexpensive USB audio device.
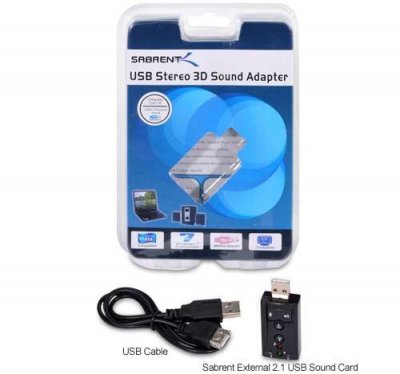
The SABRENT USB-SBCV USB 2.0 External 2.1 Surround Sound Adapter is a wonderful alternative to VIA audio CODEC and confirmed to run out-of-box with OS X. It allows a 2.0 or 2.1 speaker setup. I’ve paired my SABRENT USB-SBCV with Logitech LS21 speakers.
The product comes with a USB 2.0 extension cord and also has some volume control functionality on the device via buttons. I got an extra volume boost with it as well. It also has a Mic input.
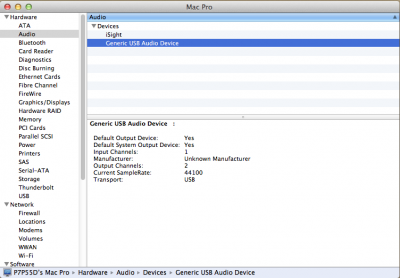
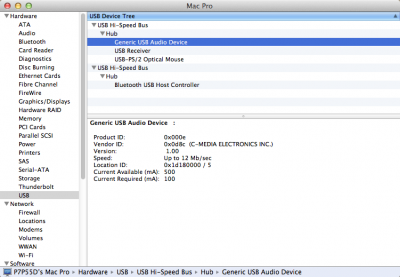
Here are a few screen shots from my 1156 ASUS CustoMac.


Sabrent External Sound Box USB-SBCV
Amazon Newegg
Источник
Plug & Play 9+
Etter Studio GmbH
Designed for iPad
-
- #135 in Puzzle
-
- 4.1 • 423 Ratings
-
- $2.99
Screenshots
![]()
![]()
![]()
![]()
Description
Explore the universe of Plug & Play, an interactive animation drawn by Michael Frei and coded by Mario von Rickenbach. An unashamedly surreal play with plugs. Run, hit, switch, fall, love, plug, pull. And push.
• Featured by Apple as Best New Game in more than 100 countries
• Nominated for the Nuovo Award at the Independent Games Festival 2015
Play time: between 10 – 15 minutes.
Works on all iOS devices newer than 2011.
«Wonderfully weird, grotesque, cute and wildly funny, and provokes some thought to boot.» – Kaiju Pop
«Beneath all the weirdness, it’s a surprisingly emotional game.» – The Verge
«A delightful oddity.» – Gamasutra
«Funny, evocative and difficult to look away from.» – Digg
«A tortuous joy.» – Short Of The Week
«The complexity of all our emotional and sensual desires appear as desperate as a sexually-charged reflex powered by an on/off switch.» – Kill Screen
«My favourite game so far of 2015.» – Patrick Smith @Vectorpark
«Profoundly good.» – Samuel Boucher @MonsieurEureka
What’s New
This app has been updated by Apple to use the latest Apple signing certificate.
performance improvements & bugfixes
Ratings and Reviews
I NEED MORE
This game is for people like me who are weird and need something to do. If you are in need of a mental break, here you go! You 100% forget everything that is happening outside of the game because you are trying to figure out what the heck is happening in this game. This game is so cool and fun! The only thing is, WE NEED MORE I think that there needs to be other “Levels” It is very short, but I do still find myself playing it over and over.
I love it.
“PLUG AND PLAY” is an absolutely fascinating and deep game. While it may seem short and perhaps confusing, but beneath the simplicity and minimalist animations, it is emotional. My favorite part to this game is the fact that the message or goal being delivered is very vague (if there even is one) and this allows the player or viewer to interpret the game in the way they want. Frei and Rickenbach combine amusing hand and plug animations, as well as strangely drawn figures to tell this story. To me, “PLUG AND PLAY” is about sexuality and binary, and the confusion that can come with love. In one scene, there are two figures can be seen arguing about love, and they always end up walking away from each other. Eventually, one of them ends up stating, “It hurts.” This shows that no matter what route you take in life, love and pleasure only end up causing pain. When you play this game, you will either love it or dislike it, you will either understand it or just be more confused. I definitely recommend this mind twisting game.
This game was.
I’m writing a review because I never do, and I feel like this, this game (is it even a game?) deserves one. It may be short, and it may not be what you expect, but that’s the point.
It is what it is. It is what you make of it. It leaves me wanting more, and it leaves me feeling like I’m missing something crucial to the game, but I’ve loved it. I don’t know what to write,or think about it, but I know that it has left me with something. What it is though, I don’t know. You should try this game. It may make you think about your experiences in a different light. It may change your perspective on society. Or maybe you get nothing from this. But you should try it.
Источник
Plug and Play и не каких сложностей
Когда вы подключаете к порту USB, например, флешку, то вряд ли вы задумываетесь о том, как так получается, что это, на самом деле, довольно сложное, устройство, почти мгновенно опознается компьютером и становится готовым к работе. А ведь подобная ситуация существовала далеко не всегда. Быстрое подключение устройств стало возможным благодаря появлению в начале 1990-х гг технологии Plug and Play (или, сокращенно, PnP). Еще, казалось бы, совсем недавно компьютерный мир обходился без этой технологии, а теперь она стала для всех нас настолько обыденной, что мы практически ее не замечаем.

Суть технологии PnP
Раньше, до появления технологии Plug and Play, для подключения к системному блоку какого-либо периферийного устройства, неважно, будь то мышь, принтер или внутренняя плата расширения типа звуковой карты, необходимо было вручную осуществлять конфигурирование оборудования. Это означало самостоятельное определение таких параметров, как номера прерывания и прямого доступа к памяти. Также очень часто пользователю требовалось устанавливать джамперы и перемычки на устройстве. Разумеется, подобная ситуация порождала многочисленные проблемы и даже могла привести к выходу устройств из строя.
Технология Plug and Play позволила делать всю рутинную работу по настройке устройств автоматически, за пользователя, попутно экономя ему много времени и сил. Кроме того, технология Plug and Play позволяет подключать устройства «на ходу», без перезагрузки компьютера, а сам процесс распознавания новых устройств занимает всего несколько секунд. Стандарт PnP теперь поддерживают практически все внешние порты и шины компьютера, такие, как USB, PCI, COM, и.т.д.
Немного истории
Словосочетание Plug and Play в переводе дословно означает «Включи и играй» (или «работай» – в зависимости от того, насколько серьезным является предназначение подключаемого устройства). Первой из операционных систем семейства Windows, в которой появилась поддержка этой технологии, была ОС Windows 95. Впрочем, на других компьютерных платформах подобные технологии появились еще раньше. Например, на платформе Mac подобная технология называлась NuBus, а на платформе Amiga – Autoconfig.
Для того, чтобы пользователи любой ОС смогли бы использовать возможности технологии в полной мере, она должна поддерживаться материнской платой компьютера, то есть, ее поддержка должна быть зашитой в системной BIOS. Первая спецификация Plug and Play была разработана в 1993 совместными усилиями таких известных компаний, как Intel, Compaq, Microsoft и Phоenix. Очень быстро технология была принята большинством производителей оборудования. Простые пользователи также очень скоро оценили ее преимущества по достоинству. Позднейшие усовершенствования технологии стали включать поддержку интерфейса ACPI, а вместе с ним и автоматическое управление питанием компьютера.
Принцип работы технологии PnP
Хотя Plug and Play значительно упрощает пользователю работу с компьютером и установку нового оборудования, тем не менее, в своей основе она довольно сложна. Для того, чтобы в полной мере использовать ее преимущества, необходимо, чтобы технология PnP поддерживалась бы следующими компонентами программного и аппаратного обеспечения:
BIOS материнской платы компьютера
- Самим устройством, которое подключается к нему
- Операционной системой
Принцип работы технологии в упрощенном виде выглядит так – после включения компьютера и проверки оборудования, до загрузки операционной системы специальная программа, хранящаяся в BIOS, получает от каждого устройства уникальный идентификатор, содержащийся в специальной ячейке памяти устройства, и конфигурирует устройства, необходимые для загрузки системы.
Впоследствии, после загрузки операционной системы, эти идентификаторы также используются для конфигурирования устройств. В ОС Windows конфигурированием занимается специальная служба «Диспетчер устройств». В задачи этой службы входит распределение системных ресурсов и разрешение конфликтов между устройствами. Наибольшим приоритетом пользуются устройства, имеющие более жесткие требования к ресурсам. Также операционная система отслеживает и контролирует процесс «горячего» подключения и отключения новых устройств.
Заключение
Технология Plug and Play призвана облегчить жизнь пользователю, исключить проблемы при подключении внешних устройств к шинам расширения и разъемам компьютера при помощи автоматического конфигурирования нового оборудования и распределения системных ресурсов. При этом ключевым условием полноценного функционирования технологии на компьютере является ее поддержка на уровне BIOS.
Источник


