- Android tethering
- Contents
- Wi-Fi access point
- USB tethering
- Using systemd-networkd with udev
- USB tethering with AziLink
- Tools needed
- Configuring the phone connection in Arch Linux
- Procedure
- USB tethering with EasyTether
- Tethering via Bluetooth
- Tethering with SOCKS proxy
- Tools needed
- Instructions
- Tetherbot
- Proxoid
- How can I add a Tethered iPhone connection in Linux (Ubuntu and Raspberry Pi OS)?
- Prerequisites
- Tethering
- How to access to internet on Linux using Android Tethering
- What is Tethering?
- Tethering on Linux
- USB Tethering
- Wifi Tethering
- Bluetooth Tethering
- iPhone USB / Bluetooth Tethering With Linux
- iPhone tethering via USB
- iPhone tethering via Bluetooth
Android tethering
Tethering is a way to have internet access on your PC through your smartphone using its network connection. USB tethering and Wi-Fi access point tethering are natively supported since Android 2.2 «Froyo».
Contents
Wi-Fi access point
Using an Android phone as a Wi-Fi access point (to a 3G/4G mobile internet connection) is available for devices running Android 2.2 «Froyo» or newer.
Enable it via one of the following:
- Settings > Wireless & networks > Internet tethering > Wi-Fi access point
- Settings > More. > Tethering & mobile hotspot > Mobile Wi-Fi hotspot
USB tethering
USB tethering is available since Android 2.2 «Froyo».
- Connect the phone to your computer via USB (the USB connection mode — Phone Portal, Memory Card or Charge only — is not important, but please note that you will not be able to change the USB mode during tethering)
- Enable the tethering option from your phone. This is usually done from one of:
- Settings -> Wireless & networks -> Internet tethering (or Tethering & portable hotspot, for more recent versions)
- Settings -> More. -> Tethering & mobile hotspot -> USB tethering
- Install the usb_modeswitch package. See Mobile broadband modem#Mode switching for more information.
- Follow Network configuration.
- If you are using a cellular data plan and you have recently entered a new billing period, you may need to restart your phone.
Using systemd-networkd with udev
 This article or section needs expansion.
Using systemd-networkd you can automatically adjust the networking to use the phone as the gateway when plugged in.
You may have to adjust the idVendor attribute depending on your phone. You can check using udevadm:
Then create the corresponding systemd-networkd file:
USB tethering with AziLink
AziLink is an application that allows USB tethering for Android-based phones, without requiring root access. It is very useful for Android older than version 2.2, when there was no stock USB tethering feature implemented. It also does not require changes to your browser, and all network traffic is transparently handled (except ICMP pings). It may be somewhat CPU intensive on the phone at high usage rates (a 500 kBytes/sec data transfer rate may take more than 50% of phone CPU).
Tools needed
For Arch, you need to install the openvpn package. You will also need to install the android-tools package for the adb tool and android-udev which sets up the correct /usr/lib/udev/rules.d/51-android.rules file for your device to be recognized. On the phone, you need the azilink.apk (azilink homepage). The android application acts as a NAT, adb forwards the ports to your phone, and your openvnp setup will connect to it.
Configuring the phone connection in Arch Linux
So that you do not have to run adb as root, we are going to grant your user permissions to your usb device. Make sure you have turned on USB debugging on the phone (usually in Settings -> Applications -> Development -> USB debugging) so that it will be shown as a device, and that it is plugged in to your computer via the USB cable. You should see it with you run the lsusb command. Original azi link instructions are here
The device should be listed. Example output for the Acer Liquid phone:
Then, create the following file, replacing ciri by your own Linux user name, and 0502 by the vendor ID of your own phone:
As root run the udevadm control —reload command to make the change effective. To make sure the change took effect, run adb devices and it should say device instead of unauthorized . Another way to make it take effect is to reboot. Another test is to run adb shell to get to your phones unix prompt.
Procedure
Run the AziLink application in the phone and select About at the bottom to receive instructions, which basically are:
- You will have to enable USB debugging on the phone if it was not already enabled (usually in Settings -> Applications -> Development -> USB debugging).
- Connect the phone with the USB cable to the PC.
- Run AziLink and make sure that the Service active option at the top is checked.
- Run the following commands in your Linux PC:
azilink.ovpn source from here
You may need to manually update the contents of resolv.conf to
If you are running NetworkManager, you may need to stop it before running OpenVPN.
USB tethering with EasyTether
Get the easytether linux client software. The commands to set it up and run it are as follows.
Make sure you have the EasyTether android app installed on your phone for it to connect to. Note: The Lite app disables some connections and you must have the paid app for full functionality. For this reason, using the AziLink setup is recommended instead.
Tethering via Bluetooth
Android (from at least 4.0 onwards, possibly earlier) can provide a Bluetooth personal-area network (PAN) in access point mode.
NetworkManager can perform this action and handle the network initialisation itself; consult its documentation for more details.
Alternatively: pair and ensure you can connect your computer and Android device, as described on Bluetooth, then, substituting the address of the device (here given as AA_BB_CC_DD_EE_FF ), do:
This will create a network interface bnep0 . Finally, configure a network connection on this interface; Android offers DHCP by default.
Tethering with SOCKS proxy
With this method tethering is achieved by port forwarding from the phone to the PC. This is suitable only for browsing. For Firefox, you should set network.proxy.socks_remote_dns to true in about:config ( address bar )
Tools needed
- The android-tools and android-udev packages
- USB connection cable from your phone to PC
- Either Tetherbot or Proxoid
Instructions
Tetherbot
Tetherbot is an experimental SOCKS proxy and Port Bouncer that should allow you to connect your laptop to the internet using the internet connection (EDGE, 3G or Wifi) of your T-Mobile G1 Cellphone. It is discontinued and its website is down, but still can be accessed from Wayback Machine[1] where its APK can also be downloaded from.
In order to do SOCKS proxy via Tetherbot to connect your browser to the Internet, do:
- For your phone, open the application Tetherbot and press the Start Socks button
- Start your SOCKS proxy by running:
- Now go to your web browser’s proxy settings, set a manual proxy configuration with the proxy host address localhost and port 1080 , leaving the rest blank.
Proxoid
Follow the instructions demonstrated in the following link.
Источник
How can I add a Tethered iPhone connection in Linux (Ubuntu and Raspberry Pi OS)?
Speedify can use USB tethered iPhones to add a cellular internet connection to your Ubuntu and Raspberry Pi OS device. To use this, your iPhone’s cellular plan must support hotspots/tethering.
Prerequisites
On Linux, you may need to install additional packages to support tethering iPhones. The exact packages can vary between distributions and versions.
For Ubuntu, the ipheth-utils package is needed for tethering iPhones («sudo apt install ipheth-utils»)
For Raspberry Pi OS, the usbmuxd package adds support for tethering iPhones («sudo apt install usbmuxd»)

If you are using another distribution, try the packages mentioned above if they are available. Otherwise, search online for the specific package needed for your distribution.
Tethering
To start tethering:
- Plug the iPhone to the computer via USB
- On the iPhone go to Settings > Cellular > Set Up Personal Hotspot, and turn on USB Tethering.
- In Speedify, within a few seconds, you will see a new connection appear representing the tethered phone.
Once it appears, you can adjust the Connection Settings, such as Priority, to control how Speedify uses the adapter.
Источник
How to access to internet on Linux using Android Tethering
What is Tethering?
It’s been over 30 years since the World Wide Web was introduced to the world. Over time, the internet took its toll and now has roughly around 45 million web pages compared to 10,000 websites earlier. We really do have come a long way.
Emerging from the primitive world of 2G signals we are now living in the era where mostly every device has an internet connection and if not of its own, gets one from another system. The technical term for sharing your phone’s internet connection to another phone or system is known as Tethering.
Tethering on Linux
Tethering the internet through your phone to your Linux desktop can be done mainly via three simple ways.
Let’s check them out!
USB Tethering
Connection over USB is just as simple as connecting your phone to a charger point. However, just like electricity is essential to charge your phone, internet connection in your phone is necessary to share it with others. Rare is the case when your charging cable is not suitable to be used as a data-transfer wire and you need to buy an apt one separately.
The connection is automatically established by plugging in your USB cable to both your computer and phone. A dialog box of confirmation highlighting the name of your device pops up.

Now, Under the Settings in your phone select Wireless and Network (or Network and Internet ). Click on the More tab and choose Tethering & Portable Hotspot and Enable USB Tethering . On the top right corner of your Linux machine, bring down the Network Connections toolbar as shown, where a tab Ethernet Connected is visible.
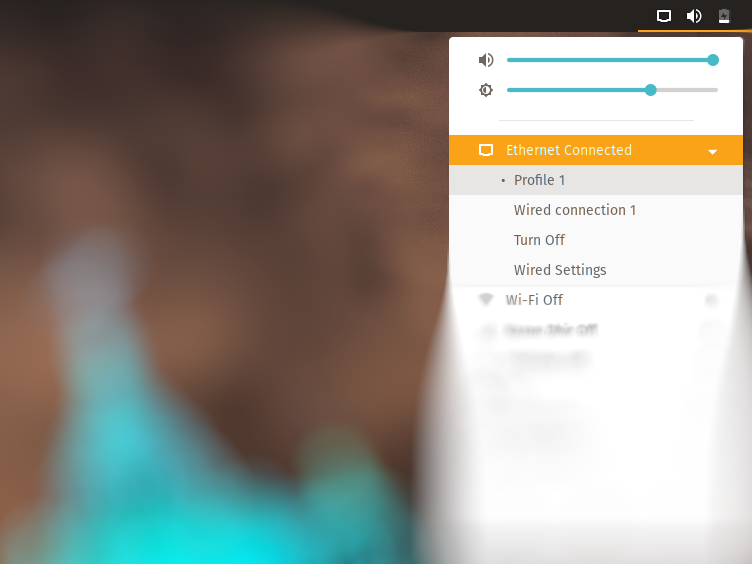
Your system’s internet connection is ready!
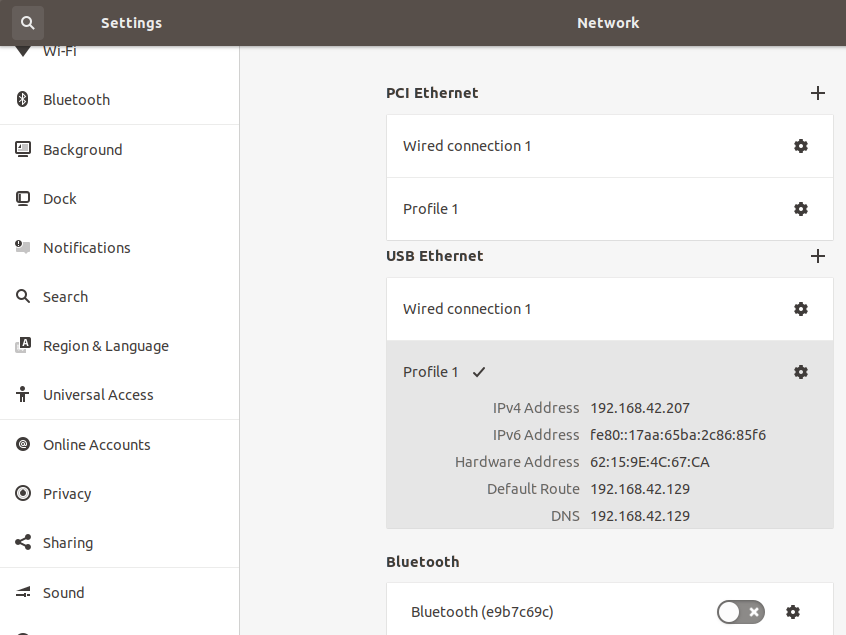
However, in a few cases you might have to further enable the Wired Settings window, where you can add a new connection and also view the IP address of your attached device. Here in this case, it is named Profile 1 .
Click on Profile 1
Wifi Tethering
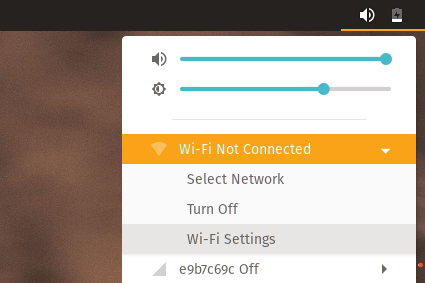
Following the same process as mentioned above, in your Android phone, open Settings and go to Network & Internet . Next, select Mobile Hotspot and Tethering and turn on the Mobile Hotspot . In your Linux system, again under the Network Connections , turn Wifi On
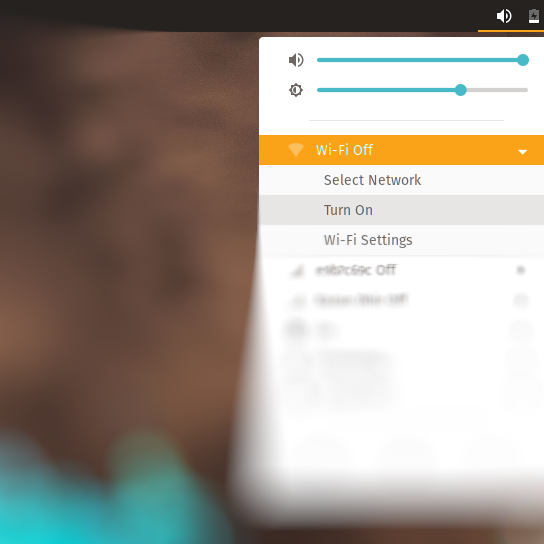
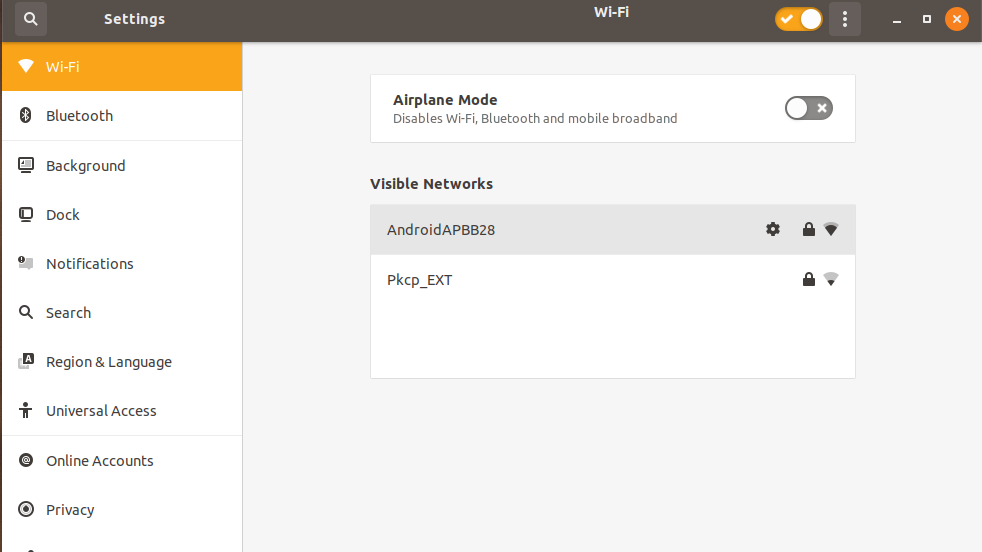
and go to Wifi Settings .
Here you can view all the available networks and connect with anyone by just entering the password available in your phone under Mobile Hotspot .
The Wi-Fi symbol in the top panel will now indicate that it’s connected.
Bluetooth Tethering
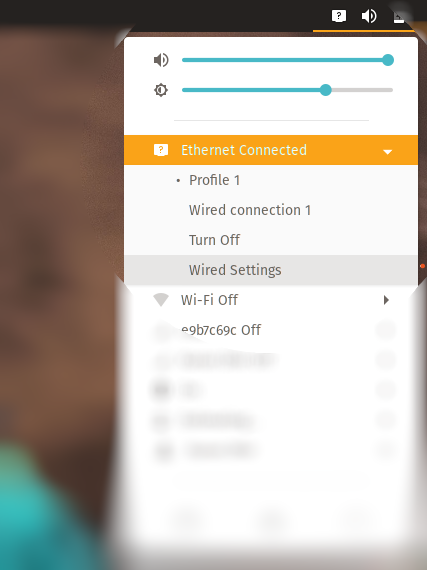
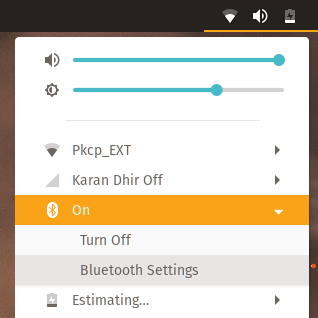
Yes! The bluetooth connection can be used not only to transfer data files but for passing on your phone’s internet connection to your Linux machine. Navigating through the Network Connections tab, switch on the Bluetooth on your Linux distro and go to Bluetooth Settings .
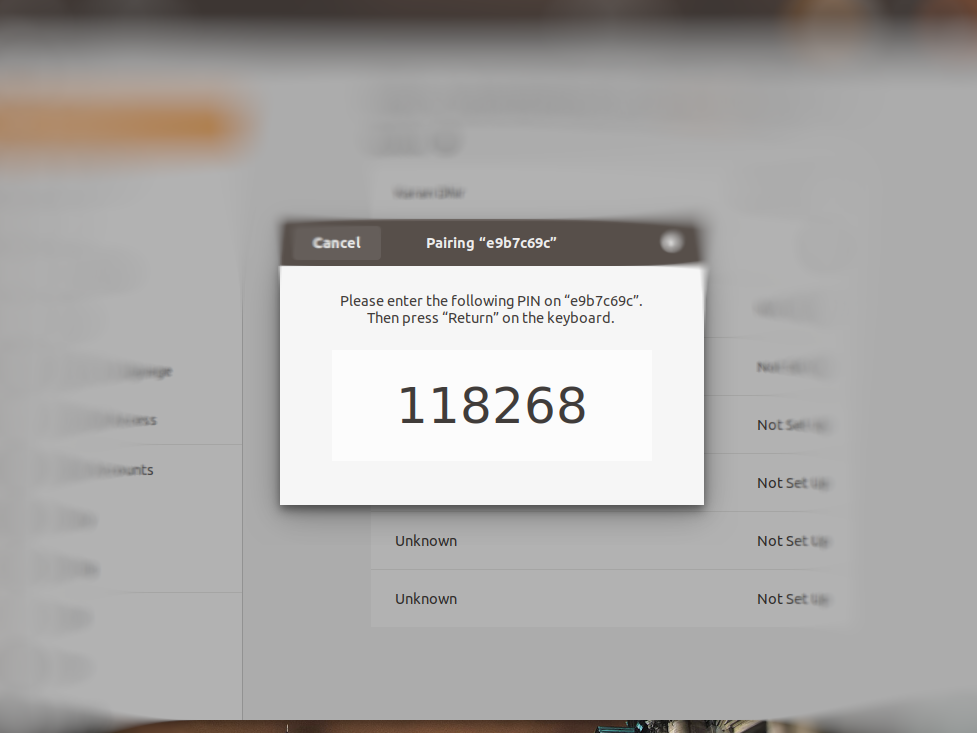
Make sure you have turned on Bluetooth in your phone too. Both of your devices will discover each other so click on the device’s name and a confirmation pin message will show up on both of the devices. If the pin matches, click confirm and Bluetooth pairing will be established.
Now, again go to the Network Connections tab and under the paired device, here e9b7c69c , select the option to Connect to Internet .
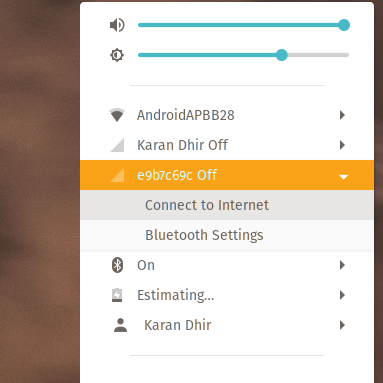
The Bluetooth symbol in the top panel will now indicate that it’s connected.
Go ahead and explore the unlimited boundaries of the internet on your Linux system! Thanks to the unimaginable scope of technology, without a doubt, your cellphone will always be at your rescue whenever a sudden need of an internet connection is required to your system.
Help us improve this content by editing this page on GitHub
Источник
iPhone USB / Bluetooth Tethering With Linux
Author : Andrew | Posted: February 12, 2010
Since we already added the required PPA for general iPhone/iPod Touch Synchronising in our previous article about syncing via GVFS, it’s now a snap to install everything needed for tethering via USB and Bluetooth:
Now, reboot. You could try to reload udev rules etc. but since you’re probably not doing this on a server just reboot to be safe.
iPhone tethering via USB
To tether via USB, all you need to do now is FIRST enable tethering in your iPhone, stay on that screen and THEN connect your iPhone to your PC/laptop via USB and it will automatically start to tether after a few seconds (you will see an additional blue bar on your iPhone). Now you can leave that screen on your iPhone. If it doesn’t automatically start to tether or you have other network connections then NetworkManager should show you a new interface in its dropdown menu (it’s called » ifupdown (bnep0) » for me). Just connect to it.
iPhone tethering via Bluetooth
Some people had success with Ubuntu/Gnome’s default bluetooth applet but I didn’t so I followed other people’s advice which was to install blueman to replace current bluetooth panel:
After a reboot you’ll have all your Bluetooth functionality back and more!
Now, to tether via Bluetooth, first enable tethering again on your iPhone. Make sure you select both USB & Bluetooth tethering. Then, turn on Bluetooth on your phone and make sure you stay on the bluetooth page in order to be visible. Click on the computer in the iphone search list. Your phone should now show up in Blueman list, too (if not, use the Search in Blueman to find your iPhone). Do a right-click on your iPhone and choose «Setup» in Blueman. You will be asked if you want to use a random password, just go ahead. Enter the PIN code Blueman shows you on your iPhone and just click through to the end to finish the Blueman wizard.
Next, right-click on your iPhone again in the Blueman main window and choose » Trust «. Now, you can just right-click on your iPhone in Blueman and select » Update Service » and then choose » Network Access Point (NAP) » again via right-click and you’ll be tethering via Bluetooth. You can now leave the Bluetooth screen again. Done!
Please note: It may happen that you need to re-add and re-pair (PIN code) your iPhone every time you want to use Bluetooth to tether. Please also note, that individual program entries may be called something else as I use a non-english Ubuntu. But I’m sure you’ll figure it out.
Источник


