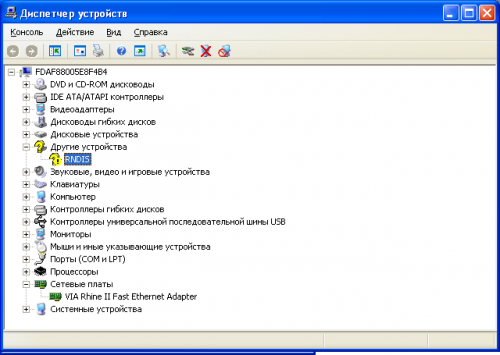
Описание проблемы: Захотелось интернет на комп через телефон. Сначала действовал согласно этой инструкции: Техподдержка Гугл. При попытке установить драйвер с помощью полученного файла (указывал папку с ним вручную) столкнулся с ошибкой установки драйвера. Что-то вроде в указанной папке драйвер не найден. В диспетчере устройств увидел следующее:
Предпринимались действия: Решил подкорректировать полученный .inf. Приведу его целиком и выделю добавленные строки:
; MS-Windows driver config matching some basic modes of the ; Linux-USB Ethernet/RNDIS gadget firmware: ; ; — RNDIS plus CDC Ethernet . this may be familiar as a DOCSIS ; cable modem profile, and supports most non-Microsoft USB hosts ; ; — RNDIS plus CDC Subset . used by hardware that incapable of ; full CDC Ethernet support. ; ; Microsoft only directly supports RNDIS drivers, and bundled them into XP. ; The Microsoft «Remote NDIS USB Driver Kit» is currently found at: ; [url=»http://www.microsoft.com/whdc/hwdev/resources/HWservices/rndis.mspx»]http://www.microsoft.com/whdc/hwdev/resour. ices/rndis.mspx[/url]
[Version] Signature = «$CHICAGO$» Class = Net ClassGUID = <4d36e972-e325-11ce-bfc1-08002be10318> Provider = %Android% Compatible = 1 MillenniumPreferred = .ME DriverVer = 03/30/2004,0.0.0.0 ; catalog file would be used by WHQL ;CatalogFile = Android.cat
[AndroidDevices] ; Google Nexus One without adb %AndroidDevice% = RNDIS, USB\VID_18D1&PID_4E13 ; Google Nexus One with adb %AndroidDevice% = RNDIS, USB\VID_18D1&PID_4E14 ; Google Nexus S without adb %AndroidDevice% = RNDIS, USB\VID_18D1&PID_4E23 ; Google Nexus S with adb %AndroidDevice% = RNDIS, USB\VID_18D1&PID_4E24 ; HTC Sapphire without adb %AndroidDevice% = RNDIS, USB\VID_0BB4&PID_0FFE ; HTC Sapphire with adb %AndroidDevice% = RNDIS, USB\VID_0BB4&PID_0FFC ; Motorola Sholes without adb %AndroidDevice% = RNDIS, USB\VID_22B8&PID_41E4 ; Motorola Sholes with adb %AndroidDevice% = RNDIS, USB\VID_22B8&PID_41E5 [color=»red»];Sony Xperia E dual C1605 %AndroidDevice% = RNDIS, USB\VID_0FCE&PID_718c&mi_00[/color]
[AndroidDevices.NT.5.1] ; Google Nexus One without adb %AndroidDevice% = RNDIS.NT.5.1, USB\VID_18D1&PID_4E13 ; Google Nexus One with adb %AndroidDevice% = RNDIS.NT.5.1, USB\VID_18D1&PID_4E14 ; Google Nexus S without adb %AndroidDevice% = RNDIS.NT.5.1, USB\VID_18D1&PID_4E23 ; Google Nexus S with adb %AndroidDevice% = RNDIS.NT.5.1, USB\VID_18D1&PID_4E24 ; HTC Sapphire without adb %AndroidDevice% = RNDIS.NT.5.1, USB\VID_0BB4&PID_0FFE ; HTC Sapphire with adb %AndroidDevice% = RNDIS.NT.5.1, USB\VID_0BB4&PID_0FFC ; Motorola Sholes without adb %AndroidDevice% = RNDIS.NT.5.1, USB\VID_22B8&PID_41E4 ; Motorola Sholes with adb %AndroidDevice% = RNDIS.NT.5.1, USB\VID_22B8&PID_41E5 [color=»red»];Sony Xperia E dual C1605 %AndroidDevice% = RNDIS.NT.5.1, USB\VID_0FCE&PID_718c&mi_00[/color]
[RNDIS.NT.5.1] Characteristics = 0x84 ; NCF_PHYSICAL + NCF_HAS_UI BusType = 15 DriverVer = 03/30/2004,0.0.0.0 AddReg = RNDIS_AddReg_NT, RNDIS_AddReg_Common ; no copyfiles — the files are already in place
Как видим всё довольно просто. Нужно только знать VID и PID своего устройства. Для этого следует запустить диспетчер устройств и зайти в свойства неизвестного устройства RNDIS: Нужно добавить в файл .inf выделенную на скрине строку. После этого устройство установилось и в папке Сетевые подключения появилось Сетевой подключение 2. Эффект достигнут. Надеюсь, не баян.
Сообщение отредактировал sh00rs — 22.09.13, 01:22
Usb tethering для windows
Краткое описание: Когда телефон подключен к ББ с помощью кабеля USB приложение автоматически включает модем
Описание: Это приложение отслеживает порт USB телефон. Всякий раз, когда телефон подключен к компьютеру или ноутбуку с помощью кабеля USB приложение автоматически включается модема USB, опционально, после подтверждения пользователем. USB-модема можно с Android версии 2.2, но это занимает довольно много раздражающих нажатий на экран телефона, чтобы включить функцию. Авто USB модема позволяет автоматизировать все эти действия вручную. Просто подключите телефон к ноутбуку и вы instantantly подключены к Интернету с ноутбука через 3G/4G сетей. Это удобно, если вы часто используете телефон в качестве модема для ноутбука обеспечивают с подключением к Интернету в течение длительного периода времени. Wi-Fi модема является оптимальным решением для такого использования. С Wi-Fi привязывать стоков батареи очень быстро, вы должны положить телефон на зарядное устройство, так или иначе (переменного или USB) и USB-соединение способ быстрее и надежнее, то Wi-Fi.
USB модема работает со всеми последними версиями ОС Windows и Linux. Он не работает с Mac OS без драйверов третьих сторон. Разработчик веб-сайта имеет для получения дополнительной информации об этом приложении, включая вопросы и ответы.
Существует также «Auto USB модема Премиум», которая обеспечивает более настройки. Пожалуйста, проверьте это, если вы думаете, это приложение является полезной и планируем сохранить его установки.
ВНИМАНИЕ: Приборы распространяются некоторые операторы (? AT & T) была изменена версия Android установленных который отключает стандартный USB-модема возможностей. Это приложение не будет работать на этих устройствах. Пожалуйста, не дать приложению плохой рейтинг по этой причине. Вина вашего оператора вместо этого. Чтобы исправить это вы должны либо «корень» телефона и установить другую прошивку (ROM) или переключиться на другое устройство. Существует ничего этого приложения (или другие) могут сделать.
Русский интерфейс: Нет Программой поддерживается установка на SD (OS 2.2+).
Сообщение отредактировал Gridzilla — 03.08.12, 19:27
How to Set Up USB Tethering on Windows 10
Use your Android or iPhone to create a hotspot
What to Know
First, connect your Android or iPhone to your laptop with a USB cable.
Next, go to Settings on your phone > turn on USBTethering (Android) or Personal Hotspot (iPhone).
In the Windows taskbar, open the computer’s Network and Internet settings to verify the connection.
This article explains how to set up USB tethering on Windows 10 devices, which allows you to create a hotspot to access the internet even when no network connection is available. Troubleshooting tips are also included if something isn’t working right.
How to Set Up USB Tethering on Windows 10
Before you begin, make sure both your phone’s operating system and your computer’s operating system are updated to the latest versions. Also, depending on your mobile carrier, you may be charged a flat fee for tethering a laptop to a mobile device. Check with your carrier if you’re worried about extra costs.
To set up USB tethering between your mobile device and your Windows 10 computer:
Connect your mobile device to your laptop via USB cable.
For Android phones, use a USB-to-micro USB or USB-to-USB-C connector. For iPhones, use the standard lightning cable.
Open your phone’s settings and go to Network & Internet > Hotspot & tethering (Android) or Cellular > Personal Hotspot (iPhone).
turn on USB tethering (on Android) or Personal Hotspot (on iPhone) to enable. Your laptop should now be able to access the internet through your phone’s mobile plan.
Make sure you turn off Wi-Fi so your computer doesn’t try connecting with other networks you can’t access.
Open your computer’s Network and Internet settings in the Windows taskbar to make sure you’re connected. Depending on your device, it may say that you’re connected via LAN.
If you’re having trouble with the connection, try plugging your phone into a different USB port, or using a different cable.
Troubleshooting Windows 10 USB Tethering
If USB tethering isn’t working in Windows 10, it could be because the driver for the network adapter is outdated. To fix this problem:
Right-click the Start Menu and select Device Manager.
Expand the Network adapters tab, then right-click your network adapter and select Update driver.
Select Search automatically for updated driver software.
You must restart the computer after installing the driver. If the Device Manager says that you already have the latest driver, then the problem could be with your connection, your phone, or your mobile data.
What Is USB Tethering?
Tethering is the process of sharing your phone’s mobile data to access the internet on another device, such as a laptop. You can tether using Bluetooth or NFC, but USB tethering is the fastest and most effective method. That said, USB tethering can’t compete with the speeds of a solid Wi-Fi connection.
Be careful about how much data you use when tethered. Since many data plans charge incremental amounts based on data usage, watching videos or downloading files on a tethered connection can quickly increase your phone bill. In some cases, it’s possible to reverse tether and share Wi-Fi from your computer to your phone to save on data.
How to set up USB tethering on Windows 10
This post will show you how to set up USB tethering on Windows 10 & share your phone’s mobile data to access the internet on other devices. Tethering is usually understood as WiFi Tethering, which allows the users to share their mobile data to any Wifi-enabled devices, including laptops. It comes in handy when you do not have any way to access the internet connection.
That said, what if you have a desktop, and you dont have any option to connect to ethernet, and there is no Wifi adapter to connect to a router. In a situation like this, you can use USB Tethering. It is almost similar to Wifi tethering, except that it works over the USB connection.
You can imagine it to be like an ethernet connection, but faster compared to Wifi tethering and even Bluetooth tethering.
Set up USB tethering on Windows 10
USB tethering like Wifi tethering is free unless your carrier has blocked it. So its best to clear that with your operator. Once done, follow the steps to set up USB tethering on Windows 10.
Connect your phone with Windows 10 using a USB cable.
If asked to enable file transfer feature, cancel it.
Usually, there is a prompt available as soon as you connect,saying “Tethering or Hotspot active—Tap to setup.” Tap on it.
If there is no prompt, go to Settings > Network and Internet > Hotspot and Tethering > Toggle on USB tethering.
The setup will automatically create a new network adapter in Windows 10. The computer will be connected to the internet using that. If you open Network settings in Windows 10, this is how it will look like.
Make sure that WiFi on your phone is turned off. If it is connected to an existing network, USB tethering will be disabled. If you see it as enabled, the tethering is successful.
Note: The location of Tethering can be different for every phone, especially on a customized OS like those from RealMe, Redmi, Samsung, or any other phone. However, they are clubbed with Mobile and Data Network section.
Troubleshooting USB Tethering in Windows 10
Windows uses Remote NDIS based Internet Sharing Device network adapter to make USB tethering possible on Windows 10. So if it stops working for you all of a sudden, check this:
1] Basic Check
Wifi-enabled automatically
USB cable disconnected
Accidentally turned off tethering
2] Update the NDIS driver using the Device Manager
Use WIN+X+M to open Device Manager
Expand the network section, and locate NDIS.
Right-click, and check if there is an update available.
If there is no update, then can manually browse for and locate USB RNDIS6 Adapter. Update it.
Restart the computer.
We hope that you were able to follow the instructions quickly, and were successful in setting up USB tethering on Windows 10.


 om.ttxapps.autousbtethering.premium_1.apk ( 5,87 КБ )
 :max_bytes(150000):strip_icc()/JordanBarabnowski-e55f2c3b35c64e889d021e40bba56799.jpg)
:max_bytes(150000):strip_icc()/ryanperiansquare-de5f69cde760457facb17deac949263e-180a645bf10845498a859fbbcda36d46.jpg)
:max_bytes(150000):strip_icc()/003_set-up-usb-tethering-windows-10-4584419-e6d45481f1ba42e7ad55df272bcd94a7.jpg)
:max_bytes(150000):strip_icc()/devicemanagerwindows-629cc0e2425742e095b807b7791e52d6.jpg)
:max_bytes(150000):strip_icc()/005_set-up-usb-tethering-windows-10-4584419-04d96ac2e78e4c4281c3e45e7fe02f31.jpg)
:max_bytes(150000):strip_icc()/searchforupdateddriversoftware-9a387f4db855412eb7eb57c34fa08f61.jpg)


