USBtinyISP
Download
For windows, we use a modified LibUSB driver. You can download it here:
- Windows USBtinyISP signed driver built with libusb v1.12. The windows binaries below are built for this driver. If you want to use the latest WinAVR use this
For historic reasons, we have a:
- Windows USBtinyISP driver built with libusb v1.10. Use this for older WinAVR’s. Don’t use this unless you have to interface with old versions of software that are bound to libusb v1.1
The firmware is based off of the USBtiny code originally here.
Use the precompiled .hex file and Makefiles as your compiler may not be able to squeeze the code down to fit in the chip. Modify the Makefile in spi as needed and, in the spi folder, type in «make fuse flash» Beyond that, you’re on your own.
You must use avr-gcc v3.4.6 and avr-libc v1.4.4 as part of Winavr-20060421to compile the firmware. Pleasedo not post to the forums asking for help on how to compile or burn the firmware.
The board design is not single sided, but it’s close: you will need to solder in the 5 wires that would go on the top. I have successfully toner-transfer etched this design.
This firmware is based off of the USBtiny code originally here.
You must use avr-gcc v3.4.6 and avr-libc v1.4.4 as part of Winavr-20060421to compile the firmware. Pleasedo not post to the forums asking for help on how to compile or burn the firmware.
This guide was first published on Jun 10, 2013. It was last updated on Jun 10, 2013.
This page (Download) was last updated on Apr 17, 2021.
USBtinyISP
Drivers
Before you plug in your board, you’ll need to possibly install a driver!
Click below to download our Driver Installer
Download and run the installer

Run the installer! Since we bundle the SiLabs and FTDI drivers as well, you’ll need to click through the license

Select which drivers you want to install:

By default, we install the Feather 32u4 , Feather M0, Flora and Trinket / Pro Trinket / Gemma / USBtinyISP drivers.
You can also, optionally, install the Arduino Gemma (different than the Adafruit Gemma!), Huzzah and Metro drivers
Click Install to do the installin’


Driver installed! Now go to your Device manager (Start Menu -> Settings -> Control Panel -> System -> Hardware) and look for the device:

A driver is not required.
This guide was first published on Jun 10, 2013. It was last updated on Jun 10, 2013.
This page (Drivers) was last updated on Apr 17, 2021.
Text editor powered by tinymce.


Related Guides


OUT OF STOCK NOTIFICATION
You have been successfully subscribed to the Notification List for this product and will therefore receive an e-mail from us when it is back in stock!
For security reasons, an e-mail has been sent to you acknowledging your subscription. Please remember that this subscription will not result in you receiving any e-mail from us about anything other than the restocking of this item.
If, for any reason, you would like to unsubscribe from the Notification List for this product you will find details of how to do so in the e-mail that has just been sent to you!
MightyOhm
For some time now, those wanting to use the Adafruit Industries USBTinyISP with the 64-bit versions of Windows 7 or Vista were faced with the following errors when attempting to install the device drivers supplied by Adafruit:
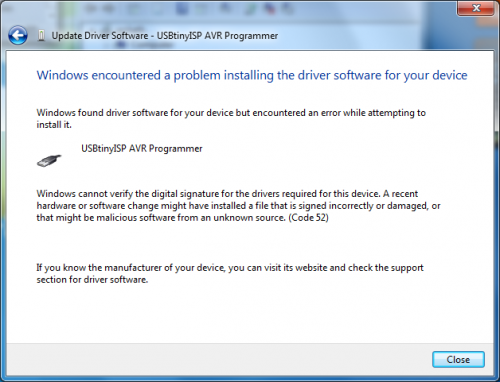
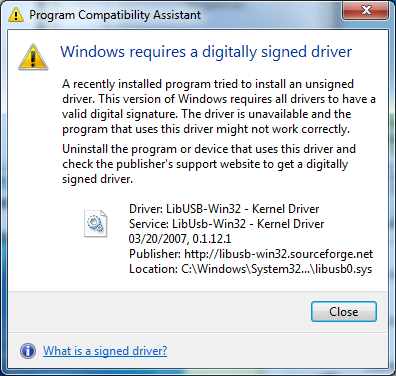
For some reason, the 32-bit versions of these operating systems don’t prevent the unsigned drivers from being installed, although they do complain.
There are a few workarounds that involve hacking Windows or disabling digital signature checking, but thanks to a tip by user wayneft on the Adafruit support forums, I was able to make the process much more straightforward.
The USBTiny drivers are based on libusb-win32. Based on some notes I found on the libusb-win32 wiki, I discovered that the latest libusb drivers contain a proper digital signature:
Vista/7 64 bit are supported from version 1.2.0.0 since a Microsoft KMCS accepted digital signature is embedded in the kernel driver libusb0.sys. libusb-win32 based device drivers can also be submitted for Microsoft WHQL testing. Several companies have successfully finished the WHQL testing with their libusb-win32 based driver package. This will allow the customers to install the driver without a warning under current 32bit/64bit Windows.
This is good news!
I downloaded the latest version of libusb-win32 (1.2.1.0) and used the included inf-wizard tool to create new drivers for the USBTinyISP:
I used the Windows device manager to upgrade the broken drivers on my Windows 7 64-bit machine. There is still a warning that “Windows can’t verify the publisher of this driver software” but there are no more errors about digital signatures and the new drivers appear to install and work correctly.
I haven’t done a huge amount of testing with the drivers, but I was able to communicate with the USBTiny via avrdude and flash a simple program to an AVR. I also haven’t tested this fix on Vista, as I don’t have access to a computer running it. If anyone tests these drivers on Vista x64, please post your results in the comments!
Usb tiny driver windows


September 10, 2010 AT 12:08 am
USBTinyISP drivers for 64-bit Windows 7 / Vista x64

For some reason, the 32-bit versions of these operating systems don’t prevent the unsigned drivers from being installed, although they do complain.
There are a few workarounds that involve hacking Windows or disabling digital signature checking, but thanks to a tip by user wayneft on the Adafruit support forums, I was able to make the process much more straightforward. The USBTiny drivers are based on libusb-win32. Based on some notes I found on the libusb-win32 wiki, I discovered that the latest libusb drivers contain a proper digital signature…
I used the Windows device manager to upgrade the broken drivers on my Windows 7 64-bit machine. There is still a warning that “Windows can’t verify the publisher of this driver software” but there are no more errors about digital signatures and the new drivers appear to install and work correctly.
Stop breadboarding and soldering – start making immediately! Adafruit’s Circuit Playground is jam-packed with LEDs, sensors, buttons, alligator clip pads and more. Build projects with Circuit Playground in a few minutes with the drag-and-drop MakeCode programming site, learn computer science using the CS Discoveries class on code.org, jump into CircuitPython to learn Python and hardware together, TinyGO, or even use the Arduino IDE. Circuit Playground Express is the newest and best Circuit Playground board, with support for CircuitPython, MakeCode, and Arduino. It has a powerful processor, 10 NeoPixels, mini speaker, InfraRed receive and transmit, two buttons, a switch, 14 alligator clip pads, and lots of sensors: capacitive touch, IR proximity, temperature, light, motion and sound. A whole wide world of electronics and coding is waiting for you, and it fits in the palm of your hand.
Join 27,000+ makers on Adafruit’s Discord channels and be part of the community! http://adafru.it/discord
Have an amazing project to share? The Electronics Show and Tell is every Wednesday at 7pm ET! To join, head over to YouTube and check out the show’s live chat – we’ll post the link there.
Join us every Wednesday night at 8pm ET for Ask an Engineer!
CircuitPython – The easiest way to program microcontrollers – CircuitPython.org
Maker Business — To make it through a tough business cycle, layoffs should be a last resort
Wearables — Frame it with PVC
Python for Microcontrollers — Python on Microcontrollers Newsletter: The Adafruit Learn System Project Bundle, and more! #Python #Adafruit #CircuitPython @micropython @ThePSF
Adafruit IoT Monthly — ESP Earrings, RP2040 WiFi, and more!
EYE on NPI — Maxim’s Himalaya uSLIC Step-Down Power Module #EyeOnNPI @maximintegrated @digikey
3 Comments
As much as I would like this to work, it doesn’t work here. Still have to jump through hoops to use a non-signed driver.
It still doesn’t work here, windows update says I already have the latest driver and doesn’t offer an update. I downloaded the latest libusb driver but it didn’t work either.
This worked for me on Win7 Home Premium 64bit. The instructions on Jeff’s site isn’t all that clear – but when you download and unpack the zip file from his site, there’s a file called USBtiny.inf. Go to the Device Manager, click on the USBTinyISP device, right-click to update the driver, then manually browse to the inf file you just unpacked and select it. It will complain about the driver being unsigned, but if you choose to install it anyway it shouldn’t give you any more hassle.
Sorry, the comment form is closed at this time.
Usb tiny driver windows
Ну вот и пришло время нам соорудить USB программатор. Я долго не мог определиться какой бы программатор нам собрать. Выбирал по критериям простоты конструкции и удобства работы с ними, но ничего не нравилось. Выбрать программатор помог случай. Вернее я его не выбирал вообще – я его случайно собрал сам того не подозревая!
А дело было так. Некоторое количество постов назад мы собрали преобразователь USB to UART на ATtiny2313 (а в прошлой статье мы даже улучшили печатную плату). Еще при выборе схемы преобразователя я планировал на его базе (при помощи заливки различных прошивок) получать устройства различного назначения. Тогда я не подозревал, что данный преобразователь можно использовать шире, чем я планировал. Увидев схему USB программатора – USBtiny на ATtiny2313 я понял, что я уже имею готовый программатор!
Посмотрев на схему, сделанного ранее, преобразователя USB to UART (домашняя страничка )
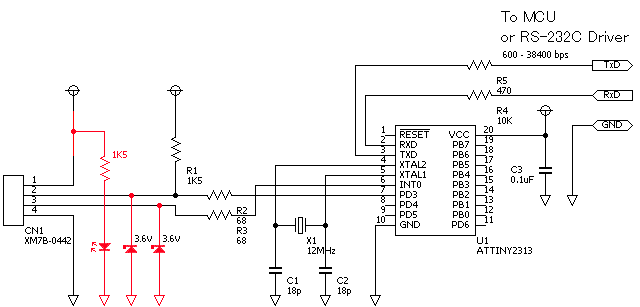
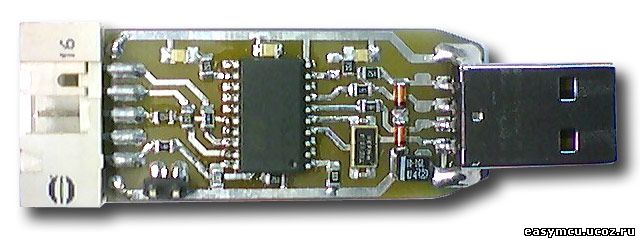
и схему USB программатора USBTiny
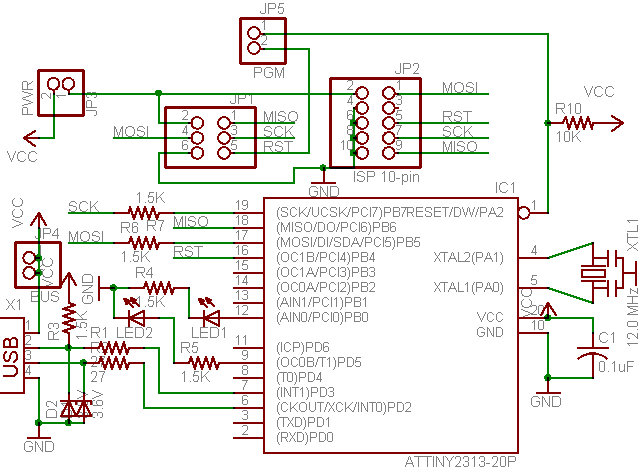
можно увидеть, что это одна и та-же схема. Различия незначительны – отсутствуют сигнальные светодиоды и несколько резисторов. Для того, чтобы преобразователь стал USB программатором нужно просто прошить микроконтроллер новой прошивкой и сделать кабель для подключения.
Теперь все по порядку.
1 Для начала нужно собрать преобразователь (это если Вы его еще не собрали).
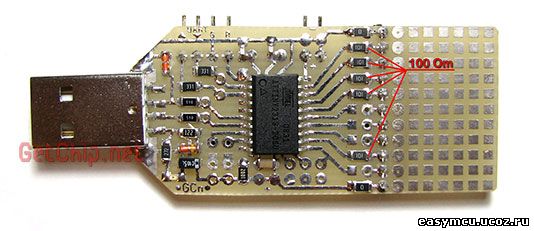
Вот рисунок печатной платы преобразователя:
T2313-SMD-2 v2.0 — Рисунок печатной платы UART-USB на ATtiny2313
Для того, чтобы обеспечить все необходимые сигналы для программирования впаиваем защитные резисторы номиналом по 100 Ом в линии ножек 12, 16, 17, 18, 19 (номинал не критичен – можно варьировать).
2 Теперь нужно прошить микроконтроллер.
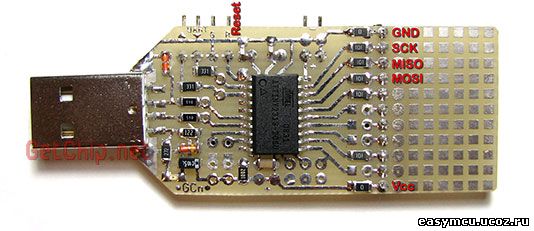
Линии для программатора выведены на общий разъем платы (кроме сброса – стоит отдельно).
usbtinyisp-T2313.hex v1.04 — Прошивка USBtiny программатора для ATtiny2313
T2313-FuseBit — Фьюз-биты ATtiny2313 для USBtiny
Для Algorithm Builder и UniProf галочки ставятся как на картинке.
Для PonyProg, AVR Studio, SinaProg галочки ставяться инверсно.
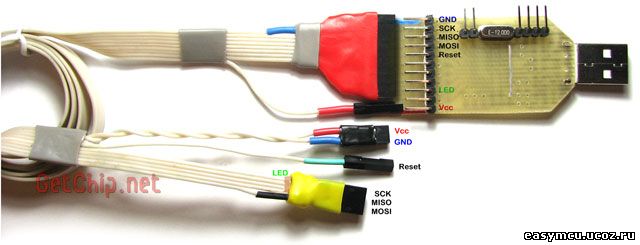
3 Далее нам нужен шлейф для того, чтобы соединить программируемое устройство с нашим программатором. Все линии, необходимые для программирования находятся на одном разъеме.
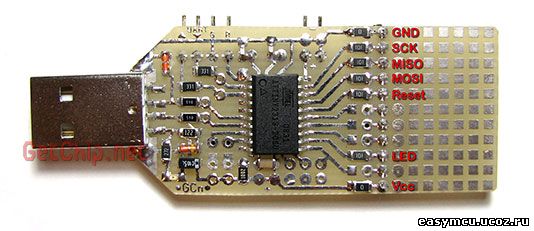
Схема шлейфа проста.
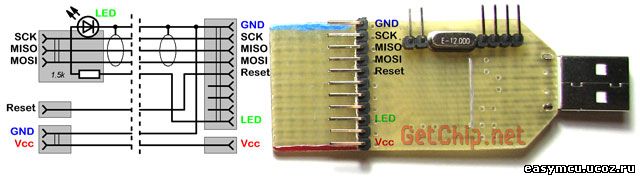
Из особенностей – я вынес индикаторный светодиод и балластный резистор для него за плату на разъем – это для того, чтобы плату без перепайки можно было использовать для других устройств (ну и так прикольней – светодиод мигает прямо в разъеме ). Кроме того, линия Vcc отделена от общего разъема – это на случай если программируемое устройство запитывается не от USB, а от своего источника (что, в принципе, желательно). Сигнальные линии (SCK, MISO, MOSI) желательно экранировать (например чередованием сигнальных и земляных линий в шлейфе). Длину шлейфа не стоит делать большой – до 50 см, не больше. Если нужно программировать удаленное устройство всегда можно применить USB удлинитель – так надежней. Вот мой готовый шнурок:
4 Сам программатор готов, теперь нужно установить драйвер для того, чтобы Винда смогла с ним работать (для Mac OS X & Linux, вродь-как, драйвера вообще не нужно). Тут все просто:
4.1 Скачиваем драйвер, разархивируем его.
usbtinyisp w32 driver v1.12 — Win драйвер для USBtiny программатора
Если у Вас Винда 64 битная, Vista или Windows 7 нужно установить другой драйвер:
usbtinyisp_libusb-win32_1.2.1.0.zip — Драйвер USBtiny для х64, Vista или Windows 7
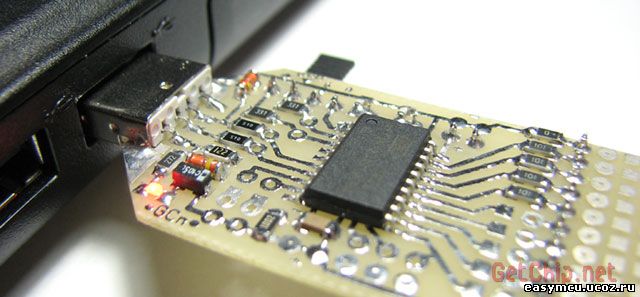
4.2 Вставляем наш программатор в USB порт.
4.3 В трее появится сообщение о том, что найдено новое устройство.
4.4 Запустится мастер нового оборудования
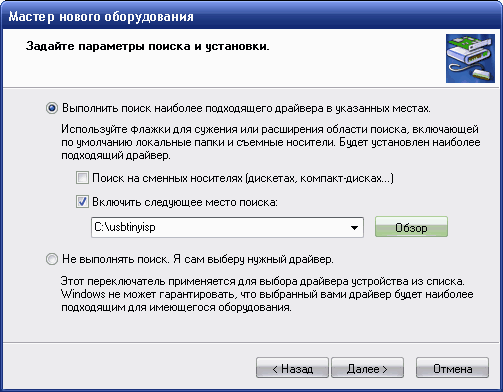
4.5 Указываем в окошке «место поиска» папку с драйвером.
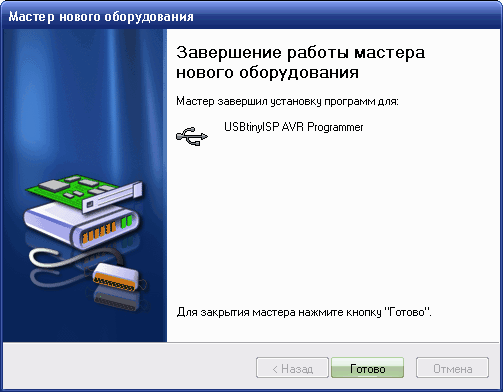
4.6 Пройдет процесс установки драйвера. Появится окошко сообщающее о том, что драйвер установлен. Чтобы проверить, что мы там наустанавливали — заходим в «Мой компьютер/Свойства/Оборудование/Диспетчер устройств» и находим там наш программатор
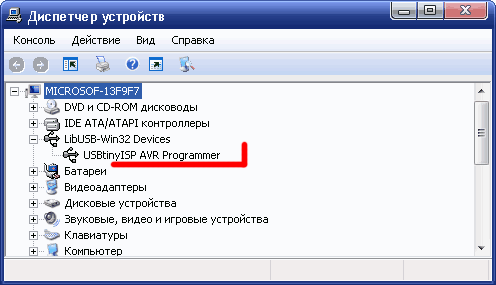
Винда увидела новое устройство и готова с ним работать.
USBtiny программатор поддерживается AVRDude, а это значит, что многие среды программирования будут с ним работать без проблем. Еще одним достоинством работы с AVRDude является то, что для работы с AVRDude существует множество оболочек GUI из которых можно выбрать подходящую именно для Вас (но об этом в следующей статье).
ДОПОЛНЕНИЯ.
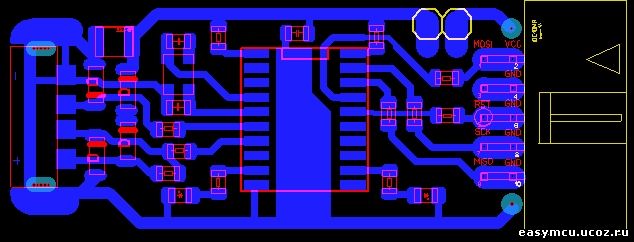
1 Дмитрий Шпак сделал довольно удачную разводку программатора. Программатор получился небольшого размера, имеет стандартный разъем для программирования и, я считаю, будет удобен в работе. Плата двусторонняя.
USBtiny.lay — Разводка USBtiny от Дмитрия Шпака
2 Еще один вариант разводки от Андрея Баранова (Andru_48)
USBtiny.lay — Разводка USBtiny от Андрея Баранова
3 Вариант от mebadboy
Доброе время суток.
Новую печатку я не собирал. Я просто исправил старую — Дмитрий Шпак . Там минимум исправлений – одну дорожку перерезать, кинуть проводок, впаять резистор и диод впаять в другое место.
USB-tiny-mebadboy — Печатка USBtiny от mebadboy
Вот лог dmesg при подключении под linux:
usb 4-2: new low speed USB device using uhci_hcd and address 2
usb 4-2: New USB device found, idVendor=1781, idProduct=0c9f
usb 4-2: New USB device strings: Mfr=0, Product=2, SerialNumber=0
usb 4-2: Product: USBtiny


