- Usbserial 1410 mac os
- Usbserial 1410 mac os
- Драйвер чипа CH340 USB-Serial
- Список поддерживаемых плат
- Зачем нужен драйвер?
- Установка драйвера
- Mostly Networks
- I Speak RF
- Fixing the Prolific Driver on OS X
- 1. Get the Driver
- 2. Discover Magic Numbers
- 3. Hex to Decimal Conversion
- 4. Edit the Driver
- 5. Kick the Driver
- WB Debug Console
- Содержание
- Физическая реализация порта отладочной консоли
- Реализация отладочной консоли в контроллерах Wiren Board
- Поддержка в операционных системах
- Подключение к отладочному порту контроллеров Wiren Board 6, Wiren Board 5.8 и Wiren Board 5.9
- Как найти порт отладочной консоли
- Подключение
- Драйвера адаптеров и названия виртуальных COM-портов
- Настройка работы отладочного порта в Linux для WB6.4 и выше
Usbserial 1410 mac os
Latest macOS Sierra/High Sierra-compatible driver for devices using the CH340G, CH34G or CH34X chipset. This chipset is used in several Arduino-compatible clones and serial-to-USB cables.
Do not install if you have the current macOS Mojave 10.14 or later. macOS Mojave 10.14 (released in October 2018) includes a CH34x driver by Apple. If both Apple’s and the OEM driver are installed, they will create conflicting non-functional serial ports. Steps 1 to 3 below can be useful to remove the conflicting OEM drivers.
If you use Apple’s driver and have problems with the serial communication, ensure the data rate is 460,800 bps or lower.
Version 1.5 (2018-07-05) of the OEM driver for the CH34x chipset.
Version 1.4 (2017-01-11) of the OEM driver for the CH34x chipset.
Version 1.3 (2016-09-27) of the OEM driver causes a kernel panic (a.k.a. crash) when installed on macOS Sierra.
- Unplug any CH34* devices.
- Unload the old drivers if running:
- sudo kextunload /Library/Extensions/usbserial.kext
- sudo kextunload /System/Library/Extensions/usb.kext
- Remove the old driver by issuing one of the following commands (depending on your installation):
- sudo rm -rf /System/Library/Extensions/usb.kext
- sudo rm -rf /Library/Extensions/usbserial.kext
- Double-click on the CH34x_Install_V1.5.pkg file and install (no need to reboot)
- Instead of rebooting, you can force quit Installer after it completes.
- Load the new driver:
- sudo kextload /Library/Extensions/usbserial.kext
- Plug in your device. It should now be listed under the /dev directory. Examples:
- /dev/cu.wchusbserial1410
- /dev/tty.wchusbserial14210 (driver version 1.5)
Installation with Homebrew-Cask
- Install the driver by the following commands:
- brew tap adrianmihalko/ch340g-ch34g-ch34x-mac-os-x-driver https://github.com/adrianmihalko/ch340g-ch34g-ch34x-mac-os-x-driver
- brew cask install wch-ch34x-usb-serial-driver
If the device doesn’t show up under /dev , check the section «Security and Privacy» in System Preferences for any notices about blocked software.
Note: disabling System Integrity Protection is no longer necessary, as the current drivers are properly signed by the OEM. If you’re having problems, they’re almost certainly not related to SIP. The instructions below are left only for reference purposes. If you had previously disabled it (especially if you did so completely), you are strongly encouraged to fully re-enable SIP.
If, and only if, the device is not recognized after the installation (or you cannot install the driver), please disable System Integrity Protection:
- Reboot your Mac into Recovery Mode by restarting your computer and holding down Command+R until the Apple logo appears on screen.
- Open the Terminal (Applications > Utilities > Terminal).
- In the Terminal window, type in csrutil enable —without kext (or to fully disable: csrutil disable ) and press Enter .
- Restart your Mac.
Please share this page!
p.s: I LOVE coffee! Buy me a coffee at: ![]()
Источник
Usbserial 1410 mac os
Copy raw contents
Latest macOS Sierra/High Sierra-compatible driver for devices using the CH340G, CH34G or CH34X chipset. This chipset is used in several Arduino-compatible clones and serial-to-USB cables.
Do not install if you have the current macOS Mojave 10.14 or later. macOS Mojave 10.14 (released in October 2018) includes a CH34x driver by Apple. If both Apple’s and the OEM driver are installed, they will create conflicting non-functional serial ports. Steps 1 to 3 below can be useful to remove the conflicting OEM drivers.
If you use Apple’s driver and have problems with the serial communication, ensure the data rate is 460,800 bps or lower.
Version 1.5 (2018-07-05) of the OEM driver for the CH34x chipset.
Version 1.4 (2017-01-11) of the OEM driver for the CH34x chipset.
Version 1.3 (2016-09-27) of the OEM driver causes a kernel panic (a.k.a. crash) when installed on macOS Sierra.
- Unplug any CH34* devices.
- Unload the old drivers if running:
- sudo kextunload /Library/Extensions/usbserial.kext
- sudo kextunload /System/Library/Extensions/usb.kext
- Remove the old driver by issuing one of the following commands (depending on your installation):
- sudo rm -rf /System/Library/Extensions/usb.kext
- sudo rm -rf /Library/Extensions/usbserial.kext
- Double-click on the CH34x_Install_V1.5.pkg file and install (no need to reboot)
- Instead of rebooting, you can force quit Installer after it completes.
- Load the new driver:
- sudo kextload /Library/Extensions/usbserial.kext
- Plug in your device. It should now be listed under the /dev directory. Examples:
- /dev/cu.wchusbserial1410
- /dev/tty.wchusbserial14210 (driver version 1.5)
Installation with Homebrew-Cask
- Install the driver by the following commands:
- brew tap adrianmihalko/ch340g-ch34g-ch34x-mac-os-x-driver https://github.com/adrianmihalko/ch340g-ch34g-ch34x-mac-os-x-driver
- brew cask install wch-ch34x-usb-serial-driver
If the device doesn’t show up under /dev , check the section «Security and Privacy» in System Preferences for any notices about blocked software.
Note: disabling System Integrity Protection is no longer necessary, as the current drivers are properly signed by the OEM. If you’re having problems, they’re almost certainly not related to SIP. The instructions below are left only for reference purposes. If you had previously disabled it (especially if you did so completely), you are strongly encouraged to fully re-enable SIP.
If, and only if, the device is not recognized after the installation (or you cannot install the driver), please disable System Integrity Protection:
- Reboot your Mac into Recovery Mode by restarting your computer and holding down Command+R until the Apple logo appears on screen.
- Open the Terminal (Applications > Utilities > Terminal).
- In the Terminal window, type in csrutil enable —without kext (or to fully disable: csrutil disable ) and press Enter .
- Restart your Mac.
Please share this page!
p.s: I LOVE coffee! Buy me a coffee at: ![]()
Источник
Драйвер чипа CH340 USB-Serial
При подключении платформ разработки на базе Arduino к компьютеру, вы связываете между собой два мира: микроконтроллерный и микропроцессорный.
Стандартным интерфейсом плат Arduino на микроконтроллерах ATmega328P является UART, а у современных компьютеров используется USB. Чип USB-UART CH340G служит мостом между микроконтроллером и USB-портом компьютера, который позволяет загружать прошивку в плату, а также передавать между собой данные.
Список поддерживаемых плат
Зачем нужен драйвер?
При подключении любого устройства к USB-порту компьютера необходимо подсказать операционной системе, как с ним общаться. На стороне компьютера таким переводчиком является специальная программа, называемая драйвером. Например, драйвер преобразователя USB-UART работает в режиме эмуляции последовательного COM-порта. Т. е. при подключении вашей платы к компьютеру чип моста с помощью драйвера попросит операционную систему открыть виртуальный COM-порт, через который начнётся общение между платой и ПК.
Каждый производитель делает свои чипы с соответствующими драйверами. К сожалению, не все драйверы предустановлены в операционных системах по умолчанию. Когда нужного драйвера нет, ОС пытается найти его для нового подключённого устройства, не находит, и вместо виртуального COM-порта вы видите надпись «USB 2.0 SERIAL» или «Неизвестное устройство». Для решения проблемы скачайте и установите драйвер для вашей операционной системы.
Установка драйвера
Рассмотрим установку драйвера на примере платы Iskra Uno в операционной системе Windows. С остальными платами ситуация будет аналогичная.
Источник
Mostly Networks
I Speak RF
Fixing the Prolific Driver on OS X

Prolific USB to Serial Adapter
There are a couple different USB to serial adapters that you might use as a network engineer. The one pictured in the article is manufactured by Prolific, but sold by multiple different vendors. There’s also another manufactured by FTDI, which I’ve heard good things about, and of course the one built into recent Cisco hardware. The driver for the chip used by Cisco is conveniently included in OS X, but the FTDI and Prolific chips require their own drivers. Myself, I have used the Prolific cables for years and have been generally happy with them.
The best drivers for the Prolific come directly from the manufacturer, not the vendors that resell them. This is because the vendor provided drivers always seem to be out of date. However, the drivers from Prolific don’t work with all cables out of the box. I’m going to show you how to fix that.
1. Get the Driver
If you haven’t already, hop over to the Prolific site to download the driver and install it. Here’s the URL at the time of this writing:
If you are running OS X Yosemite, you may need to read this article to get the driver working: OS X Yosemite and Prolific USB Drivers.
2. Discover Magic Numbers
OK, the numbers aren’t really magic, but the driver will need them so that it can be associated with your USB device. Head to Apple -> About This Mac and and choose System Report. Select USB and scroll until you find your Prolific USB device. It should look something like this:

Watch for the Manufacturer (circled in blue). Then note the Product ID and Vendor ID (circled in red). We will be adding these to the driver.
3. Hex to Decimal Conversion
![]()
Calculator in hex mode
We need to convert the hex numbers to decimal. An easy way to do that is to run Calculator and hit Command-3. Click the “16” above the clear button to switch to hex and enter the number you want to convert (like 0x2008 from the example). Now click the 10 and you have the hex to decimal conversion. If you used 0x2008, you should get 8200. You need to convert both the product and vendor IDs.
4. Edit the Driver
Fire up your favorite terminal emulator and head here:
At this point, you will need to either fire off a root shell or sudo everything.[1]
Safety First! Backup your Info.plist so you can fix the driver if you break it.
Edit Info.plist with your editor of choice. Scroll down and you will find a section that looks like this:
[code language=”xml”]
0557_2008
CFBundleIdentifier
com.prolific.driver.PL2303
IOClass
com_prolific_driver_PL2303
IOProviderClass
IOUSBInterface
bConfigurationValue
1
bInterfaceNumber
0
idProduct
8200
idVendor
1367
[/code]
What you want to do is copy and paste that section. I don’t think the actually matters, but you can change it to match the hex version of the vendor and product ID. So if your vendor ID was 0x2478 for Tripplite with a product ID of 0x2008, you can change the key for your new section to:
[code language=”xml”]
2478_2008
[/code]
Then you will want to put the decimal version of that you converted before into the idProduct and idVendor sections. So for the Tripplite example you only need to change the idVendor and it would look like this:
[code language=”xml”]
idVendor
9336
[/code]
So the final product for my Tripplite version of the Prolific adapter works when I have this section added:
[code language=”xml”]
2478_2008
CFBundleIdentifier
com.prolific.driver.PL2303
IOClass
com_prolific_driver_PL2303
IOProviderClass
IOUSBInterface
bConfigurationValue
1
bInterfaceNumber
0
idProduct
8200
idVendor
9336
[/code]
5. Kick the Driver
Now you need to unload and reload the driver to load the new settings:
You should now have a working USB device! This is a bit of a hassle. I recently found another way to solve this problem, but it’s not free and it’s another blog post.
Источник
WB Debug Console
Внимание: Отображаемое название «Отладочный порт» переопределяет ранее заданное отображаемое название «WB Debug Console».
Контроллеры Wiren Board имеют отладочный порт, через который можно получить прямой доступ к консоли контроллера. Через него можно взаимодействовать с загрузчиком и следить за загрузкой операционной системы (последовательная консоль, serial console). Другие способы подключения к контроллеру: через веб-интерфейс, по SSH.
Содержание
Физическая реализация порта отладочной консоли
Физически в разных версиях контроллера отладочный порт реализован по разному:
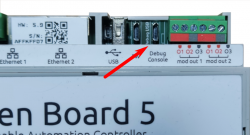
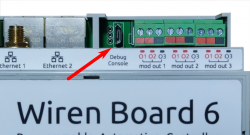
- для версий WB 6 и позднее он выглядит как Micro-USB разъём (подпись Debug Console);
- для версий WB 5.8 и позднее он выглядит как Micro-USB разъём (подпись Debug Console или Debug USB);
- для версий WB 5.6 и ранее, до версии 2.8 он выглядит как трёхштыревой разъём (подпись Debug UART).
Программно во всех случаях это последовательный порт.
Варианты реализации отладочной консоли в разных версиях контроллеров перечислены ниже.
Реализация отладочной консоли в контроллерах Wiren Board
| Версия коннтроллера | Тип разъема | Название разъема | Интерфейс | Чип USB/UART |
|---|---|---|---|---|
| 6.4 и старше | microUSB | Debug Console | USB/UART | HT42B534 |
| 6.0 — 6.3 | microUSB | Debug Console | USB/UART | CH340 |
| 5.8 — 5.9 | microUSB | Debug Console | USB/UART | CH340 |
| 5.6.1 | 3-pin UART (Gnd, Rx, Tx) | UART | UART (3,3 В) | — |
| 5.3 | 3-pin UART (Tx, Rx, GND) | Debug UART | UART (3,3 В) | — |
| 4 | 3-pin UART (Gnd, Rx, Tx) | Debug UART | UART (3,3 В) | — |
| 3.5 | 3-pin UART (Gnd, Tx, Rx) | UEXT1 (выводы 2,3,4) и 3-pin разъем без названия | UART (3,3 В) | — |
| 2.8 | 3-pin UART (Gnd, Tx, Rx) | UEXT1 (выводы 2,3,4) и 3-pin разъем без названия | UART (3,3 В) | — |
Поддержка в операционных системах
| Версия контроллера | Linux | Windows XP, 7, 8 | Windows 10 | MacOS X (High Sierra) | Android 9 + USB Serial Console |
|---|---|---|---|---|---|
| 6.4 и старше | Модуль ядра cdc_acm (все новые дистрибутивы — из коробки), смотрите дополнительную информацию по настройке порта | Необходим драйвер HT42B534 | Из коробки | Из коробки | Из коробки |
| 6.0 — 6.3 | Модуль ядра ch341 (все новые дистрибутивы — из коробки) | Необходим драйвер CH341SER | Необходим драйвер CH341SER | [CH341SER_MAC.ZIP] | Из коробки |
| 5.8 — 5.9 | Модуль ядра ch341 (все новые дистрибутивы — из коробки) | Необходим драйвер CH341SER | Необходим драйвер CH341SER | [CH341SER_MAC.ZIP] | Из коробки |
Для контроллеров версии 5.6.1 и младше требуется переходник USB/UART. См. раздел Подключение к отладочному порту в Wiren Board 5.6 и младше
Подключение к отладочному порту контроллеров Wiren Board 6, Wiren Board 5.8 и Wiren Board 5.9
Как найти порт отладочной консоли
На корпусе напротив разъема порта отладочной консоли находится надпись Debug Console.
Подключение
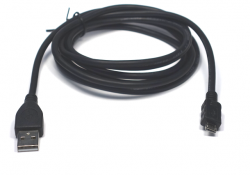
Для подключения понадобится стандартный кабель USB — Micro-USB — такой же, как для подключения сотовых телефонов. Более точное название кабеля USB (A) — Micro-USB (B). Разъем USB (А) подключается к компьютеру, Micro-USB (B) — к контроллеру.
Кабели от зарядных устройств подходят, но бывают исключения. Лучше выбирать такие, на которых указано, что они предназначены для передачи данных. Если кабель выбран правильно, Windows сообщит звуком об обнаружении устройства.
Драйвера адаптеров и названия виртуальных COM-портов
Внутри контроллера установлен переходник USB-UART; подробнее — в таблице Реализация отладочной консоли в контроллерах Wiren Board.
- Linux: адаптер обычно определяется автоматически, при подключении в выводе команды dmesg должна появится строка usb 1-1: ch341-uart converter now attached to ttyUSB0 или (для версий контроллера 6.4 и старше) cdc_acm:3-6:1.0: ttyACM0: USB ACM device . Номер порта ttyUSBx или ttyACMx может меняться, в зависимости от уже подключенных устройств. Смотрите список файлов в папке /dev/ . Консольный порт контроллеров новых версий 6.4 и старше определяется автоматически как устройство /dev/ttyACM0. Смотрите также раздел Настройка работы отладочного порта в Linux для WB6.4 и выше.
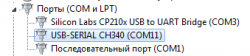
- Windows: в зависимости от версии и типа контроллера возможно потребуется установка драйвера (см. таблицу Поддержка в операционных системах). В Диспетчере устройств (Device Manager) в разделе Ports(COM&LPT) должен появиться виртуальный COM-порт контроллера. Если не очевидно, какой из портов используется контроллером, можно отсоединить кабель и включить снова.
- macOS: Начиная с High Sierra отладочная консоль контроллеров определяется из коробки, предыдущие версии операционной системы, возможно, потребуют установки драйверов. При подключении создается устройство /dev/tty.usbserial-1410 или /dev/tty.usbmodem00001 (для контроллеров версии 6.4 и старше).
- Android: Поздние версии Android при подключении через OTG поддерживают отладочную консоль контроллеров без дополнительных драйверов. Тестировалось с приложением USB Serial Console.
Настройка работы отладочного порта в Linux для WB6.4 и выше
Суть проблемы: на некоторых системах процесс ModemManager автоматически открывает устройство /dev/ttyACM0. Чтобы ModemManager не мешал работе с портом, необходимо отключить его для данного устройства с помощью правил udev.
Источник


