- How to switch from a Windows phone to iPhone
- First step: You need iTunes
- Moving over your contacts, calendars and email
- Moving over your photos and videos
- What about my Microsoft apps?
- Moving over your music and video content
- Adding all the rest
- This is just the beginning
- Get More iPhone
- Apple iPhone
- Rumor: Apple TV app coming to Sky Q in the UK
- Apple’s App Store ‘breaking at the seams’, says former marketing director
- Review: Charge faster with OtterBox’s 30W Fast Charge Wall Charging Kit
- Keep that iPhone 11 Pro Max safe with these amazing cases
- Download and use iTunes for Windows
- If you can’t access the Microsoft Store
- Explore iTunes for Windows
- Manually manage and sync your iPhone, iPad, or iPod touch
- Change settings and manage your account
- Use iTunes to sync your iPhone, iPad, or iPod with your computer
- What you can sync with iTunes
- Sync or remove content using iTunes
- Sync your content using Wi-Fi
How to switch from a Windows phone to iPhone

If you’ve been using a Windows phone for a while, you no doubt have a considerable amount of data stored on your device, including contacts, calendars, email, messages, favorite apps, music, photos and more. There’s no automated Switch to iOS app for your Windows phone the way there is for Android, but there are cloud services like OneDrive, and iOS apps like Office, Outlook, Skype, and more than making it easier than ever before.
First step: You need iTunes
With Apple’s iCloud service, iTunes — the company’s all-in-one media player, manager, and sync service — may not be needed anywhere near as much as before. There might still be occasions when you want to transfer big files, make local backups, or troubleshoot problems. Then iTunes, clunky as it is, is invaluable. Mac owners will find it pre-installed, but for Windows navigate yourself to the link below to get started.
Moving over your contacts, calendars and email
Our phones have quickly become our main communications tools, beyond just calling relatives. Managing both work and personal lives in our pockets is very much a thing and moving your contacts, calendars and email to your new iPhone will be a top priority.
Fortunately, Apple makes it pretty easy. Assuming you’ve been using your Microsoft account to keep these three entities, you’ll be able to import to your iPhone with ease. Before you proceed, it’s a good idea to make sure you’ve backed up your Windows phone first.
- Launch the Settings app on your new iPhone.
Tap Accounts & Passwords.

Follow the instructions to log in with your account credentials.
Once the account has been added, make sure you’ve enabled syncing for all of the data you want transferred to your iPhone.
- If you’re not already in your new account screen, tap Accounts in the upper left corner to go back to the Accounts screen.
Tap your new Account.

Tap the Notes switch to turn on and sync your iPhone’s Notes content, which will appear in your email account under Notes.
Your Microsoft account will pull in your email, your contacts and your calendar to the relevant stock apps on the iPhone.
You also have the option of using the Microsoft Outlook app on your iPhone to manage your Outlook email and calendars. It’s considered by many to be the best mail client on iOS, so it’s worth checking out.
Moving over your photos and videos
Our recommendation would be to avoid transferring your photo library from your old phone to your new one. Not least because on Windows Mobile you may have been using a microSD card to store them on, something not supported on the iPhone without needing extra peripherals and apps. (Apple uses the iCloud Photo Library service instead — for a price.)
You can opt to start fresh, or better still, backup all your photos to your computer and your favorite online service, and then go from there.
The best option is to use the cloud. If you’ve been using Windows 10 Mobile then there’s a strong chance you had your phone set to auto-upload your photo library to OneDrive. If you didn’t have it set this way, there’s still time to do so and upload your entire photo library to Microsoft’s cloud. You can also upload your iPhone photos to OneDrive, so you don’t have to switch from what you’re familiar and comfortable with.
With this, you just need to install the OneDrive app from the App Store and you’ll have instant access to all your photos wherever you are.
Or, if you use Dropbox, the other big, cross-platform popular option, same applies. Make sure everything has uploaded then grab the Dropbox app for iPhone and you’ll be set.
With no expandable physical storage on the iPhone, we strongly recommend the cloud route if you want to have easy access to all of the photos you’ve been collecting on your Windows phone. You’ll be snapping a ton with the iPhone camera so don’t fill up that storage with gigabytes of old stuff.
If you can’t or simply don’t want to use the cloud, you can still make the transfer using a good, old-fashioned cable. If you’re using a Windows 10 PC getting your photos off your phone is straightforward. You can either go through the Phone Companion app, which then imports from your Windows phone into the Photos app, or you can just navigate to your phone in File Explorer, find the folder and drag and drop.
On a Mac, it’s a little more difficult. To move photos from your computer to your iPhone requires iTunes. With your iPhone connected via the USB-to-Lightning cable you’ll be able to select items to sync between the phone and the computer.
What about my Microsoft apps?
Microsoft is a big supporter of cross-platform apps and services. As such, all the most popular apps are available to use on iPhone. And they’re pretty good too, for the most part. We’ve already linked up OneDrive and Outlook above, the list below will help you find some of the other big ones.
You can find a complete list of all Microsoft apps for iPhone here:
Moving over your music and video content
The iPhone and iTunes are heavily invested in music, and you’ll be well looked after. If you have a physical collection on your computer that you synced to your old Windows phone, simply fire up iTunes and start syncing it to your phone.
If you used a third-party service such as Spotify or Deezer to get your aural fix, there are of course apps available for all these in the App Store.
Adding all the rest
The iOS App Store is the place to find apps. You can get almost every Google app available. (Which were notably absent from the Windows Store. )
Equally apps like:
There are also hundreds of thousands of games, including all the major mobile titles, so hit the App Store and download away!
This is just the beginning
Hopefully, these tips help you to get started with your new iPhone without having to start again from scratch. With the prevalence of the cloud and Microsoft’s strong support for iOS, with a little work you’ll be up and running in no time with all your personal communications, media and app needs!
Updated October 2017: Updated account setup for iOS 11.
Get More iPhone
![]()
Apple iPhone
We may earn a commission for purchases using our links. Learn more.
![]()
Rumor: Apple TV app coming to Sky Q in the UK
A new rumor on Reddit claims the Apple TV app may be coming to Sky Q in the UK.
![]()
Apple’s App Store ‘breaking at the seams’, says former marketing director
Apple’s former Sr. Director of Worldwide Product Marketing, Michael Gartenberg, says he hopes Apple «gets its act together soon» in the face of growing reports regarding scam apps on its App Store, which he says appears to be «breaking at the seams».
![]()
Review: Charge faster with OtterBox’s 30W Fast Charge Wall Charging Kit
With 30 watts of power, this charging kit will charge your iPad Pro and other devices faster than ever. It automatically adjusts the charging speed for your particular device.
![]()
Keep that iPhone 11 Pro Max safe with these amazing cases
Need to protect that giant iPhone 11 Pro Max? Here are the absolute best cases you can still purchase for it.
Download and use iTunes for Windows
With iTunes for Windows, you can manage your entire media collection in one place. Subscribe to Apple Music to access millions of songs. Buy music and movies from the iTunes Store. And sync content from your computer to your iPhone, iPad, or iPod touch.
If you can’t access the Microsoft Store
![]()
Explore iTunes for Windows
To navigate iTunes, use the buttons in the navigation bar at the top of the iTunes window. To switch to a media type, like Music, Movies, TV Shows, Podcasts, or Audiobooks, click the pop-up menu in the upper-left corner.
Listen to music
Subscribe to Apple Music to access millions of songs, buy music from the iTunes Store, listen to Radio, or listen to music imported into iTunes.
Listen to Apple Podcasts
Discover and subscribe to podcasts that entertain, inform, and inspire. Browse free episodes and shows about a variety of topics.
![]()
Watch movies and TV shows
Browse categories to find movies and TV shows that you can buy, or find movies you can rent.
Listen to audiobooks
Browse categories to find audiobooks that you can buy.
Store availability and features might vary by country or region. See what you can buy in your country or region.
![]()
Manually manage and sync your iPhone, iPad, or iPod touch
You can use iTunes for Windows to back up and update your iPhone, iPad, or iPod touch, and to sync content from your computer to your device.
You can also use iCloud for Windows to access your photos, contacts, calendars, files, and more across all of your devices.
![]()
Change settings and manage your account
- Choose Account > View My Account to view information about your purchase history, manage your subscriptions, change your payment information, and more.
- Choose Account > Sign Out to sign out of iTunes with your Apple ID and remove access to your content from iTunes.
- Choose Edit > Preferences to change things like your language, set restrictions, and more.
If you change your language in iTunes, you might have to quit iTunes and reopen it.
Use iTunes to sync your iPhone, iPad, or iPod with your computer
Learn how to sync music, movies, and more using iTunes on your Mac or PC.
If you’re using macOS Mojave or earlier or a Windows PC, use iTunes to sync content to your devices. Before you use iTunes to sync content to your iOS or iPadOS device, consider using iCloud, Apple Music, or similar services to keep content from your Mac or PC in the cloud. This way, you can access your music, photos, and more on your devices when you aren’t near your computer. Learn more about using Apple Music or iCloud Photos instead of iTunes.
If you use iCloud or other services like Apple Music to keep your content up-to-date across all of your devices, some syncing features through iTunes might be turned off.

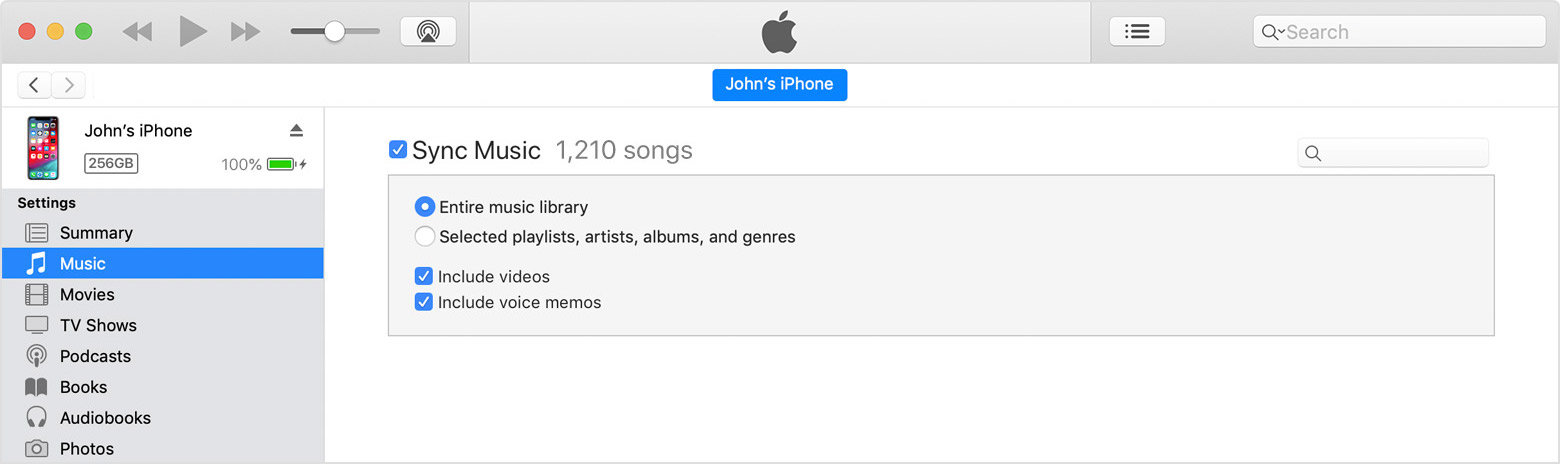
What you can sync with iTunes
- Albums, songs, playlists, movies, TV shows, podcasts, and audiobooks.
- Photos and videos.
- Contacts and calendars.
iTunes features might vary by country or region.
Sync or remove content using iTunes
- Open iTunes and connect your device to your computer with a USB cable.
- Click the device icon in the upper-left corner of the iTunes window. Learn what to do if you don’t see the icon.

- From the list under Settings on the left side of the iTunes window, click the type of content that you want to sync or remove. * To turn syncing on for a content type, select the checkbox next to Sync.
- Select the checkbox next to each item that you want to sync.
- Click the Apply button in the lower-right corner of the window. If syncing doesn’t start automatically, click the Sync button.

* You can only sync your device with one iTunes library at a time. If you see a message that your device is synced with another iTunes library, your device was previously connected to another computer. If you click «Erase and Sync» in that message, all content of the selected type on your device will be erased and replaced with content from this computer.
Sync your content using Wi-Fi
After you set up syncing with iTunes using USB, you can set up iTunes to sync to your device with Wi-Fi instead of USB.
- Connect your device to your computer with a USB cable, then open iTunes and select your device. Learn what to do if your device doesn’t appear on your computer.
- Click Summary on the left side of the iTunes window.
- Select «Sync with this [device] over Wi-Fi.»
- Click Apply.
When the computer and the device are on the same Wi-Fi network, the device appears in iTunes. The device syncs automatically whenever it’s plugged in to power and iTunes is open on the computer.


