- Get started using Python on Windows for scripting and automation
- Set up your development environment
- Install Python
- Install Visual Studio Code
- Install the Microsoft Python extension
- Open the integrated PowerShell terminal in VS Code
- Install Git (optional)
- Example script to display the structure of your file system directory
- Example script to modify all files in a directory
- Python on Windows FAQ
- How do I run a Python program under Windows?В
- How do I make Python scripts executable?В
- Why does Python sometimes take so long to start?В
- How do I make an executable from a Python script?В
- Is a *.pyd file the same as a DLL?В
- How can I embed Python into a Windows application?В
- How do I keep editors from inserting tabs into my Python source?В
- How do I check for a keypress without blocking?В
Get started using Python on Windows for scripting and automation
The following is a step-by-step guide for setting up your developer environment and getting you started using Python for scripting and automating file system operations on Windows.
This article will cover setting up your environment to use some of the helpful libraries in Python that can automate tasks across platforms, like searching your file system, accessing the internet, parsing file types, etc., from a Windows-centered approach. For Windows-specific operations, check out ctypes, a C-compatible foreign function library for Python, winreg, functions exposing the Windows registry API to Python, and Python/WinRT, enabling access Windows Runtime APIs from Python.
Set up your development environment
When using Python to write scripts that perform file system operations, we recommend you install Python from the Microsoft Store. Installing via the Microsoft Store uses the basic Python3 interpreter, but handles set up of your PATH settings for the current user (avoiding the need for admin access), in addition to providing automatic updates.
If you are using Python for web development on Windows, we recommend a different setup using the Windows Subsystem for Linux. Find a walkthrough in our guide: Get started using Python for web development on Windows. If you’re brand new to Python, try our guide: Get started using Python on Windows for beginners. For some advanced scenarios (like needing to access/modify Python’s installed files, make copies of binaries, or use Python DLLs directly), you may want to consider downloading a specific Python release directly from python.org or consider installing an alternative, such as Anaconda, Jython, PyPy, WinPython, IronPython, etc. We only recommend this if you are a more advanced Python programmer with a specific reason for choosing an alternative implementation.
Install Python
To install Python using the Microsoft Store:
Go to your Start menu (lower left Windows icon), type «Microsoft Store», select the link to open the store.
Once the store is open, select Search from the upper-right menu and enter «Python». Open «Python 3.7» from the results under Apps. Select Get.
Once Python has completed the downloading and installation process, open Windows PowerShell using the Start menu (lower left Windows icon). Once PowerShell is open, enter Python —version to confirm that Python3 has been installed on your machine.
The Microsoft Store installation of Python includes pip, the standard package manager. Pip allows you to install and manage additional packages that are not part of the Python standard library. To confirm that you also have pip available to install and manage packages, enter pip —version .
Install Visual Studio Code
By using VS Code as your text editor / integrated development environment (IDE), you can take advantage of IntelliSense (a code completion aid), Linting (helps avoid making errors in your code), Debug support (helps you find errors in your code after you run it), Code snippets (templates for small reusable code blocks), and Unit testing (testing your code’s interface with different types of input).
Download VS Code for Windows and follow the installation instructions: https://code.visualstudio.com.
Install the Microsoft Python extension
You will need to install the Microsoft Python extension in order to take advantage of the VS Code support features. Learn more.
Open the VS Code Extensions window by entering Ctrl+Shift+X (or use the menu to navigate to View > Extensions).
In the top Search Extensions in Marketplace box, enter: Python.
Find the Python (ms-python.python) by Microsoft extension and select the green Install button.
Open the integrated PowerShell terminal in VS Code
VS Code contains a built-in terminal that enables you to open a Python command line with PowerShell, establishing a seamless workflow between your code editor and command line.
Open the terminal in VS Code, select View > Terminal, or alternatively use the shortcut Ctrl+` (using the backtick character).
The default terminal should be PowerShell, but if you need to change it, use Ctrl+Shift+P to enter the command pallette. Enter Terminal: Select Default Shell and a list of terminal options will display containing PowerShell, Command Prompt, WSL, etc. Select the one you’d like to use and enter Ctrl+Shift+` (using the backtick) to create a new terminal.
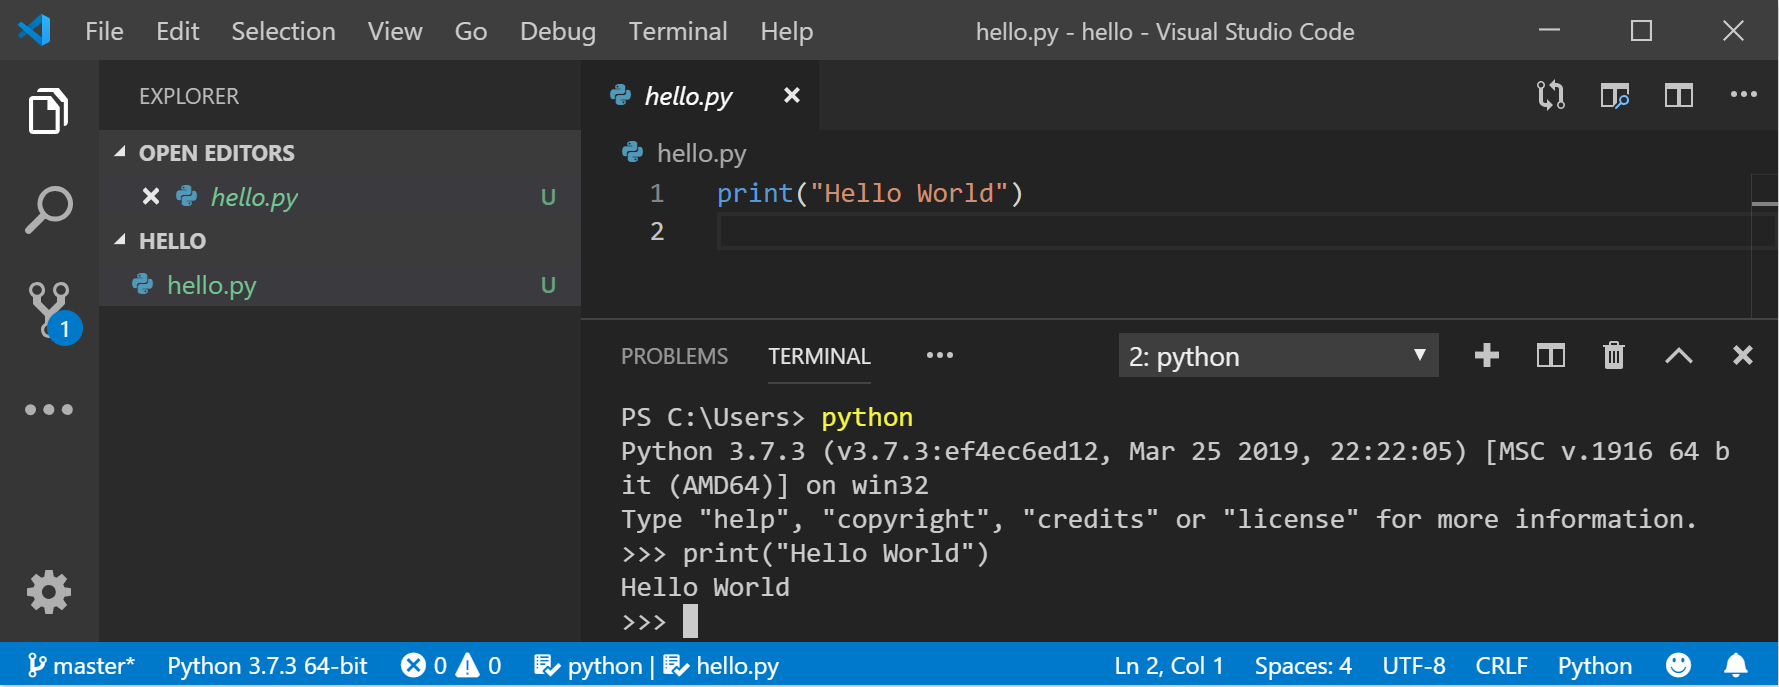
Inside your VS Code terminal, open Python by entering: python
Try the Python interpreter out by entering: print(«Hello World») . Python will return your statement «Hello World».
To exit Python, you can enter exit() , quit() , or select Ctrl-Z.
Install Git (optional)
If you plan to collaborate with others on your Python code, or host your project on an open-source site (like GitHub), VS Code supports version control with Git. The Source Control tab in VS Code tracks all of your changes and has common Git commands (add, commit, push, pull) built right into the UI. You first need to install Git to power the Source Control panel.
Download and install Git for Windows from the git-scm website.
An Install Wizard is included that will ask you a series of questions about settings for your Git installation. We recommend using all of the default settings, unless you have a specific reason for changing something.
If you’ve never worked with Git before, GitHub Guides can help you get started.
Example script to display the structure of your file system directory
Common system administration tasks can take a huge amount of time, but with a Python script, you can automate these tasks so that they take no time at all. For example, Python can read the contents of your computer’s file system and perform operations like printing an outline of your files and directories, moving folders from one directory to another, or renaming hundreds of files. Normally, tasks like these could take up a ton of time if you were to perform them manually. Use a Python script instead!
Let’s begin with a simple script that walks a directory tree and displays the directory structure.
Open PowerShell using the Start menu (lower left Windows icon).
Create a directory for your project: mkdir python-scripts , then open that directory: cd python-scripts .
Create a few directories to use with our example script:
Create a few files within those directories to use with our script:
Create a new python file in your python-scripts directory:
Open your project in VS Code by entering: code .
Open the VS Code File Explorer window by entering Ctrl+Shift+E (or use the menu to navigate to View > Explorer) and select the list-directory-contents.py file that you just created. The Microsoft Python extension will automatically load a Python interpreter. You can see which interpreter was loaded on the bottom of your VS Code window.
Python is an interpreted language, meaning that it acts as a virtual machine, emulating a physical computer. There are different types of Python interpreters that you can use: Python 2, Python 3, Anaconda, PyPy, etc. In order to run Python code and get Python IntelliSense, you must tell VS Code which interpreter to use. We recommend sticking with the interpreter that VS Code chooses by default (Python 3 in our case) unless you have a specific reason for choosing something different. To change the Python interpreter, select the interpreter currently displayed in blue bar on the bottom of your VS Code window or open the Command Palette (Ctrl+Shift+P) and enter the command Python: Select Interpreter. This will display a list of the Python interpreters that you currently have installed. Learn more about configuring Python environments.
Paste the following code into your list-directory-contents.py file and then select save:
Open the VS Code integrated terminal (Ctrl+`, using the backtick character) and enter the src directory where you just saved your Python script:
Run the script in PowerShell with:
You should see output that looks like this:
Use Python to print that file system directory output to it’s own text file by entering this command directly in your PowerShell terminal: python3 list-directory-contents.py > food-directory.txt
Congratulations! You’ve just written an automated systems administration script that reads the directory and files you created and uses Python to display, and then print, the directory structure to it’s own text file.
If you’re unable to install Python 3 from the Microsoft Store, see this issue for an example of how to handle the pathing for this sample script.
Example script to modify all files in a directory
This example uses the files and directories you just created, renaming each of the files by adding the file’s last modified date to the beginning of the filename.
Inside the src folder in your python-scripts directory, create a new Python file for your script:
Open the update-filenames.py file, paste the following code into the file, and save it:
os.getmtime returns a timestamp in ticks, which is not easily readable. It must be converted to a standard datetime string first.
Test your update-filenames.py script by running it: python3 update-filenames.py and then running your list-directory-contents.py script again: python3 list-directory-contents.py
You should see output that looks like this:
Use Python to print the new file system directory names with the last-modified timestamp prepended to it’s own text file by entering this command directly in your PowerShell terminal: python3 list-directory-contents.py > food-directory-last-modified.txt
Hope you learned a few fun things about using Python scripts for automating basic systems administration tasks. There is, of course, a ton more to know, but we hope this got you started on the right foot. We’ve shared a few additional resources to continue learning below.
Python on Windows FAQ
How do I run a Python program under Windows?В
This is not necessarily a straightforward question. If you are already familiar with running programs from the Windows command line then everything will seem obvious; otherwise, you might need a little more guidance.
Unless you use some sort of integrated development environment, you will end up typing Windows commands into what is variously referred to as a “DOS window” or “Command prompt window”. Usually you can create such a window from your search bar by searching for cmd . You should be able to recognize when you have started such a window because you will see a Windows “command prompt”, which usually looks like this:
The letter may be different, and there might be other things after it, so you might just as easily see something like:
depending on how your computer has been set up and what else you have recently done with it. Once you have started such a window, you are well on the way to running Python programs.
You need to realize that your Python scripts have to be processed by another program called the Python interpreter. The interpreter reads your script, compiles it into bytecodes, and then executes the bytecodes to run your program. So, how do you arrange for the interpreter to handle your Python?
First, you need to make sure that your command window recognises the word “py” as an instruction to start the interpreter. If you have opened a command window, you should try entering the command py and hitting return:
You should then see something like:
You have started the interpreter in “interactive mode”. That means you can enter Python statements or expressions interactively and have them executed or evaluated while you wait. This is one of Python’s strongest features. Check it by entering a few expressions of your choice and seeing the results:
Many people use the interactive mode as a convenient yet highly programmable calculator. When you want to end your interactive Python session, call the exit() function or hold the Ctrl key down while you enter a Z , then hit the “ Enter ” key to get back to your Windows command prompt.
You may also find that you have a Start-menu entry such as Start ‣ Programs ‣ Python 3.x ‣ Python (command line) that results in you seeing the >>> prompt in a new window. If so, the window will disappear after you call the exit() function or enter the Ctrl-Z character; Windows is running a single “python” command in the window, and closes it when you terminate the interpreter.
Now that we know the py command is recognized, you can give your Python script to it. You’ll have to give either an absolute or a relative path to the Python script. Let’s say your Python script is located in your desktop and is named hello.py , and your command prompt is nicely opened in your home directory so you’re seeing something similar to:
So now you’ll ask the py command to give your script to Python by typing py followed by your script path:
How do I make Python scripts executable?В
On Windows, the standard Python installer already associates the .py extension with a file type (Python.File) and gives that file type an open command that runs the interpreter ( D:\Program Files\Python\python.exe «%1» %* ). This is enough to make scripts executable from the command prompt as вЂfoo.py’. If you’d rather be able to execute the script by simple typing вЂfoo’ with no extension you need to add .py to the PATHEXT environment variable.
Why does Python sometimes take so long to start?В
Usually Python starts very quickly on Windows, but occasionally there are bug reports that Python suddenly begins to take a long time to start up. This is made even more puzzling because Python will work fine on other Windows systems which appear to be configured identically.
The problem may be caused by a misconfiguration of virus checking software on the problem machine. Some virus scanners have been known to introduce startup overhead of two orders of magnitude when the scanner is configured to monitor all reads from the filesystem. Try checking the configuration of virus scanning software on your systems to ensure that they are indeed configured identically. McAfee, when configured to scan all file system read activity, is a particular offender.
How do I make an executable from a Python script?В
See cx_Freeze for a distutils extension that allows you to create console and GUI executables from Python code. py2exe, the most popular extension for building Python 2.x-based executables, does not yet support Python 3 but a version that does is in development.
Is a *.pyd file the same as a DLL?В
Yes, .pyd files are dll’s, but there are a few differences. If you have a DLL named foo.pyd , then it must have a function PyInit_foo() . You can then write Python “import foo”, and Python will search for foo.pyd (as well as foo.py, foo.pyc) and if it finds it, will attempt to call PyInit_foo() to initialize it. You do not link your .exe with foo.lib, as that would cause Windows to require the DLL to be present.
Note that the search path for foo.pyd is PYTHONPATH, not the same as the path that Windows uses to search for foo.dll. Also, foo.pyd need not be present to run your program, whereas if you linked your program with a dll, the dll is required. Of course, foo.pyd is required if you want to say import foo . In a DLL, linkage is declared in the source code with __declspec(dllexport) . In a .pyd, linkage is defined in a list of available functions.
How can I embed Python into a Windows application?В
Embedding the Python interpreter in a Windows app can be summarized as follows:
Do _not_ build Python into your .exe file directly. On Windows, Python must be a DLL to handle importing modules that are themselves DLL’s. (This is the first key undocumented fact.) Instead, link to python NN .dll ; it is typically installed in C:\Windows\System . NN is the Python version, a number such as “33” for Python 3.3.
You can link to Python in two different ways. Load-time linking means linking against python NN .lib , while run-time linking means linking against python NN .dll . (General note: python NN .lib is the so-called “import lib” corresponding to python NN .dll . It merely defines symbols for the linker.)
Run-time linking greatly simplifies link options; everything happens at run time. Your code must load python NN .dll using the Windows LoadLibraryEx() routine. The code must also use access routines and data in python NN .dll (that is, Python’s C API’s) using pointers obtained by the Windows GetProcAddress() routine. Macros can make using these pointers transparent to any C code that calls routines in Python’s C API.
Borland note: convert python NN .lib to OMF format using Coff2Omf.exe first.
If you use SWIG, it is easy to create a Python “extension module” that will make the app’s data and methods available to Python. SWIG will handle just about all the grungy details for you. The result is C code that you link into your .exe file (!) You do _not_ have to create a DLL file, and this also simplifies linking.
SWIG will create an init function (a C function) whose name depends on the name of the extension module. For example, if the name of the module is leo, the init function will be called initleo(). If you use SWIG shadow classes, as you should, the init function will be called initleoc(). This initializes a mostly hidden helper class used by the shadow class.
The reason you can link the C code in step 2 into your .exe file is that calling the initialization function is equivalent to importing the module into Python! (This is the second key undocumented fact.)
In short, you can use the following code to initialize the Python interpreter with your extension module.
There are two problems with Python’s C API which will become apparent if you use a compiler other than MSVC, the compiler used to build pythonNN.dll.
Problem 1: The so-called “Very High Level” functions that take FILE * arguments will not work in a multi-compiler environment because each compiler’s notion of a struct FILE will be different. From an implementation standpoint these are very _low_ level functions.
Problem 2: SWIG generates the following code when generating wrappers to void functions:
Alas, Py_None is a macro that expands to a reference to a complex data structure called _Py_NoneStruct inside pythonNN.dll. Again, this code will fail in a mult-compiler environment. Replace such code by:
It may be possible to use SWIG’s %typemap command to make the change automatically, though I have not been able to get this to work (I’m a complete SWIG newbie).
Using a Python shell script to put up a Python interpreter window from inside your Windows app is not a good idea; the resulting window will be independent of your app’s windowing system. Rather, you (or the wxPythonWindow class) should create a “native” interpreter window. It is easy to connect that window to the Python interpreter. You can redirect Python’s i/o to _any_ object that supports read and write, so all you need is a Python object (defined in your extension module) that contains read() and write() methods.
How do I keep editors from inserting tabs into my Python source?В
The FAQ does not recommend using tabs, and the Python style guide, PEP 8, recommends 4 spaces for distributed Python code; this is also the Emacs python-mode default.
Under any editor, mixing tabs and spaces is a bad idea. MSVC is no different in this respect, and is easily configured to use spaces: Take Tools ‣ Options ‣ Tabs , and for file type “Default” set “Tab size” and “Indent size” to 4, and select the “Insert spaces” radio button.
Python raises IndentationError or TabError if mixed tabs and spaces are causing problems in leading whitespace. You may also run the tabnanny module to check a directory tree in batch mode.
How do I check for a keypress without blocking?В
Use the msvcrt module. This is a standard Windows-specific extension module. It defines a function kbhit() which checks whether a keyboard hit is present, and getch() which gets one character without echoing it.


