- Search indexing in Windows 10: FAQ
- What is indexing?
- How does indexing make my searches faster?
- What information is indexed?
- Which apps use the index?
- Why does indexing automatically run on my PC at all times?
- Where is the index information stored?
- How much space is used by the index?
- What languages can be indexed?
- Which file types can be indexed?
- Can I change how much of a file’s information is indexed?
- Windows Search и конфиденциальность
- Управление параметрами Windows Search
- Безопасный поиск
- Поиск облачного содержимого
- Журнал поиска на этом устройстве
- Журнал поиска в облаке
- Fix problems in Windows Search
- Check for updates
- Run the Search and Indexing troubleshooter
- Restart Windows Search or your device
- Reset Windows Search
- Windows 10, version 1809 and earlier
- Windows 10, version 1903 and later
- Help us improve Search in Windows 10
Search indexing in Windows 10: FAQ
Indexing the contents of your PC helps you get faster results when you’re searching it for files and other things. Learn how it works.
What is indexing?
Indexing is the process of looking at files, email messages, and other content on your PC and cataloging their information, such as the words and metadata in them. When you search your PC after indexing, it looks at an index of terms to find results faster.
When you first run indexing, it can take up to a couple hours to complete. After that, indexing will run in the background on your PC as you use it, only re-indexing updated data.
How does indexing make my searches faster?
Much like having an index in a book, having a digital index allows your PC and apps to find content faster by looking for terms or common properties such as the date a file was created. A fully built index can return answers to searches such as «Show all songs by Coldplay» in a fraction of a second, versus the minutes it could take without an index.
What information is indexed?
By default, all the properties of your files are indexed, including file names and full file paths. For files with text, their contents are indexed to allow you to search for words within the files.
Apps you install may also add their own information to the index to speed up searching. For example, Outlook 2016 adds all emails synced to your machine to the index by default and uses the index for searching within the app.
Which apps use the index?
Many of the built-in apps on your PC use the index in some way. File Explorer, Photos, and Groove all use it to access and track changes to your files. Microsoft Edge uses it to provide browser history results in the address bar. Outlook uses it to search your email. Cortana uses it to provide faster search results from across your PC.
Many apps in the Microsoft Store also depend on the index to provide up-to-date search results for your files and other content. Disabling indexing will result in these apps either running slower or not working at all, depending on how heavily they rely on it.
Why does indexing automatically run on my PC at all times?
Your Windows 10 PC is constantly tracking changes to files and updating the index with the latest information. To do this, it opens recently changed files, looks at the changes, and stores the new information in the index.
Where is the index information stored?
All data gathered from indexing is stored locally on your PC. None of it is sent to any other computer or to Microsoft. However, apps you install on your PC may be able to read the data in the index, so be careful with what you install and make sure you trust the source.
How much space is used by the index?
A rule of thumb is that the index will be less than 10 percent of the size of the indexed files. For example, if you have 100 MB of text files, the index for those files will be less than 10 MB.
The index can take up a larger percentage if you have lots of very small files ( Modify.
What languages can be indexed?
All language packs installed with Windows include the information for indexing content in that language. If you have files or other content in a language that isn’t installed on your PC, the index will try to make it searchable, but that isn’t always possible.
To install more language packs to make sure the language is searchable on your PC, go to Settings > Time & Language > Region & language, and then select Add a language .
Which file types can be indexed?
For a list of file types that can be indexed, go to the Indexing Options control panel page and select Advanced > File Types.
Can I change how much of a file’s information is indexed?
Yes. There are two options for how much of a file to index: either properties only, or properties and content. For properties only, indexing will not look at the contents of the file or make the contents searchable. You’ll still be able to search by file name—just not file contents.
Choosing not to index the contents of files can reduce the size of the index, but it makes files harder to find in some cases.
To choose an option for each file type, go to the Indexing Options control panel page and select Advanced > File Types.
Windows Search и конфиденциальность
Функция Windows Search дает возможность использовать поле поискана панели задач для поиска нужных данных на устройстве, в облаке и в Интернете. Функция Windows Search может предоставлять результаты поиска:
на вашем устройстве (в приложениях, параметрах и файлах);
в вашей личной учетной записи Майкрософт (в том числе в OneDrive и Outlook);
в вашей рабочей или учебной учетной записи (в том числе в OneDrive для бизнеса, в SharePoint и других службах Майкрософт).
Если вы используете Windows Search для поиска в Интернете или для получения вариантов поиска, то результаты будут предоставлены поисковой системой Bing.
Управление параметрами Windows Search
Безопасный поиск
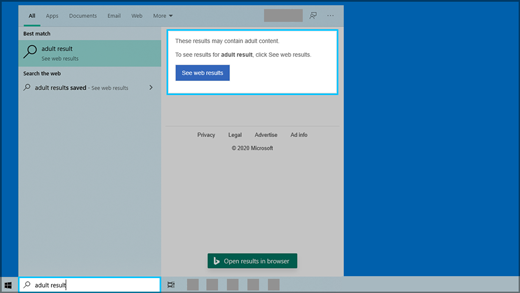
Функция безопасного поиска помогает исключить содержимое для взрослых из предварительного просмотра. Windows Search применяет технологию Bing, чтобы определить, включают ли результаты поиска недопустимое содержимое, перед отображением результатов в окне предварительного просмотра. Если система Bing определяет, что результаты включают содержимое для взрослых, вместо них в области предварительного просмотра будет отображаться кнопка Просмотреть результаты из Интернета, чтобы можно было открыть результаты в веб-браузере, как показано на следующем снимке экрана:
Изменение параметров безопасного поиска
Нажмите кнопку Пуск > Параметры > Поиск > Разрешения и журнал.
В разделе Безопасный поиск выберите:
Если выбрать Строгий, этот параметр также будет использоваться поисковой системой Bing в браузере. Поисковая система Bing будет использовать параметр «Строгий» на устройстве вне зависимости от настройки безопасного поиска Bing на странице настроек Bing.com.
Если выбрать Умеренный или Выкл., то поисковая система Bing будет использовать настройку безопасного поиска Bing, выбранную на странице настроек Bing.com.
Дополнительные сведения о безопасном поиске см. в справке Bing.
Поиск облачного содержимого
Windows Search использует добавленные ранее учетные записи других приложений Майкрософт для индивидуальной настройки возможностей поиска.
Подключение Windows Search к вашим учетным записям
Нажмите кнопку Пуск > Параметры > Учетные записи > Электронная почта и учетные записи.
В разделе Учетные записи, используемые другими приложениями выберите нужный вариант :
Чтобы добавить вашу личную учетную запись, выберите Добавить учетную запись Майкрософт.
Чтобы добавить учетную запись организации, выберите Добавить учетную запись компании или учебного заведения.
Как узнать, какие учетные записи подключены к Windows Search
Выберите поле поиска на панели задач, затем в правом верхнем углу появившегося окна щелкните значок . В разделе Подключенные учетные записи будут указаны названия и типы учетных записей.

Если включить параметр Учетная запись Майкрософт для поиска облачного содержимого, функция Windows Search будет показывать результаты поиска в ваших личных данных OneDrive, Outlook и других служб Майкрософт. При поиске в Интернете или при получении вариантов поиска в Интернете с помощью Windows Search результаты будут индивидуально настроены поисковой системой Bing. Также можно получать баллы Microsoft Rewards при поиске системой Bing в поле поиска Windows. Подробнее о баллах Microsoft Rewards
Если включить параметр Учетная запись компании или учебного заведения для поиска облачного содержимого, функция Windows Search будет отображать результаты поиска в OneDrive для бизнеса, Outlook, SharePoint и в других ресурсах, доступных для решения Поиск (Майкрософт).
Журнал поиска на этом устройстве
Функция Windows Search сохраняет журнал поиска на локальном устройстве для ускорения поиска. Например, если вы искали какое-либо приложение ранее, то при последующем поиске оно будет находиться выше в результатах поиска.
Очистка журнала поиска, сохраненного на устройстве
Нажмите кнопку Пуск > Параметры > Поиск > Разрешения и журнал.
В разделе Журнал нажмите кнопку Очистить журнал поиска на устройстве.
Журнал поиска в облаке
Функция Windows Search может сохранить и использовать журнал поиска в Интернете в вашей учетной записи Майкрософт, чтобы вы могли получать более релевантные результаты и варианты поиска в Интернете.
Использование журнала поиска в Интернете с вашей учетной записью Майкрософт
Убедитесь, что вы вошли в систему Windows, используя свою учетную запись Майкрософт.
Нажмите кнопку Пуск > Параметры > Поиск > Разрешения и журнал.
Убедитесь, что в разделе Поиск облачного содержимого для параметра Учетная запись Майкрософт установлено значение Вкл..
Для просмотра и удаления журнала поиска, связанного с вашей учетной записью Майкрософт, перейдите на панель мониторинга конфиденциальности Майкрософт.
Чтобы включить или исключить журнал поиска из вариантов поиска для вашей учетной записи Майкрософт, перейдите на страницу Журнал поиска Bing и войдите, используя учетную запись Майкрософт.
Обратите внимание, что функция Windows Search сохраняет журнал использования функции Поиск (Майкрософт) в учетной записи вашей компании или учебного заведения. Для просмотра журнала, связанного с вашей рабочей или учебной учетной записью, перейдите на страницу Журнал поиска Bing и войдите, используя рабочую или учебную учетную запись.
Fix problems in Windows Search
If Windows Search is unresponsive or the search results don’t appear as expected, try any of the following solutions in this article.
If you’re running Windows 10 May 2019 Update (version 1903) or later versions and Windows can detect a problem, we’ll run the Search troubleshooter automatically. This troubleshooter will reset Windows Search back to the default experience. View your troubleshooter history under Settings > Update & Security > Troubleshoot > View History. Follow the steps below if your issue is still not resolved.
Original product version: В Windows 10 — all editions
Original KB number: В 4520146
Check for updates
Windows 10 lets you choose when and how to get the latest updates to keep your device running smoothly and securely. To manage your options and see any available updates, select the Start button, and then go to Settings > Update & Security > Windows Update > Check for updates. Install any available updates, and then restart your computer if the updates require it.
For more information, see Update Windows 10.
Run the Search and Indexing troubleshooter
Your PC automatically indexes content to deliver faster search results. Learn more about Search indexing in Windows 10.
Use the Windows Search and Indexing troubleshooter to try to fix any problems that may arise. To use the troubleshooter, follow these steps:
- Select Start, then select Settings.
- In Windows Settings, select Update & Security >Troubleshoot. Under Find and fix other problems, select Search and Indexing.
- Run the troubleshooter, and select any problems that apply. Windows will try to detect and solve them.
You can also use a command prompt to open the troubleshooter. Press Windows logo key+R, enter cmd in the Open box, and then select OK. At the command prompt, run the following command:
Restart Windows Search or your device
End the SearchUI process to restart Windows Search by following these steps:
- Press Ctrl+Alt+Delete, and select Task Manager.
- In the Task Manager window, select the Details tab.
- In the Name column, right-click SearchUI.exe, and then select End task.
- When you’re prompted to end SearchUI.exe, select End process.
The Windows Search process will automatically restart the next time that you search.
If this solution doesn’t fix your problem, try restarting your device. Restarting will also install any pending updates.
You may want to bookmark this page before you restart.
Reset Windows Search
Try resetting Windows Search by using the method that’s appropriate for your version of Windows.
To determine which version of Windows your device is running, follow these steps:
Select Start > Settings > System > About.
Under Windows specifications, check which version of Windows your device is running.
Resetting Windows Search does not affect your files. However, it may temporarily affect the relevance of search results.
Windows 10, version 1809 and earlier
If the Windows 10 October 2018 Update or an earlier update is installed, reset Cortana to reset Windows Search by following these steps:
- Select Start, right-click Cortana, select More, and then select App settings.
- In the Cortana settings, select Reset.
Windows 10, version 1903 and later
If the Windows 10 May 2019 Update or a later update is installed, use Windows PowerShell to reset Windows Search by following these steps:
You must have administrator permissions to run this script.
Download the ResetWindowsSearchBox.ps1 script from the Reset Windows Search PowerShell script, and save the file to a local folder.
Right-click the file that you saved, and select Run with PowerShell.
If you’re asked the following question, select Yes.
Do you want to allow this app to make changes to your device?
The PowerShell script resets the Windows Search feature. When the word Done appears, close the PowerShell window.
If you receive the following error message:
Cannot be loaded because running scripts is disabled on this system
enter the following command on the command line of the PowerShell window, and then press Enter:
The current policy appears in the window. For example, you might see Restricted. We recommend that you note this value because you’ll have to use it later.
Enter the following command on the command line of the PowerShell window, and then press Enter:
You’ll receive a warning message that explains the security risks of an execution policy change. Press Y, and then press Enter to accept the change.
To learn more about PowerShell execution policies, see About Execution Policies.
After the policy change is completed, close the window, and then repeat steps 2-4. However, when the Done message appears this time, DON’T close the PowerShell window. Instead, press any key to continue.
Revert to your previous PowerShell execution policy setting. Enter the following command on the command line of the PowerShell window, press the Spacebar, enter the policy value that you noted in step 5, and then press Enter:
For example, if the policy that you noted in step 5 was Restricted, the command would resemble the following one:
You’ll receive a warning message that explains the security risks of an execution policy change. Press Y, and then press Enter to accept the change and revert to your previous policy setting.
Close the PowerShell window.
If your organization has disabled the ability to run scripts, contact your administrator for help.
Help us improve Search in Windows 10
If the previous suggestions don’t fix the problem, let us know by sending feedback in the Feedback Hub. Provide details, such as a description of the problem, screenshots, log files, and any other information that might be helpful. In the Feedback Hub, select the appropriate category and subcategory. In this case, submit your feedback in the Cortana and Search category.


