- Create a recovery drive
- Create a system repair disc
- 3 Ways to Create a System Repair Disc in Windows 10/8.1/8/7
- Why need to create a system repair disc?
- How to create a system repair disc in Windows 10/8.1/8/7?
- Part 1. Create system repair disc in Windows 7/10
- Part 2. Create a recovery drive in Windows 8/8.1/10
- Part 3. Create bootable rescue media with AOMEI Backupper
- Conclusion
Create a recovery drive
It’s a good idea to create a recovery drive. That way, if your PC ever experiences a major issue such as hardware failure, you’ll be able to use the recovery drive to reinstall Windows 10. Windows updates to improve security and PC performance periodically so it is recommended to recreate the recovery drive annually. Personal files and any applications that did not come with your PC will not be backed up. You’ll need a USB drive that’s at least 16 gigabytes.
Warning: Use an empty USB drive because this process will erase any data that’s already stored on the drive.
To create a recovery drive in Windows 10:
In the search box next to the Start button, search for Create a recovery drive and then select it. You might be asked to enter an admin password or confirm your choice.
When the tool opens, make sure Back up system files to the recovery drive is selected and then select Next.
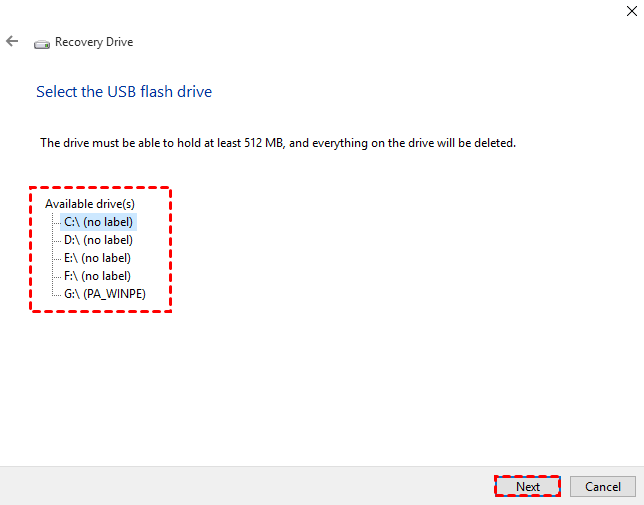
Connect a USB drive to your PC, select it, and then select Next.
Select Create. Many files need to be copied to the recovery drive, so this might take a while.
If you ever need to use the recovery drive to reinstall Windows 10 on your PC, see Recovery options in Windows 10 for further instructions. It’s a good idea to back up your files frequently because the recovery drive isn’t a system image. It doesn’t contain your personal files, settings, or programs.
Need more options for creating a recovery drive?
To download Windows 10 installation media, see Recovery options in Windows 10.
Create a system repair disc
System recovery options can help you repair Windows if a serious error occurs. To use system recovery options, you’ll need a Windows installation disc or access to the recovery options provided by your computer manufacturer. If you don’t have either of those choices, you can create a system repair disc to access system recovery options.
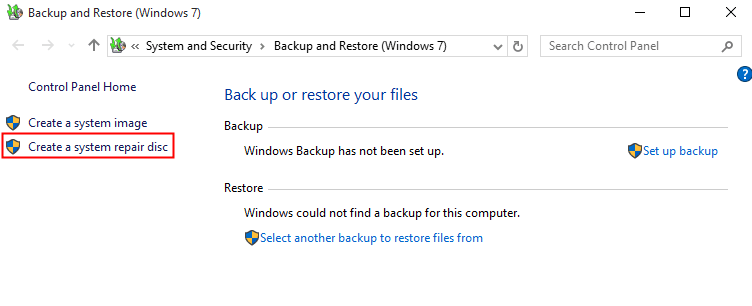
Open Backup and Restore by clicking the Start button, clicking Control Panel, clicking System and Maintenance, and then clicking Backup and Restore.
In the left pane, click Create a system repair disc, and then follow the steps.  If you’re prompted for an administrator password or confirmation, type the password or provide confirmation.
Note: If you’re prompted to insert a Windows installation disc, it means that the files needed to create the system repair disc can’t be found on your computer. Insert a Windows 7 installation disc.
Insert the system repair disc into your CD or DVD drive.
Restart your computer using the computer’s power button.
If prompted, press any key to start the computer from the system repair disc.
If your computer isn’t configured to start from a CD or DVD, check the information that came with your computer. You might need to change your computer’s BIOS settings.
Choose your language settings, and then click Next.
Select a recovery option, and then click Next.
Tip: Print these instructions and keep them in a safe location with your system repair disc.
Start your computer from a Windows 7 installation disc or USB flash drive
You might need to start, or boot, your computer using the Windows 7 installation disc or a USB flash drive if you want to:
Install or reinstall Windows 7.
Recover Windows 7 from a serious error. If your computer won’t start Windows at all, you can access Startup Repair and other tools in the System Recovery Options menu from the Windows 7 installation disc or USB flash drive. These tools can help you get Windows 7 running again.
Note: If you use a Tablet PC or other computer with a touchscreen, you might need to attach a keyboard and mouse in order to use Startup Repair and other tools in the System Recovery Options menu.
Turn on your computer, insert the Windows 7 installation disc or USB flash drive, and then turn off your computer.
Restart your computer.
Press any key when prompted to do so, and then follow any instructions that appear.
When the Install Windows page appears, click Install now to begin the installation process or click Repair your computer to access system recovery options.
Follow the instructions.
If the Install Windows page doesn’t appear, and you aren’t asked to press any key, you might have to specify that your computer uses its DVD drive or a USB flash drive as the first startup device. To do this, you need to change settings in the computer’s basic input/output system (BIOS).
Note: Most newer computers can start from a USB device, but some older computers might not have this capability. For more information, check the documentation that came with your computer or go to the manufacturer’s website.
Before you change BIOS settings, check the information that came with your computer or go to the computer manufacturer’s website. Specific procedures for accessing the BIOS and changing settings can differ depending on your computer’s manufacturer, or you might be able to choose which startup device your computer uses without changing BIOS settings.
Warning: Be careful when changing BIOS settings. The BIOS interface is designed for advanced users, and it’s possible to change a setting that could prevent your computer from starting correctly.
Turn on your computer, insert the Windows 7 installation disc or USB flash drive, and then restart your computer.
Newer computers often display a startup (or boot) menu. On the startup menu, choose «BIOS setup,» or «BIOS settings,» or something similar.
Procedures vary depending on the BIOS manufacturer. Usually, you must press a key (such as F2, F12, Delete, Esc) or a key combination immediately after you turn on your computer but before Windows starts. If the Windows logo appears, you need to try again by waiting until the Windows logon prompt appears, and then shutting down and restarting your computer again.
The BIOS setup screen appears. On the BIOS setup screen, choose the option called «Boot order,» or something similar. Boot order settings might also be listed under «Advanced settings» or something similar.
Select your DVD drive or USB flash drive as the first startup device. (The USB flash drive might be listed under «Removable devices» or something similar.)
Save the setting changes, and then exit the BIOS.
Restart your computer, and then start Windows 7 from the installation disc or USB flash drive as previously described.
3 Ways to Create a System Repair Disc in Windows 10/8.1/8/7
Want to create a system repair disc in case of system issues but do not now how? Read this guide to find 3 methods to create system repair disc in Windows 10/8.1/8/7.

By AOMEI  / Last Updated January 5, 2021
Why need to create a system repair disc?
In case of system failure, Windows provides System Recovery Options, allowing you to fix some errors, restore your system, repair Windows files, recover previous settings, and more.
To use the system recovery options, you need a Windows installation disc. If you don’t have a Windows installation disc, then you can create a system repair disc to boot the computer that has serious problem and then start System Recovery Options to make your computer work normally again. Besides that, a system repair disc can also help you restore your computer from a system image or restore point.
In a word, it’s necessary to create system repair disc. It can help you get out of the trouble as soon as possible when your computer goes wrong. Read on to get three methods.
How to create a system repair disc in Windows 10/8.1/8/7?
There are two Windows built-in utilities can help you create a system repair disc: Create a system disk (CD/DVD) & Create a recovery drive (USB).
For Windows 7 and Windows 10 users, you can simply create a system repair disk via the Backup and Restore utility. It can help you troubleshoot Windows when it won’t boot correctly. Also, it can help you restore your computer from a system image backup.
For Windows 8/8.1 users (Windows 8 has removed the feature Backup and Restore) and Windows 10 users, you can choose to create a recovery drive. It gives you access to the same troubleshooting tools as a system repair disc. In addition, it can also help you reinstall Windows as long as the recovery drive copies the system files necessary for reinstallation from your current computer.
For Windows 7 or Windows 8 users, it’s clear enough which tool to choose to create a system repair. However, for Windows 10 users, which one is better?
Well, one important thing you should know is that: the system repair disc can let you troubleshoot problems on different PCs that running the same Windows version, while the USB-based recovery drive is only tied to the PC that you used to create it.
Actually, besides the Windows 10 built-in utility, there’s one free third-party tool that can help you create system repair disk in an easy way. It is available for all Windows versions, including Windows 10/8.1/8/7/XP. And it supports both CD/DVD disc and USB flash drive. If you are interested in, just refer to Part 3 to get the method.
Part 1. Create system repair disc in Windows 7/10
1. Make sure you have inserted a writable empty disc to your computer and make sure it is detected.
2. Type “backup” into the search box and select Backup and Restore.
3. You can find Create a system repair disc in the left pane and click it.
4. By default, the CD/DVD disc is detected automatically. If not, select it manually. Then click on Create disc.
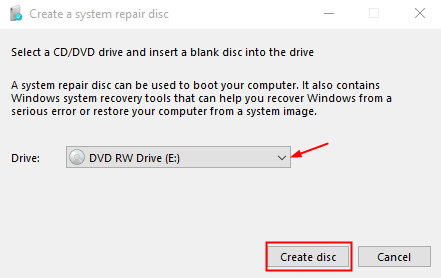
5. Windows will start to create disc right after the clicking.
Part 2. Create a recovery drive in Windows 8/8.1/10
1. Connect the USB drive to your computer.
2. Type “recovery drive” into the search box. In the listed results, select Create a recovery drive.
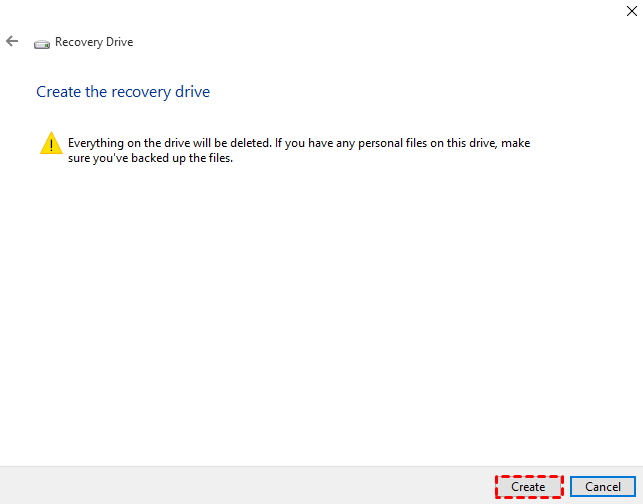
3. In the pop-up window, check the option “Back up system files to the recovery drive” and click Next.
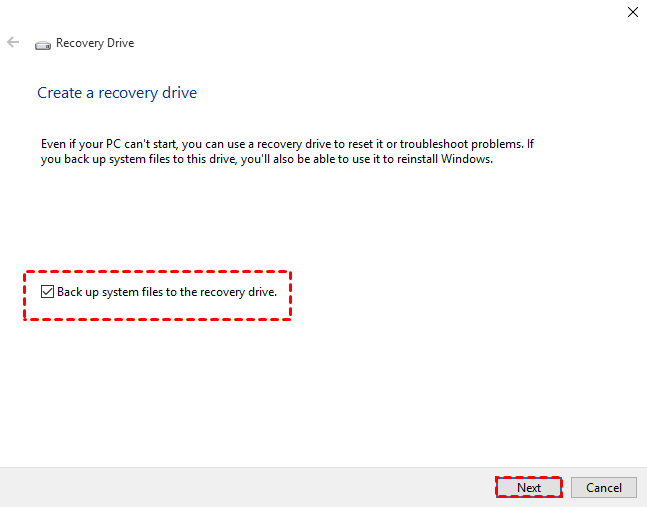
Note: If you check Back up system files to the recovery drive, it gives you a chance to reinstall your computer in a pinch.
4. Select the USB flash drive, and click Next to continue.
5. Click Create to begin creating the recovery drive.
Now you know how to create a system repair disc in Windows 7/8.1/8/10. If you ever want to use the system repair disk, insert the disc and restart your computer. If your computer starts directly from the hard drive instead of the repair disk, enter BIOS to configure your computer to boot from the CD/DVD or USB drive.
However, unlike installation disc, the system repair disc and recovery disk may not boot other computers except the one that created it. If you may fail to create a system recovery disk or system repair disc with an error message that System repair disc could not be created (0x80070057), which is often caused by the incapability with other software, or other errors. Then you can create bootable rescue disk with third-party software to restore your computer.
Part 3. Create bootable rescue media with AOMEI Backupper
AOMEI Backupper Standard, a powerful Windows backup software, allows you to create bootable rescue media using DVD/CD or USB drive. If you don’t have DVD/CD or USB drive at hand, you can create an ISO image file so you can burn to any removable devices. It supports directly create bootable media on Windows 10/8/8.1/7. If your computer runs Windows XP or old version of Windows before it, you will need to install AIK before creating bootable disc.
To create bootable media:
Step 1. Download, install and launch it.
Step 2. Click Tools and then choose Create Bootable Media.

Step 3. Select a type of bootable media you want to create and click Next to continue. For better performance, the Windows PE bootable disc is recommended.

Step 4. Choose Create legacy bootable disc or Create UEFI bootable disc and then click Next to continue. The two options enable the bootable media to boot from legacy MBR mode or GPT/UEFI. Please view your motherboard user manual for information on choosing boot options at PC startup.
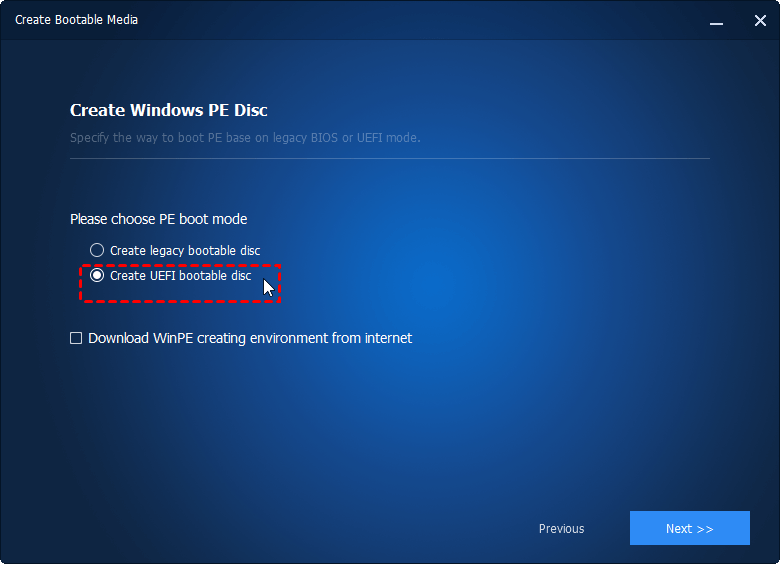
Note: You can download a pre-build PE from AOMEI server by selecting «Download WinPE creating environment from the internet», Windows AIK/ ADK is no longer required.
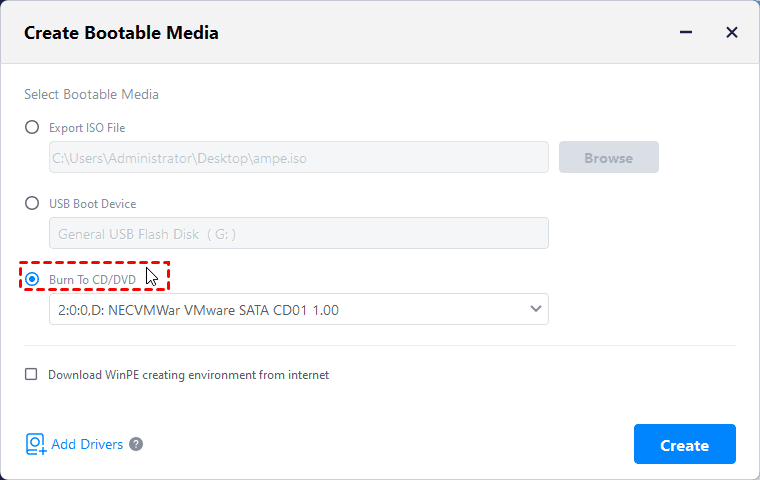
Step 5. Select the storage device or specify the location path where you want to export the ISO file, and then click Next to start. Wait for the process to complete and click Finish.
Tips: In case of unexpected system failures, you could also go «Tools» > «Recovery Environment» to enable the boot option of AOMEI Backupper recovery environment. It allows you to boot into WinPE and peform backup/restore with AOMEI Backupper as well.
Conclusion
That’s all for how to make a system repair disc in Windows 10/8/7/XP. If you have more than one computer, you can create a bootable media with AOMEI Backupper which can boot any PCs regardless of Windows 10/8/7/XP/Vista or other Windows system it runs.
If you want it to be able to boot Windows Servers, you can download AOMEI Bacupper Server. It also lets you create a system image backup to that bootable media or other storage devices, so you can boot the recovery disk to restore your computer, even when it is unbootable.
If you don’t want to connect any removable devices to boot your computer when it is in serious condition, you can also create a recovery partition on your internal hard drive, which allows you to restore your computer when it is not working without any removable devices.


