- Recovery options in Windows 10
- Restore points
- References
- FIX: Windows 10 can’t find a restore point
- How do I restore Windows 10 if there is no restore point?
- 1. Make sure System Restore is enabled
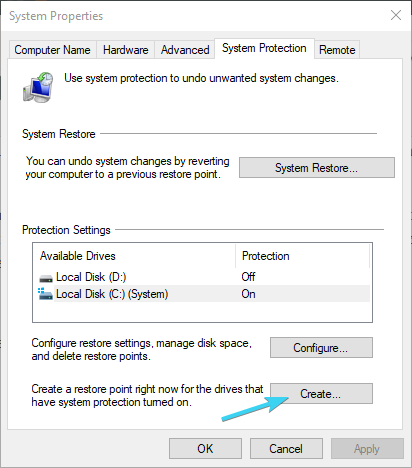
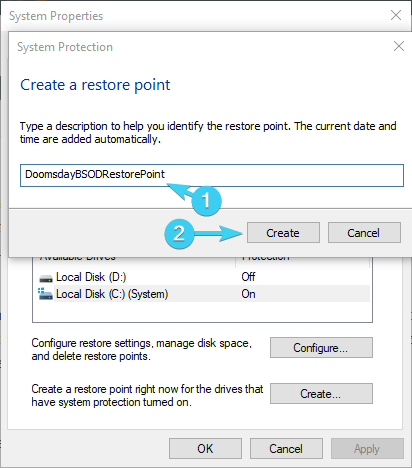
- 2. Create restore points manually
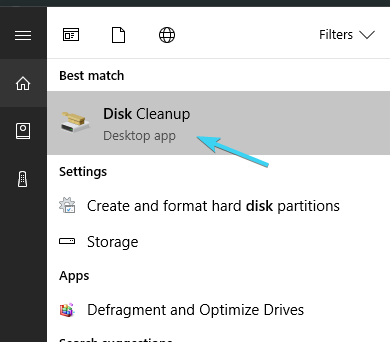
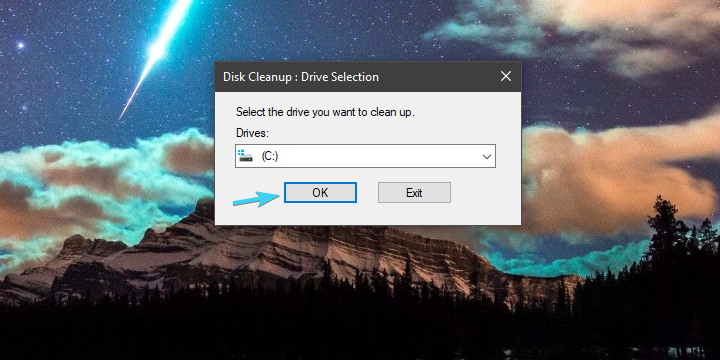
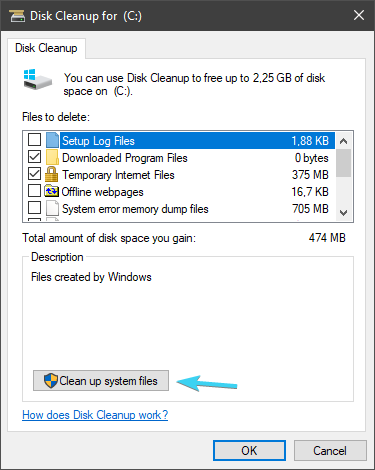
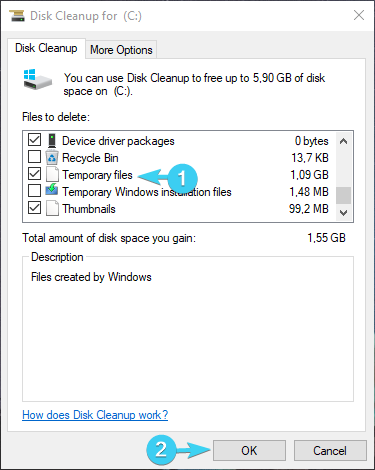
- 3. Check the HDD with Disk Cleanup
- 4. Check the HDD state with command prompt
- 5. Rollback to previous Windows 10 version
- 7. Reset your PC
Recovery options in Windows 10
If you’re having problems with your PC, the following table can help you decide which recovery option to use.
See this section
Your PC isn’t working well and you recently installed an update.
Your PC isn’t working well and it’s been a while since you installed an app, driver, or update.
Your PC won’t start, you haven’t created a recovery drive, and resetting your PC didn’t work.
Your PC won’t start and you haven’t created a recovery drive.
Your PC won’t start and you’ve created a recovery drive.
You want to reinstall your previous operating system.
Your PC isn’t working well and you recently installed an app.
Click one of the recovery options below and follow the steps to try to get things working again.
If you’ve recently installed a Windows update, uninstall the update to try to resolve the issue.
Select the Start button, then select Settings > Update & Security > Windows Update > View your update history > Uninstall updates.
View update history settings
Right-click the update you want to remove, and then select Uninstall.
Important: If you’ve encrypted your device, you’ll need your BitLocker key to reset your PC If you don’t know your BitLocker key, see Find my BitLocker recovery key.
Resetting reinstalls Windows 10, but lets you choose whether to keep your files or remove them, and then reinstalls Windows. You can reset your PC from Settings, the sign-in screen, or by using a recovery drive or installation media.
Reset your PC from Settings
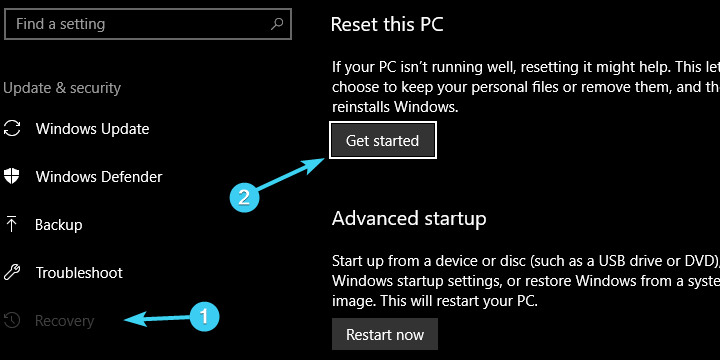
Select the Start button, then select Settings > Update & Security > Recovery .
Open Recovery settings
Under Reset this PC, select Get started and then choose from the options and/or settings in the table below.
Keep my files > Change settings > Preinstalled apps On
Reinstalls Windows 10 and keeps your personal files.
Removes apps and drivers you installed.
Removes changes you made to settings.
Restores any apps your PC manufacturer installed if your PC came with Windows 10.
Keep my files > Change settings > Preinstalled apps Off
Reinstalls Windows 10 and keeps your personal files.
Removes apps and drivers you installed.
Removes changes you made to settings.
Removes any apps your PC manufacturer installed.
Reinstalls Windows 10 and removes your personal files.
Removes apps and drivers you installed.
Removes changes you made to settings.
Removes any apps your PC manufacturer installed. (If your PC came with Windows 10, apps from your PC manufacturer will be reinstalled.)
Note: Remove everything > Change settings gives you two options.
Data erasure On removes files and cleans the drive. If you’re planning to donate, recycle, or sell your PC, use this option. This might take an hour or two, but it makes it harder for other people to recover files you’ve removed.
Data erasure Off just removes files. It takes less time, but is less secure.
Reset your PC from the sign-in screen
If you can’t open Settings, you can reset your PC from the sign-in screen. Here’s how:
Press Windows logo key + L to get to the sign-in screen, and then restart your PC by pressing the Shift key while you select the Power button > Restart in the lower-right corner of the screen.
Your PC will restart in the Windows Recovery Environment (WinRE) environment.
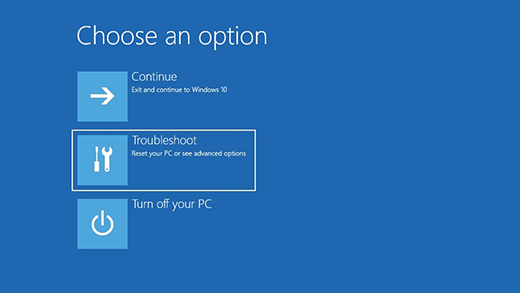
On the Choose an option screen, select Troubleshoot > Reset this PC, and then choose one of the options in the previous table.
Connect the installation media you created to your PC and reinstall Windows 10.
Open File Explorer and select the drive with the installation media.
From the root directory of the drive, double-click setup.exe, and then select Yes when asked if you’d like to allow the app to make changes to your device.
Select Change what to keep.
Select one of the following options, and then select Next:
Keep personal files and apps – This will preserve your personal data, apps, and settings.
Keep personal files only – This will preserve your personal data and settings, but all your apps will be removed.
Keep nothing – This will remove all personal data, settings, and apps.
Warning: You cannot undo a reinstallation of Windows 10. Be sure to back up your files first if you choose the Keep nothing option.
To finish, select Install to start reinstalling Windows 10 on your PC.
Your PC will restart several times during the resinstallation.
Important: If you’ve encrypted your device, you’ll need your BitLocker key to use a recovery drive to restore or reset your PC If you don’t know your BitLocker key, see Find my BitLocker recovery key.
If your PC won’t start and you haven’t created a recovery drive, download installation media and use it to restore from a system restore point or reset your PC.
Download the Windows 10 media creation tool and then run it.
Select Create installation media for another PC.
Choose a language, edition, and architecture (64-bit or 32-bit).
Follow the steps to create installation media, and then select Finish.
Connect the installation media you created to your nonfunctional PC, and then turn it on.
On the initial setup screen, enter your language and other preferences, and then select Next. If you don’t see the setup screen, your PC might not be set up to boot from a drive. Check your PC manufacturer’s website for info on how to change your PC’s boot order, and then try again.
Select Repair your computer.
On the Choose an option screen, select Troubleshoot. From there, you can:
Restore from a system restore point by selecting Advanced options > System Restore. This will remove recently installed apps, drivers, and updates that might be causing your PC problems. Restoring from a restore point won’t affect your personal files.
Important: If you’ve encrypted your device, you’ll need your BitLocker key to use a recovery drive to restore or reset your PC If you don’t know your BitLocker key, see Find my BitLocker recovery key.
If your PC won’t start, you can use a recovery drive to restore from a system restore point or recover your PC. For info on how to create a recovery drive on a working PC, see Create a recovery drive.
Note: If you are using a Surface, see Creating and using a USB recovery drive for Surface to download and create a USB recovery image specifically for your Surface device.
To restore or recover using the recovery drive:
Connect the recovery drive and turn on your PC.
Press Windows logo key + L to get to the sign-in screen, and then restart your PC by pressing the Shift key while you select the Power button> Restart in the lower-right corner of the screen.
Your PC will restart in the Windows Recovery Environment (WinRE) environment.
On the Choose an option screen, select Troubleshoot, and then select one of the following two options. (If you don’t see the Choose your option screen, your PC might not be set up to boot from a drive. Check your PC manufacturer’s website for info on how to change your PC’s boot order.)
To restore from a system restore point, select Advanced Options > System Restore. This won’t affect your personal files, but it will remove recently installed apps, drivers, and updates that might be causing your PC problems.
To reinstall Windows 10, select Advanced Options > Recover from a drive. This will remove your personal files, apps and drivers you installed, and changes you made to settings.
For a limited time after upgrading to Windows 10, you’ll be able to go back to your previous version of Windows by selecting the Start button, then select Settings > Update & Security > Recovery and then selecting Get started under Go back to the previous version of Windows 10. This will keep your personal files, but it’ll remove apps and drivers installed after the upgrade, as well as any changes you made to settings. In most cases, you’ll have 10 days to go back.
Open Recovery settings
To go back, you’ll need to:
Keep everything in the windows.old and $windows.
bt folders after the upgrade.
Remove any user accounts you added after the upgrade.
Know the password you used to sign in to Windows 7 or Windows 8.1 (if you used one).
Have the USB drive you used to upgrade to Windows 10 (if you used one).
Note: If you go back to Windows 8.1, some apps that came with Windows, like Mail and People, might not work anymore. To fix the apps, reinstall them from the Microsoft Store.
Note: The option in Settings to go back to your previous version of Windows is only available for a limited time after upgrading.
Info for Windows Insiders
If you’re an Insider and the current preview build isn’t working for you, select the Start button, then select Settings > Update & Security > Recovery . Under Go back to the previous version of Windows 10, select Get Started. This won’t remove your personal files, but it’ll remove recently installed apps and drivers, and change settings back to their defaults.
Going back to an earlier build won’t remove you from the Insider Program. When the next preview build is ready, it’ll be installed on your PC.
This option takes your PC back to an earlier point in time, called a system restore point. Restore points are generated when you install a new app or driver, and when you create a restore point manually. Restoring won’t affect your personal files, but it will remove apps, drivers, and updates installed after the restore point was made.
In the search box on the taskbar, type control panel,andthen choose it from the list of results
In the Control Panel search box, type recovery.
Select Recovery > Open System Restore.
In the Restore system files and setting box, select Next.
Select the restore point that you want to use in the list of results, and then select Scan for affected programs.
If you don’t see the restore point that you want to use, select the Show more restore points check box to see more restore points.
If you’re not seeing any restore points, it might be because system protection isn’t turned on. Here’s how to check:
In the search box on the taskbar, type control panel,andthen choose it from the list of results.
In the Control Panel search box, type recovery.
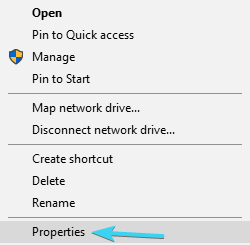
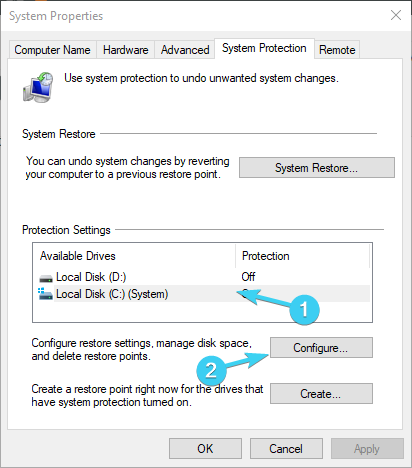
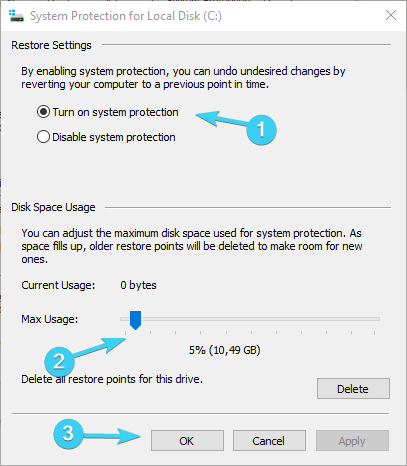
Select Recovery > Configure System Restore > Configure and see if the Turn on system protection option is selected.
If the Turn on system protection option is not selected, system protection isn’t turned on and there aren’t any restore points. In this scenario, you won’t be able to recovery your PC using a system restore point and will need to use one of the other recovery options listed on this page.
If the Turn on system protection option is selected, continue with step 6.
You’ll see a list of items that will be deleted if you remove this restore point. If you’re OK with the deletions, select Close> Next > Finish.
Restore points
Restore points are created to let users select a previous system state. Each restore point contains the required information to restore the system to the selected state. Restore points are created before key changes are made to the system.
System Restore automatically manages the disk space that is allocated for restore points. It purges the oldest restore points to make room for new ones. System Restore allocates space based on the size of the hard disk and the version of Windows that the computer runs, as shown in the following table.
| Windows version | HardВ disk size | System Restore space |
|---|---|---|
| Windows 7 and later versions | > 64 GB | Up to five percent of total disk space or a maximum of 10 GB, whichever is less |
| ≤ 64 GB | Up to three percent of total disk space | |
| Windows Vista | Up to 15 percent of the total disk space or a maximum of 30 percent of available disk space, whichever is less | |
| Windows XP | >4 GB | Up to 12 percent of total disk space To change the maximum storage limit in WindowsВ XP, use the System item in Control Panel. |
| Advanced options >More recovery options >Startup settings, and then select Restart now. In the list of startup settings, select Disable driver signature enforcement. You may have to use the F7 key to select this setting. These steps restore the computer to its «R1» state. To recover from the failed restart To recover from the failed restart and roll back the restore process, follow these steps:
These steps return the computer to the state that it was in before you started the restore process. To restore Windows to a restore point by using WinRE To start the System Restore wizard on an affected computer, use WinRE instead of the Settings dialog box. To do this, follow these steps:
ReferencesFor more information about how to use WinRE, see the following articles: FIX: Windows 10 can’t find a restore point
The first thought that comes to the user’s mind when something goes awry with anything Windows is System Restore. This feature is as old as the Windows platform itself and it provided a safe exit for many concerned Windows users. As you probably know, System Restore creates restore points you can use to rewind time. But what happens when you just can’t access any restore point? Some users reported this issue in Windows 10, but it’s frequently occurring in previous iterations, as well. How do I restore Windows 10 if there is no restore point?1. Make sure System Restore is enabled
After that, your system will keep track of changes and create restore points accordingly. Basically, after every newly installed program or major system change, the system will create a restore point. With Windows 10, Microsoft decided to disable the System Restore feature by default in order to preserve storage space and lower the requirements. Restore points can take a lot of storage space and, with them running in the background, the minimum of 16GB of free space Windows 10 actually requires, would be impossible to work with. For that reason, make sure that automatic restore maintenance is enabled. Of course, if you’re trying to repair your already damaged system, enabling System restore won’t help you too much. 2. Create restore points manually
There’s a scenario where you are certain that there were some restore points but they’re gone for no apparent reason. Sadly, that’s not unusual. Sometimes they’re wiped out by system updates, configuration changes, or even third-party antivirus solutions. And the worst thing is that you are, most of the time, unaware of that. And when the dire times come and you’ll need to restore PC and fix the errors – not a single restore point is there to answer your call. If this is a repeating occurrence, your best bet is to leave the automatization behind and do it manually. You can create a restore point whenever you deem it needed, but you can’t move it from the default location which complicates things. The only thing you can do to avoid possible absence at the time of need is to create them as often as you can. 3. Check the HDD with Disk Cleanup
Of, course, you can uninstall old or unused programs or games to get even more free space. Many users use third-party tools to delete temporary and unnecessary files, but our advice is to stick with Disk Cleanup in order to avoid critical damage. 4. Check the HDD state with command prompt
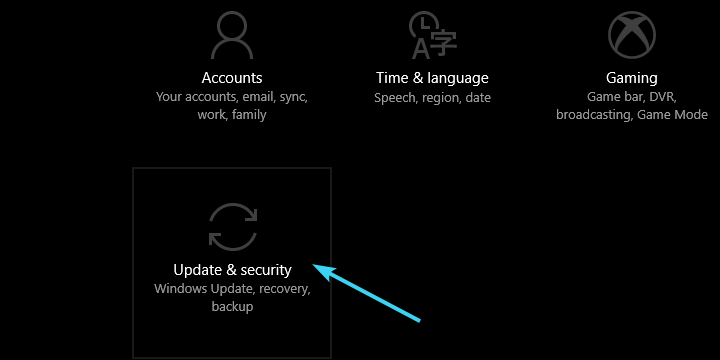
5. Rollback to previous Windows 10 versionVia Recovery
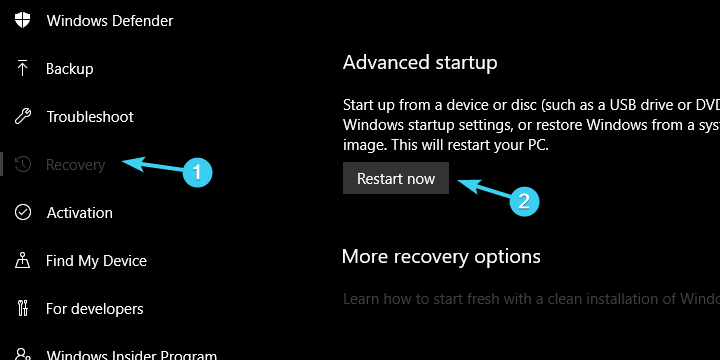
The previous steps were mainly intended to fix the issues with missing restore points. But, what to do when you’ve already bumped into a critical system issue and there’s no restore point you can turn to for help? Luckily, there are a lot of alternative recovery options in Windows 10. It’s just like they predicted the possible problems that might occur. The first one is mainly introduced to repair an abundance of issues that often emerge after a major update. It enables you to restore to a previous build version. You’ll eventually update again (just Windows 10 thing, we guess), but waiting for patches with the fully functional system is a much more pleasant experience. Via Advanced Startup
If the first option is missing, there’s an alternative way to utilize this recovery tool. Follow the instructions above. 7. Reset your PC
This recovery option enables you to reset your PC to default settings, restoring everything in the process to the default values. It’s analog to reinstallation of the system, with the exception that you can keep your files untouched. Finally, if none of the previous steps worked for you, you can always perform a clean reinstallation. Make sure to check out our detailed explanation in our guide. That should do it. In case you have questions or suggestions in regards to System restore and/or missing restore points, don’t forget to tell us in the comments section below. |
