Команда CHANGE и аналоги — CHGLOGON, CHGPORT, CHGUSR
Команда CHANGE используется для просмотра или изменения некоторых параметров сервера терминалов Terminal Services Windows ( удаленного рабочего стола ).
Формат командной строки:
Для получения справки по контексту команды используется синтаксис:
CHANGE LOGON /? — отобразить справку по контексту LOGON
Набор параметров для разных версий операционных систем Windows может незначительно различаться. Кроме того, в Windows 7 /Windows 2008 имеются дополнительные команды:
CHGLOGON — аналог команды CHANGE в контексте LOGON
CHGPORT — аналог команды CHANGE в контексте PORT
CHGUSR аналог команды CHANGE в контексте USER
Для управления сеансами подключений пользователей к серверу терминалов (удаленному рабочему столу) используется команда CHANGE LOGON . CHANGE LOGON
/QUERY — Опрос текущего режима входа удаленных пользователей.
/ENABLE — Разрешение удаленных подключений пользователей.
/DISABLE — Запрещение удаленных подключений пользователей.
/DRAIN — Запрет входить в систему новым пользователям, но разрешено повторное подключение к существующим сеансам.
/DRAINUNTILRESTART — Запрет на вход в систему новым пользователям до перезагрузки сервера, но разрешено повторное подключение к существующим сеансам.
CHANGE LOGON /QUERY — отобразить текущее состояние режима подключений удаленных пользователей.
CHANGE LOGON /DISABLE — запретить удаленное подключение пользователей. Команда не закрывает уже существующие сессии ( удаленные подключения ), а только запрещает новые.
chglogon /disable — то же, что и в предыдущем случае, но с использованием аналога chglogon.exe для версий ОС, где он установлен.
Для просмотра и изменения режима установки и выполнения приложений используется команда:
/EXECUTE Разрешение режима выполнения (по умолчанию).
/INSTALL Разрешение режима установки.
/QUERY Отображение текущих параметров.
Сервер терминалов может использоваться в режиме удаленного управления или в режиме сервера приложений. В последнем случае обеспечивается полноценная многопользовательская среда для удаленных сеансов. Данная команда предназначена для переключения между режимом выполнения (Execute mode) и режимом установки (Install mode). Службы Terminal Services в режиме сервера приложений, работают в Execute mode по умолчанию, когда создается удаленная пользовательская сессия. Режим установки используется в процессе установки и настройки приложения, с которым будут работать пользователи. Такая установка гарантирует, что соответствующие записи реестра и параметры в INI-файлах будут настроены на работу в многопользовательском режиме. Для установки приложений, выполняется переключение в режим установки, инсталляция, и возврат в режим выполнения:
change user /install — перейти в режим установки.
C:\Users\Administrator>setup.exe — запустить установку
change user /execute — вернуться в режим выполнения.
Команда CHANGE PORT предназначена для обеспечения совместимости приложений MS DOS работающих с последовательными портами ( COM1 — COM4 ) и позволяет отобразить или изменить сопоставление реально присутствующих и переназначенных портов:
CHANGE PORT [portx=porty | /D portx | /QUERY]
portx=porty Сопоставление порта x порту y.
/D portx Удалить сопоставление для порта x.
/QUERY Отображение текущего сопоставления портов.
change port /query — отобразить текущее сопоставление портов.
change user
Applies to: Windows Server (Semi-Annual Channel), Windows Server 2019, Windows Server 2016, Windows Server 2012 R2, Windows Server 2012
Changes the install mode for the Remote Desktop Session Host server.
Syntax
Parameters
| Parameter | Description |
|---|---|
| /execute | Enables .ini file mapping to the home directory. This is the default setting. |
| /install | Disables .ini file mapping to the home directory. All .ini files are read and written to the system directory. You must disable .ini file mapping when installing applications on a Remote Desktop Session Host server. |
| /query | Displays the current setting for .ini file mapping. |
| /? | Displays help at the command prompt. |
Remarks
Use change user /install before installing an application to create .ini files for the application in the system directory. These files are used as the source when user-specific .ini files are created. After installing the application, use change user /execute to revert to standard .ini file mapping.
The first time you run the app, it searches the home directory for its .ini files. If the .ini files aren’t found in the home directory, but are found in the system directory, Remote Desktop Services copies the .ini files to the home directory, ensuring that each user has a unique copy of the application .ini files. Any new .ini files are created in the home directory.
Each user should have a unique copy of the .ini files for an application. This prevents instances where different users might have incompatible application configurations (for example, different default directories or screen resolutions).
When the system is running change user /install, several things occur. All registry entries that are created are shadowed under HKEY_LOCAL_MACHINE\SOFTWARE\Microsoft\Windows NT\Currentversion\Terminal Server\Install, in either the \SOFTWARE subkey or the \MACHINE subkey. Subkeys added to HKEY_CURRENT_USER are copied under the \SOFTWARE subkey, and subkeys added to HKEY_LOCAL_MACHINE are copied under the \MACHINE subkey. If the application queries the Windows directory by using system calls, such as GetWindowsdirectory, the rd Session Host server returns the systemroot directory. If any .ini file entries are added by using system calls, such as WritePrivateProfileString, they are added to the .ini files under the systemroot directory.
When the system returns to change user /execute, and the application tries to read a registry entry under HKEY_CURRENT_USER that does not exist, Remote Desktop Services checks to see whether a copy of the key exists under the \Terminal Server\Install subkey. If it does, the subkeys are copied to the appropriate location under HKEY_CURRENT_USER. If the application tries to read from an .ini file that does not exist, Remote Desktop Services searches for that .ini file under the system root. If the .ini file is in the system root, it is copied to the \Windows subdirectory of the user’s home directory. If the application queries the Windows directory, the rd Session Host server returns the \Windows subdirectory of the user’s home directory.
When you log on, Remote Desktop Services checks whether its system .ini files are newer than the .ini files on your computer. If the system version is newer, your .ini file is either replaced or merged with the newer version. This depends on whether or not the INISYNC bit, 0x40, is set for this .ini file. Your previous version of the .ini file is renamed as Inifile.ctx. If the system registry values under the \Terminal Server\Install subkey are newer than your version under HKEY_CURRENT_USER, your version of the subkeys is deleted and replaced with the new subkeys from \Terminal Server\Install.
Examples
To disable .ini file mapping in the home directory, type:
To enable .ini file mapping in the home directory, type:
To display the current setting for .ini file mapping, type:
Getting Started with WinDbg (User-Mode)
WinDbg is a kernel-mode and user-mode debugger that is included in Debugging Tools for Windows. Here we provide hands-on exercises that will help you get started using WinDbg as a user-mode debugger.
For information about how to get Debugging Tools for Windows, see Debugging Tools for Windows (WinDbg, KD, CDB, NTSD).
After you have installed the debugging tools, locate the installation directories for 64-bit (x64) and 32-bit (x86) versions of the tools. For example:
- C:\Program Files (x86)\Windows Kits\10\Debuggers\x64
- C:\Program Files (x86)\Windows Kits\10\Debuggers\x86
Launch Notepad and attach WinDbg
Navigate to your installation directory, and open WinDbg.exe.
On the File menu, choose Open Executable. In the Open Executable dialog box, navigate to the folder that contains notepad.exe (typically, C:\Windows\System32). For File name, enter notepad.exe. Select Open.
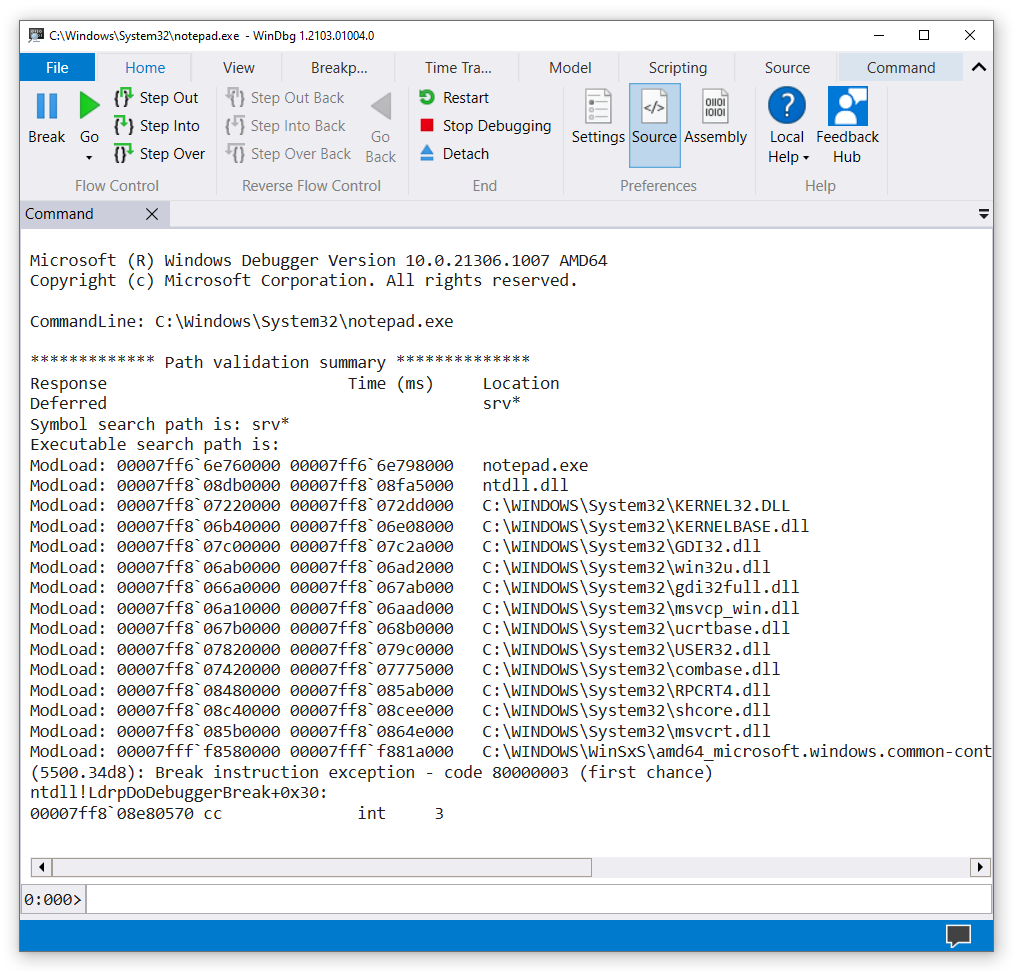
Near the bottom of the WinDbg window, in the command line, enter this command:
The output is similar to this:
The symbol search path tells WinDbg where to look for symbol (PDB) files. The debugger needs symbol files to obtain information about code modules (function names, variable names, and the like).
Enter this command, which tells WinDbg to do its initial finding and loading of symbol files:
To see the symbols for the Notepad.exe module, enter this command:
NoteВ В If you don’t see any output, enter .reload again.
To see symbols in the Notepad.exe module that contain main, use the examine symbols command like this to list modules that match the mask:
The output is similar to this:
To put a breakpoint at notepad!wWinMain, enter this command:
To verify that your breakpoint was set, enter this command:
The output is similar to this:
To start Notepad running, enter this command:
Notepad runs until it comes to the WinMain function, and then breaks in to the debugger.
To see a list of code modules that are loaded in the Notepad process, enter this command:
The output is similar to this:
To see a stack trace, enter this command:
The output is similar to this:
To start Notepad running again, enter this command:
To break in to Notepad, choose Break from the File menu.
To set and verify a breakpoint at ZwWriteFile, enter these commands:
Enter g to start Notepad running again. In the Notepad window, enter some text and choose Save from the File menu. The running code breaks in when it comes to ZwCreateFile. Enter k to see the stack trace.
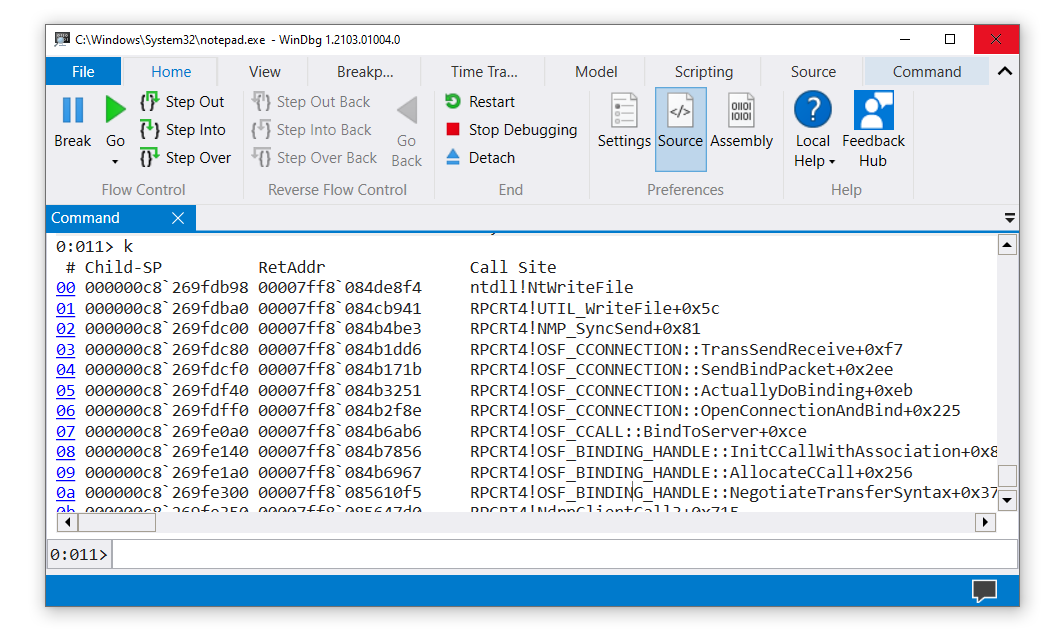
In the WinDbg window, just to the left of the command line, notice the processor and thread numbers. In this example the current processor number is 0, and the current thread number is 11. So we are looking at the stack trace for thread 11 (which happens to be running on processor 0).
To see a list of all threads in the Notepad process, enter this command (the tilde):
The output is similar to this:
In this example, there are 14 threads with indexes 0 through 13.
To look at the stack trace for thread 0, enter these commands:
The output is similar to this:
To quit debugging and detach from the Notepad process, enter this command:
Launch your own application and attach WinDbg
Suppose you have written and built this small console application.
For this exercise, we will assume that the built application (MyApp.exe) and the symbol file (MyApp.pdb) are in C:\MyApp\x64\Debug. We will also assume that the application source code is in C:\MyApp\MyApp and that the target machine compiled MyApp.exe.
On the File menu, choose Open Executable. In the Open Executable dialog box, navigate to C:\MyApp\x64\Debug. For File name, enter MyApp.exe. Select Open.
Enter these commands:
Now WinDbg knows where to find symbols and source code for your application. In this case, the source code location doesn’t need to be set with .srcpath because the symbols have fully qualified paths to the source files.
Enter these commands:
Your application breaks in to the debugger when it comes to its main function.
WinDbg displays your source code and the Command window.

On the Debug menu, choose Step Into (or press F11). Continue stepping until you have stepped into MyFunction. When you step into the line y = x / p2 , your application will crash and break in to the debugger. The output is similar to this:
Enter this command:
WinDbg displays an analysis of the problem (division by 0 in this case).
Change user
Applies To: Windows Vista, Windows Server 2008, Windows Server 2008 R2, Windows Server 2012, Windows 8
Changes the install mode for the Remote Desktop Session Host (RD Session Host) server.
For examples of how to use this command, see Examples.
In Windows Server 2008 R2, Terminal Services was renamed Remote Desktop Services. To find out what’s new in the latest version, see What’s New in Remote Desktop Services in Windows Server 2012 in the Windows Server TechNet Library.
Syntax
Parameters
Enables .ini file mapping to the home directory. This is the default setting.
Disables .ini file mapping to the home directory. All .ini files are read and written to the system directory. You must disable .ini file mapping when installing applications on an RD Session Host server.
Displays the current setting for .ini file mapping.
Displays help at the command prompt.
Remarks
Use change user /install before installing an application to create .ini files for the application in the system directory. These files are used as the source when user-specific .ini files are created. After installing the application, use change user /execute to revert to standard .ini file mapping.
The first time that you run the application, it searches the home directory for its .ini files. If the .ini files are not found in the home directory, but are found in the system directory, Remote Desktop Services copies the .ini files to the home directory, ensuring that each user has a unique copy of the application .ini files. Any new .ini files are created in the home directory.
Each user should have a unique copy of the .ini files for an application. This prevents instances where different users might have incompatible application configurations (for example, different default directories or screen resolutions).
When the system is in install mode (that is, change user /install), several things occur. All registry entries that are created are shadowed under HKEY_LOCAL_MACHINE\SOFTWARE\Microsoft\Windows NT\CurrentVersion\Terminal Server\Install, in either the \SOFTWARE subkey or the \MACHINE subkey. Subkeys added to HKEY_CURRENT_USER are copied under the \SOFTWARE subkey, and subkeys added to HKEY_LOCAL_MACHINE are copied under the \MACHINE subkey. If the application queries the Windows directory by using system calls, such as GetWindowsDirectory, the RD Session Host server returns the systemroot directory. If any .ini file entries are added by using system calls, such as WritePrivateProfileString, they are added to the .ini files under the systemroot directory.
When the system returns to execution mode (that is, change user /execute), and the application tries to read a registry entry under HKEY_CURRENT_USER that does not exist, Remote Desktop Services checks to see whether a copy of the key exists under the \Terminal Server\Install subkey. If it does, the subkeys are copied to the appropriate location under HKEY_CURRENT_USER. If the application tries to read from an .ini file that does not exist, Remote Desktop Services searches for that .ini file under the system root. If the .ini file is in the system root, it is copied to the \Windows subdirectory of the user’s home directory. If the application queries the Windows directory, the RD Session Host server returns the \Windows subdirectory of the user’s home directory.
When you log on, Remote Desktop Services checks whether its system .ini files are newer than the .ini files on your computer. If the system version is newer, your .ini file is either replaced or merged with the newer version. This depends on whether or not the INISYNC bit, 0x40, is set for this .ini file. Your previous version of the .ini file is renamed as Inifile.ctx. If the system registry values under the \Terminal Server\Install subkey are newer than your version under HKEY_CURRENT_USER, your version of the subkeys is deleted and replaced with the new subkeys from \Terminal Server\Install.
Examples
To disable .ini file mapping in the home directory, type:
To enable .ini file mapping in the home directory, type:
To display the current setting for .ini file mapping, type:


