- Изменяем сетевые параметры Windows с помощью netsh+batch
- Netsh
- Batch-файлы
- Итого
- How to get Networked Computer Name from IP Address on a LAN
- 8 ways to find your IP address in Windows (all versions)
- 1. How to find your IP address from the Command Prompt (all versions of Windows)
- 2. How to find your IP address in the Settings app (Windows 10 only)
- 3. How to find your IP Address in the Control Panel (all versions of Windows)
- 4. How to find your IP address in System Information (all versions of Windows)
- 5. How to find the IP address in PowerShell (all versions of Windows)
- 6. How to find your IP address in Task Manager (Windows 10 and Windows 8.1 only)
- 7. How to find your computer’s IP address using the Network Map (Windows 7 only)
- 8. How to find your IP address in the PC Settings app (Windows 8.1 only)
- Conclusion
- Resolve host name from IP address
- 8 Answers 8
- Доступ к домашнему оборудованию извне (IP адреса серые и белые, динамический DNS (DDNS), p2p)
- Виды IP адресов
- IP адреса могут быть разных видов (цветов)
- Как узнать какой у Вас IP адрес?
- Настройка с серым IP
- Настройка с белым IP динамическим и статическим DDNS (динамический DNS)
- Проброс портов роутера
- Автоматический проброс портов роутера
- Проброс портов роутера вручную
Изменяем сетевые параметры Windows с помощью netsh+batch
Года полтора назад была у меня такая рутинная работа: приходя на работу – вводить IP-адрес, маску, шлюз, DNS для Ethernet-порта ноутбука, а приходя домой – менять все эти параметры на другие. Первое время я мирился, но длилось это недолго – ну как можно каждый день делать одно и то же!? Тогда и вышел я на след Windows-утилиты netsh, которая, вкупе с batch-файлом дала возможность делать то же самое, но гораздо (!) быстрее и удобнее (используя стандартные средства Windows и всего один текстовый файл).
Здесь утилита netsh уже была немного описана, но я предлагаю другую реализацию, возможности которой будут более гибкими.
Netsh
Итак, поигравшись с netsh на Windows 7 (для Windows XP синтаксис немного меняется) я обнаружил, что можно присвоить интерфейсу (в приведенном ниже примере — интерфейсу под названием «LAN») IP-адрес, маску и шлюз с помощью команды:
Команды, понятное дело, вводятся в командной строке Windows. Если параметры отказываются изменяться — запускаем cmd от имени администратора.
Если понадобится добавить еще один IP-адрес, то используем:
Две следующие команды очищают список DNS-серверов и выставляют IP-адрес 212.154.163.162 первым в списке DNS-серверов:
Чтобы предоставить возможность назначения сетевых параметров DHCP-серверу используем:
Ну и для отображения текущих параметров можно использовать:
Batch-файлы
На этом закончим наше знакомство с netsh и перейдем к batch-файлами Windows (текстовый файл с расширением «bat»), который позволяет не только автоматизировать ввод длинных команд (в том числе и netsh-комманд), но также поможет сделать этот процесс более интересным, интерактивным и не заставит нас использовать для каждого варианта настроек отдельный файл.
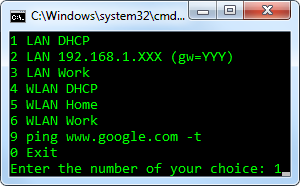
Для вывода на экран используется команда «ECHO» (она будет использоваться для вывода своеобразного меню):
Для вывода сообщения и запроса ввода от пользователя используем «SET»:
Для условного перехода к метке воспользуемся связкой «IF» и «GOTO» (если кто знает, можно ли использовать Case — буду рад упростить итоговый скрипт):
Для обозначения метки (в нашем случае метки «one») используется двоеточие:
Итого
На этом можно закончить и торжественно сообщить, что Вы знаете все, что нужно для того, чтобы полностью разобраться в итоговом batch-файле (есть комментарии на русском языке) и переделать его под себя. Вот ссылка на страничку гугл-проекта QNet (сделал по аналогии с Yet Another Net Switcher — спасибо автору, раньше этим не пользовался). Ах да, комментарии в batch-файлах начинаются с «rem».
P.S. Теперь ни на работе, ни дома этим скриптом почти не пользуюсь (есть DHCP), но в командировках — по-прежнему очень удобная вещь.
P.P.S. С русскоязычным названием «Подключение по локальной сети» скрипт может и не сработать, но я давно привык именовать сетевые карты как «LAN» и «WLAN».
Данная статья не подлежит комментированию, поскольку её автор ещё не является полноправным участником сообщества. Вы сможете связаться с автором только после того, как он получит приглашение от кого-либо из участников сообщества. До этого момента его username будет скрыт псевдонимом.
How to get Networked Computer Name from IP Address on a LAN
If you have the local IP address of a computer on your network, and need to get that computer’s name, there is an easy method using the ping command in a Windows command prompt.
Command Prompt
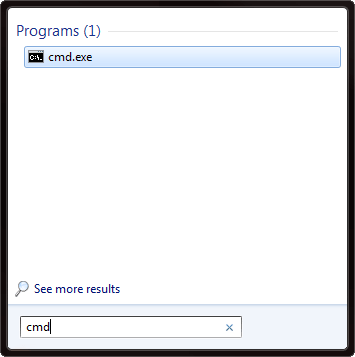
Open up a command prompt by typing «cmd» into the start menu search (Windows Vista, 7, or newer) or by opening a Run window and then running «cmd» (Windows XP).
Use the following command to ping the local IP address (change xxx.xxx.xxx.xxx to the IP address you want to ping):
ping -a xxx.xxx.xxx.xxx
The -a option of the ping command tells it to resolve the hostname of the IP address, so it will give you the name of the networked computer.
Here is an example of the output for a hypothetical computer named «Office1» that is at local IP address 192.168.1.123:
C:\Users\Username>ping -a 192.168.1.123
Pinging Office1 [192.168.1.123] with 32 bytes of data:
Reply from 192.168.1.123: bytes=32 time<1ms ttl=128
Reply from 192.168.1.123: bytes=32 time<1ms ttl=128
Reply from 192.168.1.123: bytes=32 time<1ms ttl=128
Reply from 192.168.1.123: bytes=32 time<1ms ttl=128
Ping statistics for 192.168.1.123:
Packets: Sent = 4, Received = 4, Lost = 0 (0% loss),
Approximate round trip times in milli-seconds:
Minimum = 0ms, Maximum = 0ms, Average = 0ms
8 ways to find your IP address in Windows (all versions)
The IP address or Internet Protocol address is a numerical label that is used in networks to identify and locate network devices, from computers to smartphones, to printers and other devices. The IP address can be a useful piece of information, especially when you want to set up your home router or when you want to connect to other devices on a network. But how do you check a PC’s IP address in Windows? In this tutorial, we will show you eight methods that work in Windows 10, Windows 7 and Windows 8.1:
NOTE: The information shared in this tutorial applies to all modern Windows operating systems: Windows 10, Windows 8.1 and Windows 7. To make things simpler, we use screenshots taken mostly in Windows 10. If you want to learn more technical details about IP addresses and their role in networking, we recommend you to read these articles:
1. How to find your IP address from the Command Prompt (all versions of Windows)
Open the Command Prompt , type the command ipconfig and press Enter. This command lists all the network adapters (both Ethernet and wireless) found on your Windows computer, and it shows details about each of them.
For each network adapter, you get to see both the IPv4 address and the IPv6 Address.
To learn more about the parameters accepted by the ipconfig command and what each of them does, run the command ipconfig /?.
And, if you are interested in finding more information about other networking commands that you can run using the Command Prompt, check this tutorial: Command Prompt – Advanced networking commands .
2. How to find your IP address in the Settings app (Windows 10 only)
If you are using Windows 10, open the Settings app . There, go to Network & Internet. You are shown a list of networking related settings and categories. If you are connected to a wireless network, in the column on the left, choose Wi-Fi and then, on the right, click or tap on the name of the network that you are connected to.
You are shown a long list of properties. Scroll down until you find the fields for the IPv6 and IPv4 addresses, highlighted below.
If you are connected using a network cable, in the column on the left choose Ethernet and then click or tap on the network name, on the right side of the screen.
Scroll down the list of network properties until you find the entries for the IPv6 and IPv4 addresses, highlighted below.
Now you can close the Settings app.
3. How to find your IP Address in the Control Panel (all versions of Windows)
Another geeky method that does not involve using a command is to use the Network and Sharing Center. To access it, open the Control Panel and go to “Network and Internet -> Network and Sharing Center.” If you want to learn more about it, read this guide: Simple questions: What is the Network and Sharing Center in Windows? . Next, click or tap the “Change adapter settings” link on the left.
The Network Connections window is opened, listing the network adapters installed on your computer, including virtual ones, used by VPN services or virtualization apps. Double click (or double tap) the network adapter for which you want to see the IP address.
This action opens the Status window of that adapter. Click or tap the Details button to see a series of details about that network adapter, including its IPv4 and IPv6 addresses.
Scroll through the list of details until you find the IPv4 and IPv6 address fields, highlighted below.
When done, Close the windows you just opened.
4. How to find your IP address in System Information (all versions of Windows)
Another method that works in all versions of Windows is to use the System Information desktop app. You can open it by using search and typing “System Information“ in the appropriate search field and clicking on the search result with the same name. Learn more about this tool and how to open it, from this guide: System Information – How to learn your PC’s complete configuration .
In the System Information desktop app, on the column on the left, expand Components followed by Networks and then Adapter. On the right side of the app window, you can see detailed information about each network adapter that is found on your computer. Scroll down the list until you find the network card that you are interested in. There you see a field named IP Address, giving you all the information you need.
Close the System Information app when done.
5. How to find the IP address in PowerShell (all versions of Windows)
PowerShell is a tool similar to the Command Prompt, but it is even more powerful and allows you to work with more elements that make up Windows. PowerShell has two commands which you can use to find the IPv4 and IPv6 address of a network adapter. The first one is gip. Type it in PowerShell and then press Enter. The command triggers the display of several details about each network adapter, including their IP addresses.
Another command which returns the same results is Get-NetIPConfiguration. Type it, press Enter and then look for the information that you want.
Close PowerShell when done.
6. How to find your IP address in Task Manager (Windows 10 and Windows 8.1 only)
If you use Windows 10 or Windows 8.1, start the Task Manager . If it starts in the compact view that only displays open apps, click or tap “More details.” Next, select the Performance tab and look for your network card. If you are connected to a wireless network, click or tap Wi-Fi. On the right side, you can see the IPv6 and IPv4 addresses.
If you are connected to a wired network, choose Ethernet on the left side of the Performance tab. On the right side look for the IPv6 and IPv4 addresses.
Close Task Manager when done.
7. How to find your computer’s IP address using the Network Map (Windows 7 only)
Windows 7 has a unique feature that is not available in Windows 8.1 or Windows 10. It is called the Network Map, and it shares a visual map of your network. If you want to find more about it, we recommend that you read this article: The Network Map – Access your network computers in a fun way . First, open the Network and Sharing Center. On the top right of the window, there is a link called “See full map.” Click on it.
This opens the Network Map. If you hover with the mouse over your computer, networking related information will be displayed, including the IPv4 and IPv6 address.
Write it down and close the Network Map.
8. How to find your IP address in the PC Settings app (Windows 8.1 only)
If you are using Windows 8.1, open the PC Settings app . There, choose Network and then go to Connections. Here you can see the network adapter that you are using the name of the network that you are connected to. Click or tap on the network name, under Ethernet (if you are on a wired connection) or Wi-Fi (if you are using a wireless network).
You are shown the properties of your connection, including the IP address.
Close PC Settings when done.
Conclusion
Finding the IP address of your Windows computer provides information that can be useful in many networking situations. If you know of other ways to find the IP address in Windows, or if you have questions regarding this subject, do not hesitate to leave a comment below.
Resolve host name from IP address
I’m looking for a command line tool which gets an IP address and returns the host name, for Windows.
8 Answers 8
The command you are looking for is called nslookup , works fine for reverse lookups IFF someone has configured a reverse zone file, which they don’t always do.
if all the above fails, and you are specifically looking for a Windows machine, you can use
The data returned will be all the NetBIOS records the machine has. The one with a record type will usually be the machine’s name.
For many IP addresses you could just use ping -a, for example
If you use nslookup command with the IP address as its first argument will return the PTR record (the reverse entry) if it exists. For example:

Use dig. A Windows port is available from the ISC here (look in the immediate download box for the link to the zip file). Here’s their man page reference for dig.
Ward’s point about the reverse lookup records often not getting created is very much true. Reverse lookups often do fail because many admins don’t bother creating the ptr records.

(tested under Windows 10 x64)
From command line:
FOR /F «tokens=2 delims= » %A in (‘2^>NUL NSLOOKUP «%IP_ADDRESS%» ^| FINDSTR /C:»: «‘) do ECHO %A
Within a script:
FOR /F «tokens=2 delims= » %%A in (‘2^>NUL NSLOOKUP «%IP_ADDRESS%» ^| FINDSTR /C:»: «‘) do ECHO %%A
Two (side)notes:
- To supress NSLOOKUP errors you have to use 2^>NUL instead of 1^>NUL
- I’ve used FINDSTR /C to extract the value after the four whitespace characters. As the four spaces only seem to exist for the Name: entry, this appears to be only way to make it work on other localized systems.
Доступ к домашнему оборудованию извне (IP адреса серые и белые, динамический DNS (DDNS), p2p)
Для того чтобы получить удаленный доступ к устройству (сетевой жесткий диск, видеорегистратор, IP камера, система умного дома, сетевой принтер и так далее ) через сеть интернет нужно знать какой у нас (Вас) IP адрес. А затем настроить удаленный доступ одним из способов описанных ниже. Статья посвящена «чайникам», разбираемся по пунктам, последовательно и вдумчиво.
Разбираясь с настройками видеорегистратора мне пришлось разобраться с видами IP адресов и организации удаленного доступа из этого получилась отдельная статья
Виды IP адресов
IP адреса могут быть разных видов (цветов)
- белые IP они, в свою очередь делятся на:
- статический
- динамический
- серые IP
Обычно серые IP-адреса имеют следующие диапазоны:
- 10.0.0.0 — 10.255.255.255
- 172.16.0.0 — 172.31.255.255
- 192.168.0.0 — 192.168.255.255
(!) Если вы не знаете какой у вас адрес, но он скорее всего серый так как за белый придется (чаще всего) заплатить
Как узнать какой у Вас IP адрес?
Самый простой способ заглянуть в договор с провайдером или позвонить провайдеру интернет и спросить его. Но можно сделать по другому.
Заходим в настройки своего роутера, и заходим в раздел WAN (Интернет), смотрим WAN IP-адрес, который присвоен роутеру интернет провайдером. Но иногда найти вот этот IP адрес довольно сложно, например на роутере Asus c прошивкой Padavan нужно зайти вот сюда: http://Ваш_IP/device-map/internet.asp (Пример: http://192.168.1.1/device-map/internet.asp ) по другому IP адрес с этой прошивкой посмотреть не получится.
Затем заходим на любой сайт, на котором можно посмотреть свой внешний IP-адрес. Их много, например.
Список сайтов показывающих информацию о соединении, проверка адресов IPV4, IPV6 , настроек.
В браузере должен быть выключен VPN, блокировщики рекламы, анонимайзеры и так далее (использовать нужно голый браузер без включенных расширений, по крайне мере тех которые меняют метрики соединения если Вы не знаете как расширения действуют выключите их все или зайдите с «нулевого» браузера у которого не установлены расширения чаще всего это Edge который установлен в системе по умолчанию, а пользуются ка правило другим браузером, например Chromом)
- WAN IP-адрес в настройках роутера и на сайте отличатся это серый IP-адрес.
- WAN IP-адрес в настройках роутера и на сайте совпадают – то белый (Но! Скорее всего динамический)
Отличить белый статичный от белого динамического можно наблюдением если с течением времени IP адрес меняется то он динамический.
Для получение удаленного доступа можно воспользоваться:
- Белым IP адресом (если он есть)
- Динамическим DDNS (работает с любым белым IP адресом)
- Подключится к облачному сервису например P2P (сработает в любом случае) или к другому сервису например WebDAV от Keenetic
Настройка с серым IP
Будем подключатся к облачному сервису P2P так как это будет работать в любом случае, т. е. и с любым белым, и с серым IP адресом.
(!) С серым IP остается использовать только P2P сервисы, иди другие сервисы например WebDAV от Keenetic
Peer-to-peer (P2P ) — равный к равному, от пользователя к пользователю. Одноранговая, децентрализованная, пиринговая, оверлейная компьютерная сеть. Каждый компьютер является и сервером и клиентом одновременно. Поэтому тут становится неважно использование IP адреса, но это лирика, переходим к практике, будем использовать сервисы P2P
Пример сервисов P2P для видеонаблюдения
Сервис Hik-connect ( http://i.hik-connectru.com/ ) для видеорегистраторов
Настройка с белым IP динамическим и статическим DDNS (динамический DNS)
Сразу скажу что сервис DDNS (динамический DNS) для серого IP работать не будет (работает только с любым белым IP статичным и динамическим IP).
Необходимо воспользоваться сервисами DDNS (Dynamic Domain Name Server), которые автоматически будут сопоставлять ваш текущий IP-адрес с вашим доменным именем.
Таких сервисов очень много, они есть платные и бесплатные, вот несколько примеров (посмотря в интернете в их найдете огромную кучу)
Примеры настройки роутера для работы с сервисами DDNS
Действителен 30 дней потом нужно обновлять
- DDNS провайдер: No-IP
- Адрес сервера: www.noip.com
- Домен (Host Name, Имя хоста): xxxxxxx.ddns.net
- Пользователь(Логин или адрес e-mail): мой_адрес@mail.com
- Пароль: Ваш пароль XXXX
- Адрес сервера: www.newddns.com
- Домен: ваше имя домена.newddns.com (Пример: video.newddns.com )
- Пользователь: ваше имя домена (Пример: video)
- Пароль: ХХХХХ
На скриншоте ниже показана настройка сервиса DDNS средствами роутера Asus прошивка Padavan
- Asuscomm.com http://www.asuscomm.com выбран потому как на роутере Asus сделать это легче всего.
- No-IP http://www.noip.com выбран этот сервис как демонстрация написанного выше
Проброс портов роутера
Автоматический проброс портов роутера
(Автоматическая переадресация портов, UPnP, IGD UPnP)
Можно включить автоматическую переадресацию портов (UPnP) .
Возможно кому то это пригодится так как не придется парится с прописыванием портов. Хотя, иногда это не рекомендуют, так как может быть конфликт портов.
Проброс портов роутера вручную
Называется это по разному ( «проброс» или «маршрутизация» портов, «Port forwarding»/»Виртуальный сервер», переадресация портов, ручная переадресация портов и так далее), но суть одна перенаправить, разрешить передачу данных из внешней сети на внутреннюю по необходимым портам.
Проброс портов на роутере понадобится в случает подключение к видеорегистратору через сеть интернет т. е. из любого места при белом IP адресе, статическом и динамическом.
Проброс портов нужен:
- при белом статическом IP адресе
- при белом динамическом IP адресе
- при настройки службы DDNS на роутере
- при настройки службы DDNS на видеорегистраторе
(! )Т. е. проброс портов понадобится в любом случае при настройки с белым IP адресом


