- Linux Wireless
- User Tools
- Site Tools
- Sidebar
- Table of Contents
- About mac80211
- Supported features
- The mac80211 book
- mac80211 driver API
- mac80211 drivers
- mac80211 802.11d support
- 802.11n and WEP or TKIP
- Using CData ODBC Drivers in Mac & Linux/Unix Environments
- Using the CData ODBC Drivers on a Unix/Linux Machine
- Installing the Driver Manager
- Installing the Driver
- Create a DSN
- Installing the CData ODBC Drivers on Mac OS X
- Installing iODBC
- Creating a DSN for iODBC
- Using Configuration Files
- Download Free Trials
- How to Run Mac Apps on Linux
- Run a macOS Virtual Machine (All Apps)
- Using the Darling Translation Layer (CLI Only)
- Building and Installing Darling
- Linux and macOS Installation Tutorial for the Microsoft Drivers for PHP for SQL Server
- Installing on Ubuntu
- Step 1. Install PHP (Ubuntu)
- Step 2. Install prerequisites (Ubuntu)
- Step 3. Install the PHP drivers for Microsoft SQL Server (Ubuntu)
- Step 4. Install Apache and configure driver loading (Ubuntu)
- Step 5. Restart Apache and test the sample script (Ubuntu)
- Installing on Ubuntu with PHP-FPM
- Step 1. Install PHP (Ubuntu with PHP-FPM)
- Step 2. Install prerequisites (Ubuntu with PHP-FPM)
- Step 3. Install the PHP drivers for Microsoft SQL Server (Ubuntu with PHP-FPM)
- Step 4. Install and configure nginx (Ubuntu with PHP-FPM)
- Step 5. Restart nginx and test the sample script (Ubuntu with PHP-FPM)
- Installing on Red Hat
- Step 1. Install PHP (Red Hat)
- Step 2. Install prerequisites (Red Hat)
- Step 3. Install the PHP drivers for Microsoft SQL Server (Red Hat)
- Step 4. Install Apache (Red Hat)
- Step 5. Restart Apache and test the sample script (Red Hat)
- Installing on Debian
- Step 1. Install PHP (Debian)
- Step 2. Install prerequisites (Debian)
- Step 3. Install the PHP drivers for Microsoft SQL Server (Debian)
- Step 4. Install Apache and configure driver loading (Debian)
- Step 5. Restart Apache and test the sample script (Debian)
- Installing on Suse
- Step 1. Install PHP (Suse)
- Step 2. Install prerequisites (Suse)
- Step 3. Install the PHP drivers for Microsoft SQL Server (Suse)
- Step 4. Install Apache and configure driver loading (Suse)
- Step 5. Restart Apache and test the sample script (Suse)
- Installing on Alpine
- Step 1. Install PHP (Alpine)
- Step 2. Install prerequisites (Alpine)
- Step 3. Install the PHP drivers for Microsoft SQL Server (Alpine)
- Step 4. Install Apache and configure driver loading (Alpine)
- Step 5. Restart Apache and test the sample script (Alpine)
- Installing on macOS
- Step 1. Install PHP (macOS)
- Step 2. Install prerequisites (macOS)
- Step 3. Install the PHP drivers for Microsoft SQL Server (macOS)
- Step 4. Install Apache and configure driver loading (macOS)
- Step 5. Restart Apache and test the sample script (macOS)
- Testing Your Installation
- SQLSRV example
- PDO_SQLSRV example
Linux Wireless
User Tools
Site Tools
Sidebar
Table of Contents
About mac80211
mac80211 is a framework which driver developers can use to write drivers for SoftMAC wireless devices.
SoftMAC devices allow for a finer control of the hardware, allowing for 802.11 frame management to be done in software for them, for both parsing and generation of 802.11 wireless frames. Most 802.11 devices today tend to be of this type.
mac80211 implements the cfg80211 callbacks for SoftMAC devices, mac80211 then depends on cfg80211 for both registration to the networking subsystem and for configuration. Configuration is handled by cfg80211 both through nl80211 and wireless extensions.
In mac80211 the MLME is done in the kernel for station mode (STA) and in userspace for AP mode (hostapd).
If you have new userspace utilities which support nl80211 you do not need wireless-extensions to support a mac80211 device.
Supported features
Here is a quick review of the features supported in mac80211.
The mac80211 book
We are working on a set of documentation books, including one for mac80211, which are generated from comments in the various source files. You will find a more thorough review of mac80211 in the mac80211 book; the wiki pages can be used as a quick reference for mac80211 development. The book incorporates the kernel-doc docs below.
mac80211 driver API
The new mac80211 driver interface semantics gives an overview of the expected and suggested driver behavior.
The API page lists notes about using the driver API .
The tracing page has notes on how to trace what mac80211 is asking the driver to do.
mac80211 drivers
mac80211 drivers are listed on the drivers table
mac80211 802.11d support
mac80211 supports 802.11d by processing country information element on beacons after association with an AP. You should still be able to associate to the AP in your region as cfg80211 allows users to set the regulatory domain from userspace before country information elements are parsed, this is expected to be set via wpa_supplicant upon initialization. We let cfg80211 parse the country information element for us and deal with reviewing regulatory enforcement for us. To review that please see cfg80211’s regulatory support.
802.11n and WEP or TKIP
IEEE 802.11n does not allow TKIP/WEP as pairwise ciphers in HT mode. If any of these ciphers are found to be used by the AP when a STA tries to associate to it:
then 802.11n will be disabled and the STA will fall back to legacy mode of operation: 802.11a/b/g.
Источник
Using CData ODBC Drivers in Mac & Linux/Unix Environments
Our ODBC drivers support unixODBC and iODBC, the most popular driver managers for Unix/Linux environments and Mac OS X, giving you unprecedented access to your Big Data, NoSQL, and SaaS sources from ODBC-capable tools and applications, no matter what operating system you use. This article will walk you through the installation and configuration of any of our ODBC drivers on Mac OS X, Red Hat Linux, and Debian-based Linux environments like Ubuntu. The ODBC Driver for Salesforce is used as an example.
Using the CData ODBC Drivers on a Unix/Linux Machine
Below are the minimum supported versions for Red Hat-based and Debian-based systems:
See the «Getting Started» section in the help documentation for the libraries required by the driver.
Installing the Driver Manager
Before installing the driver, you need to be sure that your system has a driver manager. unixODBC is a free and open source ODBC driver manager that is widely supported.
For Debian-based systems like Ubuntu, you can install unixODBC with the APT package manager:
For systems based on Red Hat Linux, you can install unixODBC with yum or dnf:
The unixODBC driver manager reads information about drivers from an odbcinst.ini file and about data sources from an odbc.ini file. You can determine the location of the configuration files on your system by entering the following command into a terminal:
The output of the command will display the locations of the configuration files for ODBC data sources and registered ODBC drivers. User data sources can only be accessed by the user account whose home folder the odbc.ini is located in. System data sources can be accessed by all users. Below is an example of the output of this command:
Installing the Driver
iYou can downloading the driver in standard packages formats, the Debian .deb package format or the .rpm file format. Once you have downloaded the file, you can install the driver from the terminal.
The driver installer registers the driver with unixODBC and creates a system DSN, which can be used later in any tools or applications that support ODBC connectivity.
For Debian-based systems like Ubuntu, run the following command as root or with sudo
For systems that support .rpms, run the following command as root or with sudo
Create a DSN
Define the required connection properties in sections of an odbc.ini file. The section name is the DSN. Refer to the «Getting Started» section in the help documentation for more information on the connection properties needed to connect to your data source.
You will also need to set the Driver property to the name of the driver as defined in the odbcinst.ini.
Installing the CData ODBC Drivers on Mac OS X
There are several options for user-friendly interfaces when it comes to configuring ODBC data sources on Mac OS X. However, a GUI still relies on an ODBC driver manager. The CData ODBC drivers are preconfigured for the iODBC driver manager, as are many other products like Filemaker Pro and Microsoft Excel for Mac. This makes the driver easy to use with these tools.
Another driver manager, unixODBC, is widely supported by scripting languages like Python and Ruby. For a guide to creating and testing DSNs with unixODBC, see the «Getting Started» section in the help documentation.
Installing iODBC
You can find the latest version of iODBC on the iODBC site. The iODBC installation installs its own GUI, the iODBC Administrator. It is this tool that is used in the following procedure to create a DSN.
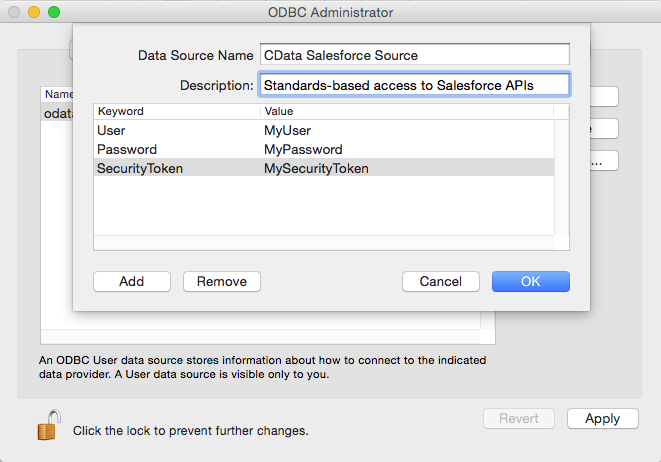
Creating a DSN for iODBC
Installing a CData ODBC Driver registers the driver with the iODBC driver manager, so the only remaining step is to use the iODBC Administrator to supply the necessary connection properties in a DSN. The driver installation automatically creates a system DSN. System DSNs can be accessed by all users, while user DSNs can only be accessed by a single user. However, modifying a system DSN requires elevated permissions.
- Open a terminal and enter the following command to start the iODBC Administrator with the necessary permissions:
- On the System tab, select CData Salesforce Source.
Click the Add button to enter connection properties as key-value pairs.
If you wish to authenticate using OAuth, you will need to add an additional key-value pair to the DSN to ensure that the OAuth flow can execute properly:
| Keyword | Value |
|---|---|
| Other | CheckPromptMode=False |
For more information on the connection properties needed for your data source, refer to the driver help documentation.
Using Configuration Files
While it is recommended that you use the iODBC Administrator GUI to create ODBC data sources, you can also modify the configuration files of the iODBC driver manager. The iODBC driver manager uses the following files:
- odbci.ini — The file used to define individual ODBC data sources.
- odbcinst.ini — The file containing the ODBC drivers registered with the driver manager. With iODBC, drivers can be available to only one user account or the drivers can be available to all users in a system, as with DSNs.
You can modify the files at the paths below, depending on the level of access you want.
| Privileges | Path |
|---|---|
| User | /Users/myuser/Library/ODBC/ |
| System | /Library/ODBC/ |
For specific information on using these configuration files, please refer to the help documentation included in the installation of the drivers.
Download Free Trials
To download free 30-day trial versions of any ODBC Driver, select an ODBC Driver data source on our driver listing page, and navigate to the download page.
CData Software is a leading provider of data access and connectivity solutions. Our standards-based connectors streamline data access and insulate customers from the complexities of integrating with on-premise or cloud databases, SaaS, APIs, NoSQL, and Big Data.
Источник
How to Run Mac Apps on Linux

macOS and Linux share a common heritage. Unfortunately, that does not mean applications can smoothly transition between the operating systems. To run Mac apps on Linux, you’ll need some sort of virtual machine or translation layer.
Run a macOS Virtual Machine (All Apps)
The most reliable way to run Mac apps on Linux is through a virtual machine. With a free, open-source hypervisor application like VirtualBox, you can run macOS on a virtual device on your Linux machine. A properly-installed virtualized macOS environment will run all macOS apps without issue.

Virtualizing a desktop like this does require significant RAM, so it may not run smoothly on low-resource devices. For machines with the technical specs, virtualizing an operating systems through a VirtualBox virtual machine is the best option.
Using the Darling Translation Layer (CLI Only)
You can also run a translation layer called Darling. This works like WINE, which creates a Windows-to-Linux translation environment that allows you to run some Windows applications on Linux systems. Darling tries to accomplish the same goal between macOS and Linux. Because macOS and Linux both share the same UNIX-style base, Darling is less resource-intensive than WINE, producing better results in more circumstances.
For the time being, Darling can only work with very simple GUI apps and several command-line apps. While GUI app support is a goal for the project, the feature hasn’t yet been implemented. Basically, you can run a macOS shell in Terminal reliably and may or may not be able to run other apps effectively.
It also contains an enormous amount of code, requiring about 12 gigabytes of disk space after building. It’s essentially duplicating the functionality of the macOS operating system. So, if you worry about remote executables corrupting your system, you might want to avoid a package of this size.
Building and Installing Darling
1. Follow the installation instructions to download the correct dependencies for your Linux distro from the Darling Install page. Depending on your distro, you may need to run a lengthy command.
For example, for Ubuntu, run the following Terminal command to download Darling’s dependencies:
2. Clone Darling’s git depository to your local machine:
Источник
Linux and macOS Installation Tutorial for the Microsoft Drivers for PHP for SQL Server
The following instructions assume a clean environment and show how to install PHP 8.0, the Microsoft ODBC driver, the Apache web server, and the Microsoft Drivers for PHP for SQL Server on Ubuntu, Red Hat, Debian, Suse, Alpine, and macOS. These instructions advise installing the drivers using PECL, but you can also download the prebuilt binaries from the Microsoft Drivers for PHP for SQL Server GitHub project page and install them following the instructions in Loading the Microsoft Drivers for PHP for SQL Server. For an explanation of extension loading and why we do not add the extensions to php.ini, see the section on loading the drivers.
The following instructions install PHP 8.0 by default using pecl install , if the PHP 8.0 packages are available. You may need to run pecl channel-update pecl.php.net first. Some supported Linux distros default to PHP 7.1 or earlier, which is not supported for the latest version of the PHP drivers for SQL Server. See the notes at the beginning of each section to install PHP 7.4 or 7.3 instead.
Also included are instructions for installing the PHP FastCGI Process Manager, PHP-FPM, on Ubuntu. PHP-FPM is needed if you’re using the nginx web server instead of Apache.
While these instructions contain commands to install both SQLSRV and PDO_SQLSRV drivers, the drivers can be installed and function independently. Users comfortable with customizing their configuration can adjust these instructions to be specific to SQLSRV or PDO_SQLSRV. Both drivers have the same dependencies except where noted below.
Installing on Ubuntu
Ubuntu versions 16.04, 18.04, and 20.04 are supported.
To install PHP 7.4 or 7.3, replace 8.0 with 7.4 or 7.3 in the following commands.
Step 1. Install PHP (Ubuntu)
Step 2. Install prerequisites (Ubuntu)
Install the ODBC driver for Ubuntu by following the instructions on the Install the Microsoft ODBC driver for SQL Server (Linux). Make sure to also install the optional unixodbc-dev package. It’s used by the pecl command to install the PHP drivers.
Step 3. Install the PHP drivers for Microsoft SQL Server (Ubuntu)
If there is only one PHP version in the system, then the last step can be simplified to phpenmod sqlsrv pdo_sqlsrv .
Step 4. Install Apache and configure driver loading (Ubuntu)
Step 5. Restart Apache and test the sample script (Ubuntu)
To test your installation, see Testing your installation at the end of this document.
Installing on Ubuntu with PHP-FPM
Ubuntu versions 16.04, 18.04, and 20.04 are supported.
To install PHP 7.4 or 7.3, replace 8.0 with 7.4 or 7.3 in the following commands.
Step 1. Install PHP (Ubuntu with PHP-FPM)
Verify the status of the PHP-FPM service by running:
Step 2. Install prerequisites (Ubuntu with PHP-FPM)
Install the ODBC driver for Ubuntu by following the instructions on the Install the Microsoft ODBC driver for SQL Server (Linux). Make sure to also install the optional unixodbc-dev package. It’s used by the pecl command to install the PHP drivers.
Step 3. Install the PHP drivers for Microsoft SQL Server (Ubuntu with PHP-FPM)
If there is only one PHP version in the system, then the last step can be simplified to phpenmod sqlsrv pdo_sqlsrv .
Verify that sqlsrv.ini and pdo_sqlsrv.ini are located in /etc/php/8.0/fpm/conf.d/ :
Restart the PHP-FPM service:
Step 4. Install and configure nginx (Ubuntu with PHP-FPM)
To configure nginx, you must edit the /etc/nginx/sites-available/default file. Add index.php to the list below the section that says # Add index.php to the list if you are using PHP :
Next, uncomment, and modify the section following # pass PHP scripts to FastCGI server as follows:
Step 5. Restart nginx and test the sample script (Ubuntu with PHP-FPM)
To test your installation, see Testing your installation at the end of this document.
Installing on Red Hat
Red Hat versions 7 and 8 are supported.
Step 1. Install PHP (Red Hat)
To install PHP on Red Hat 7, run the following commands:
To install PHP 7.4 or 7.3, replace remi-php80 with remi-php74 or remi-php73 respectively in the following commands.
To install PHP on Red Hat 8, run the following commands:
To install PHP 7.4 or 7.3, replace remi-8.0 with remi-7.4 or remi-7.3 respectively in the following commands.
Step 2. Install prerequisites (Red Hat)
Install the ODBC driver for Red Hat 7 or 8 by following the instructions on the Install the Microsoft ODBC driver for SQL Server (Linux). Make sure to also install the optional unixodbc-dev package. It’s used by the pecl command to install the PHP drivers.
Step 3. Install the PHP drivers for Microsoft SQL Server (Red Hat)
You can alternatively install from the Remi repo:
Step 4. Install Apache (Red Hat)
SELinux is installed by default and runs in Enforcing mode. To allow Apache to connect to databases through SELinux, run the following command:
Step 5. Restart Apache and test the sample script (Red Hat)
To test your installation, see Testing your installation at the end of this document.
Installing on Debian
Debian versions 9 and 10 are supported.
To install PHP 7.4 or 7.3, replace 8.0 in the following commands with 7.4 or 7.3.
Step 1. Install PHP (Debian)
Step 2. Install prerequisites (Debian)
Install the ODBC driver for Debian by following the instructions on the Install the Microsoft ODBC driver for SQL Server (Linux). Make sure to also install the optional unixodbc-dev package. It’s used by the pecl command to install the PHP drivers.
You may also need to generate the correct locale to get PHP output to display correctly in a browser. For example, for the en_US UTF-8 locale, run the following commands:
You may need to add /usr/sbin to your $PATH , as the locale-gen executable is located there.
Step 3. Install the PHP drivers for Microsoft SQL Server (Debian)
If there is only one PHP version in the system, then the last step can be simplified to phpenmod sqlsrv pdo_sqlsrv . As with locale-gen , phpenmod is located in /usr/sbin so you may need to add this directory to your $PATH .
Step 4. Install Apache and configure driver loading (Debian)
Step 5. Restart Apache and test the sample script (Debian)
To test your installation, see Testing your installation at the end of this document.
Installing on Suse
Suse Enterprise Linux versions 12 and 15 are supported.
In the following instructions, replace with your version of Suse. If you are using Suse Enterprise Linux 15, it will be SLE_15_SP1 or SLE_15_SP2. For Suse 12, use SLE_12_SP4 (or above if applicable). Not all versions of PHP are available for all versions of Suse Linux. Refer to http://download.opensuse.org/repositories/devel:/languages:/php to see which versions of Suse have the default version of PHP available, or check http://download.opensuse.org/repositories/devel:/languages:/php:/ to see which other versions of PHP are available for which versions of Suse.
Packages for PHP 7.4 or above are not available for Suse 12 and Package for PHP 8.0 is not yet available for Suse 15. To install PHP 7.3, replace the repository URL below with the following URL: https://download.opensuse.org/repositories/devel:/languages:/php:/php73/ /devel:languages:php:php73.repo .
Step 1. Install PHP (Suse)
Step 2. Install prerequisites (Suse)
Install the ODBC driver for Suse by following the instructions on the Install the Microsoft ODBC driver for SQL Server (Linux). Make sure to also install the optional unixodbc-dev package. It’s used by the pecl command to install the PHP drivers.
Step 3. Install the PHP drivers for Microsoft SQL Server (Suse)
If you get an error message saying Connection to ‘pecl.php.net:443’ failed: Unable to find the socket transport «ssl» , edit the pecl script at /usr/bin/pecl and remove the -n switch in the last line. This switch prevents PECL from loading ini files when PHP is called, which prevents the OpenSSL extension from loading.
Step 4. Install Apache and configure driver loading (Suse)
Step 5. Restart Apache and test the sample script (Suse)
To test your installation, see Testing your installation at the end of this document.
Installing on Alpine
Alpine versions 3.11 and 3.12 are supported.
The default version of PHP is 7.3. PHP 7.4 or above may be available from testing or edge repositories for Alpine. You can instead compile PHP from source.
Step 1. Install PHP (Alpine)
PHP packages for Alpine can be found in the edge/community repository. Check Enable Community Repository on their WIKI page. Add the following line to /etc/apk/repositories , replacing with the URL of an Alpine repository mirror:
Step 2. Install prerequisites (Alpine)
Install the ODBC driver for Alpine by following the instructions on the Install the Microsoft ODBC driver for SQL Server (Linux). Make sure to also install the unixodbc-dev package ( sudo apk add unixodbc-dev ). It’s used by the pecl command to install the PHP drivers.
Step 3. Install the PHP drivers for Microsoft SQL Server (Alpine)
Step 4. Install Apache and configure driver loading (Alpine)
Step 5. Restart Apache and test the sample script (Alpine)
To test your installation, see Testing your installation at the end of this document.
Installing on macOS
MacOS versions 10.14 (Mojave), 10.15 (Catalina), and 11.0 (Big Sur) are supported.
If you do not already have it, install brew as follows:
To install PHP 7.4 or 7.3, replace php@8.0 with php@7.4 or php@7.3 respectively in the following commands.
Step 1. Install PHP (macOS)
PHP should now be in your path. Run php -v to verify that you are running the correct version of PHP. If PHP is not in your path or it is not the correct version, run the following commands:
Step 2. Install prerequisites (macOS)
Install the ODBC driver for macOS by following the instructions on the Install the Microsoft ODBC driver for SQL Server (macOS).
In addition, you may need to install the GNU make tools:
Step 3. Install the PHP drivers for Microsoft SQL Server (macOS)
Step 4. Install Apache and configure driver loading (macOS)
To find the Apache configuration file, httpd.conf , for your Apache installation, run:
The following commands append the required configuration to httpd.conf . Be sure to substitute the path returned by the preceding command in place of /usr/local/etc/httpd/httpd.conf :
Step 5. Restart Apache and test the sample script (macOS)
To test your installation, see Testing your installation at the end of this document.
Testing Your Installation
To test this sample script, create a file called testsql.php in your system’s document root. This path is /var/www/html/ on Ubuntu, Debian, and Red Hat, /srv/www/htdocs on SUSE, /var/www/localhost/htdocs on Alpine, or /usr/local/var/www on macOS. Copy the following script to it, replacing the server, database, username, and password as appropriate.
SQLSRV example
PDO_SQLSRV example
Point your browser to https://localhost/testsql.php ( https://localhost:8080/testsql.php on macOS). You should now be able to connect to your SQL Server/Azure SQL database. If you don’t see a success message showing SQL version information, you can do some basic troubleshooting by running the script from the command line:
If running from the command line is successful but nothing shows in your browser, check the Apache log files. For more help, see Support resources for places to go.
Источник


