- Use SSH Keys with PuTTY on Windows
- Table of Contents
- Introduction
- Requirements
- Install PuTTY and PuTTYgen
- Use Existing Public and Private Keys
- Create New Public and Private Keys
- Copy Public Key to Server
- Connect to Server with Private Key
- How To Use SSH Keys on Windows Clients (with PuTTY)
- Step 1: Download and Install PuTTY, PuTTYgen and Pageant
- Step 2: Generate the OpenSSH-compatible Keys with PuTTYgen
- Step 3: Save The Public Key On The Server
- Step 4: Create a PuTTY Profile to Save Your Server’s Settings
- Step 5 (Optional): Disable the Password for Root Login via SSH
- Download PuTTY for Windows , Linux and Mac
- Download PuTTY (0.74) for Windows
- Download PuTTY for Windows Operating System (Released 27 June 2020)
- Download Alternative Binary Files for PuTTY (Windows)
- Installing PuTTY on Windows
- Using SSH in PuTTY (Windows)
- 1. Manage Session in PuTTY
- 2. What is Logging in PuTTY?
- 3. What is Terminal in PuTTY?
- 4. Configure Keyboard setting in PuTTY.
- 5. What is Bell in PuTTY?
- 6. Features of PuTTY
- 7. Adjust the size of Window in PuTTY.
- 8. Change the Appearance of PuTTY
- 9. What is PuTTY Behaviour?
- 10. What is Translation in PuTTY?
- 11. What is Selection in PuTTY?
- 12. How to Adjust Colours in PuTTY?
- 13. Configure Connection in PuTTY.
- 14. Manage Data in PuTTY.
- 15. A proxy setting in PuTTY
- 16. What are Telnet, Rlogin, and SSH in PuTTY?
- Download PuTTY on Linux and Installation Guide
- PuTTY for Linux
- Install PuTTY on Linux
- Installation of PuTTY on other Linux distributions
- Working on PuTTY on Linux
- SSH Key Management in PuTTY on Linux
- Download PuTTY for Mac and Installation Guide
- PuTTY for Mac
- Install Putty on a Mac using Command-line Tools
- Use X-Code to install Putty for mac
- Install Putty for mac using MacPorts
- Download PuTTY for Mac and Installation
Use SSH Keys with PuTTY on Windows
Table of Contents
Introduction
SSH can handle authentication using a traditional username and password combination or by using a public and private key pair. The SSH key pair establishes trust between the client and server, thereby removing the need for a password during authentication. While not required, the SSH private key can be encrypted with a passphrase for added security.
The PuTTY SSH client for Microsoft Windows does not share the same key format as the OpenSSH client. Therefore, it is necessary to create a new SSH public and private key using the PuTTYgen tool or convert an existing OpenSSH private key.
Requirements
- PuTTY SSH client for Microsoft Windows
- Remote server accessible over OpenSSH
Install PuTTY and PuTTYgen
Both PuTTY and PuTTYgen are required to convert OpenSSH keys and to connect to the server over SSH. These two tools can be downloaded individually or, preferably, as a Windows installer from the PuTTY Download Page.
Once the PuTTY Windows installer is downloaded, double-click the executable in the Download folder and follow the installation wizard. The default settings are suitable for most installations. Both PuTTY and PuTTYgen should now be accessible from the Windows Programs list.
Use Existing Public and Private Keys
If you have an existing OpenSSH public and private key, copy the id_rsa key to your Windows desktop. This can be done by copying and pasting the contents of the file or using an SCP client such as PSCP which is supplied with the PuTTY install or FileZilla.
Next launch PuTTYgen from the Windows Programs list.
- Click Conversions from the PuTTY Key Generator menu and select Import key .
- Navigate to the OpenSSH private key and click Open .
- Under Actions / Save the generated key , select Save private key .
- Choose an optional passphrase to protect the private key.
- Save the private key to the desktop as id_rsa.ppk .

If the public key is already appended to the authorized_keys file on the remote SSH server, then proceed to Connect to Server with Private Key.
Create New Public and Private Keys
Launch PuTTYgen from the Windows Programs list and proceed with the following steps.
- Under Parameters , increase the Number of bits in a generated key: to a minimum value of 2048.
- Under Actions / Generate a public/private key pair , click Generate .
- You will be instructed to move the mouse cursor around within the PuTTY Key Generator window as a randomizer to generate the private key.
- Once the key information appears, click Save private key under Actions / Save the generated key .
- Save the private key to the desktop as id_rsa.ppk .
- The box under Key / Public key for pasting into OpenSSH authorized_keys file: contains the public key.

Copy Public Key to Server
The OpenSSH public key is located in the box under Key / Public key for pasting info OpenSSH authorized_keys file: . The public key begins with ssh-rsa followed by a string of characters.
- Highlight entire public key within the PuTTY Key Generator and copy the text.
- Launch PuTTY and log into the remote server with your existing user credentials.
Use your preferred text editor to create and/or open the authorized_keys file:
Paste the public key into the authorized_keys file.
Save the file and close the text editor.
Adjust the permissions of the authorized_keys file so that the file does not allow group writable permissions.
Logout of the remote server.
Connect to Server with Private Key
Now it is time to test SSH key authentication. The PuTTYgen tool can be closed and PuTTY launched again.
How To Use SSH Keys on Windows Clients (with PuTTY)
Using encrypted keys for authentication offers two main benefits. Firstly, it is convenient as you no longer need to enter a password (unless you encrypt your keys with password protection) if you use public/private keys. Secondly, once public/private key pair authentication has been set up on the server, you can disable password authentication completely meaning that without an authorized key you can’t gain access — so no more password cracking attempts.
It’s a relatively simple process to create a public/private key pair and install them for use on your ssh server.
Step 1: Download and Install PuTTY, PuTTYgen and Pageant
To get started, we’ll need to download and install both PuTTY (putty.exe), PuTTYgen (puttygen.exe) and Pageant (pageant.exe). You can find links to each of these at the project’s website. However, the easiest way to get both of the necessary programs is by downloading and installing the full .msi package, as pictured below:

Step 2: Generate the OpenSSH-compatible Keys with PuTTYgen
- Start the PuTTYgen utility, by double-clicking on its .exe file or pressing the Windows key and searching for PuTTYgen
- For Type of key to generate, select SSH-2 RSA
- In the Number of bits in a generated key field, specify either 2048 or 4096 (increasing the bits makes it harder to crack the key by brute-force methods)
- Click the Generate button
- Move your mouse pointer around in the blank area of the Key section, below the progress bar (to generate some randomness) until the progress bar is full
- A private/ public key pair has now been generated
- In the Key comment field, enter any comment you’d like, to help you identify this key pair, later (e.g. your e-mail address; home; office; etc.) — the key comment is particularly useful in the event you end up creating more than one key pair
- Optional: Type a passphrase in the Key passphrase field & re-type the same passphrase in the Confirm passphrase field (if you would like to use your keys for automated processes, however, you should notcreate a passphrase)
- Click the Save public key button & choose whatever filename you’d like (some users create a folder in their computer named my_keys)
- Click the Save private key button & choose whatever filename you’d like (you can save it in the same location as the public key, but it should be a location that only you can access and that you will NOT lose! If you lose your keys and have disabled username/password logins, you will no longer be able log in!)
- Right-click in the text field labeled Public key for pasting into OpenSSH authorized_keys file and choose Select All
- Right-click again in the same text field and choose Copy
NOTE: PuTTY and OpenSSH use different formats for public SSH keys. If the SSH Key you copied starts with «—- BEGIN SSH2 PUBLIC KEY . «, it is in the wrong format. Be sure to follow the instructions carefully. Your key should start with «ssh-rsa AAAA . «
Step 3: Save The Public Key On The Server
Now, you need log into your server via SSH as you normally would using PuTTY and paste the copied public key in the file
/.ssh/authorized_keys on your server.
If your SSH folder does not yet exist, create it manually:
Paste the SSH public key into your
/.ssh/authorized_keys file using the command-line text editor of your choice and save it.
Step 4: Create a PuTTY Profile to Save Your Server’s Settings
In PuTTY, you can create (and save) profiles for connections to your various SSH servers, so you don’t have to remember, and continually re-type, redundant information.
- Start PuTTY by double-clicking its executable file or pressing the Windows key and searching for PuTTY
- PuTTY’s initial window is the Session Category (navigate PuTTY’s various categories, along the left-hand side of the window)
- In the Host Name field, enter the IP address of your server
- Enter the port number in the Port field
- Select SSH under Protocol;
- Along the left-hand side of the window, select the Data sub-category, under Connection;
- Specify the username that you plan on using, when logging in to the SSH server, and whose profile you’re saving, in the Auto-login username field;
- Expand the SSH sub-category, under Connection;
- Highlight the Auth sub-category and click the Browse button, on the right-hand side of the PuTTY window;
- Browse your file system and select your previously-created private key;
- Return to the Session Category and enter a name for this profile in theSaved Sessions field, e.g. user@12.34.56.78 or user@hostname;
- Click the Save button for the Load, Save or Delete a stored session
Now you can log in to user@12.34.56.78 and you will not be prompted for a password. However, if you had set a passphrase on your public key, you will be asked to enter the passphrase at that time (and every time you log in, in the future).
Step 5 (Optional): Disable the Password for Root Login via SSH
Once you have copied your SSH keys unto your server and ensured that you can log in with the SSH keys alone, you can restrict the root login to only be permitted via SSH keys.
In order to do this, open up the /etc/ssh/sshd_config file:
Within that file, find the line that includes PermitRootLogin and modify it to ensure that users can only connect with their SSH key:
Alternatively, if you have configured sudo on your server and are configuring SSH keys for a sudo user, you can disable direct root access altogether:
Download PuTTY for Windows , Linux and Mac
Download PuTTY (0.74) for Windows
A step by step guide to Download PuTTY on Windows and installing.
PuTTY, a popular terminal emulator, is an open-source, light-weight, and free SSH client. It was developed by Simon Tatham in C language. Its primary function is to connect to a computer remotely while offering the facilities of transferring files, manipulating data, etc.
It offers support to a variety of network protocols like SSH, Telnet, Serial, SCP, SFTP, etc. PuTTY also comes with a command-line tool called “psftp” which can securely transfer files between computers over an SSH connection. It is compatible to use in most of the operating systems (for both 32 bit and 64 bit).
The List of Operating Systems that support PuTTY:
- Windows 95, 98
- Windows ME, NT
- Windows 2000, 2003, 2008
- Windows XP
- Windows Vista
- Mac OSX
Use of PuTTY
In a multi-user operating system like Unix, the interface is generally of command-line type, just like the command prompt or MS-DOS. As such the user needs to type in the command in the command line program to get anything processed by the system.
Generally, these commands can quickly be run over a network from a different computer on a different location (client) and the response is transferred over the network to the client.
The arrangement mentioned above is made possible with the help of network protocols like SSH, Telnet, Rlogin, etc. Interestingly, users can give commands to multiple computers simultaneously.
SSH (Secure Shell) protocol is a cryptographic network protocol that allows you to access an internet server while encrypting any information sent to that server. Some of the other protocols include Telnet, Rlogin only if either you are connected to a Unix system or you have a login account on a web server (a shell account). PuTTY is one such application that enables this kind of transfer.
PuTTY supports the following protocols
- SCP (Secure Copy)
- SSH (Secure Shell)
- Telnet
- Rlogin
- Raw socket connection.
Download PuTTY for Windows Operating System (Released 27 June 2020)
Following are the steps required to download and install the latest version of PuTTY for Windows operating system:
Choose the appropriate windows installer version (32-bit or 64-bit ) and click on it.
| MSI (вЂWindows Installer for putty’) | |||
| 32-bit: | putty-0.74-installer.msi | (via FTP) | (signature) |
| 64-bit: | putty-64bit-0.74-installer.msi | (via FTP) | (signature) |
| Unix source archive for putty | |||
| .tar.gz: | putty-0.74.tar.gz | (via FTP) | (Signature) |
Download Alternative Binary Files for PuTTY (Windows)
| putty.exe (the SSH and Telnet client itself) | |||
| 32-bit: | putty.exe | (via FTP) | (signature) |
| 64-bit: | putty.exe | (via FTP) | (signature) |
| pscp.exe (an SCP client, i.e. command-line secure file copy) | |||
| 32-bit: | pscp.exe | (via FTP) | (signature) |
| 64-bit: | pscp.exe | (via FTP) | (signature) |
| psftp.exe (an SFTP client, i.e. general file transfer sessions much like FTP) | |||
| 32-bit: | psftp.exe | (via FTP) | (signature) |
| 64-bit: | psftp.exe | (via FTP) | (signature) |
| puttytel.exe (a Telnet-only client) | |||
| 32-bit: | puttytel.exe | (via FTP) | (signature) |
| 64-bit: | puttytel.exe | (via FTP) | (signature) |
| plink.exe (a command-line interface to the putty back ends) | |||
| 32-bit: | plink.exe | (via FTP) | (signature) |
| 64-bit: | plink.exe | (via FTP) | (signature) |
| pageant.exe (an SSH authentication agent for putty, PSCP, PSFTP, and Plink) | |||
| 32-bit: | pageant.exe | (via FTP) | (signature) |
| 64-bit: | pageant.exe | (via FTP) | (signature) |
| puttygen.exe (a RSA and DSA key generation utility) | |||
| 32-bit: | puttygen.exe | (via FTP) | (signature) |
| 64-bit: | puttygen.exe | (via FTP) | (signature) |
| putty.zip (a .ZIP archive of all the above) | |||
| 32-bit: | putty.zip | (via FTP) | (signature) |
| 64-bit: | putty.zip | (via FTP) | (signature) |
PuTTY installer for windows will be downloaded shortly. You’ve successfully downloaded PuTTY on Windows.
Installing PuTTY on Windows
Once it is successfully downloaded on Windows than follow the following steps to install the software:
Double click on the downloaded .msi file and being with the setup process.
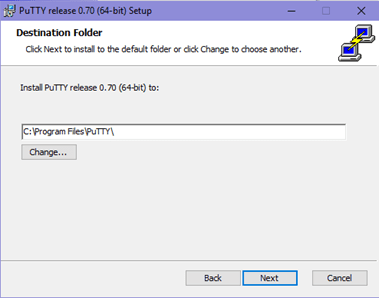
 Installing PuTTY in Windows – (step 1)
Click on next and then select the path for the installation.
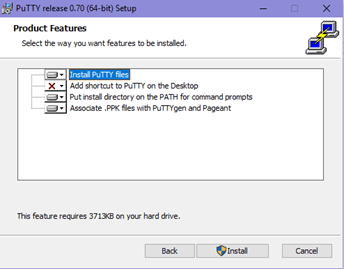
 Installing PuTTY Release in Windows – (step 2)
Select the product feature you want to be installed in your system and click on install.
 Install PuTTY Files (Step 3)
Click on Finish to complete the setup and close the dialog box.
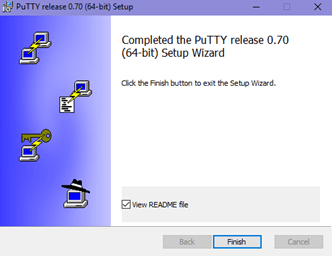 Complete Installing PuTTY in Windows
Voila! You are done with the installation.
Using SSH in PuTTY (Windows)
Following the successful installation, navigate to the location folder where you have installed the application and run the .exe file.
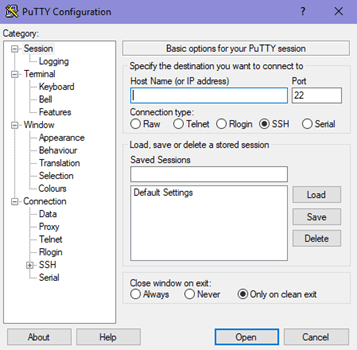 PuTTY Configuration
1. Manage Session in PuTTY
It is the preliminary panel where you get to specify specific options to open a session.
- The Host Name (or IP Address) bar is where a user will input the name or IP address of the server they want to connect.
- Connection type of radio buttons allows users to choose from the kind of network they are planning to connect.
- The Port bar is the section that is filled automatically on selecting the type of connection. However, if you choose the Raw type, the bar stays blank and requires the user to enter the port manually.
- Upon selecting Serial as the connection type, the Host Name and Port bars will be replaced by Serial Line and Speed.
The “Load, save or delete a stored session” section is to set some connection setting without having to type all the details again when needed.
- Once you save it, it can just select on the saved session and click on Load. The saved settings will appear on their respective boxes in the configuration panel.
- The panel permits to modify a saved session by first loading a session, editing everything you want to change and then clicking on “save” button.
- Users have the option to delete a session as well.
The Close Window On Exit option helps in deciding whether the PuTTY terminal will close as soon as the session ends or restarts the session on the termination.
2. What is Logging in PuTTY?
This configuration panel saved the log files of your PuTTY sessions which can be used for debugging and analysis purposes. Users can choose the type of data you want to log in this window.
3. What is Terminal in PuTTY?
The section has a variety of options to decide how the texts in the window should appear. Whether you want the text to come in the next line as soon as it reaches the right edge of the window or you want to interpret the cursor position.
4. Configure Keyboard setting in PuTTY.
With the option, users can modify the behavior of вЂbackspace,’ вЂhome’ and вЂend’ keys, and several other keys to coordinate with the server settings.
5. What is Bell in PuTTY?
It lets PuTTY make an alert sound as and when you want it to function.
6. Features of PuTTY
Users can choose to disable or enable some of the advanced terminal features of PuTTY like disabling cursor keys, etc. using the function.
7. Adjust the size of Window in PuTTY.
The option allows to predefine a fixed size of the PuTTY window and control the scrolling. Many other configurations can be made using this feature.
8. Change the Appearance of PuTTY
Under this panel, the appearance of the cursor, the font in the terminal window or even control the window border can be changed.
9. What is PuTTY Behaviour?
Enables to change the title of the window, control the warning window operation, etc.
10. What is Translation in PuTTY?
The “Remote Character Set” lets you select how to interpret the information received from the server.
11. What is Selection in PuTTY?
Users can change the course of copy-pasting or the actions of mouse-buttons in Unix environment by making appropriate changes in this panel.
12. How to Adjust Colours in PuTTY?
You can control the color of background as well as of the texts using this panel.
13. Configure Connection in PuTTY.
The panel has options that solve any issues when closing of connections while a window is idle. With the option, users can select between the old and new protocols.
14. Manage Data in PuTTY.
The auto-login option dismisses the need to type the username every time. It can also specify the terminal needs using this panel.
15. A proxy setting in PuTTY
Permits configuration of various types of proxies used while making the network connections.
16. What are Telnet, Rlogin, and SSH in PuTTY?
These panels allow configuration of session-related options like changing the mode for negotiation between the server and client, allowing an automated form of login on the server, etc.
The above were details about the panels and the steps to install PuTTY client on windows.
Download PuTTY on Linux and Installation Guide
PuTTY, the open-source and free to download software, provides an easy way to access a Unix shell environment from a windows system. Unlike Unix, Windows don’t have any SSH server or client pre-installed. The network file transfer application supports many protocols including the popular SSH and Telnet clients.
PuTTY for Linux
PuTTY is not only limited to Windows OS, but it’s popular among Linux users too. The Linux version is a graphical terminal program which is not pre-installed in most of the Linux distributions.
In various enterprises, many IT projects have their development environment on a remote Linux system where Windows is used as the local system. Why PuTTY? There is already a Linux terminal in the Linux Operating System. Even then, why an SSH tool like PuTTY is preferred?
- The interface of PuTTY makes it a favorite choice among the users since most of them are accustomed to operating the application on Windows.
- It has the option of connecting to raw sockets and serial ports.
- Saving various sessions and loading them in one go is the main highlighting feature of PuTTY that its users swear by since it is difficult to edit sessions whenever logging-in manually.
Install PuTTY on Linux
On a Linux-based system, PuTTY can easily be installed via terminal. Let us look at the steps of installing the server application on a Ubuntu machine.
1. As a prerequisite, it is necessary to make sure whether the universe repository of Ubuntu is enabled or not.
Type the command:
2. Generally, PuTTY is already available in the repository of Ubuntu. Before starting with the installation process, update the packages and repositories of Ubuntu using the command:
Note: The command would make sure that Ubuntu installs the latest version of PuTTY, in case, it might install the older versions of the software. The word “sudo” in the command is used to instruct the terminal to run the update command as “root” since a user might not have privileges to get going with the installation and updation. It will prompt you to enter the username and password if you have the required access.
3. Now, run the command:
It will complete the installation by installing the application tools.
4. A prompt will asked if you want to continue the installation. Press вЂy’.
5. PuTTY tools will be unpacked and set up in the further process.
6. To confirm if that the installation is successful, run the command:
It will display information about the application such as version, architecture, and description.
Installation of PuTTY on other Linux distributions
In Debian based Linux system, use apt-get or aptitude to install the server application PuTTY. The command is:
PuTTY can easily be installed on Arch-based Linux system. The command for installing is:
It is also available for installation on Fedora or Red Hat based Linux system, and the default package manager does that job for it. The command is:
Working on PuTTY on Linux
Now that you have installed PuTTY, working on it is pretty simple too.
- Just type the command “PuTTY” on the shell prompt. It will open the PuTTY SSH client application.
- After opening it, enter the IP address or the hostname of the computer or any device you want to connect on Hostname field.
- Next, select the required connection type, like SSH, Raw, Telnet, Rlogin, Serial, etc.
- For security reasons, a prompt will ask to confirm the connection. Just click вЂyes’ to continue.
- Now, you will be connected to your remote system. It will further ask for credentials – username and password, to make sure that you are authorized to connect to the system.
- In Linux, the application can also be opened by searching in the Computer Box.
- The Linux version of the program almost looks and feels exactly like the windows version.
SSH Key Management in PuTTY on Linux
Public key authentication is also supported by PuTTY. Public key authentication is used for interactive and automated connections. It offers a higher cryptographic strength which is difficult to achieve with long passwords. For generating a private key for authentication, the PuTTYgen tool is used.
Open PuTTYgen and run the following command to get public key authentication enabled:
To get the public key use the following command:
Hence, that was all about installing and getting started with PuTTY on Linux based systems.
Download PuTTY for Mac and Installation Guide
PuTTY is a free, highly configurable and open-source SSH client which makes it convenient to connect to a remote server and transfer files over the network. Mainly aimed for the use of programmers and network administrator, it helps establish secure connections when transferring data over the network.
Apart from SSH, the application supports many other protocols like SCP, Telnet, Raw Socket Connection, etc. Additionally, it can also connect to a serial port. While it supports many variations on the secure remote terminal, it also facilitates user control over SSH encryption key and protocol versions.
PuTTY for Mac
Let’s talk about the steps to install PuTTY on a MAC operating system. As a prerequisite, users need the following application installed on the system:
Install Putty on a Mac using Command-line Tools
MAC users have this facility to use a Unix toolkit. Users have to use the terminal to access the kit. The tool package gives its users many tools, utilities, and compilers that include GCC, Perl, svn, git, etc. Many of the commands are found on Linux installations by default. Let’s look at the steps to install it.
- To begin with, the installation, go to the Apple Developer website.
- Login and in the download section and search for Command Line Tools.
- Install the .dmg file.
Use X-Code to install Putty for mac
It’s an IDE (Integrated Development Environment) specially designed for MAC OS. It consists of a suite of software development tools for developing software for MAC OS, iOS, WatchOS, and tvOS.
It also supports source codes from programming languages like C, C++, Java, Python, Ruby, etc. It’s available on the app store. So, go to app store, search for “x-code” and click on “get.”
Install Putty for mac using MacPorts
It’s open-source software designed to simplify the installation of other software. One can install some packages by entering a command in the terminal, which will download, compile and install the requested software. It also installs any required dependencies related to the software automatically.
- Download MacPorts from here.
- A pkg file will be downloaded. Just double-click to install it.
Download PuTTY for Mac and Installation
After installing the tools, let’s get to the PuTTY installation part.
1. You need to accept the Licence Agreement of X-Code before using it. So, open the terminal from the utility section. It’s just like command line on Linux.
2. Type the command:
By running this command, the Xcode License will be viewed/accepted on behalf of all accounts on the Mac.
3. Press enter to view the License agreement and type “agree.” A line on the terminal will say “You can view the license agreements in x-code About box.”
4. Update MacPorts by typing:
to make sure that x-code is fully installed. Now, the Mac system is ready to install PuTTY.
5. Type the following command
in the Terminal and run the command. It will download some of the dependencies of PuTTY.
in the terminal to launch the application. Running the command would open PuTTY in an X11 window.
7. To copy PuTTY to the desktop as a shortcut icon, type the following command
8. A desktop icon will be on the desktop which opens the PuTTY configuration box.
Following the installation users can start connecting to servers by adding the IP address and the port (depending on the type of connection you want to make) of the server.
Users can even save sessions containing the IP address of the servers, which would need to be accessed multiple times. Once connected, users can create, update or manipulate with the data present on the server, given that you have the necessary rights to perform those actions.
PuTTY client is one of the best SSH clients as it offers a variety of features like logging, cursor formatting, keyboard formatting, alert sound, resizing the terminal window, changing the actions of mouse buttons, configuring proxies, configuring session-related options, auto-login facility and much more.
However, alternatives to PuTTY can be found here.


