- Using Windows
- Creating a Main Window
- Creating, Enumerating, and Sizing Child Windows
- Destroying a Window
- Using Layered Windows
- What happens when you Reset Windows 10
- What happens when you Reset Windows 10
- Windows 10 Reset: Keep my files
- Windows 10 Reset: Remove everything
- Windows 10 Reset: Restore factory settings
- 14 ways to speed up Windows 10
- If you want to optimize Windows 10, take a few minutes to try out these tips to speed up your PC and make it less prone to performance and system issues.
- Windows 10 tips
- 1. Change your power settings
- 2. Disable programs that run on startup
- 3. Use ReadyBoost to speed up disk caching
- 4. Shut off Windows tips and tricks
- 5. Stop OneDrive from syncing
- 6. Turn off search indexing
- 7. Clean out your hard disk
- 8. Clean out your Registry
Using Windows
The examples in this section describe how to perform the following tasks:
Creating a Main Window
The first window an application creates is typically the main window. You create the main window by using the CreateWindowEx function, specifying the window class, window name, window styles, size, position, menu handle, instance handle, and creation data. A main window belongs to an application-defined window class, so you must register the window class and provide a window procedure for the class before creating the main window.
Most applications typically use the WS_OVERLAPPEDWINDOW style to create the main window. This style gives the window a title bar, a window menu, a sizing border, and minimize and maximize buttons. The CreateWindowEx function returns a handle that uniquely identifies the window.
The following example creates a main window belonging to an application-defined window class. The window name, Main Window, will appear in the window’s title bar. By combining the WS_VSCROLL and WS_HSCROLL styles with the WS_OVERLAPPEDWINDOW style, the application creates a main window with horizontal and vertical scroll bars in addition to the components provided by the WS_OVERLAPPEDWINDOW style. The four occurrences of the CW_USEDEFAULT constant set the initial size and position of the window to the system-defined default values. By specifying NULL instead of a menu handle, the window will have the menu defined for the window class.
Notice that the preceding example calls the ShowWindow function after creating the main window. This is done because the system does not automatically display the main window after creating it. By passing the SW_SHOWDEFAULT flag to ShowWindow, the application allows the program that started the application to set the initial show state of the main window. The UpdateWindow function sends the window its first WM_PAINT message.
Creating, Enumerating, and Sizing Child Windows
You can divide a window’s client area into different functional areas by using child windows. Creating a child window is like creating a main window—you use the CreateWindowEx function. To create a window of an application-defined window class, you must register the window class and provide a window procedure before creating the child window. You must give the child window the WS_CHILD style and specify a parent window for the child window when you create it.
The following example divides the client area of an application’s main window into three functional areas by creating three child windows of equal size. Each child window is the same height as the main window’s client area, but each is one-third its width. The main window creates the child windows in response to the WM_CREATE message, which the main window receives during its own window-creation process. Because each child window has the WS_BORDER style, each has a thin line border. Also, because the WS_VISIBLE style is not specified, each child window is initially hidden. Notice also that each child window is assigned a child-window identifier.
The main window sizes and positions the child windows in response to the WM_SIZE message, which the main window receives when its size changes. In response to WM_SIZE, the main window retrieves the dimensions of its client area by using the GetClientRect function and then passes the dimensions to the EnumChildWindows function. EnumChildWindows passes the handle to each child window, in turn, to the application-defined EnumChildProc callback function. This function sizes and positions each child window by calling the MoveWindow function; the size and position are based on the dimensions of the main window’s client area and the identifier of the child window. Afterward, EnumChildProc calls the ShowWindow function to make the window visible.
Destroying a Window
You can use the DestroyWindow function to destroy a window. Typically, an application sends the WM_CLOSE message before destroying a window, giving the window the opportunity to prompt the user for confirmation before the window is destroyed. A window that includes a window menu automatically receives the WM_CLOSE message when the user clicks Close from the window menu. If the user confirms that the window should be destroyed, the application calls DestroyWindow. The system sends the WM_DESTROY message to the window after removing it from the screen. In response to WM_DESTROY, the window saves its data and frees any resources it allocated. A main window concludes its processing of WM_DESTROY by calling the PostQuitMessage function to quit the application.
The following example shows how to prompt for user confirmation before destroying a window. In response to WM_CLOSE, the example displays a dialog box that contains Yes, No, and Cancel buttons. If the user clicks Yes, DestroyWindow is called; otherwise, the window is not destroyed. Because the window being destroyed is a main window, the example calls PostQuitMessage in response to WM_DESTROY.
Using Layered Windows
To have a dialog box come up as a translucent window, first create the dialog as usual. Then, on WM_INITDIALOG, set the layered bit of the window’s extended style and call SetLayeredWindowAttributes with the desired alpha value. The code might look like this:
Note that the third parameter of SetLayeredWindowAttributes is a value that ranges from 0 to 255, with 0 making the window completely transparent and 255 making it completely opaque. This parameter mimics the more versatile BLENDFUNCTION of the AlphaBlend function.
To make this window completely opaque again, remove the WS_EX_LAYERED bit by calling SetWindowLong and then ask the window to repaint. Removing the bit is desired to let the system know that it can free up some memory associated with layering and redirection. The code might look like this:
In order to use layered child windows, the application has to declare itself WindowsВ 8-aware in the manifest.
What happens when you Reset Windows 10
Windows 10 offers an in-built feature which allows you to reset Windows 10. This feature comes in handy on many occasions, but have you wondered what happens when you reset Windows 10? In this guide, we will share all the details when you perform a reset.
What happens when you Reset Windows 10
On a basic level, when you reset Windows 10, it will reinstall Windows 10 again. That solves a lot of problems, especially file corruption, on the computer. You can either reset using Settings > Update & Security > Recovery, or you can choose to boot into Advanced Recovery mode or use recovery drive or installation media if nothing else works.
There are three ways to reset Windows 10. The first is where you get to keep your files, the second is where you remove everything, and the last one is a complete reset.
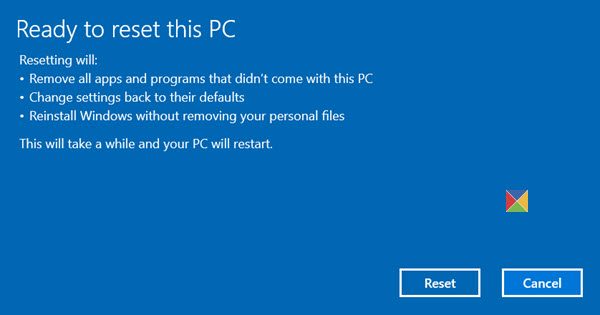
Windows 10 Reset: Keep my files
If the computer is not working as expected, this is what you should choose. It will do the following:
- Reinstalls Windows 10 and keeps your personal files.
- Removes apps and drivers you had installed.
- Eliminates changes you made to settings.
- Excludes any apps your PC manufacturer installed.
If your computer came with preinstalled Windows 10, it would also install the apps from the PC manufacturer.
Windows 10 Reset: Remove everything
You should choose this option if you are planning to donate, recycle or sell your computer. It will completely wipe your data. The process usually takes a lot of time to make it harder for other people to recover files directly or using the software.
- Reinstalls Windows 10 and removes all your personal files.
- Removes apps and drivers you installed.
- Removes changes you made to settings.
- Removes any apps your PC manufacturer installed.
- Installs preinstalled apps that came with the pre-installed OS in the PC.
Windows 10 Reset: Restore factory settings
While it does the same as the above two, It will reinstall the version of Windows that came with your PC. So if you upgraded to Windows 10 from Windows 8.1/8, it would reinstall it. This option is usually not available on all computers and laptops. The advantage of this method is that if you are giving it to somebody, he will have to buy his license as they would sign with a different account.
I hope this explains how Windows 10 reset works.
TIP: Do note that If your device is encrypted, you will need your BitLocker key to reset your computer.
14 ways to speed up Windows 10
If you want to optimize Windows 10, take a few minutes to try out these tips to speed up your PC and make it less prone to performance and system issues.


Contributing Editor, Computerworld |
Windows 10 tips
Want Windows 10 to run faster? We’ve got help. In just a few minutes you can try out this baker’s dozen of tips; your machine will be zippier and less prone to performance and system issues.
1. Change your power settings
If you’re using Windows 10’s “Power saver” plan, you’re slowing down your PC. That plan reduces your PC’s performance in order to save energy. (Even desktop PCs typically have a “Power saver” plan.) Changing your power plan from “Power saver” to “High performance” or “Balanced” will give you an instant performance boost.
To do it, launch the Control Panel app, then select Hardware and Sound > Power Options. You’ll typically see two options: “Balanced (recommended)” and “Power saver.» (Depending on your make and model, you might see other plans here as well, including some branded by the manufacturer.) To see the “High performance” setting, click the down arrow by “Show additional plans.”
Change your power settings in Control Panel to give your PC a performance boost. (Click image to enlarge it.)
To change your power setting, simply choose the one you want, then exit Control Panel. “High performance” gives you the most oomph, but uses the most power; “Balanced” finds a happy medium between power use and better performance; and “Power saver” does everything it can to give you as much battery life as possible. Desktop users have no reason to choose “Power saver,” and even laptop users should consider the “Balanced” option when unplugged — and “High performance” when connected to a power source.
2. Disable programs that run on startup
One reason your Windows 10 PC may feel sluggish is that you’ve got too many programs running in the background — programs that you rarely or never use. Stop them from running, and your PC will run more smoothly.
Start by launching the Task Manager: Press Ctrl-Shift-Esc, right-click the lower-right corner of your screen and select Task Manager, or type task manager into the Windows 10 search box and press Enter. If the Task Manager launches as a compact app with no tabs, click “More details” at the bottom of your screen. The Task Manager will then appear in all of its full-tabbed glory. There’s plenty you can do with it, but we’re going to focus only on killing unnecessary programs that run at startup.
Click the Startup tab. You’ll see a list of the programs and services that launch when you start Windows. Included on the list is each program’s name as well as its publisher, whether it’s enabled to run on startup, and its “Startup impact,” which is how much it slows down Windows 10 when the system starts up.
To stop a program or service from launching at startup, right-click it and select “Disable.” This doesn’t disable the program entirely; it only prevents it from launching at startup — you can always run the application after launch. Also, if you later decide you want it to launch at startup, you can just return to this area of the Task Manager, right-click the application and select “Enable.”
You can use the Task Manager to help get information about programs that launch at startup and disable any you don’t need. (Click image to enlarge it.)
Many of the programs and services that run on startup may be familiar to you, like OneDrive or Evernote Clipper. But you may not recognize many of them. (Anyone who immediately knows what “bzbui.exe” is, please raise your hand. No fair Googling it first.)
The Task Manager helps you get information about unfamiliar programs. Right-click an item and select “Properties” for more information about it, including its location on your hard disk, whether it has a digital signature, and other information such as the version number, the file size and the last time it was modified.
You can also right-click the item and select “Open file location.” That opens File Explorer and takes it to the folder where the file is located, which may give you another clue about the program’s purpose.
Finally, and most helpfully, you can select “Search online” after you right-click. Bing will then launch with links to sites with information about the program or service.
If you’re really nervous about one of the listed applications, you can go to a site run by Reason Software called Should I Block It? and search for the file name. You’ll usually find very solid information about the program or service.
Now that you’ve selected all the programs that you want to disable at startup, the next time you restart your computer, the system will be a lot less concerned with unnecessary programs.
3. Use ReadyBoost to speed up disk caching
Windows 10 regularly stores cached data on your hard disk, and then when it needs the data, fetches it from there. The time it takes to fetch cached data depends on the speed of your hard disk. If you have a traditional hard disk instead of an SSD, there’s a trick that can help speed up your cache: use Windows’ ReadyBoost feature. It tells Windows to cache data to a USB flash drive, which is faster than a hard disk. Fetching data from that speedier cache should speed up Windows.
First, plug a USB flash drive into one of your PC’s USB ports. The flash drive needs to support at least USB 2.0, and preferably USB 3 or faster. The faster your flash drive, the more of a speed boost you should see. Also, look for a flash drive that is at least double the size of your PC’s RAM for maximum performance.
After you plug in in the drive, open File Explorer and click “This PC.” Look for the flash drive. It may have an odd name, like UDISK 28X, or something even less-obvious. Right-click it, choose Properties and click the ReadyBoost tab.
Turn on ReadyBoost from this screen to speed up your PC.
You’ll come to a screen that asks whether you want to use the flash drive as a cache and recommends a cache size. Leave the cache size as is or change it if you like. Then select “Dedicate this device to ReadyBoost” and click Apply and then click OK.
(Note that if you see the message, “This device cannot be used for ReadyBoost” when you click the ReadyBoost tab it means your flash drive doesn’t meet ReadyBoost’s minimum performance standards, so you’ll have to insert a new one.)
As you use your computer, ReadyBoost will start filling the cache with files, so you may notice an increase in disk activity. Depending on how much you use your PC, it can take a few days for your cache to fill and offer maximum improved performance. If you don’t see an increase in performance, try a flash disk with more capacity.
4. Shut off Windows tips and tricks
As you use your Windows 10 PC, Windows keeps an eye on what you’re doing and offers tips about things you might want to do with the operating system. In my experience, I’ve rarely if ever found these “tips” helpful. I also don’t like the privacy implications of Windows constantly taking a virtual look over my shoulder.
Windows watching what you’re doing and offering advice can also make your PC run more sluggishly. So if you want to speed things up, tell Windows to stop giving you advice. To do so, click the Start button, select the Settings icon and then go to System > Notifications & actions. Scroll down to the Notifications section and uncheck the box marked “Get tips, tricks, and suggestions as you use Windows.”
Turning off Windows’ suggestions for you should help things run more smoothly (and give you back a measure of privacy). (Click image to enlarge it.)
That’ll do the trick.
5. Stop OneDrive from syncing
Microsoft’s cloud-based OneDrive file storage, built into Windows 10, keeps files synced and up to date on all of your PCs. It’s also a useful backup tool so that if your PC or its hard disk dies, you still have all your files intact, waiting for you to restore them.
Here’s how to turn off OneDrive syncing temporarily, to see if that boosts system performance. (Click image to enlarge it.)
It does this by constantly syncing files between your PC and cloud storage — something that can also slow down your PC. That’s why one way to speed up your PC is to stop the syncing. Before you turn it off permanently, though, you’ll want to check whether it is actually slowing down your PC.
To do so, right-click the OneDrive icon (it looks like a cloud) in the notification area on the right side of the taskbar, then click the More button at the bottom of the screen. From the popup screen that appears, click “Pause syncing” and select either 2 hours, 8 hours or 24 hours, depending upon how long you want it paused. During that time, gauge whether you’re seeing a noticeable speed boost.
If so, and you decide you do indeed want to turn off syncing, right-click the OneDrive icon, and from the popup, select Settings > Account. Click “Unlink this PC,” and then from the screen that appears, click “Unlink account.” When you do that, you’ll still be able to save your files to your local OneDrive folder, but it won’t sync with the cloud.
If you find that OneDrive slows down your PC but prefer to keep using it, you can try to troubleshoot OneDrive problems. For info on how to do that, check out Microsoft’s “Fix OneDrive sync problems” page.
6. Turn off search indexing
Windows 10 indexes your hard disk in the background, allowing you — in theory — to search your PC more quickly than if no indexing were being done. But slower PCs that use indexing can see a performance hit, and you can give them a speed boost by turning off indexing. Even if you have an SSD disk, turning off indexing can improve your speed, because the constant writing to disk that indexing does can eventually slow down SSDs.
To get the maximum benefit in Windows 10, you need to turn indexing off completely. To do so, type services.msc in the Windows 10 search box and press Enter. The Services app appears. Scroll down to either Indexing Service or Windows Search in the list of services. Double-click it, and from the screen that appears, click Stop. Then reboot your machine. Your searches may be slightly slower, although you may not notice the difference. But you should get an overall performance boost.
Here’s how to turn off Windows 10 indexing. (Click image to enlarge it.)
If you’d like, you can turn off indexing only for files in certain locations. To do this, type index in the Windows 10 search box and click the Indexing Options result that appears. The Indexing Options page of the Control Panel appears. Click the Modify button, and you’ll see a list of locations that are being indexed, such as Microsoft Outlook, your personal files, and so on. Uncheck the box next to any location, and it will no longer be indexed.
7. Clean out your hard disk
If you’ve got a bloated hard disk filled with files you don’t need, you could be slowing down your PC. Cleaning it out can give you a speed boost. Windows 10 has a surprisingly useful built-in tool for doing this called Storage Sense. Go to Settings > System > Storage and at the top of the screen, move the toggle from Off to On. When you do this, Windows constantly monitors your PC and deletes old junk files you no longer need — temporary files, files in the Downloads folder that haven’t been changed in a month, and old Recycle Bin files.
You can customize how Storage Sense works and also use it to free up even more space than it normally would. Underneath Storage Sense, click “Configure Storage Sense or run it now.” From the screen that appears, you can change how often Storage Sense deletes files (every day, every week, every month or when your storage space gets low).
You can also tell Storage Sense to delete files in your Download folder, depending on how long they’ve been there, and set how long to wait to delete files in the Recycle Bin automatically. You can also have Storage Sense move files from your PC to the cloud in Microsoft’s OneDrive cloud storage if they’re not opened for a certain amount of time (every day, or every 14 days, 30 days or 60 days).
Here’s how to customize the way Storage Sense works, and to tell it to delete old versions of Windows. (Click image to enlarge it.)
You can also delete old versions of Windows that might be hogging space. At the bottom of the screen, check the box next to “Delete previous versions of Windows.” Storage Sense will then delete old versions of Windows ten days after you’ve installed an upgrade. Note that if you do this, you won’t be able to revert to the older version of Windows.
8. Clean out your Registry
Under the Windows hood, the Registry tracks and controls just about everything about the way Windows works and looks. That includes information about where your programs are stored, which DLLs they use and share, what file types should be opened by which program, and just about everything else.
But the Registry is a very messy thing. When you uninstall a program, for example, that program’s settings don’t always get cleaned up in the Registry. So over time, it can get filled with countless outdated settings of all types. And that can lead to system slowdowns.
Don’t even think of trying to clean any of this out yourself. It’s impossible. To do it, you need a Registry Cleaner. There are plenty available, some free and some paid. But there’s really no need to outright buy one, because the free Auslogics Registry Cleaner does a solid job.
Before using Auslogics or any other Registry Cleaner, you should back up your Registry so you can restore it if anything goes wrong. (Auslogics Registry Cleaner does this for you as well, but it can’t hurt to have it backed up twice.) To do your own Registry backup, type regedit.ext in the search box, then press Enter. That runs the Registry editor. From the File menu, select Export. From the screen that appears, make sure to choose the “All” option in the Export range section at the bottom of the screen. Then choose a file location and file name and click Save. To restore the Registry, open the Registry editor, select Import from the File menu, then open the file you saved.
Now download, install and run Auslogics Registry Cleaner. On the left-hand side of the screen you can select the kinds of Registry issues you want to clean up — for example, File Associations, Internet or Fonts. I generally select them all.
Auslogics Registry Cleaner scans for and fixes problems in your Windows Registry. (Click image to enlarge it.)
Next, tell it to scan the Registry for problems. To do that, click “Scan Now,” and from the drop-down menu that appears, select Scan. That lets you first examine the Registry problems it finds. If you instead choose “Scan and Repair,” it makes the fixes without you checking them.
It now scans your Registry for errors, then shows you what it found. It ranks the errors according to their severity to help you decide which to fix. Click Repair when you’ve made your decision, and make sure that “Back Up Changes” is checked, so you can restore the Registry easily if something goes wrong.


