- Максим Михеев
- . о Mac OS, iOS, Xcode, Objective-C и не только.
- Установка Xcode в Windows
- Внимание!
- Этап I. Установка OS X в Windows 7
- Основные требования
- Установка
- Этап II. Установка Xcode
- Xcode in windows pc
- 9 Replies
- Xcode for Windows: Develop iOS Apps on PC
- Xcode for Windows: What & Why
- Rent a Mac in the Cloud
- Learn how to code iOS apps
Максим Михеев
. о Mac OS, iOS, Xcode, Objective-C и не только.
Установка Xcode в Windows
С момента написания моего предыдущего поста о процессе установки Xcode на Windows-машину прошло больше двух лет. За это время многое изменилось, процесс установки существенно упростился. Поэтому я взял на себя труд обновить указанное руководство, оставив, тем не менее, оригинальную статью для истории и любителей утверждать, что “раньше трава была зеленее…”.
Внимание!
Описание процесса установки, праведённое в данной статье, безнадёжно устарело. Если вы попытаетесь следовать данной инструкции, с высокой долей вероятности, у вас ничего не выйдет!
Этап I. Установка OS X в Windows 7
Эти инструкции описывают процесс установки полностью функциональной OS X 10.7 Lion на Windows-машине. Процесс займет около часа, но большую часть времени вы потратите на загрузку необходимых файлов. Несмотря на то, что в данном обзоре использовалась Windows 7, данный процесс подойдет и для других версий Windows.
Основные требования
- Ноутбук или настольный компьютер, поддерживающий виртуализацию (большинство современных компьютеров).
- 1 Гб оперативной памяти или больше.
- VMWare Workstation — это платная программа, но, немного поискав, можно найти ее бесплатно.
- VMWare Hard Drive — набор vmx-файлов в самораспаковывающемся архиве.
- OS X Lion — VMDK-файл.
Перед началом установки убедитесь, что в BIOS вашего компьютера включена виртуализация (Virtualization). Она может быть выключена по-умолчанию производителем компьютера.
Установка
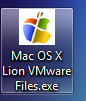
Шаг 1. Распакуйте загруженный вами архив Mac OS X Lion VMware Files.exe двойным кликом.
Шаг 2. Откройте появившуюся при распаковке архива папку Mac OS X Lion VMware Files.
Шаг 3. Следуйте инструкциям, приведенным в этом видео для разблокировки VMWare. Вместо использования файлов из видео, используйте файлы, полученные на шаге 2.
Шаг 4. После шага 1 у вас должна появится папка Mac OS X Lion. Найдите в ней файл с названием Mac OS X Lion.vmx и сделайте по нему двойной клик. Файл откроется в VMWare Workstation.

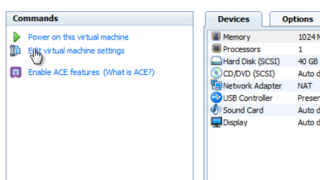
Шаг 5. В левой части окна нажмите на Edit Virtual Machine Settings. Во вкладке Memory выберите, сколько памяти будет использовать виртуальная машина с OS X. Во вкладке Sound выберите свою звуковую карту в настройке Specify host sound card. Если после запуска виртуальной машины звука не будет, смените эту настройку на Use default host sound card.
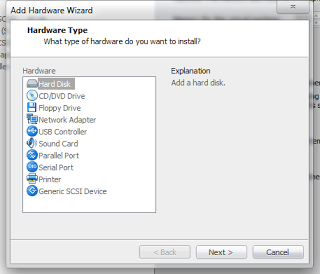
Шаг 6. В нижней части окна нажмите кнопку Add. Выберите Hard Disk, нажмите Next, затем выберите Use an existing virtual disk.
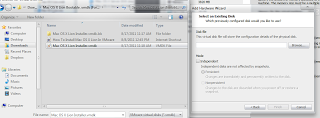
Шаг 7. В открывшемся окне найдите и выберите файл Mac OS X Lion Installer.vmdk, который был загружен с помощью торрента. Нажмите Finish и OK.
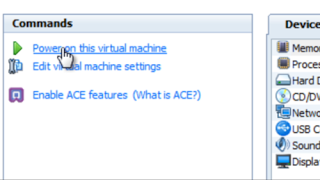
Шаг 8. В левой части окна нажмите Power on this virtual machine.
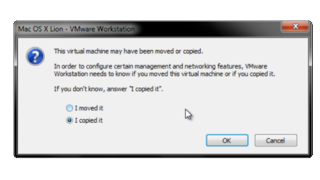
Шаг 9. Если появится окно с вопросом о починке образа диска, нажмите Repair. Если появится окно с вопросом о виртуальной машине, как на рисунке ниже, выберите I copied it и нажмите OK. Если появится окно с сообщением о CD-приводе, нажмите OK.
Шаг 10. Машина должна запуститься в течение нескольких минут. Для удобства можете добавить данную машину в Избранное, выбрав File > Add to Favorites.
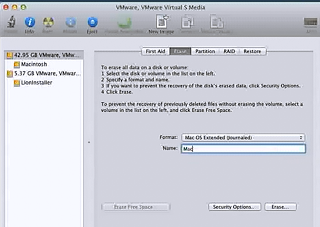
Шаг 11. После загрузки должен появится экран Install Mac OS X. В верхней части экрана нажмите Utilities, затем нажмите Disk Utility. Выберите жесткий диск 42.45 GB. Выберите вкладку Erase и дайте жесткому диску название в поле ввода Name. Нажмите Erase…, в появившемся окне нажмите Erase.
Шаг 12. После завершения процесса, закройте окно Disk Utility. На экране Install нажмите Continue, затем Agree. Выберите 40 GB Hard Disk для установки OS X Lion. Нажмите Install. Процесс установки займет порядка получаса. После установки вам будет предложено создать аккаунт пользователя.
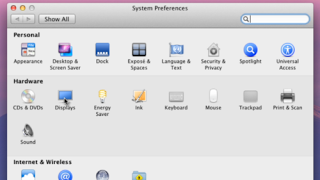
Шаг 13. Для запуска виртуальной машины в полноэкранном режиме в OS X откройте Preferences, выберите Displays. Далее выберите разрешение своего монитора. После этого в VMWare нажмите кнопку Full Screen, она десятая слева на тулбаре.
Шаг 14. Установка и настройка OS X завершена, теперь можно переходить к установке Xcode.
Этап II. Установка Xcode
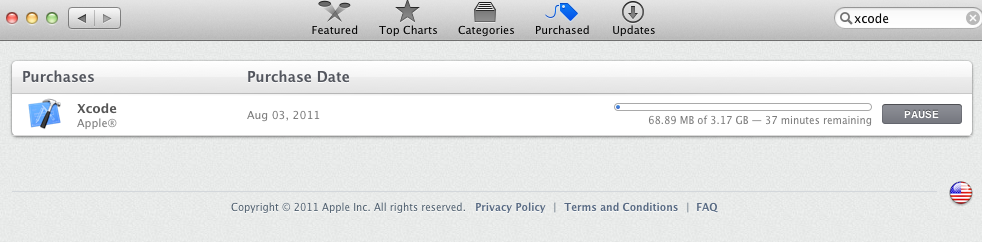
Шаг 1. Если у вас его еще нет, создайте бесплатный аккаунт разработчика. Это необходимо для того, чтобы бесплатно загрузить Xcode. После этого, откройте приложение App Store и загрузите Xcode. Вы можете следить за состоянием загрузки на вкладке Purchases (Покупки).
Последние версии Xcode обычно устанавливаются автоматически после загрузки. Однако если в Launchpad никакого Xcode после загрузки не появилось, следуйте шагам 2-5. Если Xcode появился в Launchpad и в Dock, установка завершена и все готово к разработке приложений для OS X и iOS.
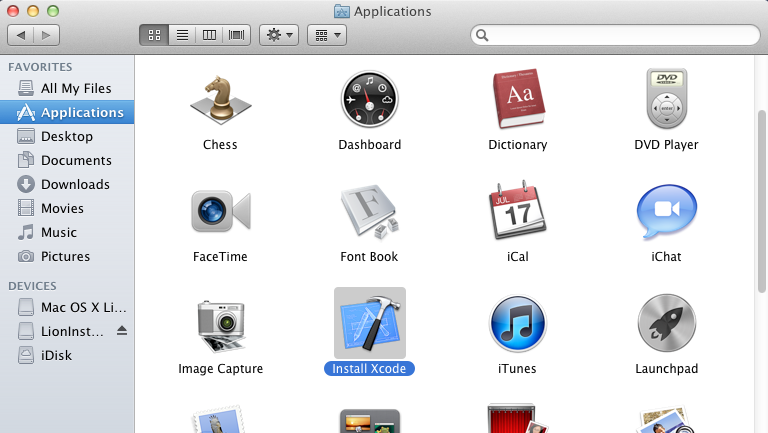
Шаг 2. После завершения загрузки откройте в Finder (Проводник в OS X) папку Applications (Программы), найдите иконку Install Xcode и сделайте по ней двойной клик.
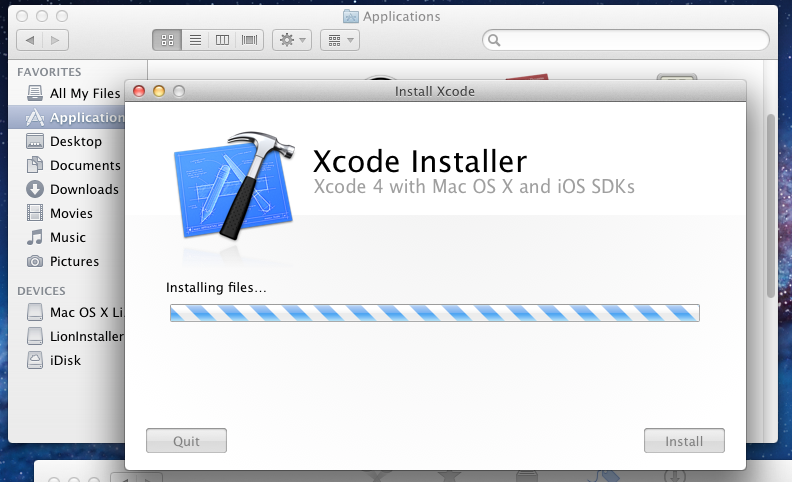
Шаг 3. Следуйте инструкциям установщика приложения, дождитесь завершения установки.
Шаг 4. После завершения установки Xcode запустится сам. Если этого не произошло, откройте в Finder папку Applications (Программы), найдите иконку Xcode и запустите его двойным кликом. Рекомендую перетащить иконку в Dock (список программ в нижней части рабочего стола), чтобы не искать ее каждый раз в разделе Приложения.
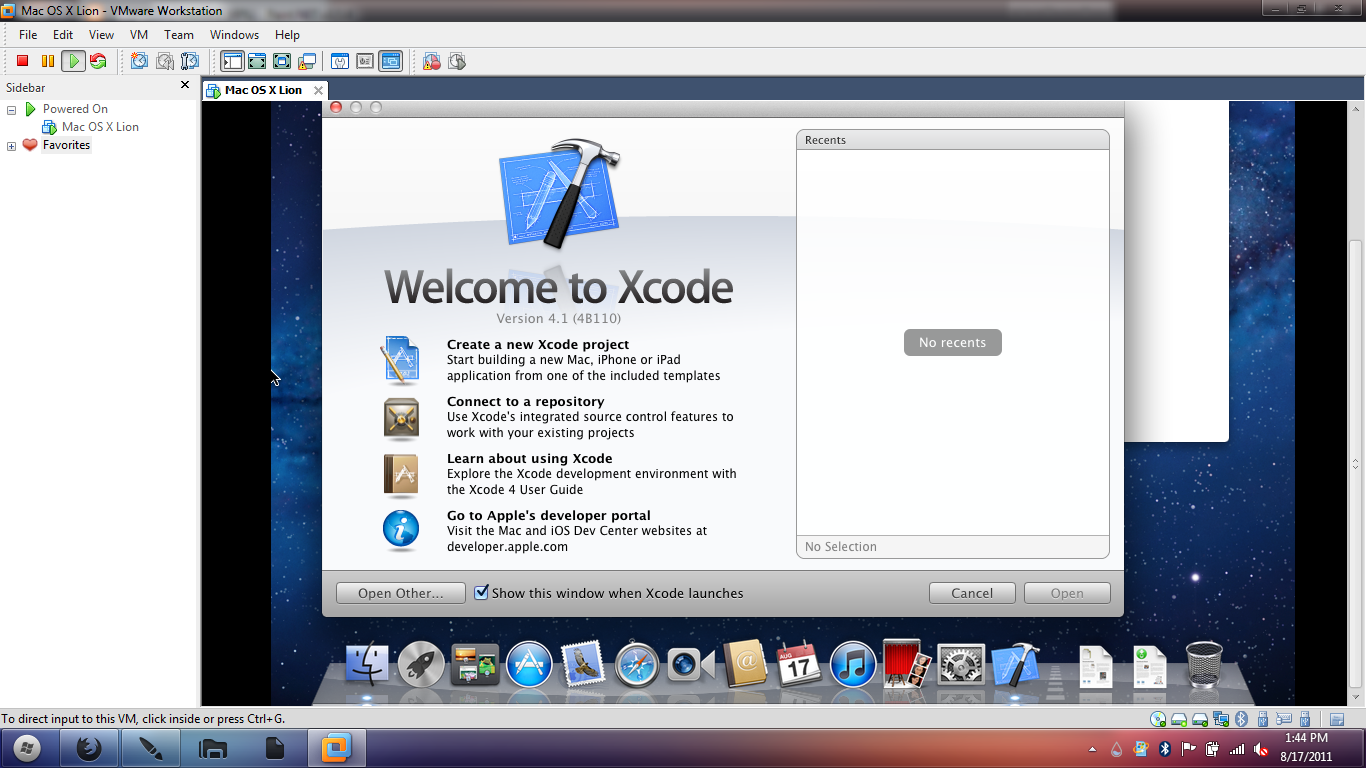
Шаг 5. Все готово к разработке приложений для OS X и iOS!
Теперь Вы можете начать программировать на Objective-C. Если Вы ни разу не программировали на этом языке, где этому научиться я расскажу в одной из своих следующих заметок. Также можно воспользоваться встроенной в Xcode справочной системой.
Более подробно с процессом можно ознакомиться по этой ссылке (английский).
Xcode in windows pc
Hello! I have windows pc and an iphone, I want to develop apps and use xcode. Please help me on that and what should I do
9 Replies
Xcode requires a Mac/macOS.
Hi! You might check out the following video from Code with Chris; I’m in the same boat—looking for a solution!
That video advocates (among other things) running OS X in a virtual machine. I thought that was against the OS X terms of service.
It is unless you are running it in a virtual machine on a Mac (which is not a solution for the poster).
You can’t officially run macOS (and by extension Xcode) on non-Apple hardware. If you do, you basically are going rogue. If you plan on developing for the platform officially (submitting apps to the App Stores) I recommend you invest in a Mac. Maybe you’ll get away with it by running macOS on a virtual machine, maybe you won’t. Maybe they will notice that you are not on Mac and turn a blind eye, but then again, maybe they won’t. If Apple chooses to enforce its rules, they may kick you out of the dev program and you will have wasted your time.
So yeah. the answer is this. technically you can run macOS on non-Apple hardware but you are violating Apple’s terms of service. I think I remember someone telling me in some countries Apple’s terms of service may not be enforceable on this, but I don’t know if that’s true or not. Interestingly I recently read a blog post by a well known dev that built himself a Hackintosh, not sure if its being used a development machine or was just for fun.
Macs are expensive, but if you want to develop on Apple platforms you kind of have to s u c k it up and buy one.
Xcode for Windows: Develop iOS Apps on PC
Written by Reinder de Vries on February 28 2020 in App Development

How can you run Xcode on Windows and develop iOS apps with a Windows PC? The short answer is: you can’t! You’ve got a few alternatives to get around that, however. In this tutorial, we’ll discuss how you can install Xcode on Windows to build iOS apps.
Here’s what we’ll get into:
- Rent a Mac in the cloud (starting at $20/mo)
- Run and compile Swift directly on Windows/Linux
- Learning to code with a Swift Sandbox
- Build your own “Hackintosh” by installing macOS on a PC
- Run Xcode on Windows by installing macOS on a virtual machine
- Develop iOS apps on Windows with cross-platform tools
- Get your hands on a second-hand Mac (starting at $300)
Xcode for Windows: What & Why
Xcode contains everything you need to build iOS apps, and it only runs on macOS!
That’s when the problems start. You want to make an iOS app with your Windows PC, but you can’t buy a PC or laptop with macOS pre-installed on it. Unlike Windows, Apple doesn’t license its operating system to other computer manufacturers. You can only use macOS on a Mac.
In fact, when you obtain a license to use macOS, which happens when you purchase a Mac computer, you have to agree to only run the operating system on Apple hardware. This effectively limits you to only develop apps on a Mac.
“It’s more fun to be a pirate than to join the navy.”
— Steve Jobs (1983)
But… it’s more fun to be a pirate, than to join the navy, right? Let’s discuss a few alternatives that’ll let you run Xcode on Windows and develop iOS apps on a Windows PC!
Rent a Mac in the Cloud
An even easier way to get your hands on macOS, albeit more expensive, is to rent a Mac “in the Cloud”. You can work with Xcode on Windows with this approach, because you’re essentially connected to a Mac that’s elsewhere.
Here’s how that works:
- Someone connects a bunch of Mac’s to the internet
- You sign in on one of those Macs via a Remote Desktop Connection (RDP)
- Done! You can use this Mac from Windows/Linux and build iOS apps
Services like MacinCloud and MacStadium offer affordable rent-a-Mac products, usually paid on a monthly basis. Prices typically start at $20/month and you can choose from several hardware options, including Mac Mini and Mac Pro.
| Starting at | Type | |
|---|---|---|
| MacinCloud | $20/month | Dedicated, Virtual, Server |
| MacStadium | $79/month | Dedicated, Enterprise |
| virtualmacosx.com | $9.75/month | Shared (timesharing) |
| Mac Cloud | $49/month | Virtual |
| Flow | Premium | Dedicated, Enterprise |
| HostMyApple | $25/month | Virtual, Dedicated |
You connect to those cloud-based Macs via a Remote Desktop Connection (RDP). Windows includes a stock Remote Desktop Client you can use, and so do most Linux operating systems. Once you’re logged on, you can launch Xcode, and start building your iOS app. That way you’re effectively running Xcode on your Windows PC!
Cloud-based Macs usually come in 3 flavours:
- A dedicated Mac, which means you get access to a physical Mac located in a data center, as if you bought a Mac in the Apple Store and put it on your desk.
- A virtual Mac, which means you get access to a virtual Mac in a data center, much like the VirtualBox solution mentioned earlier. Your Mac won’t run on Apple hardware, but it will run macOS.
- A Mac Build Server, which is a specialized kind of Mac that can be used to compile iOS apps. You’ll create those apps on your Mac, and then instruct the Build Server to compile the app for you.
A dedicated Mac is the most convenient, and the most powerful option. A virtual Mac is OK too, but it typically does not perform as well as a physical Mac computer.
Running Xcode via a Mac in the cloud has a drawback: you can’t easily connect your iPhone to Xcode via USB! With Xcode on your local Mac you can run and debug your app on your own iPhone, via the USB/Lightning cable. This obviously won’t work when your Mac is in the cloud…
Don’t worry! There are plenty of solutions for that:
- A simple approach is to run your app on iPhone Simulator, right from within Xcode. You can launch iPhone Simulator in Xcode, and debug your app with it. This is perfect for the development phase of your project.
- An alternative solution are tools like Flexihub, NoMachine and USB Network Gate. They only work with dedicated Mac hardware, and you need to have a dedicated IP address.
- Install your iOS app on your iPhone via TestFlight, and debug it with a tool like Bugsnag. You can monitor and debug live crashes in your app.
An interesting use case for renting a Mac in the cloud comes from the latest developments in Apple’s hardware. Many designers, developers and desktop-publishers have voiced their concerns over Apple hardware lagging behind, offering low-spec computers for a fairly high price.
If you don’t want to take your $3.000 MacBook Pro with you in a coffee shop, or on your next trip to Thailand, why not purchase a low-end Windows or Linux laptop, and connect to your Mac in the cloud? You can either host it at home yourself, co-locate it in a data center, or rent a dedicated cloud-based Mac.
Do you want to learn how to code iOS apps, but don’t want to invest money in a Mac? Rent a Mac in the cloud for the duration of the iOS development course you’re taking! It’s a great way to bootstrap learning iOS development, and you can always buy your own Mac later.

Learn how to code iOS apps
Get started with Xcode and Swift
Ready to get started with iOS development? Learn how to code iOS apps with Xcode and Swift with our immersive iOS development course. Works both on Mac and PC!


