- Установить jre для linux
- What you’ll learn
- What you’ll need
- 2. Installing OpenJDK JRE
- 3. Installing Oracle HotSpot JRE
- Downloading the Oracle HotSpot JRE binaries
- Installing
- Post-installation steps
- 7 JRE Installation for Linux Platforms
- System Requirements
- JRE 8 Installation Instructions
- Installation Instruction Notation and Files
- Installation of the 64-bit JRE on Linux Platforms
- Installation of the 64-bit JRE on RPM-based Linux Platforms
- Installation of the 32-bit JRE on Linux Platforms
- Installation of the 32-bit JRE on RPM-based Linux Platforms
- Installation of Public Key on RPM-based Linux Platforms
- General Installation Notes
- Root Access
- Overwriting Files
- System Preferences
- Установка Java в Ubuntu и Linux Mint
- Что такое Java
- Какие версии Java бывают и чем отличаются
- Какую версию устанавливать
- Проверка версии Java
- Установка OpenJDK
- Установка OpenJDK JRE
- Установка OpenJDK JDK
- Установка OpenJDK определенной версии
- Установка Oracle JDK
- Установка Oracle JDK свежей версии
- Установка Oracle JDK старой версии
- Как удалить Java
- Запуск Java-программ
- Заключение
Установить jre для linux
The Java Runtime Environment (JRE) is required to run Java programs. Nowadays there are many JRE packages available from a variety of projects and companies, but the two most popular on Ubuntu are OpenJDK and Oracle HotSpot. Using one package over the other should not create any functional difference in most applications; however, some prefer OpenJDK over Oracle HotSpot as the former does not contain closed-source components, has a much clearer licensing and support policy, and is maintained as part of the Ubuntu archive, with easier installation and upgrades.
In this guide, we’ll be going through the installation of both JRE packages. Of course, you generally only need to pick the one that best suits your needs and preferences.
What you’ll learn
- How to install OpenJDK JRE
- How to install Oracle HotSpot JRE
What you’ll need
That’s all you need. If you have that, let’s proceed to the next step!
2. Installing OpenJDK JRE
With new versions of Java released every 6 months, there are multiple versions available for use. Nowadays, Java 11 is the current Long Term Support (LTS) version, but Java 8 is still widely used. Moreover, the non LTS versions of Java are bringing a steady stream of innovation into the language, and also see some adoption.
Ubuntu offers the default-jre package, which is regularly updated to ship the latest version of the current OpenJDK JRE in Long Term Support (LTS). The default-jre is an excellent choice for most situations, thanks to the outstanding track of backwards compatibility of the Java Virtual Machine.
(Alternatively, you may opt to use a specific Java version, using for example the openjdk-11-jre package; as updates are released for that version of the Java Virtual Machine, that packages will be updated, allowing you to stick to the latest and greatest update of one specific version of the Java language.)
To install the OpenJDK JRE, we run:
We can check if OpenJDK JRE was properly installed by running:
It should output the following:
(Although the output may change in the future as new Java versions are promoted to LTS status, or the current LTS version receives updates.)
In the next step we’ll install Oracle HotSpot JRE.
3. Installing Oracle HotSpot JRE
Downloading the Oracle HotSpot JRE binaries
Download JRE binaries in .tar.gz (tarball) by heading over to their website. An Oracle account is needed to download the Oracle HotSpot JRE.
Oracle does not currently offer JRE packages for Java 11 or above from their website so, for this tutorial, we will use the Oracle HotSpot JRE version to be 8u291 (Java 8, update 291).
Installing
Create a directory to install JRE in with:
Move the JRE binaries into the directory:
Go into the install directory:
Unpack the tarball:
Post-installation steps
To save space, delete the tarball by running:
Let the system know where JRE is installed:
After that’s done, check the installation by running:
Источник
7 JRE Installation for Linux Platforms
This page describes JRE for Linux system requirements and gives installation instructions for several JRE-Linux combinations.
This page contains these topics:
See «JDK 8 and JRE 8 Installation Start Here» for general information about installing JDK 8 and JRE 8.
For information on enhancements to JDK 8 that relate to the installer, see «Installer Enhancements in JDK 8».
System Requirements
See http://www.oracle.com/technetwork/java/javase/certconfig-2095354.html for information about supported platforms, operating systems, and browsers.
On a 64-bit system, you can download either the 64-bit or the 32-bit version of the Java platform. However, if you are using a 32-bit browser and you want to use the plugin, then you need to install the 32-bit version of the Java platform. To determine which version of Firefox you are running, launch the application, and select the menu item Help -> About Mozilla Firefox. At the bottom of the window is a version string line that contains either «Linux i686» (32-bit) or «Linux x86_64» (64-bit). To setup the Java plugin, see «Manual Installation and Registration of Java Plugin for Linux».
JRE 8 Installation Instructions
This topic contains these topics:
Installation Instruction Notation and Files
For instructions containing the notation version , substitute the appropriate JRE update version number. For example, if you are installing update JRE 8 update release 2, the following string representing the name of the bundle:
Note that, as in the preceding example, the version number is sometimes preceded with the letter u , for example, 8u2 , and sometimes it is preceded with an underbar, for example, jre1.8.0_02 .
The following table lists the options and instructions for downloading the JRE 8 release for a Linux platform.
| Download File and Instructions | Architecture | Who Can Install |
|---|---|---|
| jre-8u version -linux-x64.tar.gz «Installation of the 64-bit JRE on Linux Platforms» | 64-bit | anyone |
| j re-8u version -linux-i586.tar.gz «Installation of the 32-bit JRE on Linux Platforms» | 32-bit | anyone |
| jre-8u version -linux-x64.rpm «Installation of the 64-bit JRE on RPM-based Linux Platforms» | 64-bit RPM-based Linux | root |
| jre-8u version -linux-i586.rpm «Installation of the 32-bit JRE on RPM-based Linux Platforms» | 32-bit RPM-based Linux | root |
JDK 7u6 and later releases include JavaFX SDK (version 2.2 or later). The JavaFX SDK and Runtime are installed and integrated into the standard JDK directory structure.
Installation of the 64-bit JRE on Linux Platforms
This procedure installs the Java Runtime Environment (JRE) for 64-bit Linux, using an archive binary file ( .tar.gz ).
These instructions use the following file:
Download the file.
Before the file can be downloaded, you must accept the license agreement. The archive binary can be installed by anyone (not only root users), in any location that you can write to. However, only the root user can install the JDK into the system location.
Change directory to the location where you would like the JDK to be installed, then move the .tar.gz archive binary to the current directory.
Unpack the tarball and install the JRE.
The Java Development Kit files are installed in a directory called jdk1.8.0_ version in the current directory.
Delete the .tar.gz file if you want to save disk space.
Installation of the 64-bit JRE on RPM-based Linux Platforms
This procedure installs the Java Runtime Environment (JRE) for 64-bit RPM-based Linux platforms, such as Red Hat and SuSE, using an RPM binary file ( .rpm ) in the system location. You must be root to perform this installation.
These instructions use the following file:
Download the file.
Before the file can be downloaded, you must accept the license agreement.
Become root by running su and entering the super-user password.
Uninstall any earlier installations of the JDK packages.
Install the package.
To upgrade a package:
Delete the .rpm file if you want to save disk space.
Exit the root shell.
There is no need to reboot.
Installation of the 32-bit JRE on Linux Platforms
This procedure installs the Java Runtime Environment (JRE) for 32-bit Linux, using an archive binary file ( .tar.gz ).
These instructions use the following file:
Download the file.
Before the file can be downloaded, you must accept the license agreement. The archive binary can be installed by anyone (not only root users), in any location that you can write to. However, only the root user can install the JRE into the system location.
Change directory to the location where you would like the JRE to be installed, then move the .tar.gz archive binary to the current directory.
Unpack the tarball and install the JRE.
The JRE files are installed in a directory called jre1.8.0_ version in the current directory.
Delete the .tar.gz file if you want to save disk space.
Installation of the 32-bit JRE on RPM-based Linux Platforms
This procedure installs the Java Runtime Environment (JRE) for 32-bit RPM-based Linux platforms, such as Red Hat and SuSE, using an RPM binary file ( .rpm ) in the system location. You must be root to perform this installation.
These instructions use the following file:
Download the file.
Before the file can be downloaded, you must accept the license agreement.
Become root by running su and entering the super-user password.
Uninstall any earlier installations of the JRE packages.
Install the package.
To upgrade a package:
Exit the root shell.
There is no need to reboot.
Delete the .rpm file if you want to save disk space.
Installation of Public Key on RPM-based Linux Platforms
Since JDK version 8, the JRE RPMs are signed with OL keys. Installation of these RPMs on Linux distributions other than OL gives a warning message indicating that security validation of the package fails. This indicates that the public key used to sign this RPM needs to be installed in the system. A sample warning message and the public key installation steps are as follows:
Sample Warning Message
Installation Steps
Download the key file from https://yum.oracle.com/RPM-GPG-KEY-oracle-ol7 using the following command:
Install the key using the following command:
sudo rpm —import RPM-GPG-KEY-oracle-ol7
Public key installation needs to be done only once. The key installation is persistent across reboots.
General Installation Notes
This topic describes general installation topics.
Root Access
Installing the software automatically creates a directory called jre1.8.0_ version . Note that if you choose to install the Java SE Runtime Environment into system-wide location such as /usr/jre , you must first become root to gain the necessary permissions. If you do not have root access, simply install the Java SE Runtime Environment into your home directory, or a subdirectory that you have permission to write to.
Overwriting Files
If you install the software in a directory that contains a subdirectory named jre 1.8.0_ version , the new software overwrites files of the same name in that jre 1.8.0_ version directory. Rename the old directory if it contains files you want to keep.
System Preferences
By default, the installation script configures the system such that the backing store for system preferences is created inside the JRE’s installation directory. If the JRE is installed on a network-mounted drive, it and the system preferences can be exported for sharing with Java runtime environments on other machines.
Источник
Установка Java в Ubuntu и Linux Mint
Что такое Java
Java — это язык программирования, разработанный компанией Sun Microsystems, которую потом купила компания Oracle.
Программы, написанные на Java обычно работают в различных операционных системах, то есть являются кроссплатформенными. Для запуска таких программ необходимо наличие в системе Виртуальной машины Java (Java Virtual Machine — JVM), то есть, проще говоря, наличие некоторых дополнительных компонентов, которые обеспечивают возможность запуска Java-программ в системе.
Обычно, когда говорят о том, что в Linux нужно установить Java, то имеют ввиду, что нужно установить Виртуальную машину Java, чтобы получить возможность запускать программы, написанные на Java.
Какие версии Java бывают и чем отличаются
Существует несколько реализаций Java для Linux. Самыми популярными являются OpenJDK и Oracle Java. В Linux обычно пользователь устанавливает одну из этих реализаций.
- Oracle Java — реализация Java для Linux от компании Oracle. В ней содержатся некоторые закрытые (проприетарные) компоненты и компоненты, которые защищены патентами.
- OpenJDK — реализация Java для Linux с открытым исходным кодом.
Обе версии вполне работоспособны и в Linux можно использовать любую из них. Но иногда, для некоторых приложений, рекомендуется использовать Oracle Java.
В Linux пакеты с Java представлены в двух редакциях:
- JRE — Java Runtime Environment — компоненты, предназначенные для запуска Java-программ в Linux.
- JDK — Java Development Kit — компоненты, предназначенные для запуска, компиляции и разработки Java-программ.
Какую версию устанавливать
Рядовому пользователю, которому нужно просто запускать Java-программы, обычно достаточно установить «OpenJDK JRE».
Если потребуется компиляция Java-программ, то нужно будет установить «OpenJDK JDK».
Рассмотрим, как установить Java в Ubuntu Linux. Абсолютно аналогично выполняется установка в Linux Mint и других дистрибутивах, основанных на Ubuntu.
Проверка версии Java
Чтобы проверить, установлена ли у вас уже в системе какая-либо версия Java, выполните в терминале команду:
Если Java установлена, то вы получите информацию о том, какие компоненты Java установлены в системе.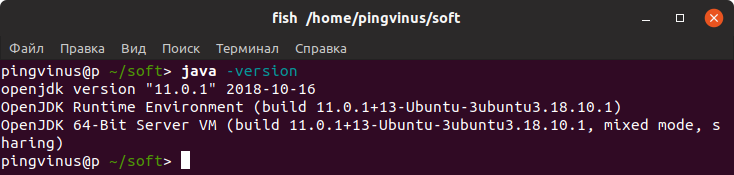
Установка OpenJDK
Установка OpenJDK JRE
Для установки OpenJDK JRE в Ubuntu Linux достаточно установить пакет default-jre. Для установки выполните в терминале команду:
Установка OpenJDK JDK
Если вы хотите установить OpenJDK JDK, то нужно установить пакет default-jdk (он также установит default-jre). Для установки выполните команду:
Установка OpenJDK определенной версии
Если вам нужно установить конкретную версию, то выполните одну из следующих команд. В репозиториях Ubuntu сейчас представлены OpenJDK версий 11 и 8.
После установки, можно проверить, какие компоненты Java установлены, выполнив команду:
Установка Oracle JDK
Установка Oracle JDK свежей версии
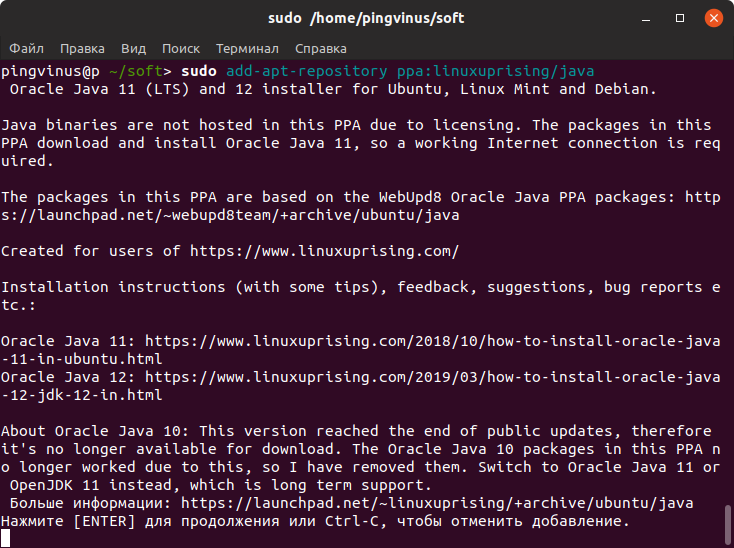
Свежую версию Oracle JDK можно установить, используя PPA-репозиторий, подготовленный проектом linuxuprising.
Сначала добавим PPA-репозиторий. Выполняем следующие команды. При выполнении первой команды появится информационное сообщение, нажмите Enter для продолжения.
Теперь выполним установку Oracle Java версии 12:
Во время установки нужно будет ознакомиться и принять лицензию:
Для установки Oracle Java версии 11 используйте команду:
Установка Oracle JDK старой версии
Если вам нужно установить Oracle JDK старой версии 8, то вы можете воспользоваться PPA-репозиторием, который подготовлен проектом webupd8. Для установки выполните в терминале следующие команды. При выполнении первой команды появится информационное сообщение, нажмите Enter для продолжения.
Как удалить Java
Если у вас установлены пакеты OpenJDK, то для их удаления используйте команду:
Или следующую команду, если требуется также удалить файлы конфигурации (полное удаление OpenJDK):
Для удаления Oracle Java используется команда:
Запуск Java-программ
Если Java установлена в Ubuntu Linux, то для запуска Java-программ обычно достаточно дважды щелкнуть по файлу программы. Он может иметь расширение .jar .
Для запуска .jar файлов из командной строки, выполните команду:
Заключение
Мы рассмотрели, какие версии Java бывают для Linux. Рассмотрели, как установить версию OpenJDK, а также версию Java от Oracle. Обычно начинающий пользователь вообще не понимает, что именно ему нужно установить. Поэтому краткое резюме: Если вам нужно просто запустить какую-нибудь Java-программу в Ubuntu Linux (Linux Mint и других подобных дистрибутивах), то устанавливайте OpenJDK JRE.
Источник


