- UNetbootin
- Features
- Using UNetbootin
- Supported Distributions
- Installing Other Distributions Using UNetbootin
- Distribution X isn’t on the list of supported distributions, will it work?
- UNetbootin isn’t able to download the distribution, what should I do?
- My USB stick isn’t booting, what should I do?
- My USB stick/hard drive isn’t detected, what should I do?
- How do I use UNetbootin from the command line?
- How does UNetbootin work, and what does it do?
- Where can I report bugs, submit patches, etc?
- Does UNetbootin have any spyware, viruses, trojans, or other malware?
- What translations are available, and how can I use them?
- Can I help translate?
- Removal Instructions (Applicable only to Hard Disk installs)
- Where’s the source code, and how can I compile or modify it?
- License
- Other open-source projects from the creators of UNetbootin
- HabitLab
- UNetbootin для Linux — обзор и установка отличного инструмента
- О UNetbootin
- Преимущества и недостатки UNetbootin
- Установка
- Видео
- Вывод
- Step-by-step | Install UNetbootin in Kali GNU/Linux
- UNetbootin Kali Linux — Installation
- 1. Launching Shell Emulator
- 2. Downloading UNetbootin
- 3. Accessing Target
- 4. Installing UNetbootin
- 5. Launching UNetbootin
- Contents
- The GNU+Linux Foundation
- Telegram Channel
- Telegram Channel
- Follow Us
- The GNU/Linux Free Software Phylosophy
- Spiritual Quote
- Creating an Installation USB Stick for Kali Linux
- Creating an Installation USB Stick for Kali Linux
UNetbootin
UNetbootin allows you to create bootable Live USB drives for Ubuntu and other Linux distributions without burning a CD.
You can either let UNetbootin download one of the many distributions supported out-of-the-box for you, or supply your own Linux .iso file.
Features
UNetbootin can create a bootable Live USB drive
It loads distributions either by downloading a ISO (CD image) files for you, or by using an ISO file you’ve already downloaded.
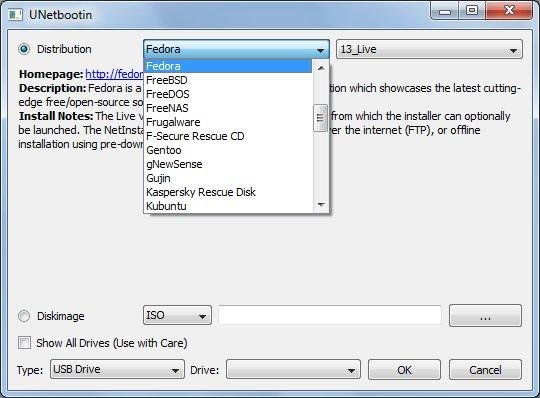
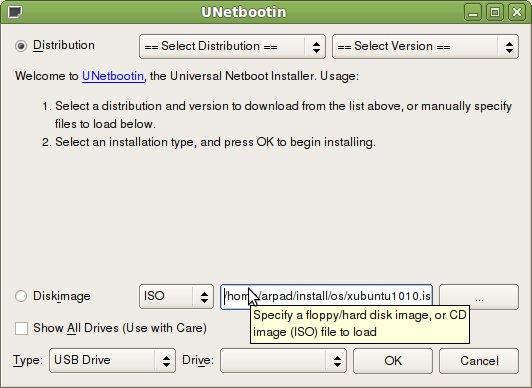
Using UNetbootin
Select an ISO file or a distribution to download, select a target drive (USB Drive or Hard Disk), then reboot once done. If your USB drive doesn’t show up, reformat it as FAT32.
If you used the «USB Drive» install mode: After rebooting, boot from the USB drive. On PCs, this usually involves pressing a button such as Esc or F12 immediately after you turn on your computer, while on Macs, you should hold the Option key before OSX boots.
If you used the «Hard Disk» install mode: After rebooting, select the UNetbootin entry from the Windows Boot Menu.
Supported Distributions
UNetbootin has built-in support for automatically downloading and loading the following distributions, though installing other distributions is also supported:
UNetbootin can also be used to load various system utilities, including:
Installing Other Distributions Using UNetbootin
Download and run UNetbootin, then select the «disk image» option and supply it with an ISO (CD image).
UNetbootin doesn’t use distribution-specific rules for making your live USB drive, so most Linux ISO files should load correctly using this option. However, not all distributions support booting from USB, and some others require extra boot options or other modifications before they can boot from USB drives, so these ISO files will not work as-is. Also, ISO files for non-Linux operating systems have a different boot mechanism, so don’t expect them to work either.
Distribution X isn’t on the list of supported distributions, will it work?
UNetbootin isn’t able to download the distribution, what should I do?
Download the ISO straight from the website, then provide it to UNetbootin via the diskimage option.
My USB stick isn’t booting, what should I do?
Reformat the USB drive as FAT32, then use UNetbootin again to put your distribution on the USB stick.
My USB stick/hard drive isn’t detected, what should I do?
Reformat the USB drive as FAT32, then use UNetbootin again. If it still isn’t showing up, use the targetdrive command line option.
How do I use UNetbootin from the command line?
How does UNetbootin work, and what does it do?
Where can I report bugs, submit patches, etc?
First, make sure you are using the latest version available on this website.
» See Github Issues to file a bug report.
» See Github Pull Requests to submit a patch.
Does UNetbootin have any spyware, viruses, trojans, or other malware?
No; though some anti-virus products may raise «Trojan.generic» warnings due to the auto-uninstall feature, these are false positives. Just make sure you obtain UNetbootin from this site, not some shady third-party source. If you’re absolutely paranoid, you can check the source code and compile it yourself.


What translations are available, and how can I use them?
A number of translations are included in the latest UNetbootin release. See the Translations Page for the status of each.
If a translation corresponding to your system’s native language has already been included into UNetbootin, it should automatically load the corresponding translation. Alternatively, you can force the language to use via the lang=es command-line option, where you substitute es with the the 2-letter ISO 639-1 code for your language.
Can I help translate?
If you’d like to help translate this website, join the project on Transifex, then edit translations either on this website or on Transifex.
If you’d like to help translate the UNetbootin program itself, please use Launchpad Translations. If you are new to Launchpad, you will first have to join the corresponding Ubuntu Translators group for the language you intend to translate. For information on using the Launchpad Translations system, see the translations help page.
Removal Instructions (Applicable only to Hard Disk installs)
If using Windows, UNetbootin should prompt you to remove it the next time you boot into Windows. Alternatively, you can remove it via Add/Remove Programs in the Control Panel.
If using Linux, re-run the UNetbootin executable (with root priveledges), and press OK when prompted to uninstall.
Removal is only required if you used the «Hard Drive» installation mode; to remove the bootloader from a USB drive, back up its contents and reformat it.
Uninstalling UNetbootin simply removes the UNetbootin entry from your boot menu; if you installed an operating system to a partition using UNetbootin, removing UNetbootin will not remove the OS.
To manually remove a Linux installation, you will have to restore the Windows bootloader using «fixmbr» from a recovery CD, and use Parted Magic to delete the Linux partition and expand the Windows partition.
Where’s the source code, and how can I compile or modify it?
Source code is on Github, though you may prefer a tarball of the latest release.
License
UNetbootin was created and written by Geza Kovacs (Github: gkovacs, Launchpad: gezakovacs, contact info).
Translators are listed on the translations page.
UNetbootin is licensed under the GNU General Public License (GPL) Version 2 or above. Site materials, documentation, screenshots, and logos are licensed as Creative Commons Attribution-Share-Alike 3.0.
Other open-source projects from the creators of UNetbootin

HabitLab
A Chrome extension to help you waste less time online (on sites like Facebook, Youtube, etc) by experimenting with different interventions (news feed blockers, comment hiders, and more) to find the ones that work best for you.
Источник
UNetbootin для Linux — обзор и установка отличного инструмента
О UNetbootin
UNetbootin (Universal Netbook Installer) — это утилита, используемая для создания Live USB-накопителей, которые могут устанавливать дистрибутивы Linux.
Это ПО использует существующий образ диска. Кроме того, существует возможность загрузки поддерживаемого дистрибутив или системную утилиту. Дополнительно, UNetboot поддерживает много дистрибутивов.
Основные особенности утилиты:
- Неразрушающая установка с использованием Syslinux.
- Широкая поддержка основных дистрибутивов Linux
- Загружает системные утилиты, такие как:
Parted Magic
SystemRescueCD
Super Grub Disk
Backtrack
Ophcrack
Gujin
Smart Boot Manager
другие - Другие ОС загружаются через предварительно загруженный образ ISO или файлы образа флешки или жесткого диска.
- Автоматически обнаруживает все съемные устройства.
- Поддерживает постоянство LiveUSB (сохранение файлов при перезагрузке; эта функция применима только к Ubuntu).
- Ребрендинг и адаптация к конкретному дистрибутиву с использованием системы плагинов или серии операторов.
Перечень дистрибутивов с встроенной поддержкой UNetbootin:
- Ubuntu
- Debian
- Linux Mint
- openSUSE
- Arch Linux
- Damn Small Linux
- Puppy Linux
- SliTaz
- gNewSense
- FreeBSD
- NetBSD
- Fedora
- PCLinuxOS
- Sabayon Linux
- Gentoo
- MEPIS
- Zenwalk
- Slax
- Dreamlinux
- Elive
- CentOS
- Mandriva
- FaunOS
- Frugalware Linux
- xPUD


Преимущества и недостатки UNetbootin
- Во-первых, поддерживает распространенные дистрибутивы для скачивания. Кроме того, инструмент предлагает простой интерфейс, в котором можно автоматически загружать практически любую ОС. Это избавляет пользователей от просмотра веб-страницы в поисках загрузки.
- Во-вторых, UNetbootin является кроссплатформенным, означает, что его можно использовать на любом компьютере. Кроме того, это универсальный инструмент, поскольку его можно рекомендовать всем, не беспокоясь о том, какую операционную систему они используют.
- В-третьих, утилита автоматически обнаруживает USB-накопители в компьютере. В результате, эта функция защищает неопытных пользователей от случайного повреждения жесткого диска.
- Во-первых, существует вероятность того, что в процессе ваш USB будет поврежден.
- Во-вторых, возникают проблемы на autorun.inf при установке нескольких дистрибутивов.
Установка
- sudo add-apt-repository ppa:gezakovacs/ppa
- Затем sudo apt-get update
- sudo dpkg —configure -a и sudo apt-get install unetbootin


Видео
Данное видео посвящено установке и записи образов на USB двумя способами.
Вывод
UNetbootin (Universal Network Installer) — это отличный инструмент, который упрощает создание загрузочных USB-дисков. Еще одна из особенностей, он взаимодействует с подавляющим большинством дистрибутивов Linux.
Надеемся что приведенная выше инструкция поможет пользователям познакомиться с замечательным инструментом. Спасибо за внимание.
Источник
Step-by-step | Install UNetbootin in Kali GNU/Linux
UNetbootin Kali Linux — Installation
1. Launching Shell Emulator
Open a Terminal window
(Press “Enter” to Execute Commands)

2. Downloading UNetbootin
How to Download UNetbootin for Kali GNU/Linux
3. Accessing Target
So to Access the Target Directory
First, Try:
(But if yuo are in Trouble to Find it out on Terminal then See: How to Access Downloads Folder from Browser.)
To Verify it’s there List the Directory Contents with:
4. Installing UNetbootin
Then to Install UNetbootin on Kali Linux
First, Give Execution Permissions with:
Set the SuperUser as Owner with:
Next Relocate it:
Again, Make a Symlink to Easy Launching from Shell:
5. Launching UNetbootin
Finally, Launch & Enjoy UNetbootin Free
From Shell Simply like:
How to Create UNetbootin App Launcher on Main Menu

So Now I’m truly Happy if My Guide could Help You to Install UNetbootin on Kali Linux!
Contents
The GNU+Linux Foundation
Telegram Channel
Telegram Channel
Follow Us
The GNU/Linux Free Software Phylosophy

Spiritual Quote
“The five colors can blind one’s eyes.
The five tones can deafen one’s ears.
The five flavors can dull one’s taste buds.
The pursuit of pleasures can derange one’s mind.
The hard-to-get valuables can distort one’s behavior.
Therefore, a saint cultivates himself with virtues and does not indulge himself in sensory
pleasures.
He rejects those outer temptations and chooses this True Nature.”
Источник
Creating an Installation USB Stick for Kali Linux
Creating an Installation USB Stick for Kali Linux
Kali Linux is an ultra-powerful security tool. I use it extensively when doing Wi-Fi penetration testing, network security evaluations, and security audit tasks. It is freely downloadable from Kali.org as an ISO.
I want to get the best possible performance out of Kali. To do that, I typically create a bootable installation on a USB stick and then install from the stick to a dedicated hard disk partition. There’s tremendous reusability value in preparing an installation stick, as you can use a single stick to install Kali Linux whenever and wherever you need it.
In this blog I’ll show you how to prepare the USB stick.
Necessary Supplies Before You Begin
You’ll need a few things to get started:
- The current Kali Linux ISO from Kali Linux Images. Download either the 32-bit or 64-bit version depending on the hardware you’re eventually installing Kali on.
- UNetbootin software from UNetbootin – Homepage and Downloads. Download the latest version for the platform you’re currently running – versions are available for Windows, Mac OS X, and several flavors of Linux including Debian, Ubuntu, Fedora, and Arch.
- A blank USB stick. Although you can get away with a 4GB stick, I prefer an 8GB USB 3 stick for speed and future expansion. Faster USB memory speeds mean faster installations, but even a slowpoke stick will be fast enough for setup.
- A running computer. Whatever computer you’re using to download the Kali ISO and UNetbootin is fine. You’ll need a computer to prepare the USB stick prior to installation. This can be the same computer that you eventually install Kali Linux on, but it doesn’t have to be.
Now it’s time to setup Kali on the stick!
Setting Up Kali On the USB Stick
I’m demonstrating this on Windows 7, so your mileage may vary on OS X or Linux.
First, connect the USB stick to the computer. It should go without saying that things go faster when you plug a USB 3 stick into a USB 3 port, but a mismatch won’t hurt anything.
Now run UNetbootin.exe You don’t need to install it on Windows, just double-click the executable.
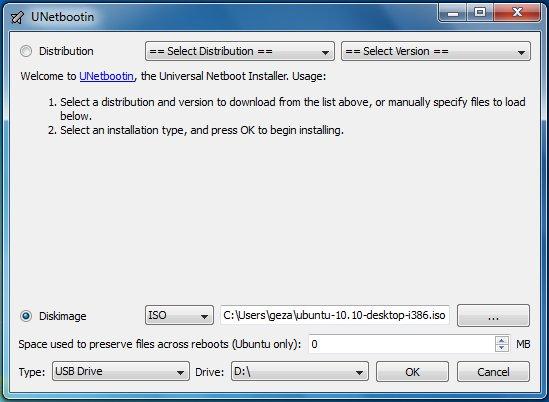
Click the Diskimage radio button and specify the Kali Linux ISO that you downloaded.
Verify that Type shows USB Drive and the Drive is set to your target USB stick. These settings are shown in Figure 1.
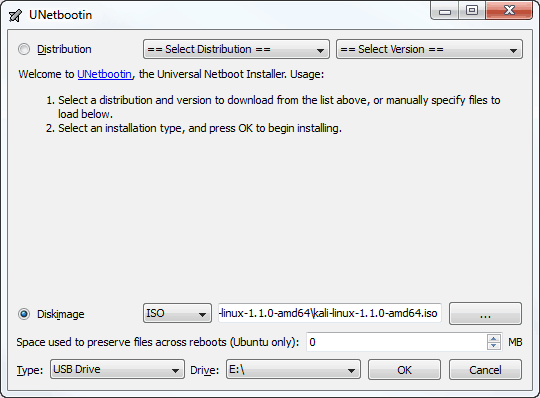
Figure 1. The configured UNetbootin screen.
Now click OK to start the fun! You may receive an error message depending on the files already on the USB stick. For example, when overwriting a previous Kali Linux image, this dialog box appears for me:
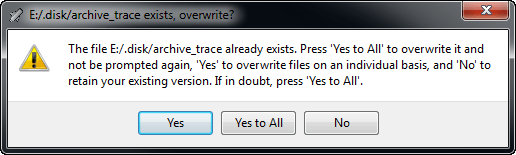
Figure 2. Confirmation before destruction.
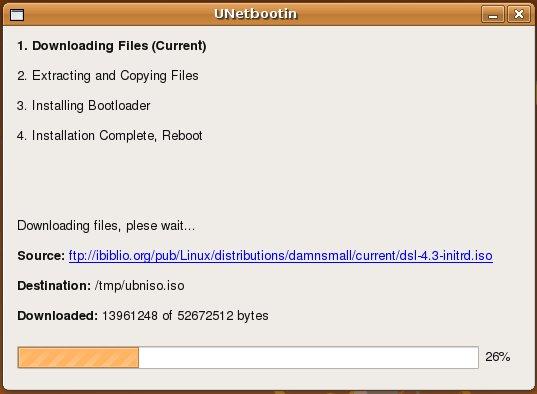
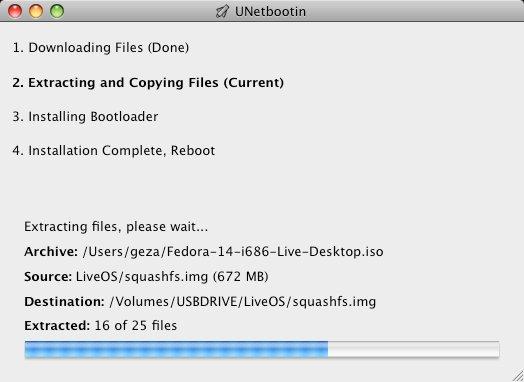
Once I click Yes to All, UNetbootin shows the progress as shown in Figure 3.
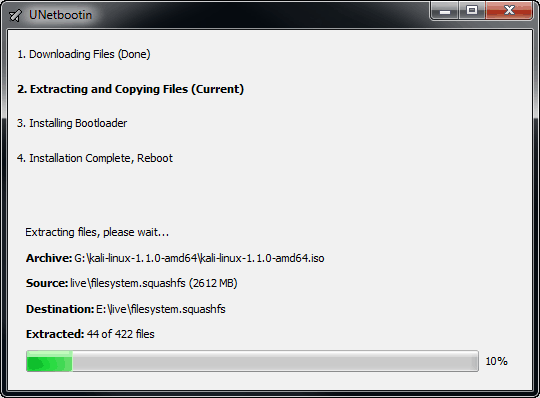
Figure 3. Confirmation before destruction.
That’s about it. The process takes a variable amount of time depending on computer load, size of the ISO, and speed of the USB stick. Eventually it will successfully complete and yield a bootable drive.
Mike Danseglio -CISSP / MCSE / CEH
Interface Technical Training – Technical Director and Instructor
Mike Danseglio teaches Security classes at Interface Technical Training. His classes can be attended in Phoenix, Arizona or online from anywhere in the world with RemoteLive.
Источник


