- Установка Visual Studio для Mac 2019
- Требования
- Инструкции по установке
- Установка Visual Studio для Mac в среде, защищенной брандмауэром или прокси-сервером
- Следующие шаги
- Android
- Xamarin.Forms
- Приложения .NET Core, веб-приложения ASP.NET Core, разработка игр Unity
- Visual Studio Code on macOS
- Installation
- Launching from the command line
- Alternative manual instructions
- Touch Bar support
- Mojave privacy protections
- Updates
- Preferences menu
- Next steps
- Common questions
- Why do I see «Visual Studio Code would like access to your calendar.»
- VS Code fails to update
- Does VS Code run on Mac M1 machines?
- Разработка на Mac в Visual Studio Code
- Как установить Visual Studio Code
- Какие возможности предоставляет среда разработки
- Code snippets
- Интеграция с GIT
- Интеграция с Visual Studio Online
- Интеграция с GitHub
- Интеграция с Unity3D
- Задачи
- Отладка в Visual Studio Code
- Публикация сайта в Microsoft BAzure
- JavaScript
- От JavaScript к TypeScript
- Setting up Visual Studio Code
- Cross platform
- Update cadence
- Insiders nightly build
- Portable mode
- Additional components
- Extensions
- Next steps
- Common questions
- What are the system requirements for VS Code?
- How big is VS Code?
- How do I know which version I’m running?
- Why is VS Code saying my installation is Unsupported?
- How can I do a ‘clean’ uninstall of VS Code?
Установка Visual Studio для Mac 2019
Чтобы приступить к разработке собственных кроссплатформенных приложений .NET в macOS, установите Visual Studio 2019 для Mac. Для этого выполните следующие действия.
Требования
- Компьютер Mac с macOS High Sierra 10.13 или более поздней версии.
Чтобы создавать приложения Xamarin для iOS или macOS, вам также потребуется:
- Компьютер Mac, совместимый с последней версией Xcode. См. документацию Apple по минимальным требованиям.
- Последняя версия Xcode. Если компьютер Mac несовместим с последней версией, можно использовать более старую версию Xcode.
- Идентификатор Apple ID. Если у вас нет идентификатора Apple ID, его можно создать на сайте https://appleid.apple.com. Он необходим для установки приложения Xcode и входа в него.
Инструкции по установке
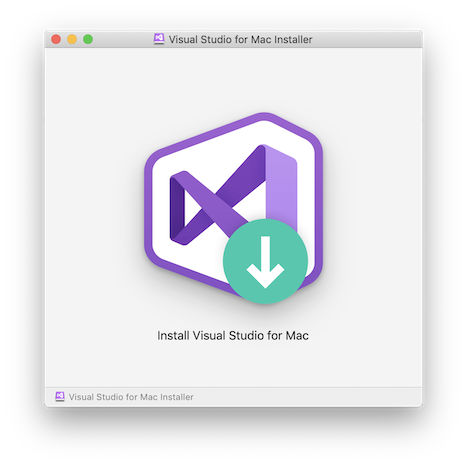
После завершения загрузки щелкните VisualStudioforMacInstaller.dmg, чтобы подключить установщик, и запустите его, дважды щелкнув значок стрелки:
Может появиться окно с предупреждением о том, что приложение загружено из Интернета. Нажмите кнопку Открыть.
Подождите, пока программа установки проверяет компьютер:

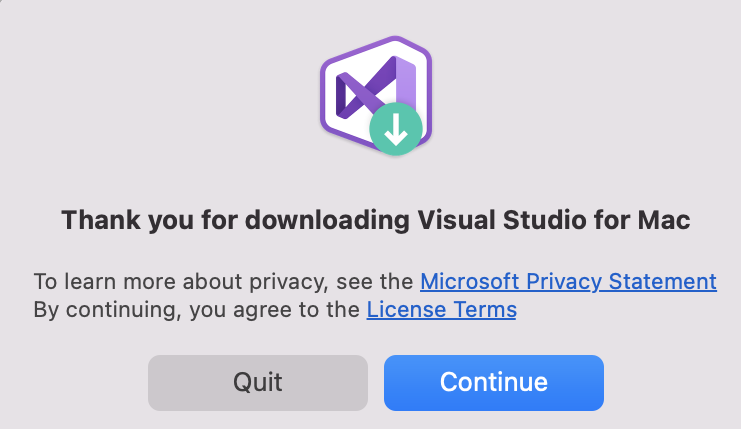
Появится оповещение, предлагающее принять условия лицензии и заявления о конфиденциальности. Перейдите по ссылкам, чтобы ознакомиться с ними, а затем нажмите клавишу Продолжить, если вы согласны с условиями:
Появится список доступных рабочих нагрузок. Выберите нужные компоненты:
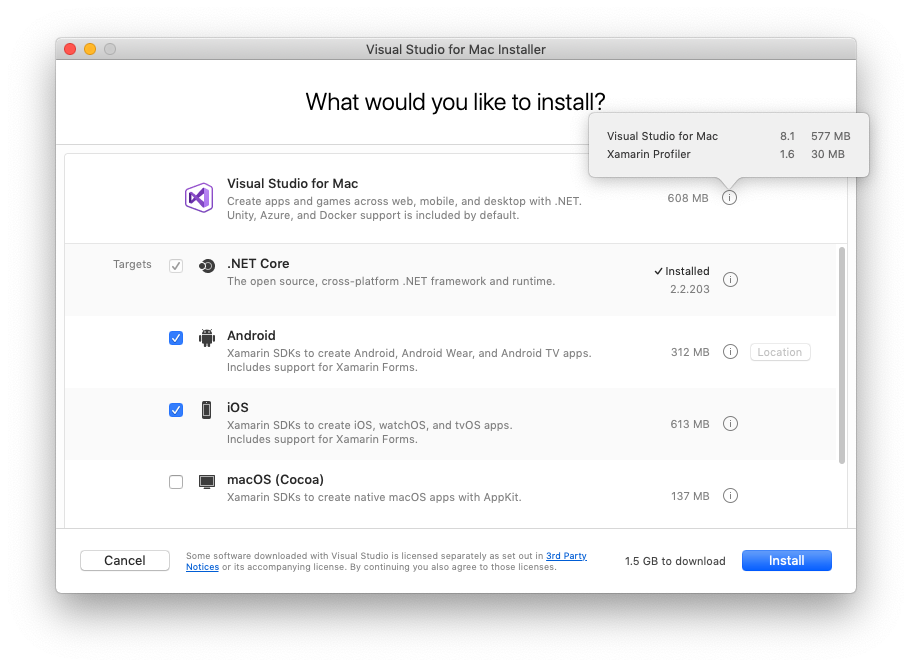
Если вы не хотите устанавливать все платформы, выберите нужные с помощью приведенных ниже рекомендаций.
| Тип приложения | целевого объекта | Выбранное | Примечания |
|---|---|---|---|
| Приложения, использующие Xamarin | Xamarin.Forms | Выберите платформы Android и iOS. | Потребуется установить Xcode. |
| Только iOS | Выберите платформу iOS. | Потребуется установить Xcode. | |
| Только Android | Выберите платформу Android. | Обратите внимание, что вам также нужно выбрать соответствующие зависимости. | |
| Только Mac | Выберите платформу macOS (Cocoa) . | Потребуется установить Xcode. | |
| Приложения .NET Core | Выберите платформу .NET Core. | ||
| Веб-приложения ASP.NET Core | Выберите платформу .NET Core. | ||
| Функции Azure | Выберите платформу .NET Core. | ||
| Разработка кроссплатформенных игр Unity | Не нужно устанавливать дополнительные платформы, кроме Visual Studio для Mac. | Дополнительные сведения об установке расширения Unity вы найдете в руководстве по установке Unity. |
Выбрав нужные параметры, нажмите кнопку Установить.
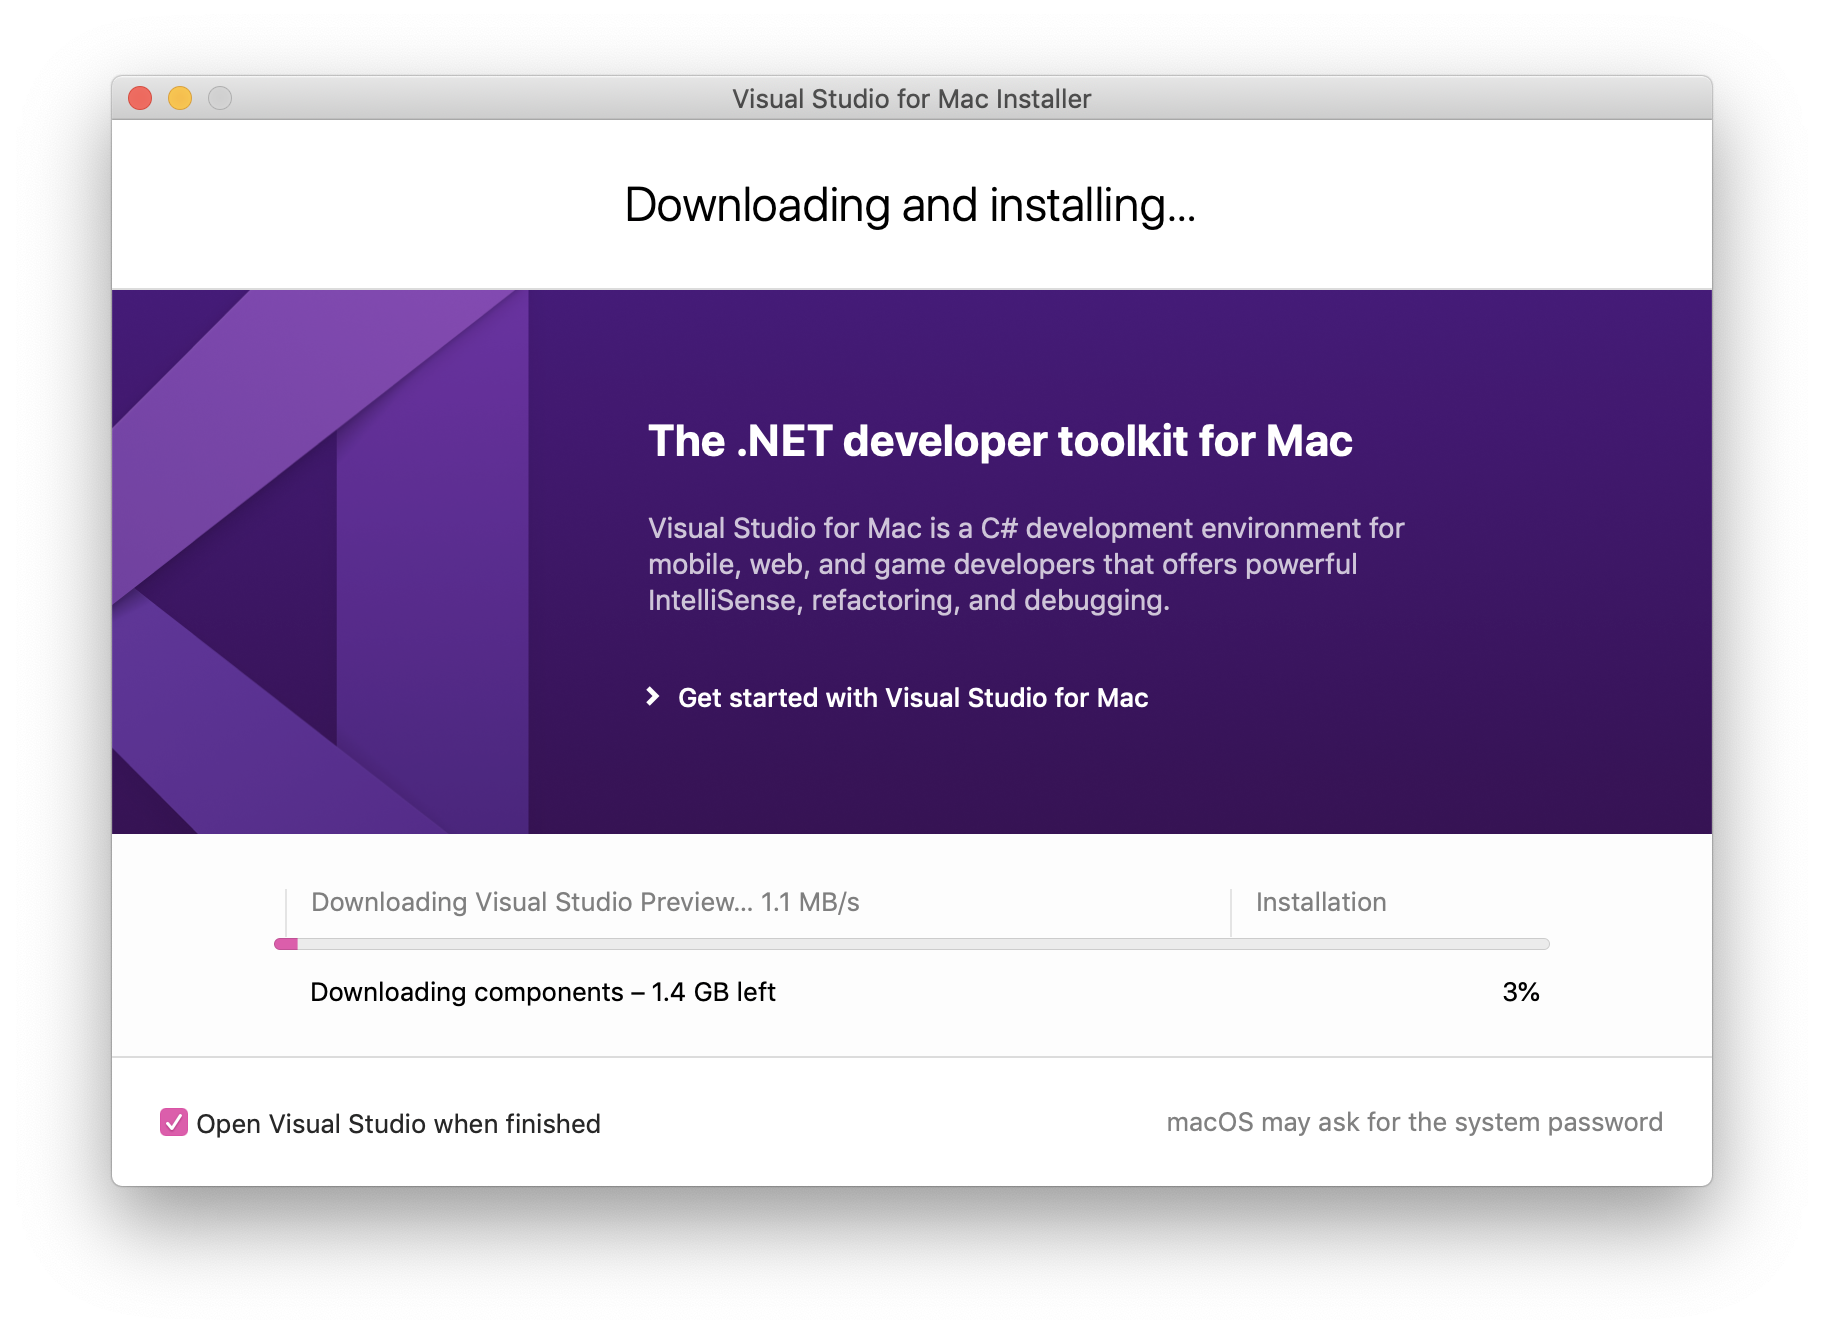
Установщик будет отображать ход выполнения, по мере загрузки и установки Visual Studio для Mac и выбранных рабочих нагрузок. Вам будет предложено ввести пароль, чтобы предоставить привилегии, необходимые для установки.
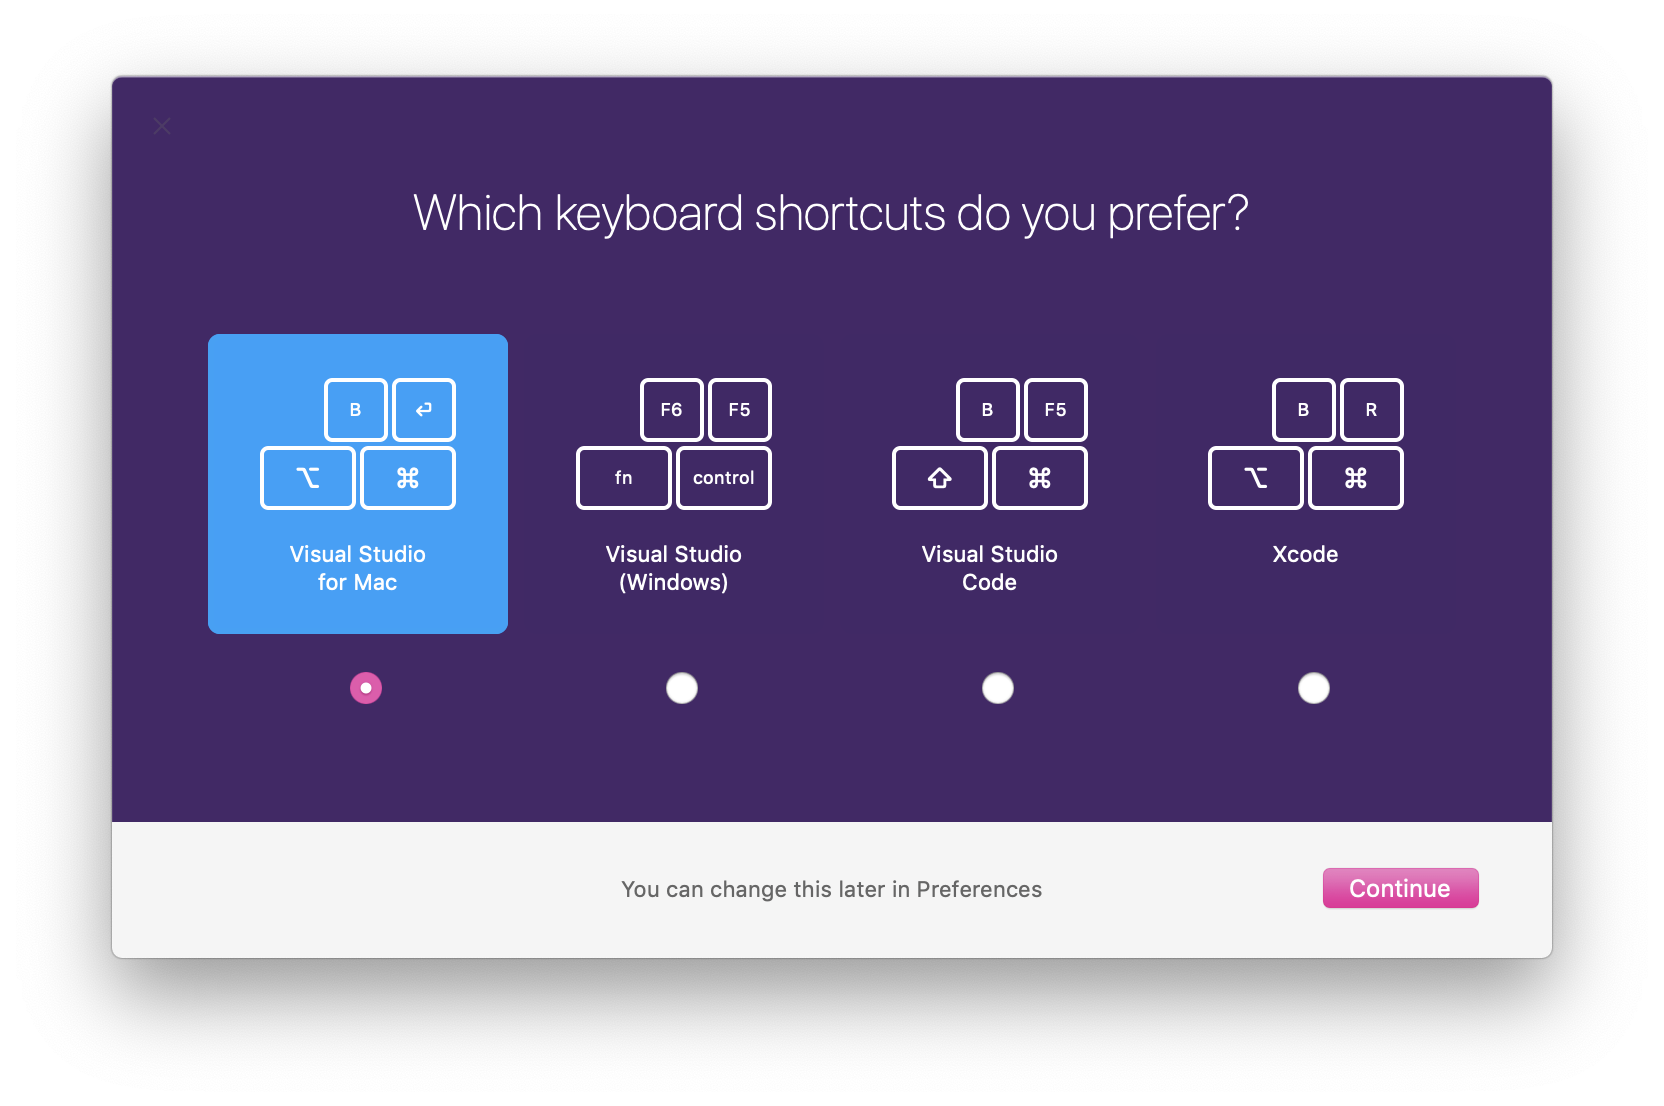
После установки Visual Studio для Mac предложит настроить личные параметры, выполнив вход и выбрав нужные настраиваемые сочетания клавиш.

Если при установке в корпоративной среде возникают проблемы с сетью, см. инструкции по установке за брандмауэром или прокси-сервером.
Сведения об изменениях см. в заметках о выпуске.
Если вы решили не устанавливать платформу или инструмент в рамках исходной установки (отменив выбор этого элемента на шаге 6), позже для установки этих компонентов потребуется снова запустить установщик.
Установка Visual Studio для Mac в среде, защищенной брандмауэром или прокси-сервером
Для установки Visual Studio для Mac в среде, защищенной брандмауэром, необходимо сделать доступными ряд конечных точек, чтобы разрешить скачивание необходимых средств и обновлений ПО.
Настройте сеть, разрешив доступ к следующим расположениям:
Следующие шаги
Установка Visual Studio для Mac позволяет перейти к написанию кода для приложений. Следующие руководства помогут вам в создании и развертывании проектов.
- Привет, iOS
- Подготовка устройства (для запуска приложения на устройстве).
Android
Xamarin.Forms
Создание собственных кросс-платформенных приложений с помощью Xamarin.Forms:
Приложения .NET Core, веб-приложения ASP.NET Core, разработка игр Unity
Другие рабочие нагрузки описаны на этой странице.
Источник
Visual Studio Code on macOS
Installation
- Download Visual Studio Code for macOS.
- Open the browser’s download list and locate the downloaded archive.
- Extract the archive contents. Use double-click for some browsers or select the ‘magnifying glass’ icon with Safari.
- Drag Visual Studio Code.app to the Applications folder, making it available in the macOS Launchpad.
- Add VS Code to your Dock by right-clicking on the icon to bring up the context menu and choosing Options, Keep in Dock.
Launching from the command line
You can also run VS Code from the terminal by typing ‘code’ after adding it to the path:
- Launch VS Code.
- Open the Command Palette ( Cmd+Shift+P ) and type ‘shell command’ to find the Shell Command: Install ‘code’ command in PATH command.

- Restart the terminal for the new $PATH value to take effect. You’ll be able to type ‘code .’ in any folder to start editing files in that folder.
Note: If you still have the old code alias in your .bash_profile (or equivalent) from an early VS Code version, remove it and replace it by executing the Shell Command: Install ‘code’ command in PATH command.
Alternative manual instructions
Instead of running the command above, you can manually add VS Code to your path, to do so run the following commands:
Start a new terminal to pick up your .bash_profile changes.
Note: The leading slash \ is required to prevent $PATH from expanding during the concatenation. Remove the leading slash if you want to run the export command directly in a terminal.
Note: Since zsh became the default shell in macOS Catalina, run the following commands to add VS Code to your path:
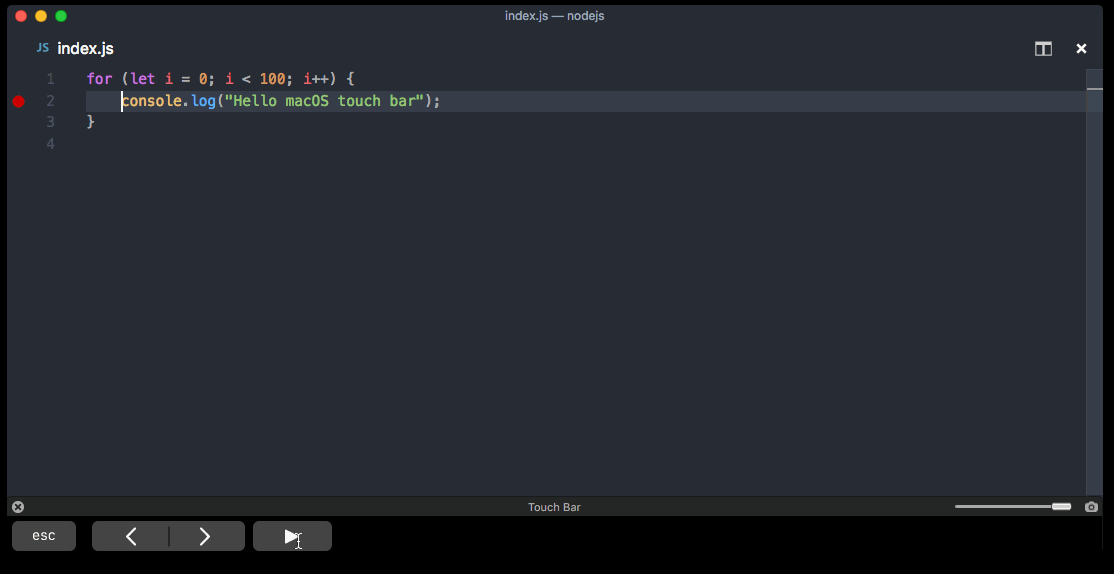
Touch Bar support
Out of the box VS Code adds actions to navigate in editor history as well as the full Debug tool bar to control the debugger on your Touch Bar:
Mojave privacy protections
After upgrading to macOS Mojave version, you may see dialogs saying «Visual Studio Code would like to access your
Updates
VS Code ships monthly releases and supports auto-update when a new release is available. If you’re prompted by VS Code, accept the newest update and it will get installed (you won’t need to do anything else to get the latest bits).
Note: You can disable auto-update if you prefer to update VS Code on your own schedule.
Preferences menu
You can configure VS Code through settings, color themes, and custom keybindings available through the Code > Preferences menu group.
You may see mention of File > Preferences in documentation, which is the Preferences menu group location on Windows and Linux. On a macOS, the Preferences menu group is under Code, not File.
Next steps
Once you have installed VS Code, these topics will help you learn more about VS Code:
- Additional Components — Learn how to install Git, Node.js, TypeScript, and tools like Yeoman.
- User Interface — A quick orientation around VS Code.
- User/Workspace Settings — Learn how to configure VS Code to your preferences settings.
Common questions
Why do I see «Visual Studio Code would like access to your calendar.»
If you are running macOS Mojave version, you may see dialogs saying «Visual Studio Code would like to access your
VS Code fails to update
If VS Code doesn’t update once it restarts, it might be set under quarantine by macOS. Follow the steps in this issue for resolution.
Does VS Code run on Mac M1 machines?
Yes, VS Code supports macOS ARM64 builds that can run on Macs with the Apple M1 chip. You can install the Universal build, which includes both Intel and Apple Silicon builds, or one of the platform specific builds.
Источник
Разработка на Mac в Visual Studio Code

Visual Studio Code – это новый инструмент разработки приложений на разных платформах. Visual Studio Code поддерживает множество языков программирования, таких как C#, TypeScript, JavaScript, и различные полезные возможности, например, интеграция с системами контроля версий, отладка приложений и другое.
Также важно, что Visual Studio Code работает с технологиями с открытым кодом, что может понравиться многим разработчикам.
Мы подготовили для вас серию видео, где расскажем о работе с Visual Studio Code с использованием разных языков программирования и интеграции с Git, Visual Studio Online и Unity3D.
Как установить Visual Studio Code
Какие возможности предоставляет среда разработки
В данной среде разработки вы можете работать с отдельными файлами и каталогами. Это значит, что для открытия проекта нужно открыть каталог, в котором находится проект. При необходимости создания нового проекта вы можете просто создать новый каталог и открыть его в Visual Studio Code.
Visual Studio Code определяет, на каком языке язык программирования написан код, и показывает разметку для нескольких поддерживаемых языков, их больше 30. Весь список языков, которые поддерживаются, вы можете найти по данной ссылке.
Code snippets
В Visual Studio Code вы можете вставлять вставлять заранее заготовленные блоки кода, которые можно снабжать параметрами.
Интеграция с GIT
Из этого видео вы узнаете, как установить GIT и пользоваться его локальным хранилищем.
Интеграция с Visual Studio Online
Visual Studio Online – один из популярных провайдеров для Git.
Интеграция с GitHub
Для тех же, кто любит использовать GitHub в качестве провайдера для Git, мы также подготовили инструкцию.
Интеграция с Unity3D
Как интегрировать Visual Studio Code и Unity plugin.
Задачи
Задачи в Visual Studio Code позволяют выполнять любые команды и смотреть результаты работы прямо из среды разработки. Таким образом, могут быть использованы внешние компиляторы, отладчики, средства тестирования.
Отладка в Visual Studio Code
С помощью Visual Studio Code вы можете осуществлять отладку для Node.js проектов и для проектов на Mono. В видео-примере показана работа отладчика на примере интеграции Unity и Visual Studio Code.
Публикация сайта в Microsoft BAzure
Интерфейс Visual Studio Community может быть интегрирован с Azure, что облегчит процесс развертывания веб-сайтов в облаке.
JavaScript
Если вы интересуетесь разработкой веб-приложений, Visual Studio Code также предоставляет возможность работать с JavaScript, Typescript и Node.js – об этом в следующем видео.
От JavaScript к TypeScript
Язык JavaScript очень популярен, однако имеет ряд ограничений. Этому языку не хватает статических типов, классов, интерфейсов и других атрибутов современных языков. В связи с этим нахождение ошибок становится сложным.
По этой причине лучше использовать надстройки, такие как TypeScript, CoffeScript или такие системы, как Dart.
Из этого видео вы больше узнаете о TypeScript и его использовании в редакторе Visual Studio Code.
Источник
Setting up Visual Studio Code
Getting up and running with Visual Studio Code is quick and easy. It is a small download so you can install in a matter of minutes and give VS Code a try.
Cross platform
VS Code is a free code editor, which runs on the macOS, Linux, and Windows operating systems.
Follow the platform-specific guides below:
VS Code is lightweight and should run on most available hardware and platform versions. You can review the System Requirements to check if your computer configuration is supported.
Update cadence
VS Code releases a new version each month with new features and important bug fixes. Most platforms support auto updating and you will be prompted to install the new release when it becomes available. You can also manually check for updates by running Help > Check for Updates on Linux and Windows or running Code > Check for Updates on macOS.
Note: You can disable auto-update if you prefer to update VS Code on your own schedule.
Insiders nightly build
If you’d like to try our nightly builds to see new features early or verify bug fixes, you can install our Insiders build. The Insiders build installs side-by-side with the monthly Stable build and you can freely work with either on the same machine. The Insiders build is the same one the VS Code development team uses on a daily basis and we really appreciate people trying out new features and providing feedback.
Portable mode
Visual Studio Code supports Portable mode installation. This mode enables all data created and maintained by VS Code to live near itself, so it can be moved around across environments, for example, on a USB drive. See the VS Code Portable Mode documentation for details.
Additional components
VS Code is an editor, first and foremost, and prides itself on a small footprint. Unlike traditional IDEs that tend to include everything but the kitchen sink, you can tune your installation to the development technologies you care about. Be sure to read the Additional Components topic after reading the platform guides to learn about customizing your VS Code installation.
Extensions
VS Code extensions let third parties add support for additional:
Extensions integrate into VS Code’s UI, commands, and task running systems so you’ll find it easy to work with different technologies through VS Code’s shared interface. Check out the VS Code extension Marketplace to see what’s available.
Next steps
Once you have installed and set up VS Code, these topics will help you learn more about VS Code:
- Additional Components — Learn how to install Git, Node.js, TypeScript, and tools like Yeoman.
- User Interface — A quick orientation to VS Code.
- Basic Editing — Learn about the powerful VS Code editor.
- Code Navigation — Move quickly through your source code.
- Debugging — Debug your source code directly in the VS Code editor.
- Proxy Server Support — Configure your proxy settings.
If you’d like to get something running quickly, try the Node.js tutorial walkthrough that will have you debugging a Node.js web application with VS Code in minutes.
Common questions
What are the system requirements for VS Code?
How big is VS Code?
VS Code is a small download ( New Project dialog or pre-installed project templates. You’ll need to add additional components and scaffolders depending on your development interests. With scaffolding tools like Yeoman and the multitude of modules available through the npm package manager, you’re sure to find appropriate templates and tools to create your projects.
How do I know which version I’m running?
On Linux and Windows, choose Help > About. On macOS, use Code > About Visual Studio Code.
Why is VS Code saying my installation is Unsupported?
VS Code has detected that some installation files have been modified, perhaps by an extension. Reinstalling VS Code will replace the affected files. See our FAQ topic for more details.
How can I do a ‘clean’ uninstall of VS Code?
If you want to remove all user data after uninstalling VS Code, you can delete the user data folders Code and .vscode . This will return you to the state before you installed VS Code. This can also be used to reset all settings if you don’t want to uninstall VS Code.
The folder locations will vary depending on your platform:
- Windows — Delete %APPDATA%\Code and %USERPROFILE%\.vscode .
- macOS — Delete $HOME/Library/Application Support/Code and
/.vscode .
Linux — Delete $HOME/.config/Code and
Источник


