- Обновление Microsoft Defender для установок операционной системы Windows
- Аннотация
- Сведения о версии
- Сведения о пакете
- Известные проблемы в этом обновлении
- Сведения об обновлении
- Получение обновления
- Средство обновления пакета
- Применение этого обновления
- Как удалить или откатить это обновление
- Как перечислить сведения об установленном обновлении
- Ссылки
- Антивирус Windows Defender в Windows Server 2016
- Графический интерфейс Windows Defender
- Удаление антивируса Windows Defender в Windows Server 2016
- Управление Windows Defender с помощью команд PowerShell
- Исключения антивируса Windows Defender
- Обновление антивируса Windows Defender
- Microsoft Defender Antivirus on Windows Server
- The process at a glance
- Enable the user interface on Windows Server
- Turn on the GUI using the Add Roles and Features Wizard
- Turn on the GUI using PowerShell
- Install Microsoft Defender Antivirus on Windows Server
- Use the Add Roles and Features Wizard
- Use PowerShell
- Verify Microsoft Defender Antivirus is running
- Update antimalware Security intelligence
- Submit samples
- Submit a file
- Enable automatic sample submission
- Configure automatic exclusions
- Need to set Microsoft Defender Antivirus to passive mode?
- Set Microsoft Defender Antivirus to passive mode using a registry key
- Disable Microsoft Defender Antivirus using the Remove Roles and Features wizard
- Turn off the Microsoft Defender Antivirus user interface using PowerShell
- Are you using Windows Server 2016?
Обновление Microsoft Defender для установок операционной системы Windows
Аннотация
Первые часы развертывания Windows могут стать уязвимыми из-за разрыва защиты Защитника Майкрософт. Это потому, что изображения установок ОС могут содержать устаревшие бинариусы программного обеспечения для антивирусной программы.
Устройства, на которых развернуты эти развертывания, не будут полностью защищены до тех пор, пока они не получат первое обновление по антивирусной программе. Рекомендуем регулярно обновлять образы установок ОС в Microsoft Defender, чтобы обновить их и свести к минимуму этот пробел в защите в новых развертываниях.
В этой статье описан пакет обновления для Microsoft Defender в изображениях установки ОС (WIM и VHD-файлах). Эта функция поддерживает следующие изображения установки ОС:
Windows 10 (корпоративные, профессиональные и домашние выпуски)
Windows Server 2019
Windows Server 2016
Сведения о версии
После выпуска новой версии пакета поддержка предыдущих двух версий будет снижена только до технической поддержки.
Версии, предшествующие предыдущим двум, больше не будут поддерживаться. Дополнительные сведения см. в Защитник Windows и применение базовых показателей.
Новая версия: 1.1.2104.1
Этот пакет обновляет клиент для работы с вредоносными программами, обустановку вредоносных программ и версии подписей в образах установки ОС до следующих версий:
Версия платформы: 4.18.2102.4
Версия обдвижки: 1.1.18000.5
Версия подписи: 1.335.232.0
Сведения о пакете
Размер пакета составляет около 96 МБ.
Известные проблемы в этом обновлении
Сведения об обновлении
Этот пакет содержит ежемесячные обновления и исправления для платформы и обдвижки Microsoft Defender для антивирусной программы «Защитник Майкрософт» в Windows 10.
Этот пакет также включает последние обновления для системы безопасности, которые доступны до даты выпуска.
Получение обновления
Для разных архитектур изображений ОС Windows необходимы разные пакеты обновления. Выберите архитектуру, которая соответствует изображению установки, к которому нужно применить это обновление:
Изображение установки Microsoft Defender для операционной системы Windows: 32-|64-битная
Примечание: Эти ссылки указывают на defender-update-kit-[x86|x64].zip. Извлеките этот ZIP-файл, чтобы получить пакет обновления Защитника (defender-dism-[x86|x64].cab)и средство обновления (DefenderUpdateWinimage.ps1), которое позволяет обновлять изображения установки ОС.
Средство обновления пакета
Для запуска этого средства исправления действуют следующие предварительные условия ( DefenderUpdateWinImage.ps1):
Необходимо использовать 64-битную среду ОС Windows 10 или более поздней версии, которая включает PowerShell 5.1 или более поздней версии.
Необходимо установить модули Microsoft.Powershell.Security и DISM.
Для запуска PowerShell на устройстве необходимо использовать права администратора.
Не используйте этот пакет для обновления изображений в прямом эфире, так как он может привести к повреждению установки Windows, запущенного на виртуальной машине.
В DefenderUpdateWinImage.ps1 есть возможность удалить обновление. Однако перед обновлением может потребоваться сохранить резервную копию изображений.
Применение этого обновления
PS C:\> DefenderUpdateWinImage.ps1 — WorkingDirectory
— Action AddUpdate — ImagePath
Как удалить или откатить это обновление
PS C:\> DefenderUpdateWinImage.ps1 — WorkingDirectory
— Action RemoveUpdate — ImagePath
Как перечислить сведения об установленном обновлении
PS C:\> DefenderUpdateWinImage.ps1 — WorkingDirectory
— Action ShowUpdate — ImagePath
Ссылки
Узнайте о терминологии, используемой Майкрософт для описания обновлений программного обеспечения.
Антивирус Windows Defender в Windows Server 2016
В Windows Server 2016 имеется встроенный функционал антивирусной защиты, представляющей собой «родной» антивирус Microsoft — Windows Defender, который установлен и включен по-умолчанию. В этой статье мы рассмотрим особенности антивируса Windows Defender в Windows Server 2016.
Графический интерфейс Windows Defender
По умолчанию в серверной редакции устанавливаются только движок антивируса Windows Defender (Защитник Windows). Чтобы установить графический интерфейс Defender, нужно с помощью консоли Server Manager установить серверный компонент GUI for Windows Defender (находится в разделе Windows Defender Features).
Включить графический интерфейс антивируса можно с помощью PowerShell
Install-WindowsFeature -Name Windows-Defender-GUI
Удаление антивируса Windows Defender в Windows Server 2016
В Windows 10 при установке любого стороннего антвируса (Kaspersky, McAfee, Symantec, и пр.) встроенный антивирус Windows Defender отключается, однако в Windows Server 2016 этого не происходит. Отключать компонент встроенного антивируса нужно вручную (в подавляющем большинстве случаев не рекомендуется использовать одновременно несколько разных антивирусов на одном компьютере/сервере).
Удалить компонент Windows Defender в Windows Server 2016 можно из графической консоли Server Manager или такой командой:
Uninstall-WindowsFeature -Name Windows-Defender

Управление Windows Defender с помощью команд PowerShell
Рассмотрим типовые команды PowerShell, которые можно использовать для управления антивирусом Windows Defender.
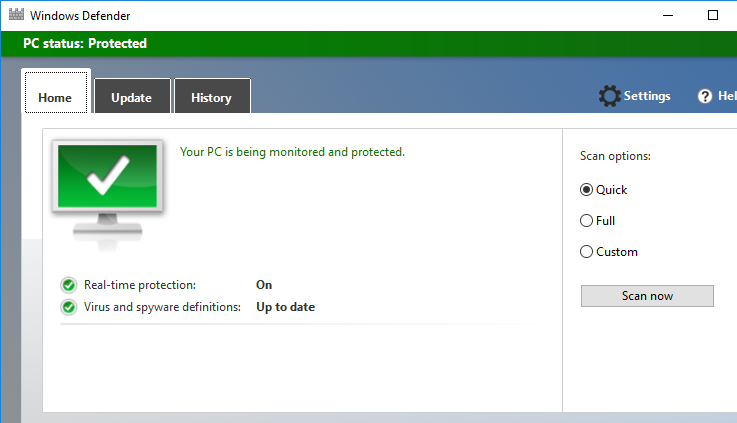
Проверить, запущена ли служба Защитник Windows можно с помощью команды PowerShell Get-Service:

Как вы видите, служба запушена (статус – Running)
Текущие настройки и статус Defender можно вывести с помощью командлета:

Вывод комадлета содержит версию и дату обновления антивирусных баз, включенные компоненты, время последнего сканирования и т.д.
Отключить защиту в реальном времен Windows Defender можно с помощью команды:
Set-MpPreference -DisableRealtimeMonitoring $true
После выполнения данной команды, антивирус не будет сканировать на лету все обрабатываемые системой файлы.
Set-MpPreference -DisableRealtimeMonitoring $false
Более полный список команд Powershell, которые можно использовать для управления антивирусом есть в статье Управление Windows Defender с помощью PowerShell.
Исключения антивируса Windows Defender
В антивирусе можно задать список исключений – это имена, расширения файлов, каталоге, которые нужно исключить из автоматической проверки антивирусом Windows Defender. Особенность Защитника Windows в Server 2016 – автоматически генерируемый список исключений антивируса, который применяется в зависимости от установленных ролей сервера. Согласитесь, логично, например при установке роли Hyper-V исключить из проверки антивирусом файлы виртуальных и дифференциальных дисков, vhds дисков (*.vhd, *.vhdx, *.avhd ), снапшоты и другие файлы виртуальных машин.
Чтобы вручную добавить определенные каталоги в список исключения антивируса, выполните команду:
Set-MpPreference -ExclusionPath «C:\Test», «C:\VM», «C:\Nano»
Чтобы исключить антивирусную проверку определенных процессов, выполните команду:
Set-MpPreference -ExclusionProcess «vmms.exe», «Vmwp.exe»
Обновление антивируса Windows Defender
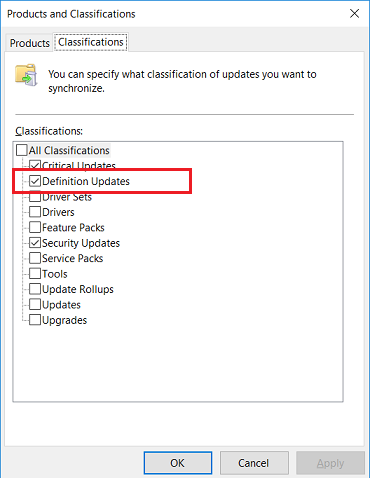
Антивирус Windows Defender может автоматически обновляться из Интернета с серверов Windows Update. В том случае, если в сети установлен внутренний сервер WSUS, антивирус может получать обновления с него. Главное, убедится, что установка обновлений была одобрена на стороне WSUS сервера (в консоли WSUS обновления антивирусных баз Windows Defender, называются Definition Updates), а клиенты нацелены на нужный сервер WSUS с помощью GPO.
В некоторых случаях, после получения «кривого» обновления, Защитник Windows может работать некорректно. В этом случае рекомендуется сбросить текущие базы и перекачать их заново:
«%PROGRAMFILES%\Windows Defender\MPCMDRUN.exe» -RemoveDefinitions -All
«%PROGRAMFILES%\Windows Defender\MPCMDRUN.exe» –SignatureUpdate
Некоторые причины, из-за которых служба Windows Defender отказывается запускаться в Windows 10 рассмотрены в статье Служба работы с угрозами остановлена.
Microsoft Defender Antivirus on Windows Server
Applies to:
Microsoft Defender Antivirus is available on the following editions/versions of Windows Server:
- Windows Server 2019
- Windows Server, version 1803 or later
- Windows Server 2016.
In some instances, Microsoft Defender Antivirus is referred to as Endpoint Protection; however, the protection engine is the same. Although the functionality, configuration, and management are largely the same for Microsoft Defender Antivirus on Windows 10, there are a few key differences on Windows Server:
- In Windows Server, automatic exclusions are applied based on your defined Server Role.
- In Windows Server, Microsoft Defender Antivirus does not automatically disable itself if you are running another antivirus product.
The process at a glance
The process of setting up and running Microsoft Defender Antivirus on a server platform includes several steps:
Enable the user interface on Windows Server
By default, Microsoft Defender Antivirus is installed and functional on Windows Server. The user interface (GUI) is installed by default on some SKUs, but is not required because you can use PowerShell or other methods to manage Microsoft Defender Antivirus. If the GUI is not installed on your server, you can add it by using the Add Roles and Features wizard, or by using PowerShell cmdlets.
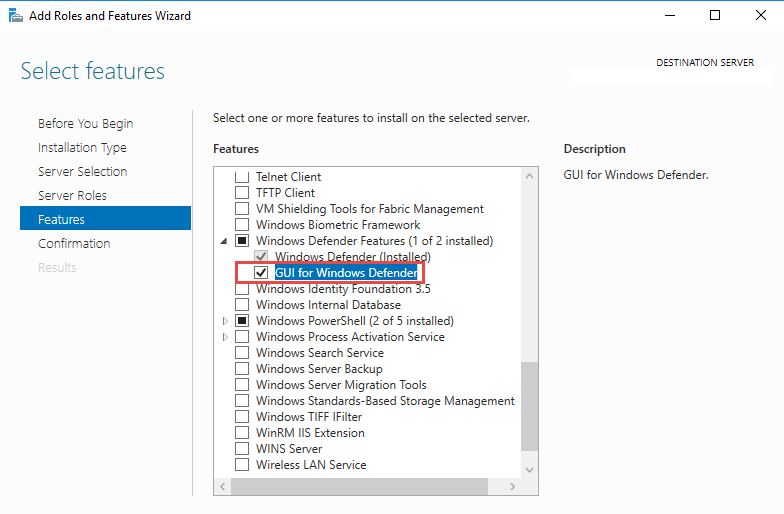
Turn on the GUI using the Add Roles and Features Wizard
When you get to the Features step of the wizard, under Windows Defender Features, select the GUI for Windows Defender option.
In Windows Server 2016, the Add Roles and Features Wizard looks like this:

In Windows Server 2019, the Add Roles and Feature Wizard is similar.
Turn on the GUI using PowerShell
The following PowerShell cmdlet will enable the interface:
Install Microsoft Defender Antivirus on Windows Server
You can use either the Add Roles and Features Wizard or PowerShell to install Microsoft Defender Antivirus.
Use the Add Roles and Features Wizard
Refer to this article, and use the Add Roles and Features Wizard.
When you get to the Features step of the wizard, select the Microsoft Defender Antivirus option. Also select the GUI for Windows Defender option.
Use PowerShell
To use PowerShell to install Microsoft Defender Antivirus, run the following cmdlet:
Event messages for the antimalware engine included with Microsoft Defender Antivirus can be found in Microsoft Defender AV Events.
Verify Microsoft Defender Antivirus is running
To verify that Microsoft Defender Antivirus is running on your server, run the following PowerShell cmdlet:
To verify that firewall protection is turned on, run the following PowerShell cmdlet:
As an alternative to PowerShell, you can use Command Prompt to verify that Microsoft Defender Antivirus is running. To do that, run the following command from a command prompt:
The sc query command returns information about the Microsoft Defender Antivirus service. When Microsoft Defender Antivirus is running, the STATE value displays RUNNING .
Update antimalware Security intelligence
To get updated antimalware security intelligence, you must have the Windows Update service running. If you use an update management service, like Windows Server Update Services (WSUS), make sure that updates for Microsoft Defender Antivirus Security intelligence are approved for the computers you manage.
By default, Windows Update does not download and install updates automatically on Windows Server 2019 or Windows Server 2016. You can change this configuration by using one of the following methods:
| Method | Description |
|---|---|
| Windows Update in Control Panel | — Install updates automatically results in all updates being automatically installed, including Windows Defender Security intelligence updates. — Download updates but let me choose whether to install them allows Windows Defender to download and install Security intelligence updates automatically, but other updates are not automatically installed. |
| Group Policy | You can set up and manage Windows Update by using the settings available in Group Policy, in the following path: Administrative Templates\Windows Components\Windows Update\Configure Automatic Updates |
| The AUOptions registry key | The following two values allow Windows Update to automatically download and install Security intelligence updates: — 4 — Install updates automatically. This value results in all updates being automatically installed, including Windows Defender Security intelligence updates. — 3 — Download updates but let me choose whether to install them. This value allows Windows Defender to download and install Security intelligence updates automatically, but other updates are not automatically installed. |
To ensure that protection from malware is maintained, we recommend that you enable the following services:
Windows Error Reporting service
Windows Update service
The following table lists the services for Microsoft Defender Antivirus and the dependent services.
| Service Name | File Location | Description |
|---|---|---|
| Windows Defender Service (WinDefend) | C:\Program Files\Windows Defender\MsMpEng.exe | This is the main Microsoft Defender Antivirus service that needs to be running at all times. |
| Windows Error Reporting Service (Wersvc) | C:\WINDOWS\System32\svchost.exe -k WerSvcGroup | This service sends error reports back to Microsoft. |
| Windows Defender Firewall (MpsSvc) | C:\WINDOWS\system32\svchost.exe -k LocalServiceNoNetwork | We recommend leaving the Windows Defender Firewall service enabled. |
| Windows Update (Wuauserv) | C:\WINDOWS\system32\svchost.exe -k netsvcs | Windows Update is needed to get Security intelligence updates and antimalware engine updates |
Submit samples
Sample submission allows Microsoft to collect samples of potentially malicious software. To help provide continued and up-to-date protection, Microsoft researchers use these samples to analyze suspicious activities and produce updated antimalware Security intelligence. We collect program executable files, such as .exe files and .dll files. We do not collect files that contain personal data, like Microsoft Word documents and PDF files.
Submit a file
Visit the sample submission portal, and submit your file.
Enable automatic sample submission
To enable automatic sample submission, start a Windows PowerShell console as an administrator, and set the SubmitSamplesConsent value data according to one of the following settings:
| Setting | Description |
|---|---|
| 0 — Always prompt | The Microsoft Defender Antivirus service prompts you to confirm submission of all required files. This is the default setting for Microsoft Defender Antivirus, but is not recommended for installations on Windows Server 2016 or 2019 without a GUI. |
| 1 — Send safe samples automatically | The Microsoft Defender Antivirus service sends all files marked as «safe» and prompts for the remainder of the files. |
| 2 — Never send | The Microsoft Defender Antivirus service does not prompt and does not send any files. |
| 3 — Send all samples automatically | The Microsoft Defender Antivirus service sends all files without a prompt for confirmation. |
Configure automatic exclusions
To help ensure security and performance, certain exclusions are automatically added based on the roles and features you install when using Microsoft Defender Antivirus on Windows Server 2016 or 2019.
Need to set Microsoft Defender Antivirus to passive mode?
If you are using a non-Microsoft antivirus product as your primary antivirus solution, set Microsoft Defender Antivirus to passive mode.
Set Microsoft Defender Antivirus to passive mode using a registry key
If you are using Windows Server, version 1803 or Windows Server 2019, you can set Microsoft Defender Antivirus to passive mode by setting the following registry key:
- Path: HKLM\SOFTWARE\Policies\Microsoft\Windows Advanced Threat Protection
- Name: ForcePassiveMode
- Type: REG_DWORD
- Value: 1
Disable Microsoft Defender Antivirus using the Remove Roles and Features wizard
See Install or Uninstall Roles, Role Services, or Features, and use the Remove Roles and Features Wizard.
When you get to the Features step of the wizard, clear the Windows Defender Features option.
If you clear Windows Defender by itself under the Windows Defender Features section, you will be prompted to remove the interface option GUI for Windows Defender.
Microsoft Defender Antivirus will still run normally without the user interface, but the user interface cannot be enabled if you disable the core Windows Defender feature.
Turn off the Microsoft Defender Antivirus user interface using PowerShell
To turn off the Microsoft Defender Antivirus GUI, use the following PowerShell cmdlet:
Are you using Windows Server 2016?
If you are using Windows Server 2016 and a third-party antimalware/antivirus product that is not offered or developed by Microsoft, you’ll need to disable/uninstall Microsoft Defender Antivirus.
You can’t uninstall the Windows Security app, but you can disable the interface with these instructions.
The following PowerShell cmdlet uninstalls Microsoft Defender Antivirus on Windows Server 2016:


