- How to install Ansible on Mac OS X
- Table of Contents
- How to install Ansible on Mac OS X using Homebrew
- How to install Ansible on Mac OS X using Python pip
- Confirm that pip is installed and upgrade it to the latest version
- Install Ansible
- Setting up a Mac using Ansible
- Getting started
- Defining Ansible Playbooks
- Как установить Ansible на Apple MacOS X с помощью командной строки
- Установите Ansible на MacOS с помощью команды brew
- Создание файла инвентаризации хостов
- Что дальше?
- Installing Ansible
- Prerequisites
- Control node requirements
- Managed node requirements
- Selecting an Ansible artifact and version to install
- Installing the Ansible community package
- Installing ansible-core
- Installing and upgrading Ansible with pip
- Prerequisites: Installing pip
- Installing Ansible with pip
- Installing Ansible in a virtual environment with pip
- Upgrading Ansible with pip
- Upgrading from 2.9 or earlier to 2.10
- Upgrading from Ansible 3 or ansible-core 2.10
- Installing Ansible on specific operating systems
How to install Ansible on Mac OS X

Written by Percy Grunwald
— Last Updated February 22, 2019
Table of Contents
The two best methods for installing Ansible on Mac OS X are:
- Using Homebrew (best for beginners)
- Using Python pip (best for advanced users)
The official documentation states that their preferred method for installing Ansible on Mac OS X is using Python pip . I also agree that this is the best way to install Ansible and this is how I do it on my machine, however I think installing it by using Homebrew is probably the best way for beginners.
The main difference between the two methods is that using pip will give you more control over the Python version Ansible uses as well as any Python packages that Ansible depends on. This is especially useful if you’re using a version manager like asdf , which I highly recommend.
How to install Ansible on Mac OS X using Homebrew
First, ensure that you have Homebrew installed. Homebrew is a package manager for Mac OS X that allows you to install many packages useful for web/software development.
Installing Ansible on Mac OS X with Homebrew is as simple as running brew install ansible in Terminal (or your preferred terminal application):
After the installation has finished, you can confirm that Ansible has installed correctly by running ansible —version :
If ansible —version runs successfully, congratulations! You now have Ansible’s power at your fingertips and you’re ready to start managing your servers.
How to install Ansible on Mac OS X using Python pip
Confirm that pip is installed and upgrade it to the latest version
First, ensure that Python pip is installed on your system. You can check if pip is in your PATH by running which pip . If pip is found, run pip —version to confirm that everything is working as expected:
I use asdf to manage the Python versions on my system (and I suggest you do too). pip is automatically installed along with asdf Python installations.
If pip isn’t on your system and you’re using the default Python version on your system, you can usually install pip by running sudo easy_install pip .
I suggest running pip install —upgrade pip to update pip to the latest version before installing Ansible:
Install Ansible
Assuming pip is installed and working, installing Ansible is as simple as running pip install ansible :
Confirm that ansible is in your path and that it runs as expected:
If ansible —version runs successfully, congratulations! You now have Ansible’s power at your fingertips and you’re ready to start managing your servers.
Источник
Setting up a Mac using Ansible

This Blog has been moved from Medium to blogs.tensult.com . All the latest content will be available there. Subscribe to our newsletter to stay updated.
In this blog entry, I want to share a step by step guide in using Ansible to set up a MacBook with the required Applications.
Using Ansible Playbooks we can easily configure the applications we want installed on our local system. The existing code can be modified so as to cater to each individual’s needs.
First, we’ll take a basic look at Ansible. Ansible is an open-source IT automation engine used for infrastructure automation. It enables us to reduce time and risk associated with making changes to the environment. We take something we want to change and put it into a script which then codifies the change we want to make. Ansible playbooks are written in YAML where key value pairs are denoted by a colon followed by a space. Ansible can work with one or multiple systems at the same time in your infrastructure. In order to work with multiple servers, Ansible needs to establish connection with the multiple servers. This is done using SSH in Linux and Powershell Remoting in Windows. This makes Ansible agentless (no need to install any additional software on target machine to work with Ansible).
Ansible Playbooks are Ansibles orchestration language where we define what we want Ansible to do. It is the set of instructions we want Ansible to carry out. It is a single YAML file which defines a set of activities or tasks to be run on the hosts. Tasks can vary from executing a command, running a script, installing a package, shutdown/restart etc. Each play contains a task. Tasks are executed in the order they are written one by one before moving on to the next. The goal of each task is to execute a module. Every task should have a name.
Ansible roles are nothing more than specific playbooks. Role allows us to take something which is common in all our playbooks and put them into a more specific playbook. The files under roles have to be in certain directory names. The ones that are not being used can be discarded. Some examples of directory names under roles are tasks, defaults, vars, files etc. You can read more about Ansible Roles here.
Getting started
Assuming you don’t have Ansible installed in your MacBook the following steps will explain how to install Ansible on your machine using Homebrew. If you have Ansible installed on your machine you can skip this part.
- Install Homebrew by opening the Terminal and typing in the following command. Enter password when prompted. ( Homebrew simplifies the installation of software on the Mac OS X operating system. )
2. Install Git by copying the below commands into the terminal.
3. Install Ansible by using pip (Python package manager).
a. If pip isn’t already available on your computer then you can get pip by . running the following commands in the terminal.
b. Install Ansible with the following commands in the terminal.
sudo pip install ansible
Enter password whenever prompted.
Defining Ansible Playbooks
The approach I have taken is to define playbooks for different applications and included all these playbooks in the main playbook. Each playbook is called from the main playbook which downloads the application from the web and then executes the set of codes depending on the type of file downloaded using roles in Ansible.
Источник
Как установить Ansible на Apple MacOS X с помощью командной строки

Как установить программное обеспечение Ansible для автоматизации приложений и IT-инфраструктуры с моего Apple Macbook pro, работающего на MacOS X?
Ansible — это самое простое и простое в использовании программное обеспечение для автоматизации приложений и IT-инфраструктуры. Вы можете использовать Ansible для развертывания приложений, управления конфигурацией, и для реализации множество задач, связанных с системным администрированием.
Установите Ansible на MacOS с помощью команды brew
Откройте приложение терминала и введите следующую команду:
Примеры возможных выводов данных:
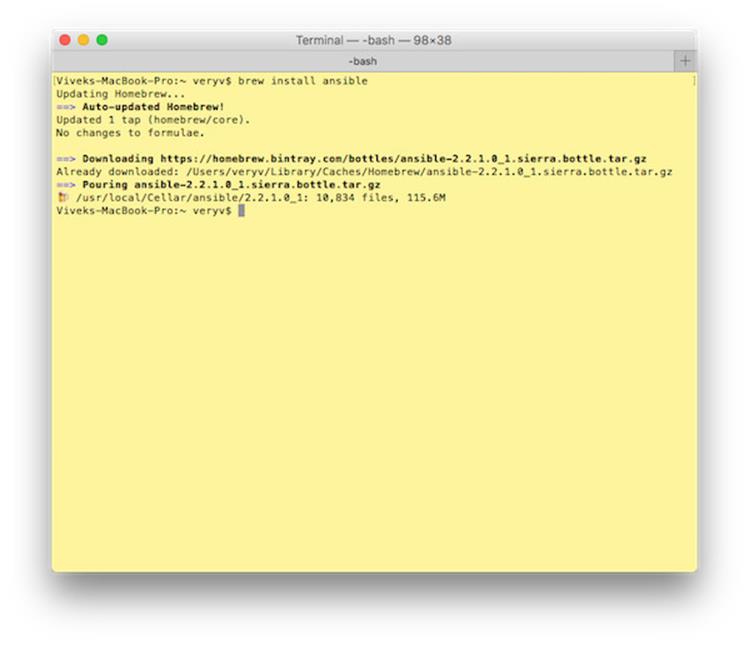 Рисунок 01: Используйте brew для установки ansible на MacOS X
Теперь ваш Macbook pro действует, как главный узел или система управления.
Создание файла инвентаризации хостов
Ansible должен знать, к каким сервера подключиться, и затем управлять этими блоками. Вам нужно определить или создать перечень файлов хоста Ansible. Файл содержит список, параметры и группы для ваших серверов. Его местоположение по умолчанию — /usr/local/etc/ansible/hosts в MacOS X. Вы можете отредактировать файл /usr/local/etc/ansible/hosts или создать файл
Вот пример моего файла:
Сохраните изменения и закройте файл. Убедитесь, что вы установили ключи ssh в серверах box1 и 192.168.2.15. Если у вас нет ключа ssh на MacOS X, сгенерируйте ключ ssh на главном узле (MacOS X):
Установите ssh ключ:
Примеры возможных выводов данных:
Вы можете установить ANSIBLE_HOSTS для определения вашего файла
Примеры возможных выводов данных:
Что дальше?
Чтобы управлять вашим сервером, вам нужны Ansible’s playbooks. Ознакомьтесь со следующими ресурсами для получения большей информации: Документация Ansible.
Источник
Installing Ansible
Ansible is an agentless automation tool that you install on a control node. From the control node, Ansible manages machines and other devices remotely (by default, over the SSH protocol).
To install Ansible for use at the command line, simply install the Ansible package on one machine (which could easily be a laptop). You do not need to install a database or run any daemons. Ansible can manage an entire fleet of remote machines from that one control node.
Prerequisites
Before you install Ansible, review the requirements for a control node. Before you use Ansible, review the requirements for managed nodes (those end devices you want to automate). Control nodes and managed nodes have different minimum requirements.
Control node requirements
For your control node (the machine that runs Ansible), you can use any machine with Python 2 (version 2.7) or Python 3 (versions 3.5 and higher) installed. ansible-core 2.11 and Ansible 4.0.0 will make Python 3.8 a soft dependency for the control node, but will function with the aforementioned requirements. ansible-core 2.12 and Ansible 5.0.0 will require Python 3.8 or newer to function on the control node. Starting with ansible-core 2.11, the project will only be packaged for Python 3.8 and newer. This includes Red Hat, Debian, CentOS, macOS, any of the BSDs, and so on. Windows is not supported for the control node, read more about this in Matt Davis’s blog post.
Please note that some plugins that run on the control node have additional requirements. These requirements should be listed in the plugin documentation.
When choosing a control node, remember that any management system benefits from being run near the machines being managed. If you are using Ansible to manage machines in a cloud, consider using a machine inside that cloud as your control node. In most cases Ansible will perform better from a machine on the cloud than from a machine on the open Internet.
Ansible 2.11 will make Python 3.8 a soft dependency for the control node, but will function with the aforementioned requirements. Ansible 2.12 will require Python 3.8 or newer to function on the control node. Starting with Ansible 2.11, the project will only be packaged for Python 3.8 and newer.
Managed node requirements
Although you do not need a daemon on your managed nodes, you do need a way for Ansible to communicate with them. For most managed nodes, Ansible makes a connection over SSH and transfers modules using SFTP. If SSH works but SFTP is not available on some of your managed nodes, you can switch to SCP in ansible.cfg . For any machine or device that can run Python, you also need Python 2 (version 2.6 or later) or Python 3 (version 3.5 or later).
Please note that some modules have additional requirements that need to be satisfied on the ‘target’ machine (the managed node). These requirements should be listed in the module documentation.
If you have SELinux enabled on remote nodes, you will also want to install libselinux-python on them before using any copy/file/template related functions in Ansible. You can use the yum module or dnf module in Ansible to install this package on remote systems that do not have it.
By default, before the first Python module in a playbook runs on a host, Ansible attempts to discover a suitable Python interpreter on that host. You can override the discovery behavior by setting the ansible_python_interpreter inventory variable to a specific interpreter, and in other ways. See Interpreter Discovery for details.
Ansible’s raw module , and the script module , do not depend on a client side install of Python to run. Technically, you can use Ansible to install a compatible version of Python using the raw module , which then allows you to use everything else. For example, if you need to bootstrap Python 2 onto a RHEL-based system, you can install it as follows:
Selecting an Ansible artifact and version to install
Starting with version 2.10, Ansible distributes two artifacts: a community package called ansible and a minimalist language and runtime called ansible-core (called ansible-base in version 2.10). Choose the Ansible artifact and version that matches your particular needs.
Installing the Ansible community package
The ansible package includes the Ansible language and runtime plus a range of community curated Collections. It recreates and expands on the functionality that was included in Ansible 2.9.
You can choose any of the following ways to install the Ansible community package:
Install the latest release with your OS package manager (for Red Hat Enterprise Linux (TM), CentOS, Fedora, Debian, or Ubuntu).
Install with pip (the Python package manager).
Installing ansible-core
Ansible also distributes a minimalist object called ansible-core (or ansible-base in version 2.10). It contains the Ansible language, runtime, and a short list of core modules and other plugins. You can build functionality on top of ansible-core by installing collections from Galaxy, Automation Hub, or any other source.
You can choose any of the following ways to install ansible-core :
Install ansible-core (version 2.11 and greater) or ansible-base (version 2.10) with pip .
Install ansible-core from source from the ansible/ansible GitHub repository to access the development ( devel ) version to develop or test the latest features.
You should only run ansible-core from devel if you are modifying ansible-core , or trying out features under development. This is a rapidly changing source of code and can become unstable at any point.
Ansible generally creates new releases twice a year. See Releases and maintenance for information on release timing and maintenance of older releases.
Installing and upgrading Ansible with pip
Ansible can be installed on many systems with pip , the Python package manager.
Prerequisites: Installing pip
If pip is not already available on your system, run the following commands to install it:
You may need to perform some additional configuration before you are able to run Ansible. See the Python documentation on installing to the user site for more information.
Installing Ansible with pip
If you have Ansible 2.9 or older installed or Ansible 3, see Upgrading Ansible with pip .
Once pip is installed, you can install Ansible 1:
In order to use the paramiko connection plugin or modules that require paramiko , install the required module 2:
If you wish to install Ansible globally, run the following commands:
Running pip with sudo will make global changes to the system. Since pip does not coordinate with system package managers, it could make changes to your system that leaves it in an inconsistent or non-functioning state. This is particularly true for macOS. Installing with —user is recommended unless you understand fully the implications of modifying global files on the system.
Older versions of pip default to http://pypi.python.org/simple, which no longer works. Please make sure you have the latest version of pip before installing Ansible. If you have an older version of pip installed, you can upgrade by following pip’s upgrade instructions .
Installing Ansible in a virtual environment with pip
If you have Ansible 2.9 or older installed or Ansible 3, see Upgrading Ansible with pip .
Ansible can also be installed inside a new or existing virtualenv :
Upgrading Ansible with pip
Upgrading from 2.9 or earlier to 2.10
Starting in version 2.10, Ansible is made of two packages. When you upgrade from version 2.9 and older to version 2.10 or later, you need to uninstall the old Ansible version (2.9 or earlier) before upgrading. If you do not uninstall the older version of Ansible, you will see the following message, and no change will be performed:
As explained by the message, to upgrade you must first remove the version of Ansible installed and then install it to the latest version.
Upgrading from Ansible 3 or ansible-core 2.10
ansible-base only exists for version 2.10 and in Ansible 3. In 2.11 and later, the package is called ansible-core . Before installing ansible-core or Ansible 4, you must uninstall ansible-base if you have installed Ansible 3 or ansible-base 2.10.
To upgrade to ansible-core :
To upgrade to Ansible 4:
Installing Ansible on specific operating systems
Follow these instructions to install the Ansible community package on a variety of operating systems.
Источник


