- Install Cisco AnyConnect Secure Mobility Client on a Mac Computer
- Available Languages
- Download Options
- Objective
- Introduction
- AnyConnect Software Version
- Install AnyConnect Secure Mobility Client
- Prerequisites
- Check these other articles out!
- Applicable Devices | Software Version
- Licensing Information
- Step 1
- Step 2
- Step 3
- Step 4
- Step 5
- Step 6
- Step 7
- Step 8
- Step 9
- Step 10
- Step 11
- Step 12
- Step 13
- Additional Resources
- AnyConnect App
- View a video related to this article.
- ASA 8.x: AnyConnect SSL VPN CAC-SmartCards Configuration with MAC Support
- Available Languages
- Download Options
- Contents
- Introduction
- Prerequisites
- Requirements
- Components Used
- Conventions
- Cisco ASA Configuration
- Deployment Considerations
- Authentication, Authorization, Accounting (AAA) Configuration
- Configure LDAP Server
- Manage Certificates
- Generate Keys
- Install Root CA Certificates
- Enroll ASA and Install Identity Certificate
- AnyConnect VPN Configuration
- Create an IP Address Pool
- Create Tunnel Group and Group Policy
- Tunnel Group Interface and Image Settings
- Certificate Matching Rules (If OCSP will be used)
- Configure OCSP
- Configure OCSP Responder Certificate
- Configure CA to use OCSP
- Configure OCSP Rules
- Cisco AnyConnect Client Configuration
- Downloading Cisco Anyconnect VPN Client – Mac OS X
- Start Cisco AnyConnect VPN Client – Mac OS X
- New Connection
- Start remote access
- Appendix A – LDAP Mapping and DAP
- Scenario 1: Active Directory Enforcement using Remote Access Permission Dial-in – Allow/Deny Access
- Active Directory Setup
- ASA Configuration
- Scenario 2 : Active Directory Enforcement using Group membership to Allow/Deny Access
- Active Directory Setup
- ASA Configuration
- Scenario 3: Dynamic Access Policies for Multiple memberOf Attributes
- ASA Configuration
- Appendix B – ASA CLI Configuration
- Appendix C- Troubleshooting
- Troubleshooting AAA and LDAP
- Example 1: Allowed Connection with correct attribute mapping
- Example 2: Allowed Connection with mis-configured Cisco attribute mapping
- Troubleshooting DAP
- Example 1: Allowed connection with DAP
- Example 2: Denied Connection with DAP
- Troubleshooting Certificate Authority / OCSP
- Appendix D – Verify LDAP Objects in MS
- LDAP Viewer
- Active Directory Services Interface Editor
- Appendix E
Install Cisco AnyConnect Secure Mobility Client on a Mac Computer
Available Languages
Download Options
Objective
This article shows you how to download and install the Cisco AnyConnect Secure Mobility Client version 4.9.x on a Mac Computer.
This article is only applicable to the RV34x series routers, not Enterprise products.
Introduction
AnyConnect Secure Mobility Client is a modular endpoint software product. It not only provides Virtual Private Network (VPN) access through Secure Sockets Layer (SSL) and Internet Protocol Security (IPsec) Internet Key Exchange version2 (IKEv2) but also offers enhanced security through various built-in modules.
AnyConnect Software Version
Install AnyConnect Secure Mobility Client
This toggled section provides details and tips for beginners.
Prerequisites
- You need to purchase client license(s) from a partner like CDW or through your company’s device procurement. There are options for 1 user (L-AC-PLS-3Y-S5) or packets of licenses including one year for 25 users (AC-PLS-P-25-S). Other license options available as well, including perpetual licenses. For more details on licensing, check out the links in the Licensing Information section below.
- Download the latest version of firmware available for your router.
Check these other articles out!
Applicable Devices | Software Version
- RV340 | 1.0.03.21 (Download latest)
- RV340W | 1.0.03.21 (Download latest)
- RV345 | 1.0.03.21 (Download latest)
- RV345P | 1.0.03.21 (Download latest)
Licensing Information
AnyConnect client licenses allow the use of the AnyConnect desktop clients as well as any of the AnyConnect mobile clients that are available. You will need a client license to download and use the Cisco AnyConnect Secure Mobility Client. A client license enables the VPN functionality and are sold in packs of 25 from partners like CDW or through your company’s device procurement.
Want to know more about AnyConnect licensing? Here are some resources:
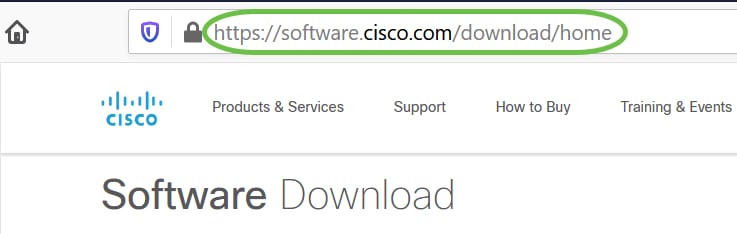
Step 1
Open a web browser and navigate to the Cisco Software Downloads webpage.
Step 2
In the search bar, start typing ‘Anyconnect’ and the options will appear. Select AnyConnect Secure Mobility Client v4.x.
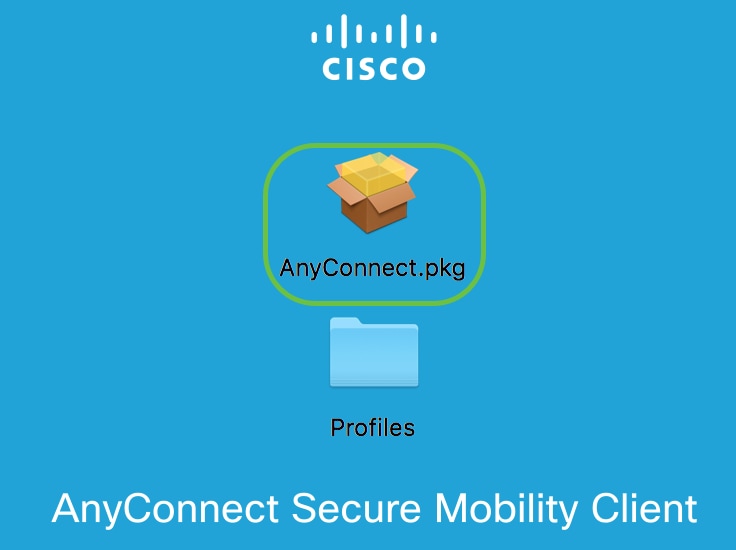
Step 3
Download the Cisco AnyConnect VPN Client. Most users will select the AnyConnect Pre-Deployment Package (Mac OS) option.

The images in this article are for AnyConnect v4.9.x, which was latest version at the time of writing this document.
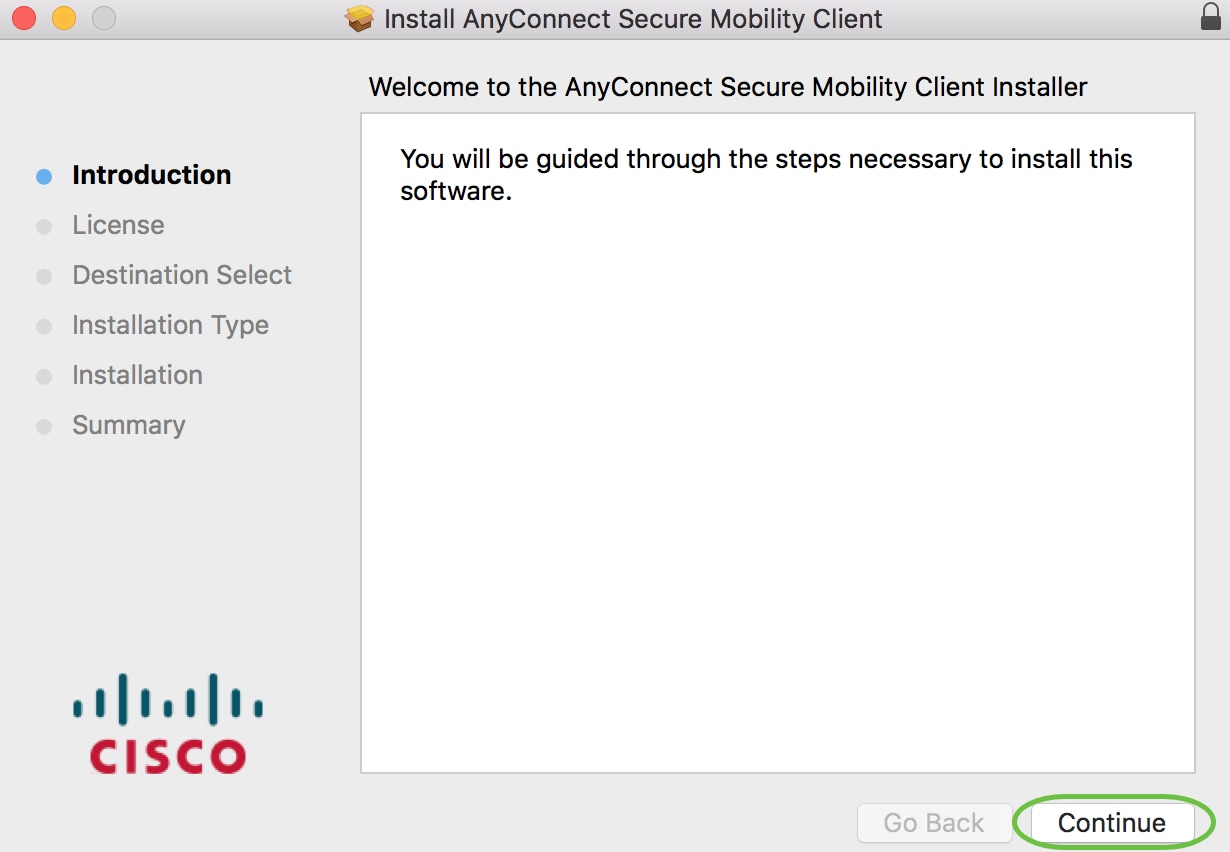
Step 4
Double-click the installer.
Step 5
Step 6
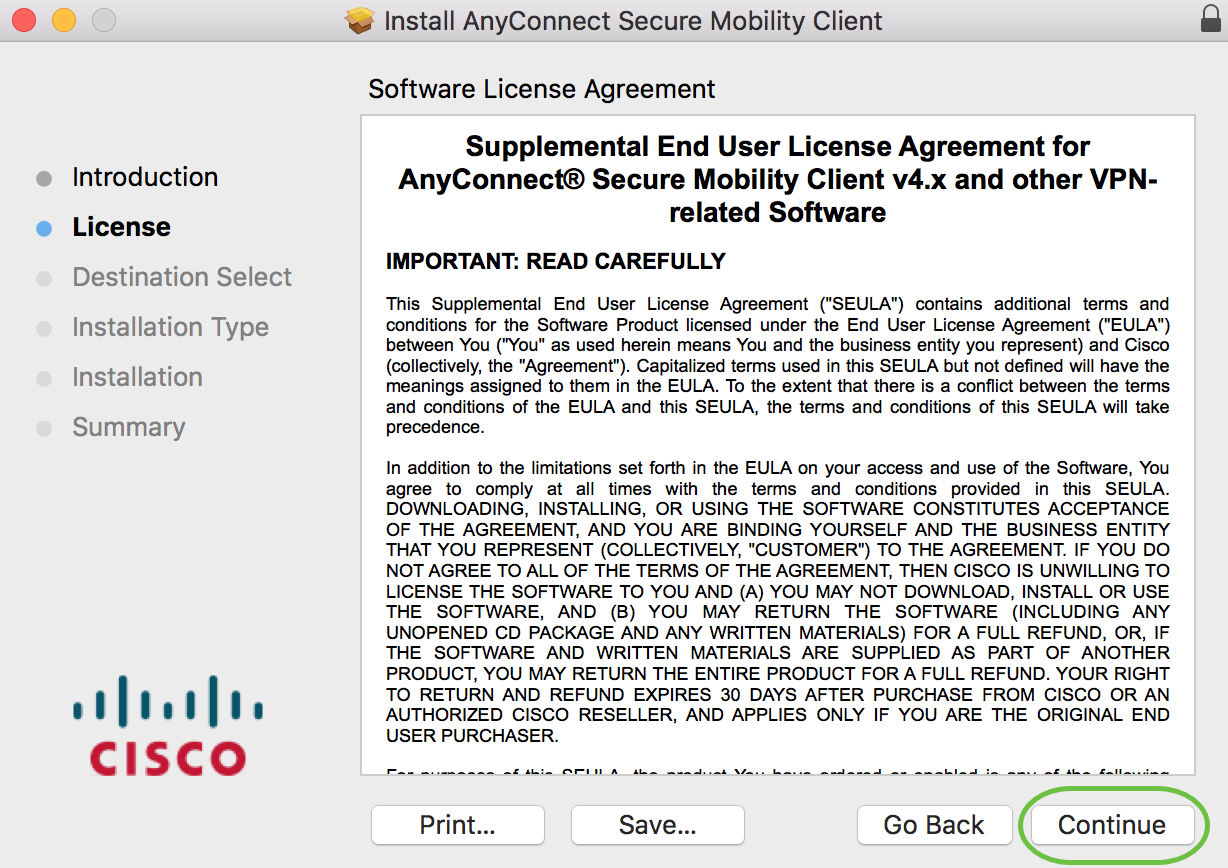
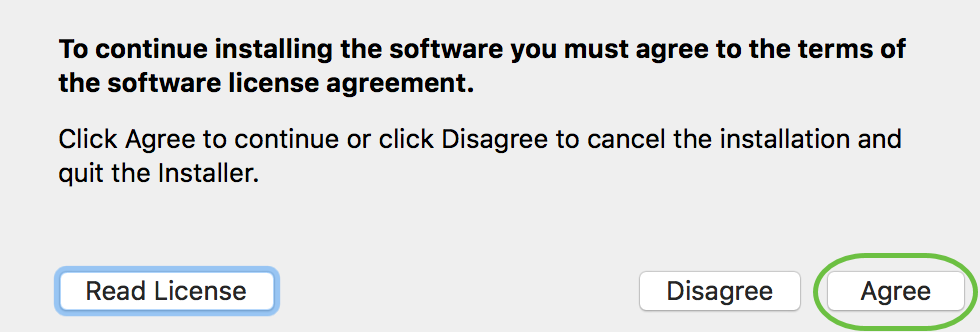
Go over the Supplemental End User License Agreement and then click Continue.
Step 7
Step 8
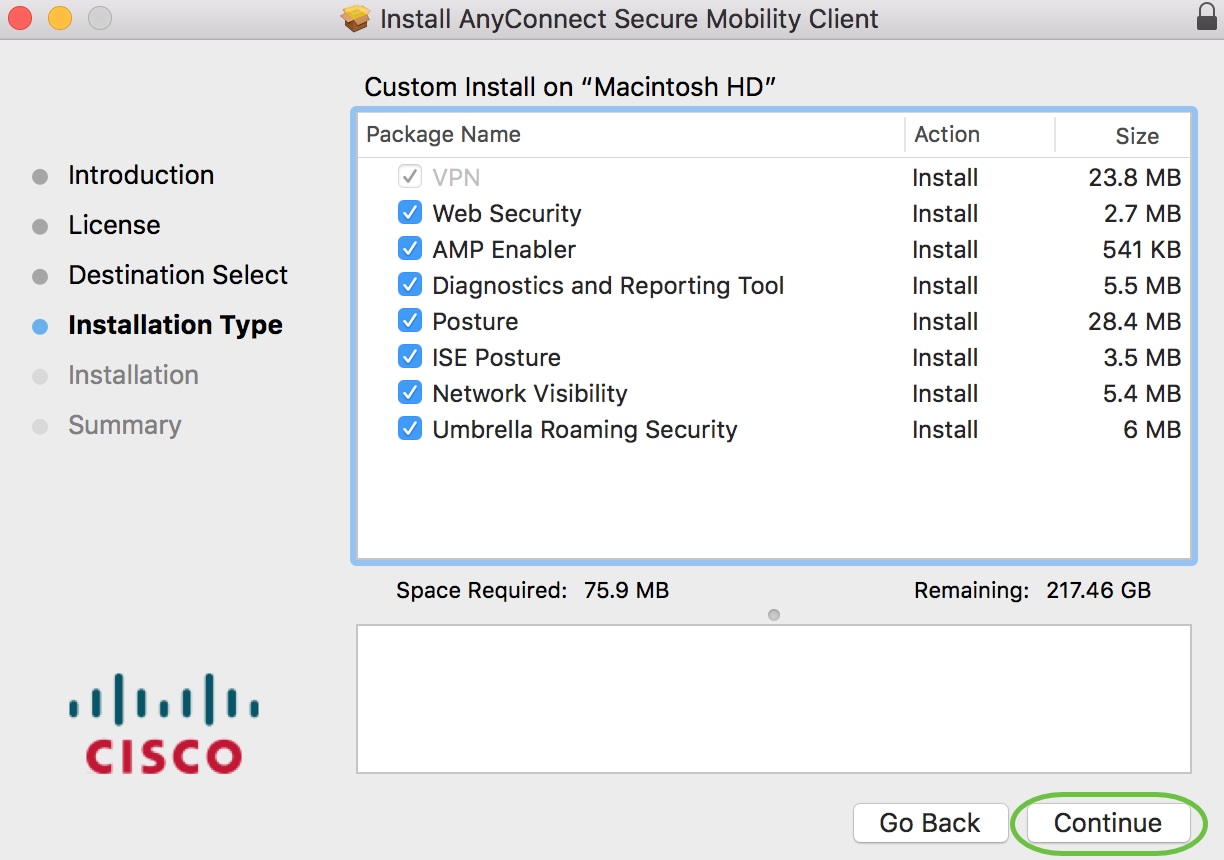
Choose the components to be installed by checking or unchecking the corresponding check boxes. All components are installed by default.
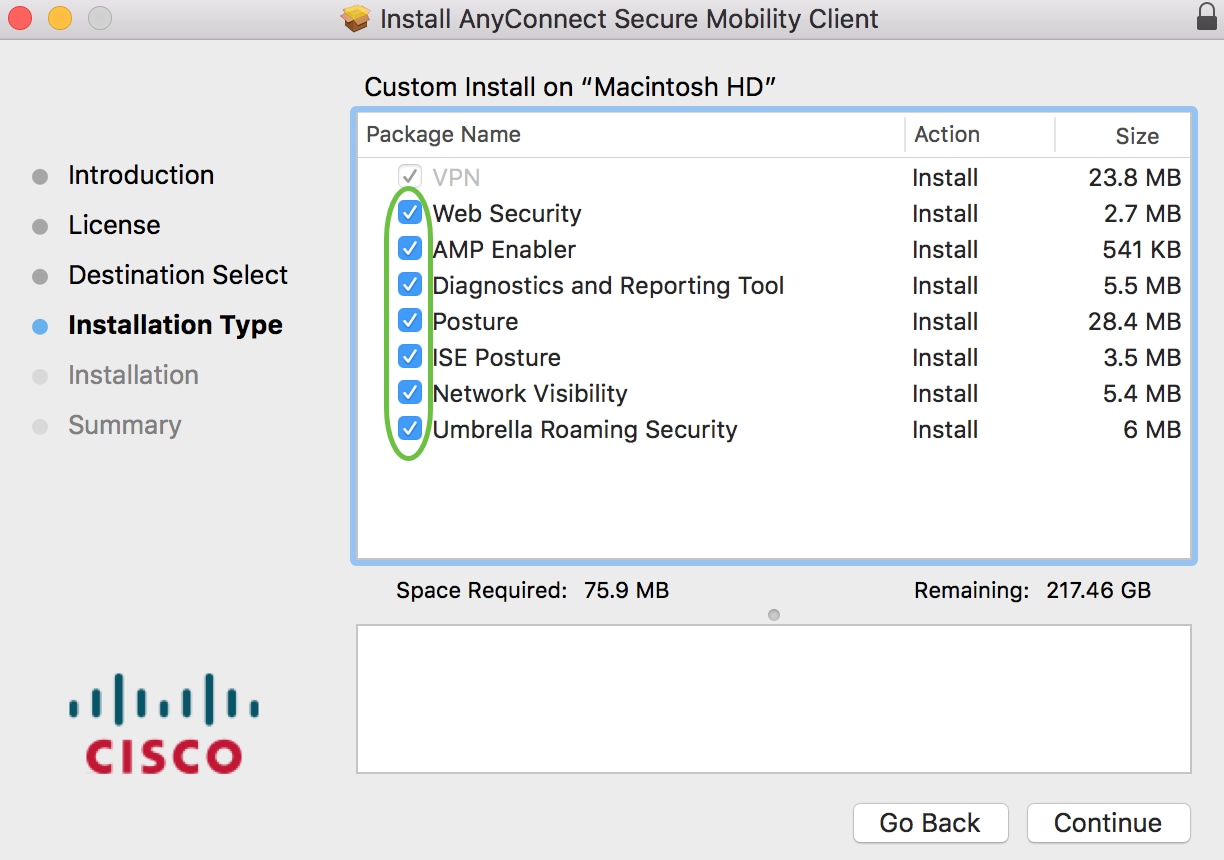
The items you select in this screen will appear as options in AnyConnect. If deploying AnyConnect for end-users, you may want to consider deselecting options.
Step 9
Step 10
Step 11
(Optional) Enter your password in the Password field.
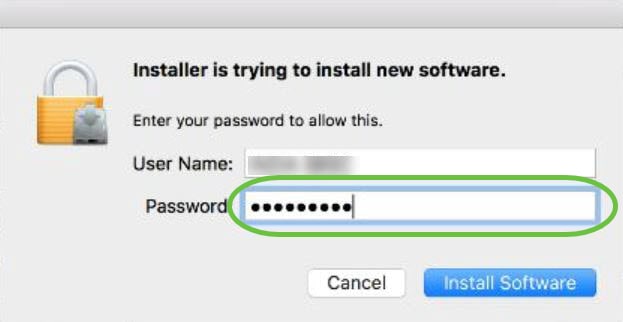
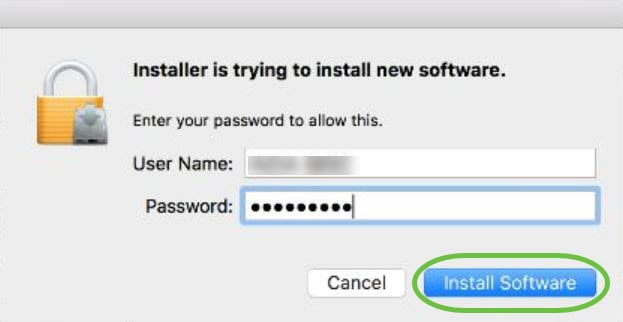
Step 12
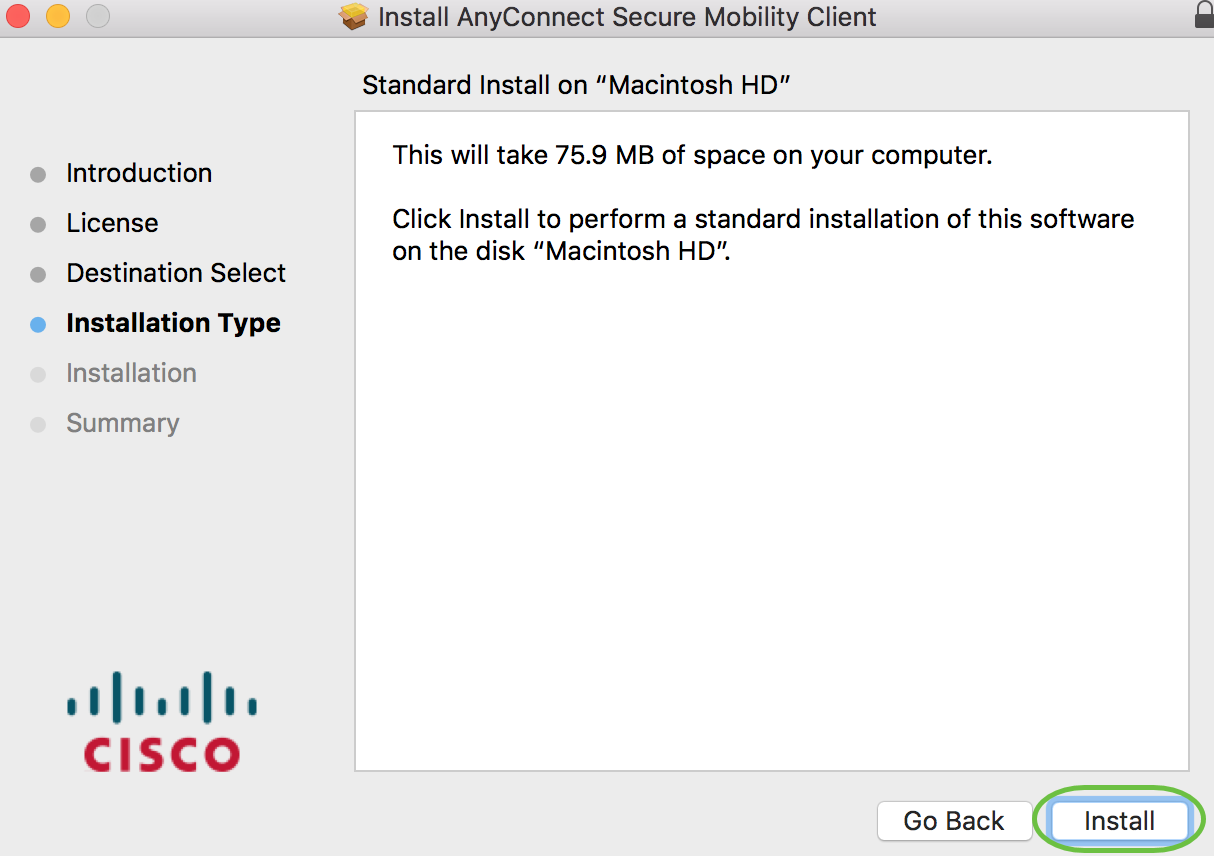
Click Install Software.
Step 13
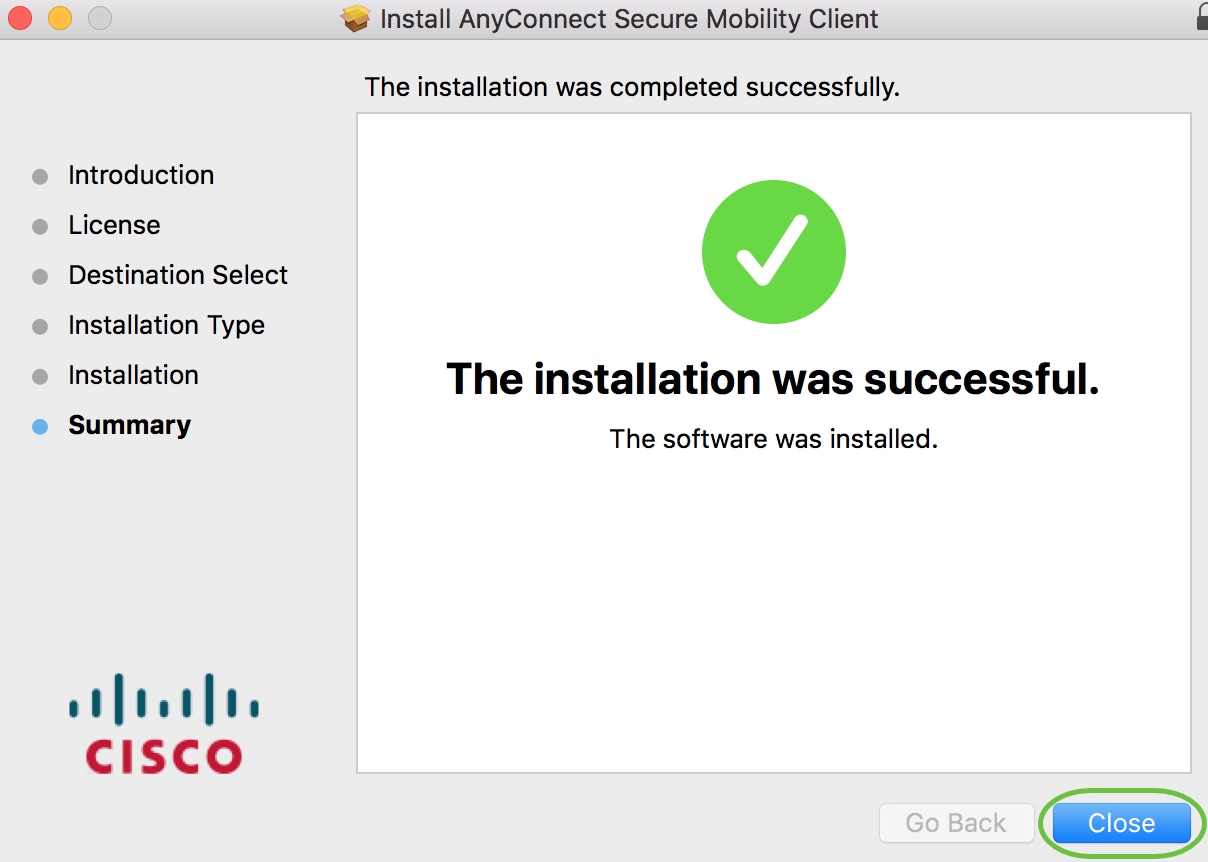
You have now successfully installed the AnyConnect Secure Mobility Client Software on your Mac computer.
Additional Resources
AnyConnect App
To try out AnyConnect on mobile devices, the App can be downloaded from Google Play store or Apple store.
View a video related to this article.
Источник
ASA 8.x: AnyConnect SSL VPN CAC-SmartCards Configuration with MAC Support
Available Languages
Download Options
Contents
Introduction
This document provides a sample configuration on Cisco Adaptive Security Appliance (ASA) for AnyConnect VPN remote access for MAC Support with the Common Access Card (CAC) for authentication.
The scope of this document is to cover the configuration of Cisco ASA with Adaptive Security Device Manager (ASDM), Cisco AnyConnect VPN Client and Microsoft Active Directory (AD)/Lightweight Directory Access Protocol (LDAP).
The configuration in this guide uses Microsoft AD/LDAP server. This document also covers advanced features such as OCSP, LDAP attribute maps and Dynamic Access Polices (DAP).
Prerequisites
Requirements
A basic understanding of Cisco ASA, Cisco AnyConnect Client, Microsoft AD/LDAP and Public Key Infrastructure (PKI) is beneficial in the comprehension of the complete setup. Familiarity with AD group membership, user properties as well as LDAP objects help in the correlation of the authorization process between certificate attributes and AD/LDAP objects.
Components Used
The information in this document is based on these software and hardware versions:
Cisco 5500 Series Adaptive Security Appliance (ASA) that runs the software version 8.0(x) and later
Cisco Adaptive Security Device Manager (ASDM) version 6.x for ASA 8.x
Cisco AnyConnect VPN Client 2.2 with MAC Support
The information in this document was created from the devices in a specific lab environment. All of the devices used in this document started with a cleared (default) configuration. If your network is live, make sure that you understand the potential impact of any command.
Conventions
Refer to the Cisco Technical Tips Conventions for more information on document conventions.
Cisco ASA Configuration
This section covers the configuration of Cisco ASA via ASDM. It covers the necessary steps in order to deploy a VPN remote access tunnel through an SSL AnyConnect connection. The CAC certificate is used for authentication and the User Principal Name (UPN) attribute in the certificate is populated in active directory for authorization.
Deployment Considerations
This guide does NOT cover basic configurations such as interfaces, DNS, NTP, routing, device access, ASDM access and so forth. It is assumed that the network operator is familiar with these configurations.
The sections highlighted in RED are mandatory configurations needed for basic VPN access. For example, a VPN tunnel can be setup with the CAC card without doing OCSP checks, LDAP mappings and Dynamic Access Policy (DAP) checks. DoD mandates OCSP checking but the tunnel works without OCSP configured.
The sections highlighted in BLUE are advanced features that can be included to add more security to the design.
ASDM and AnyConnect/SSL VPN can not use the same ports on the same interface. It is recommended to change the ports on one or the other to gain access. For example, use port 445 for ASDM and leave 443 for AC/SSL VPN. The ASDM URL access has changed in 8.x. Use https:// :
The ASA image required is at least 8.0.2.19 and ASDM 6.0.2.
AnyConnect/CAC is supported with Vista.
See Appendix A for LDAP & Dynamic Access Policy mapping examples for additional policy enforcement.
See Appendix D on how to check LDAP objects in MS.
See Related Information for a list of application ports for firewall configuration.
Authentication, Authorization, Accounting (AAA) Configuration
You are authenticated with the use of the certificate in their Common Access Card (CAC) through the DISACertificate Authority (CA) Server or the CA server of their own organization. The certificate must be valid for remote access to the network. In addition to authentication, you must also be authorized to use a Microsoft Active Directory or Lightweight Directory Access Protocol (LDAP) object. Department of Defense (DoD) requires the use of the User Principal Name (UPN) attribute for authorization, which is part of the Subject Alternative Name (SAN) section of the certificate. The UPN or EDI/PI must be in this format, 1234567890@mil. These configurations show how to configure AAA server in the ASA with an LDAP server for authorization. See Appendix A for additional configuration with LDAP object mapping.
Configure LDAP Server
Complete these steps:
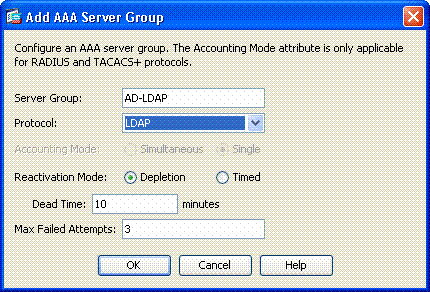
Choose Remote Access VPN > AAA Setup > AAA Server Group.
In AAA server groups table, click Add 3.
Enter server group name and choose LDAP in the protocol radio button. See Figure 1.
In Servers in the selected group table, click Add. Make sure that the server you created is highlighted in the previous table.
In the edit AAA server window, complete these steps. See Figure 2.
Note: Choose the Enable LDAP over SSL option if your LDAP/AD is configured for this type of connection.
Choose the interface where the LDAP is located. This guide shows inside the interface.
Enter the IP address of the server.
Enter server port. The default LDAP port is 389.
Choose Server Type.
Enter Base DN. Ask your AD/LDAP administrator for these values.
Under the scope option, choose the appropriate answer. This is dependent on the base DN. Ask your AD/LDAP administrator for assistance.
In the naming attribute, enter userPrincipalName. This is the attribute that is used for user authorization in the AD/LDAP server.
In the Login DN, enter the administrator DN.
Note: You have administrative rights or rights to view/search the LDAP structure that includes user objects and group membership.
In the Login Password, enter the password of the administrator.
Leave the LDAP attribute to none.
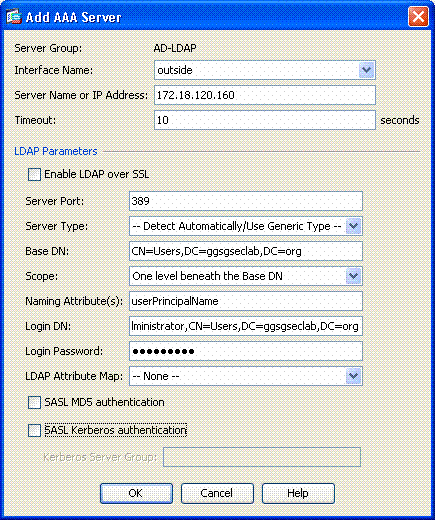
Note: You use this option later on the configuration to add other AD/LDAP object for authorization.
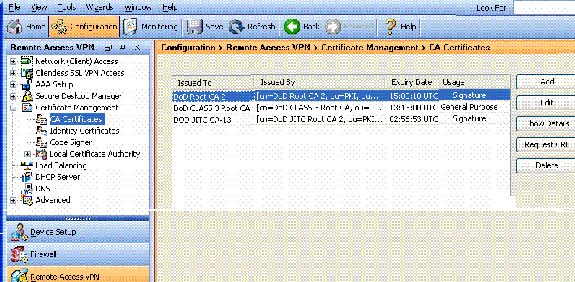
Manage Certificates
There are two steps in order to install certificates on the ASA. First, install the CA certificates (Root and Subordinate Certificate Authority) needed. Secondly, enroll the ASA to a specific CA and obtain the identity certificate. DoD PKI utilizes these certificates, Root CA2, Class 3 Root, CA## Intermediate that the ASA is enrolled with, ASA ID certificate and OCSP certificate. But, if you choose not to use OCSP, the OCSP certificate does not need to be installed.
Note: Contact your security POC in order to obtain root certificates as well as instructions on how to enroll for an identity certificate for a device. An SSL certificate should be sufficient for the ASA for remote access. A Dual SAN certificate is not required.
Note: The local machine also has to have the DoD CA chain installed. The certificates can be viewed in the Microsoft Certificate Store with Internet Explorer. DoD has produced a batch file that automatically adds all of the CAs to the machine. Ask your PKI POC for more information.
Note: DoD CA2 and Class 3 Root as well as the ASA ID and CA intermediate that issued the ASA cert should be the only CAs needed for user authentication. All of the current CA intermediates fall under the CA2 and Class 3 Root chain and are trusted as long as the CA2 and Class 3 Roots are added.
Generate Keys
Complete these steps:
Choose Remote Access VPN > Certificate Management > Identity Certificate > Add.
Choose Add a new id certificate and then New by the key pair option.
In the Add Key Pair window, enter a key name, DoD-1024. Click on the radio to add a new key. See Figure 3.
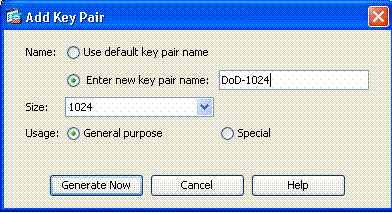
Choose size of the key.
Keep Usage to General Purpose.
Click Generate Now.
Note: DoD Root CA 2 uses a 2048 bit key. A second key that uses a 2048 bit key pair should be generated to be able to use this CA. Complete the previous above steps in order to add a second key.
Install Root CA Certificates
Complete these steps:
Choose Remote Access VPN > Certificate Management > CA Certificate > Add.
Choose Install from File and browse to the certificate.
Choose Install Certificate.
Figure 4: Installing Root Certificate
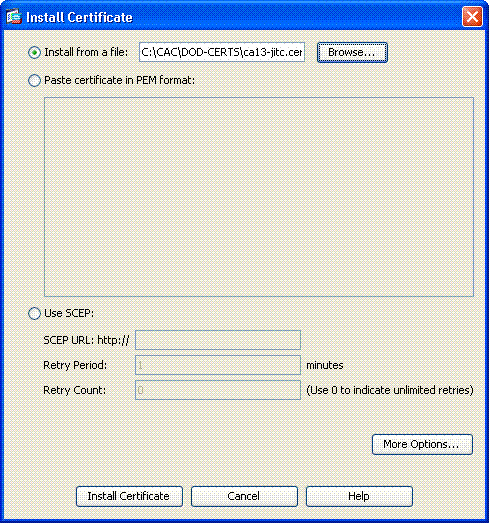
This window should appear. See Figure 5.

Note: Repeat steps 1 through 3 for every certificate that you want to install. DoD PKI requires a certificate for each of these: Root CA 2, Class 3 Root, CA## Intermediate, ASA ID and OCSP Server. The OCSP certificate is not needed if you do not use OCSP.
Figure 6: Installing Root Certificate
Enroll ASA and Install Identity Certificate
Choose Remote Access VPN > Certificate Management > Identity Certificate > Add.
Choose Add a new id certificate.
Choose the DoD-1024 Key Pair. See figure 7
Figure 7: Identity Certificate Parameters
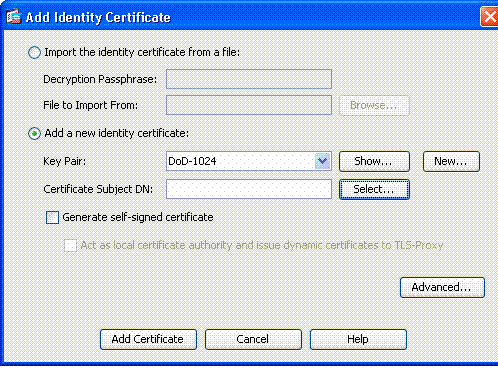
Go to the Certificate subject DN box and click Select.
In the Certificate Subject DN window, enter the information of the device. See Figure 8 for example.
Figure 8: Edit DN

Note: Make sure that you use the hostname of the device that is configured in your system when you add the subject DN. The PKI POC can tell you the mandatory fields required.
Choose Add certificate.
Click Browse in order to select the directory where you want to save the request. See Figure 9.
Figure 9 Certificate Request

Open the file with WordPad, copy the request to the appropriate documentation and send to your PKI POC. See Figure 10.
Figure 10: Enrollment Request

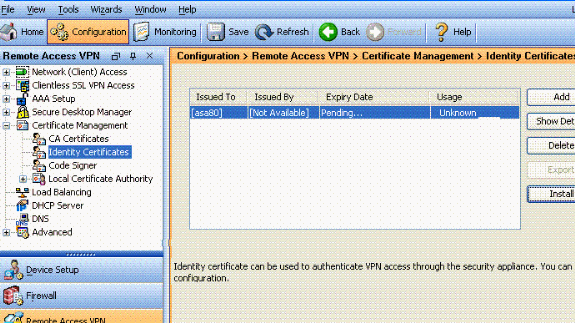
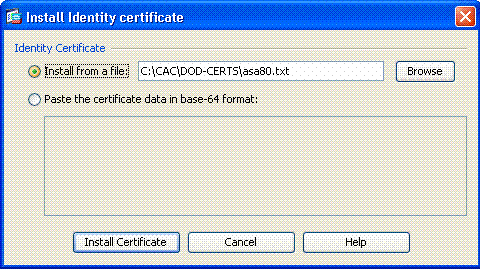
Once you have received the certificate from the CA administrator, choose Remote Access VPN > Certificate Management > ID Certificate > Install. See Figure 11.
Figure 11: Importing Identity Certificate
In the Install certificate window, browse to the ID cert and chooseInstall Certificate. See Figure 12 for example.
Figure 12: Installing Identity Certificate
Note: It is recommended to export the ID certificate trustpoint in ordewr to save the issued certificate and key pairs. This allows the ASA administrator to import the certificate and key pairs to a new ASA in case of RMA or hardware failure. Refer to Exporting and Importing Trustpoints for more information.
Note: Click SAVE in order to save the configuration in flash memory.
AnyConnect VPN Configuration
There are two options in order to configure the VPN parameters in ASDM. The first option is to use the SSL VPN wizard. This is an easy tool to use for users that are new to VPN configuration. The second option is to do it manually and to go through each option. This configuration guide uses the manual method.
Note: There are two methods to get the AC client to the user:
You can download the client from the Cisco website and install it on their machine.
The user can access the ASA via a web browser and the client can be downloaded.
Note: For example, https://asa.test.com. This guide uses the second method. Once the AC client is installed on the client machine permanently, you just launch the AC client from the application.
Create an IP Address Pool
This is optional if you use another method such as DHCP.
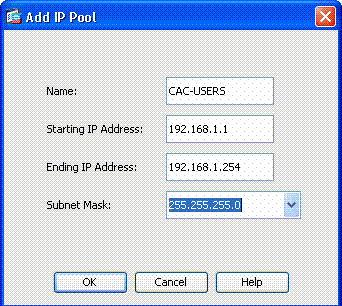
Choose Remote Access VPN > Network (Client) Access > Address Assignment > Address Pools.
In the Add IP Pool window, enter the name of the IP pool, starting and ending IP address and choose a subnet mask. See Figure 13.
Figure 13: Adding IP Pool
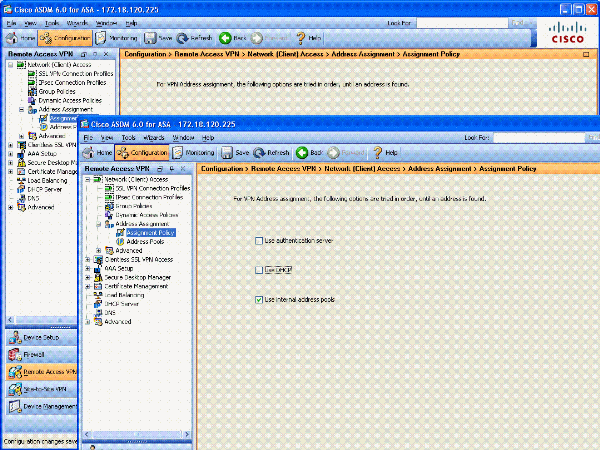
Choose Remote Access VPN > Network (Client) Access > Address Assignment > Assignment Policy.
Select the appropriate IP address assignment method. This guide uses the internal address pools. See Figure 14.
Figure 14: IP Address Assignment method
Create Tunnel Group and Group Policy
Note: If you do not want to create a new policy, you can use the default built in-group policy.
Choose Remote Access VPN -> Network (Client) Access -> Group Policies.
Click Add and choose Internal Group Policy.
In the Add Internal Group Policy window, enter the name for the Group Policy in the Name text box. See Figure 15.
Figure 15: Adding Internal Group Policy
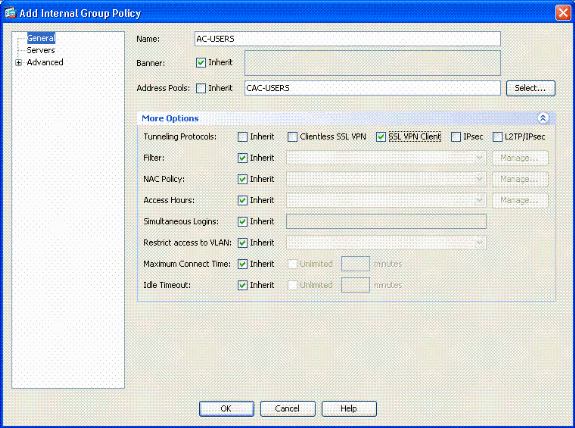
In the General tab, choose the SSL VPN Client in the Tunneling Protocols option, unless you use other protocols such as Clientless SSL.
In the Servers section, uncheck the inherit check box and enter the IP address of DNS and WINS servers. Enter DHCP scope if applicable.
In the Servers section, deselect the inherit check box in the Default Domain and enter the appropriate domain name.
In the General tab, deselect the inherit check box in the address pool section and add the address pool created in the previous step. If youuse another method of IP address assignment, leave this to inherit and make the appropriate change.
All other configuration tabs are left to default settings.
Note: There are two methods to get the AC client to the end users. One method is to go to Cisco.com and download the AC client. The second method is to have the ASA download the client to the user when the user tries to connect. This example shows the latter method.
Next, choose Advanced > SSL VPN Client > Login Settings. See Figure 16.
Figure 16: Adding Internal Group Policy
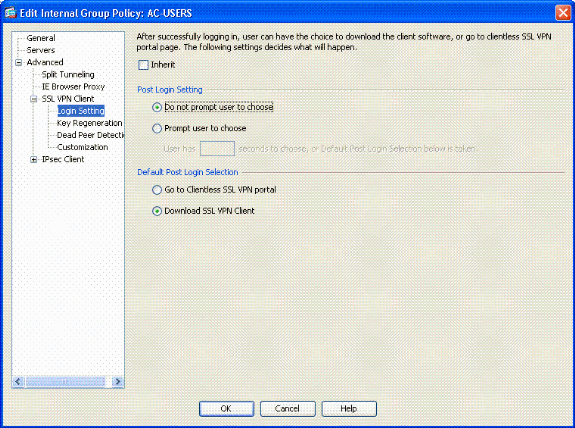
Deselect the Inherit checkbox.
Choose the appropriate Post Login Setting that fits your environment.
Choose the appropriate Default Post Login Selection that fits your environment.
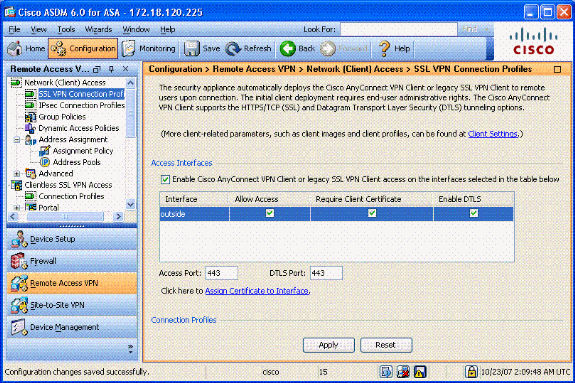
Tunnel Group Interface and Image Settings
Note: If you do not want to create a new group, you can use the default built-in group.
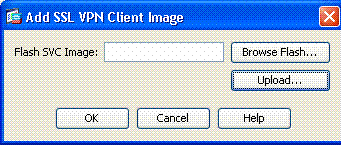
Choose Remote Access VPN > Network (Client) Access > SSL VPN Connection Profile.
Choose Enable Cisco AnyConnect Client…….
A dialog box appears with the question Would you like to designate an SVC image?
If there is already an image, choose the image to use with Browse Flash. If the image is not available, choose Upload and browse for the file on the local computer. See Figure 17. The files can be downloaded from Cisco.com; there is a Windows, MAC and Linux file.
Figure 17: Add SSL VPN Client Image
Next enable Allow Access, Require Client Cert and optionally Enable DTLS. See Figure 18.
Figure 18: Enabling Access
Next, create a Connection Profile/Tunnel Group. Choose Remote Access VPN > Network (Client) Access > SSL VPN Connection Profile.
In the Connection Profiles section, click Add.
Figure 19: Adding Connection Profile
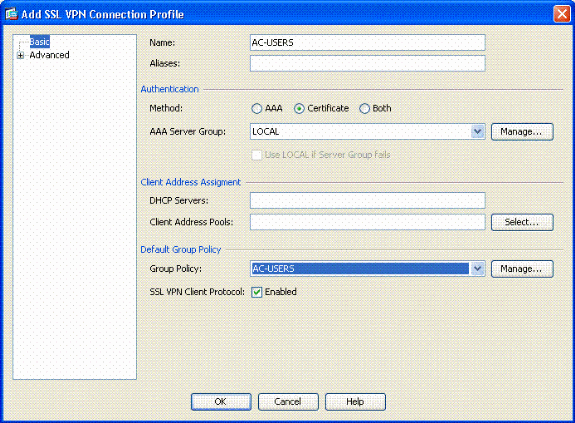
Choose Certificate in the authentication method.
Choose the group policy created previously.
Ensure that SSL VPN Client is enabled.
Leave other options as default.
Next, chooseAdvanced > Authorization. See Figure 20
Figure 20: Authorization
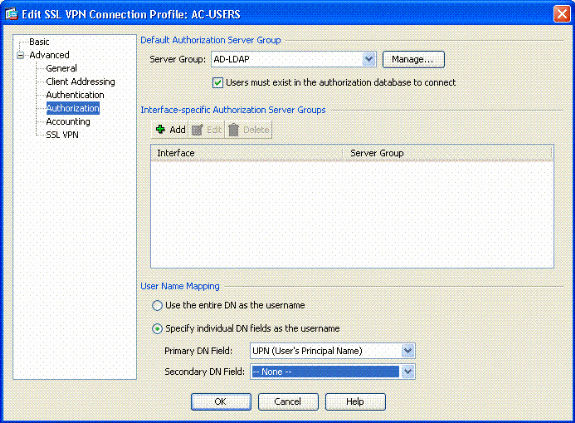
Choose the AD-LDAP group previously created.
Check Users must exist….to connect.
In the mapping fields, choose UPN for the primary and none for secondary.
Choose the SSL VPN section of the menu.
In the Connection Aliases section, complete these steps:
Figure 21: Connection Aliases
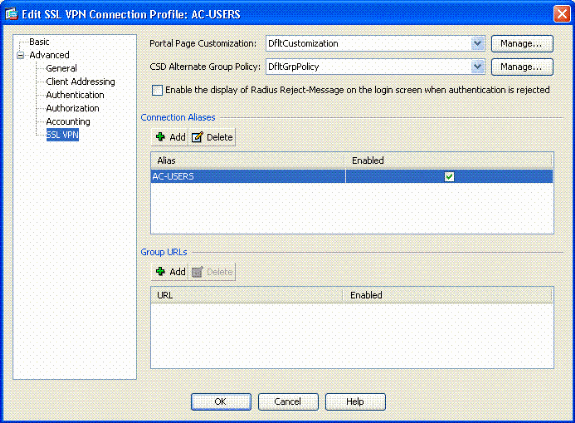
Enter the group alias you want to use.
Ensure that Enabled is checked. See Figure 21.
Note: Click Save in order to save the configuration in flash memory.
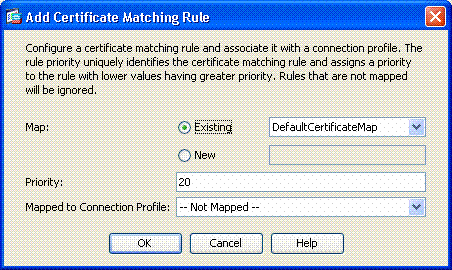
Certificate Matching Rules (If OCSP will be used)
Choose Remote Access VPN > Advanced > Certificate to SSL VPN Connection Profile Maps. See Figure 22.
Choose Add in the Certificate to Connection Profile Maps section.
You can keep the existing map as DefaultCertificateMap in the map section or create a new one if you already use cert maps for IPsec.
Keep the rule priority.
Under mapped group, leave as -- Not Mapped --. See Figure 22.
Figure 22: Adding Certificate Matching Rule
Click Add on the bottom table.
In the Add certificate Matching Rule Criterion window, complete these steps:
Figure 23: Certificate Matching Rule Criterion
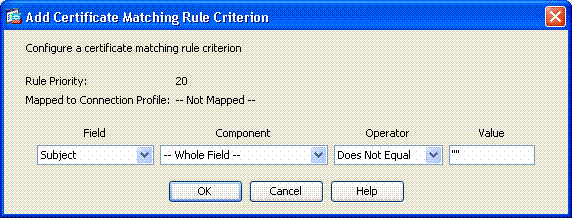
Keep the Field column to Subject.
Keep the Component column to Whole Field.
Change the Operator column to Does Not Equal.
In the Value column, enter two double quotes “”.
Click Ok and Apply. See Figure 23 for example.
Configure OCSP
The configuration of an OCSP can vary and depends upon the OCSP responder vendor. Read the manual of the vender for more information.
Configure OCSP Responder Certificate
Obtain a self-generated certificate from the OCSP responder.
Complete the procedures mentioned previously and install a certificate for the OSCP server.
Note: Make sure that Do not check certificates for revocation is selected for the OCSP certificate trustpoint.
Configure CA to use OCSP
Choose Remote Access VPN> Certificate Management > CA Certificates.
Highlight an OCSP in order to choose a CA to configure to use OCSP.
Ensure that Check certificate for revocation is checked.
In the Revocation Methods section, add OCSP. See Figure 24.
OCSP Revocation Check
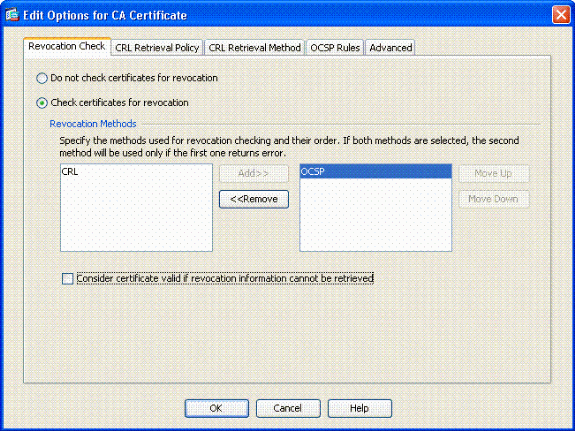
Ensure Consider Certificate valid…cannot be retrieved is unchecked if you want to follow strict OCSP checking.
Note: Configure/Edit all the CA server that uses OCSP for revocation.
Configure OCSP Rules
Note: Verify that a Certificate Group Matching Policy is created and the OCSP responder is configured before you complete these steps.
Note: In some OCSP implementations, a DNS A and PTR record can be needed for the ASA. This check is done in order to verify that the ASA is from a .mil site.
Choose Remote Access VPN> Certificate Management > CA Certificates 2.
Highlight an OCSP in order to choose a CA to configure to use OCSP.
Click the OCSP Rule tab.
In the Add OCSP Rule window, complete these steps. See Figure 25.
Figure 25: Adding OCSP Rules

In the Certificate Map option, choose DefaultCertificateMap or a map created previously.
In the Certificate option, choose OCSP responder.
In the index option, enter 10.
In the URL option, enter the IP address or the hostname of the OCSP responder. If you use the hostname, make sure DNS server is configured on ASA.
Cisco AnyConnect Client Configuration
This section covers the configuration of the Cisco AnyConnect VPN client.
Assumptions—Cisco AnyConnect VPN Client and middleware application is already installed in the host PC. ActivCard Gold and ActivClient were tested.
Note: This guide uses the group-url method for initial AC client install only. Once the AC client is installed, you launch the AC application just like the IPsec client.
Note: The DoD certificate chain needs to be installed on the local machine. Check with the PKI POC in order to obtain the certificates/batch file.
Note: The card reader driver for MAC OSX is already installed and compatible with the current OS version that you use.
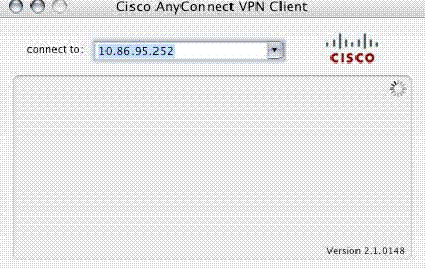
Downloading Cisco Anyconnect VPN Client – Mac OS X
Launch a web session to the ASA through Safari. The address should be in the format of https://Outside-Interface. For example, https://172.18.120.225.
A popup window asks to verify the certificate of the ASA. Click Continue.
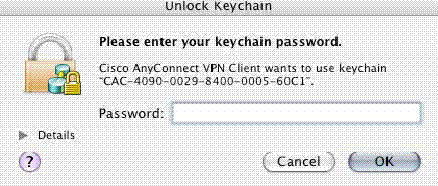
Another popup window appears in order to unlock the CAC keychain. Enter your pin number. See Figure 31.
Figure 31: Enter PIN

After the SSL VPN-service web page appears, click Continue.
After you unlock the keychain, the browser prompts you if you trust the certificate from the ASA. Click trust.
Enter the root password in order to unlock keychain to establish secure connection, and then click Ok.
Choose the certificate to use for client authentication, and then click Ok.
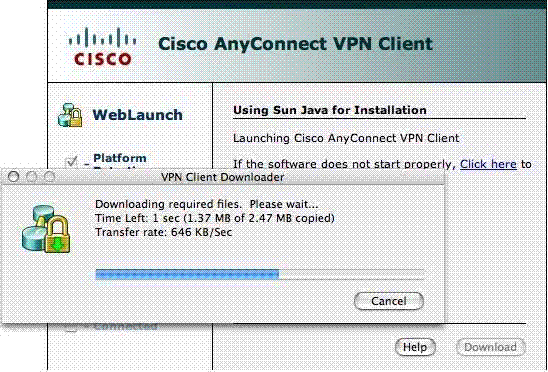
The browser then asks for the root/user password in order to allow for downloading of AnyConnect clients.
If authenticated, the AnyConnect client starts to download. See Figure 32.
Figure 32: AnyConnect Download
After the application is downloaded, the browser prompts you to accept the ASA certificate. Click Accept.
Connection is established. Figure 33.
Figure 33:AnyConnect Connected

Start Cisco AnyConnect VPN Client – Mac OS X
From Finder—Applications > Cisco AnyConnect VPN Client
Note: See Appendix E for Optional AnyConnect Client Profile Configuration.
New Connection
The AC window appears. See Figure 37.
Figure 37: New VPN Connection
Choose the appropriate host if AC does not automatically try the connection.
Enter your PIN when prompted. See Figure 38.
Figure 38: Enter PIN
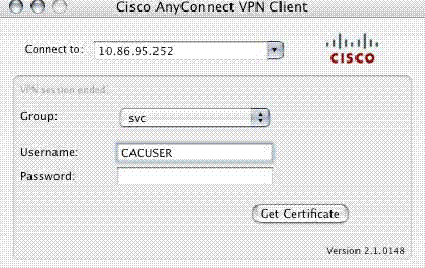
Start remote access
Choose the group and host to which you want to connect.
Since certificates are used, choose Connect in order to establish the VPN. See Figure 39.
Note: Since the connection uses certificates, there is no need to enter a username and password.
Figure 39: Connecting
Note: See Appendix E for Optional AnyConnect Client Profile Configuration.
Appendix A – LDAP Mapping and DAP
In ASA/PIX release 7.1(x) and later, a feature called LDAP mapping was introduced. This is a powerful feature that provides a mapping between a Cisco attribute and LDAP objects/attribute, which negates the need for LDAP schema change. For CAC authentication implementation, this can support additional policy enforcement on remote access connection. These are examples of LDAP mapping. Be aware that you need administrator rights in order to make changes in the AD/LDAP server. In ASA 8.x software, the Dynamic Access Policy (DAP) feature was introduced. DAP can work in conjunction with CAC to look at multiple AD groups as well as push policies, ACLs and so forth.
Scenario 1: Active Directory Enforcement using Remote Access Permission Dial-in – Allow/Deny Access
This example maps the AD attribute msNPAllowDailin to Cisco’s attribute cVPN3000-Tunneling- Protocol.
The AD attribute value: TRUE = Allow; FALSE = Deny
Cisco attribute value: 1 = FALSE, 4 (IPSec) or 20 (4 IPSEC + 16 WebVPN) = TRUE,
For ALLOW condition, you map:
For DENY dial-in condition, you map:
Note: Make sure that TRUE and FALSE are in all caps. Refer to Configuring an External Server for Security Appliance User Authorization for more information.
Active Directory Setup
In the Active Directory Server, click Start > Run.
In the Open text box, type dsa.msc then click Ok. This starts the active directory management console.
In the Active Directory management console, click the plus sign in order to expand the Active Directory Users and Computers.
Click the plus sign in order to expand the domain name.
If you have an OU created for your users, expand the OU in order to view all users; if you have all users assigned in the Users folder, expand that folder in order to view them. See Figure A1.
Figure A1: Active Directory Management Console

Double-click on the user that you want to edit.
Click on the Dial-in tab in the user properties page and click on allow or deny. See Figure A2.
Figure A2: User Properties

ASA Configuration
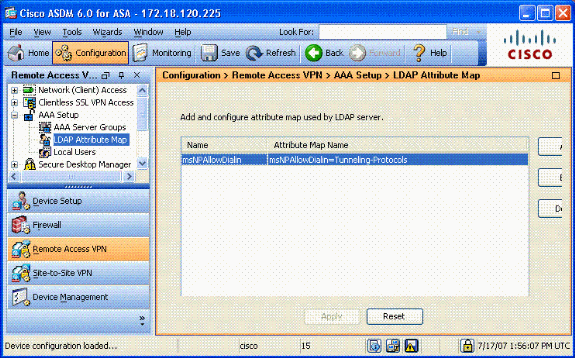
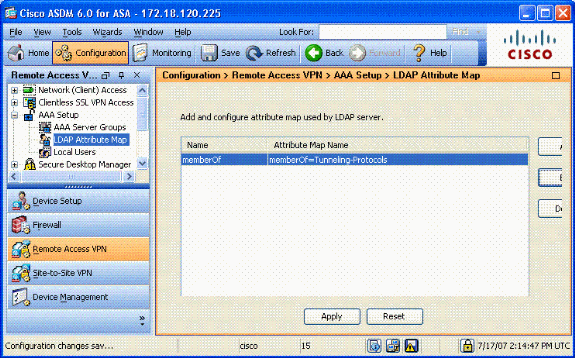
In ASDM, choose Remote Access VPN> AAA Setup > LDAP Attribute Map.
In the Add LDAP Attribute Map window, complete these steps. See Figure A3.
Figure A3: Adding LDAP Attribute Map
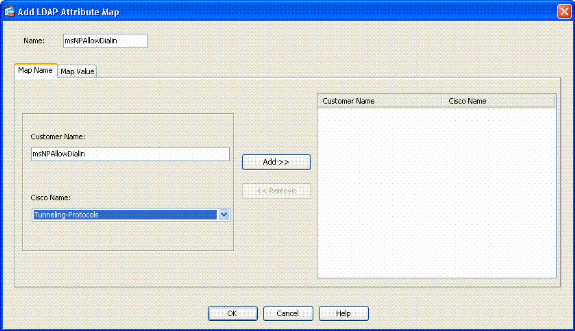
Enter a name in the Name textbox.
In the Map Name Tab, type msNPAllowDialin in the Customer Name text box.
In the Map Name Tab, choose Tunneling-Protocols in the drop-down option in the Cisco Name.
Choose the Map Value tab.
In the Add Attribute LDAP Map Value window, type TRUE in the Customer Name text box and type 20 in the Cisco Value text box.
Type FALSE in the Customer Name text box and type 1 in the Cisco Value text box. See Figure A4.
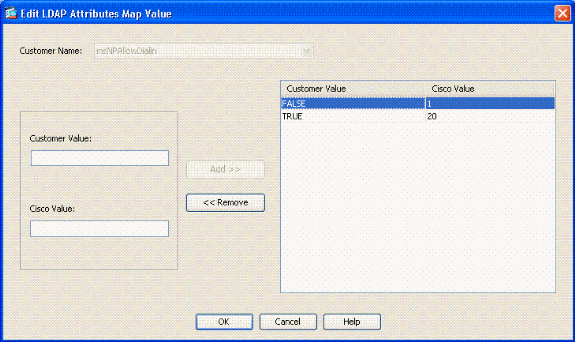
Configuration should look like Figure A5.
Figure A5: LDAP Attribute Map configuration
Choose Remote Access VPN> AAA Setup > AAA Server Groups. See Figure A6.
Figure A6: AAA Server Groups
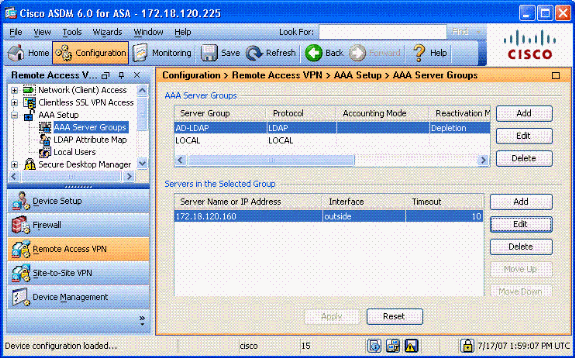
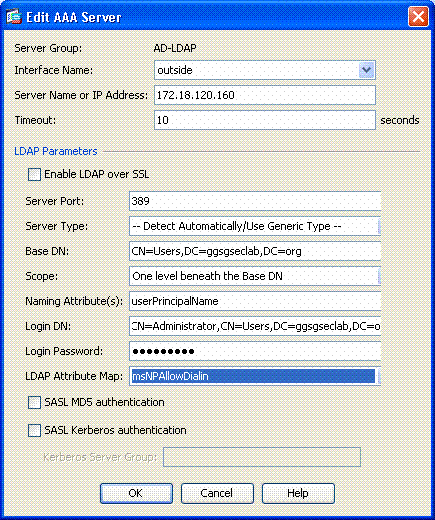
Click on the server group that you want to edit. In the Servers in the Selected Group section, choose the server IP address or hostname, and then click Edit.
In Edit AAA Server window, in the LDAP Attribute Map text box, choose the LDAP attribute map created in the drop-down menu. See Figure A7
Figure A7: Adding LDAP Attribute Map
Note: Turn on LDAP debugging while you test in order to verify if LDAP binding and attribute mapping work properly. See Appendix C for troubleshooting commands.
Scenario 2 : Active Directory Enforcement using Group membership to Allow/Deny Access
This example uses the LDAP attribute memberOf to map to the Tunneling Protocol attribute in order to establish a group membership as a condition. For this policy to work, you must have these conditions:
Use a group that already exists or create a new group for ASA VPN users to be a member of for ALLOW conditions.
Use a group that already exists or create a new group for non ASA users to be a member of for DENY conditions.
Make sure to check in the LDAP viewer that you have the right DN for the group. See Appendix D. If the DN is wrong, the mapping does not work properly.
Note: Be aware that the ASA can only read the first string of the memeberOf attribute in this release. Make sure that the new group created is on the top of the list. The other option is to put a special character in front of the name as AD looks at special characters first. In order to work around this caveat,use DAP in 8.x software to look at multiple groups.
Note: Make sure a user is part of the deny group or at least one other group so that the memberOf is always sent back to the ASA. You do not have to specify the FALSE deny condition but best practice is to do so. If the existing group name or the group name contains a space, enter the attribute in this manner:
Note: DAP allows the ASA to look at multiple groups in the memberOf attribute and base authorization off the groups. See the DAP section.
The AD attribute value:
Cisco attribute value: 1 = FALSE, 20 = TRUE,
For ALLOW condition, you map:
memberOf CN=ASAUsers,CN=Users,DC=ggsgseclab,DC=org= 20
For DENY condition, you map:
memberOf CN=TelnetClients,CN=Users,DC=ggsgseclab,DC=org = 1
Note: In future release, there is a Cisco attribute in order to allow and deny connection. Refer to Configuring an External Server for Security Appliance User Authorization for more information on Cisco attributes.
Active Directory Setup
In the Active Directory Server, choose Start > Run.
In the Open text box, type dsa.msc, and then click Ok. This starts the active directory management console.
In the Active Directory management console, click the plus sign in order to expand the Active Directory Users and Computers. See Figure A8
Figure A8: Active Directory Groups
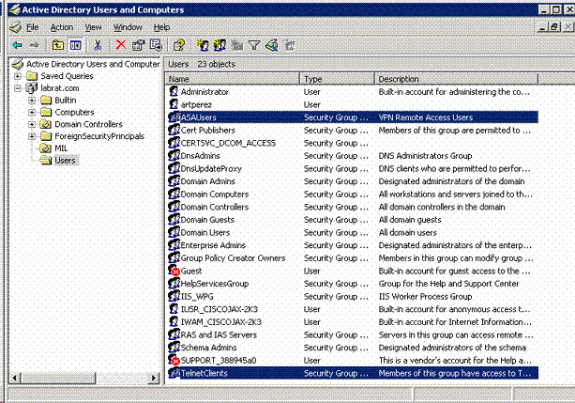
Click the plus sign in order to expand the domain name.
Right-click on the Users folder and choose New > Group.
Enter a Group Name. For example: ASAUsers.
Click on the Users folder, and then double-click on the group you just created.
Choose Members tab, and then click Add.
Type the Name of the user you want to add, and then click Ok.
ASA Configuration
In ASDM, choose Remote Access VPN > AAA Setup > LDAP Attribute Map.
In the Add LDAP Attribute Map window, complete these steps. See Figure A3.
Enter a name in the Name textbox.
In the Map Name Tab, type memberOf in the Customer Name text box c.
In the Map Name Tab, choose Tunneling-Protocols in the drop-down option in the Cisco Name.
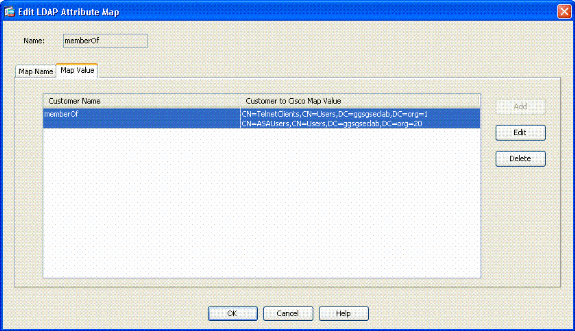
Click the Map Value tab.
In the Add Attribute LDAP Map Value window, type CN=ASAUsers,CN=Users,DC=ggsgseclab,DC=org in the Customer Name text box and type 20 in the Cisco Value text box.
Type CN=TelnetClients,CN=Users,DC=ggsgseclab,DC=org in the Customer Name text box and type 1 in the Cisco Value text box. See Figure A4.
Configuration should look like Figure A9.
Figure A9 LDAP Attribute Map
Choose Remote Access VPN> AAA Setup > AAA Server Groups.
Click on the server group that you want to edit. In the Servers in the Selected Group section, select the server IP address or hostname, and then click Edit
In Edit AAA Server window, in the LDAP Attribute Map text box, select the LDAP attribute map created in the drop-down menu.
Note: Turn on LDAP debugging while you test in order to verify LDAP binding and attribute mappings work properly. See Appendix C for troubleshooting commands.
Scenario 3: Dynamic Access Policies for Multiple memberOf Attributes
This example uses DAP to look at multiple memberOf attributes in order to allow access based off of Active Directory group membership. Prior to 8.x, the ASA only read the first memberOf attribute. With 8.x and later, the ASA can look at all the memberOf attributes.
Use a group that already exists or create a new group (or multiple groups) for ASA VPN users to be a member of for ALLOW conditions.
Use a group that already exists or create a new group for non ASA users to be a member of for DENY conditions.
Make sure to check in the LDAP viewer that you have the right DN for the group. See Appendix D. If the DN is wrong, the mapping does not work properly.
ASA Configuration
In ASDM, choose Remote Access VPN> Network (Client) Access > Dynamic Access Policies.
In the Add Dynamic Access Policy, complete these steps:
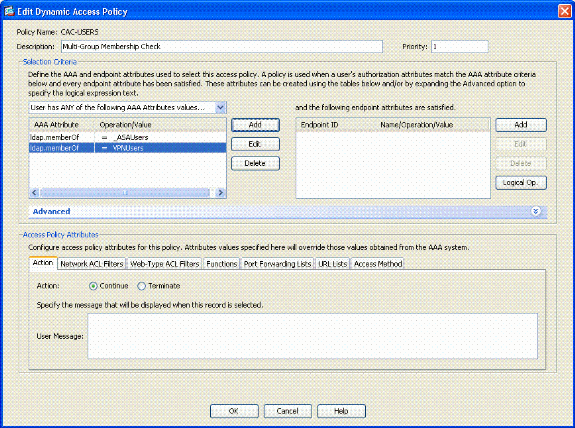
Enter a name in the Name textbox b.
In the priority section, enter 1, or a number greater than 0.
In the Selection Criteria, click Add.
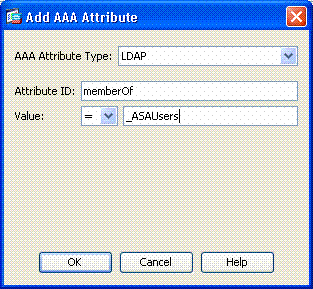
In the Add AAA Attribute, choose LDAP .
In the attribute ID section, enter memberOf.
In the value section, choose = and enter the AD group name. Repeat this step for each group you want to reference. See figure A10.
Figure A10 AAA Attribute Map
In the Access Policy Attributes section, chooseContinue. See figure A11.
Figure A11 Add Dynamic Policy
In ASDM, choose Remote Access VPN> Network (Client) Access > Dynamic Access Policies.
Choose Default Access Policy and choose Edit.
The default action should be set to Terminate. See figure A12.
Figure A12 Edit Dynamic Policy

Note: If Terminate is not selected, you are allowed in even if not in any groups because the default is to Continue.
Appendix B – ASA CLI Configuration
Appendix C- Troubleshooting
Troubleshooting AAA and LDAP
debug ldap 255—Displays LDAP exchanges
debug aaa common 10—Displays AAA exchanges
Example 1: Allowed Connection with correct attribute mapping
This example shows the output of debug ldap and debug aaa common during a successful connection with the scenario 2 shown in Appendix A.
| Figure C1: debug LDAP and debug aaa common output – correct mapping |
|---|
Example 2: Allowed Connection with mis-configured Cisco attribute mapping
This example shows the output of debug ldap and debug aaa common during an allowed connection with the scenario 2 shown in Appendix A.
| Figure C2: debug LDAP and debug aaa common output – incorrect mapping |
|---|
Troubleshooting DAP
debug dap errors—Displays DAP errors
debug dap trace—Displays DAP function trace
Example 1: Allowed connection with DAP
This example shows the output of debug dap errors and debug dap trace during a successful connection with the scenario 3 shown in Appendix A. Notice multiple memberOf attributes. You can belong to both _ASAUsers and VPNUsers or tp either group, which depends on the ASA config.
| Figure C3: debug DAP |
|---|
Example 2: Denied Connection with DAP
Thia example shows the output of debug dap errors and debug dap trace during an unsuccessful connection with the scenario 3 shown in Appendix A.
| Figure C4: debug DAP |
|---|
Troubleshooting Certificate Authority / OCSP
debug crypto ca 3
In the config mode—logging class ca console(or buffer) debugging
These examples show a successful certificate validation with the OCSP responder and a failed certificate group matching policy.
Figure C3 shows the debug output that has a validated certificate and a working certificate group matching Policy.
Figure C4 shows the debug output of a mis-configured certificate group matching policy.
Figure C5 shows the debug output of a user with a revoked certificate.
| Figure C5: OCSP debugging – successful certificate validation |
|---|
Figure C5: Output of a failed certificate group matching policy
| Figure C5: Output of a revoked certificate |
|---|
Appendix D – Verify LDAP Objects in MS
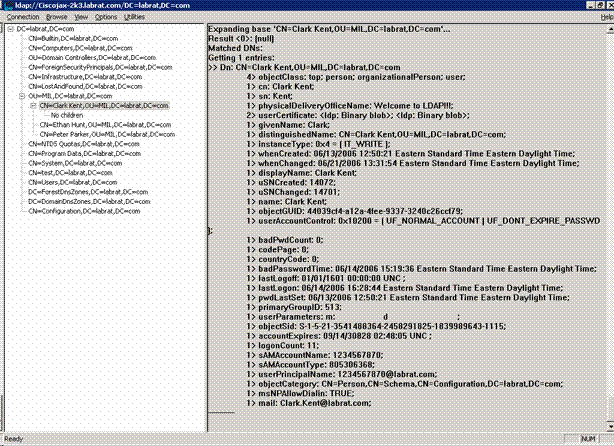
In Microsoft server 2003 CD, there are additional tools that can be installed in order to view the LDAP structure as well as the LDAP objects/attributes. In order to install these tools, go to the Support directory in the CD and then Tools. Install SUPTOOLS.MSI.
LDAP Viewer
After installation, choose Start > Run.
Type ldp, then click Ok. This starts the LDAP viewer.
Choose Connection > Connect.
Enter the server name and then click Ok.
Choose Connection > Bind.
Enter a username and password.
Note: You need administrator rights.
View LDAP objects. See Figure D1.
Figure D1: LDAP Viewer
Active Directory Services Interface Editor
In the Active Directory server, choose Start > Run.
Type adsiedit.msc. This starts the editor.
Right click on an object and click Properties.
This tool shows all attributes for specific objects. See Figure D2.
Figure D2: ADSI Edit

Appendix E
An AnyConnect profile can be created and added to a workstation. The profile can reference various values such as ASA hosts or certificate matching parameters such as distinguished name or issuer. The profile is stored as an .xml file and can be edited with Notepad. The file can be added to each client manually or pushed from the ASA through a group policy. The file is stored in:
Complete these steps:
Choose the AnyConnectProfile.tmpl and open the file with Notepad.
Make appropriate modifications to the file such as issuer or host IP. See Figure F1 for example.
When finished, save the file as an .xml.
This is a sample of a Cisco AnyConnect VPN Client Profile XML file.
Refer to the Cisco AnyConnect documentation in regards to profile management. In short:
A Profile should be uniquely named for your Company. An example is: CiscoProfile.xml
The profile name should be the same even if different for individual group within the company.
This file is intended to be maintained by a Secure Gateway administrator and then distributed with the client software. The profile based on this XML can be distributed to clients at any time. The distribution mechanisms supported are as a bundled file with the software distribution or as part of the automatic download mechanism. The automatic download mechanism only available with certain Cisco Secure Gateway products.
Источник


