- Электрический блогнот
- мои заметки на полях
- Linux как установить CUDA
- Предисловие
- Шаг 1 — проверяем nvidia драйвер
- Шаг 2 — качаем CUDA Toolkit
- Шаг 3 — устанавливаем CUDA Toolkit
- Шаг 4 — Тест
- Шаг 5 — устанавливаем cuDNN
- Выводы
- Установка cuda linux mint
- Latest commit
- Git stats
- Files
- README.md
- Setup Linux Mint 19 Tara with nvidia cuda for machine learning
- Install nvidia driver
- Install cuda
- Install cuda-toolkit
- Update Cuda
- Install docker
- Install docker-compose
- Install nvidia-docker2 [Deprecated, go next for actual version]
- Upgrade nvidia-docker2 [TO SOLVE DEPRECATION]
- Install nvidia-docker
- Install R
- Install Ide
- Through my Memory Lane.
- Tuesday, August 1, 2017
- Installing CUDA on Linux Mint and Hello CUDA Program
Электрический блогнот
мои заметки на полях
Linux как установить CUDA

Установить CUDA (Compute Unified Device Architecture) библиотеки в Linux очень легко и в тоже время сложно. Казалось бы, что тут сложного, сделай какой-нибудь apt-get install cuda или yum install cuda и система на автомате все сама установит. Действительно, во многих случаях этого достаточно, но, как говорится, есть нюансы.

Так вот, чтобы использовать всю мощь вашей графической карты необходимо выполнение следующих условий:
- Наличие карты Nvidia (будем считать, что она уже есть);
- Установленные в системе драйвера от Nvidia (будем исходить из того, что тоже установлены);
- CUDA Toolkit, те самые библиотеки и программы, которые чаще всего для простоты называют CUDA (без Toolkit)
Вот пунктом номер 3 мы и будем заниматься в этой статье.
Все последующие шаги будут приведены для Ubuntu 18.04 (самая популярная система), но они так же подойдут и для других дистрибутивов Linux.
Предисловие
Устанавливать CUDA будем от обычного пользователя, в домашнюю папку. Я не сторонник установки в /usr/local таких вещей, которые часто приходится обновлять. Лучше поставить куда-нибудь в безопасное место, чтобы не запороть работающую систему. Например, /home/username/cuda подойдет отлично. Надоест эксперементировать с CUDA, просто удалите эту папку и все. И не надо заботиться, что какие-то зависимости нарушились в системе.
Шаг 1 — проверяем nvidia драйвер
Исходим из того, что Nvidia карточка у ва есть и nvidia драйвер установлен в систему и запущен.
Проверяем:
lsmod | grep -i nvidia
вывод должен быть похожим на следующий:
Далее определяем версию nvidia драйвера с помощью команды modinfo:
Есть еще один способ определить версию драйвера. Для этого воспользуемся утилитой nvidia-smi:
Nvidia-smi так же выдала версию 435.21.
Если nvidia-smi не будет в вашей системе, то пользуйтесь способом с modinfo.
Шаг 2 — качаем CUDA Toolkit
Между весрией Nvidia драйвера и версией CUDA Toolkit существует связь. Для определенной версии Nvidia драйвера нужно скачивать и устанавливать строго соответствующий пакет CUDA Toolkit, иначе ничего не получится. Опять же есть два способа определить версию CUDA Toolkit.
Первый способ:
идем на страницу cuda toolkit release notes и в таблице «Table 1. CUDA Toolkit and Compatible Driver Versions» ищем нужное соотвествие между версией драйвера и версией CUDA Toolkit:

Например, на моем ноуте установлен nvidia драйвер версии 435.21, значит мне подойдут все версии CUDA Toolkit кроме 10.2. Иными словами 10.1 включительно и ниже.
Если у вас драйвер версии 390, то CUDA Toolkit надо скачивать версии 9.1 и ниже.
Второй способ:
можно снова воспользоваться утилитой nvidia-smi:
здесь четко написано, для вашего драйвера нужна CUDA 10.1.
После того, как определились с версией CUDA Toolkit идем и скачиваем его со страницы:
https://developer.nvidia.com/cuda-toolkit-archive

Здесь выбираем:
Linux -> x86_64 -> Ubuntu -> 18.04 -> runfile (local)
После скачивания в директории для загрузок появится файл:
cuda_10.1.105_418.39_linux.run
Шаг 3 — устанавливаем CUDA Toolkit
Инсталлер скачан. Сделаем его исполняемым:
И сразу же запускаем:
Запускается долго (наверняка происходит самораспаковка).
После соглашения с EULA появляется экран: 
Как видите здесь размечен драйвер, мы его устанавливать не будем, он уже в системе и запущен.
Далее наводи курсор на «CUDA Toolkit 10.1» и жмем букву «A», тем самым переходя к расширенным настройкам: 
Здесь делаем неактивными все позиции, как на скриншоте и переходим в «Change Toolkit Installation Path» и вводим имя директории для установки: 
в прцессе установки нужно будет еще ввести «Root install path» вводим туже саму директорию: 
Когда установка завершится нужно будет дать системе знать куда установлена CUDA, для этого в файл
/.bashrc прописываем следующие строки:
На этом установка закончена.
Шаг 4 — Тест
Тестируем связку CUDA и драйвера Nvidia. Для этого воспользуемся примеры из устанвки CUDA.
Возьмем тест с частицами.

Как видно из рисунка, тест запустился и судя по выводу nvidia-smi на 24% нагружает видеокарту. Буковки C+G перед ./particles говорят о том, что задействованы и вычислительные (С) и графические (G) ресурсы видеокарты.
Шаг 5 — устанавливаем cuDNN
Если вы планируете использовать CUDA в машинном обучении, то просто необходимо устанвить библиотеку cuDNN. Этабиблиотека позволяет максимально эффективно использовать мощности графического ускорителя при работе с нейронными сетями. Ставится cuDNN элементрано:
1) регистрируетесь;
2) скачиваете нужную версию (для каждой CUDA своя cuDNN);
3) распаковываете архив в папку куда установлена CUDA.
Выводы
В данной статье приведено описание способа установки CUDA библиотек в Linux в случае, когда графический драйвер уже установлен, а у пользователя нет прав администратора.
Источник
Установка cuda linux mint
Set of instructions to successful installation of NVIDIA official driver and CUDA Toolkit
Latest commit
Git stats
Files
Failed to load latest commit information.
README.md
Linux Mint 19.2 Cinnamon NVIDIA 940M Driver Installation & CUDA 10.2 Toolkit Installation Instructions
- This repo includes set of steps to successfully install NVIDIA Driver and CUDA 10.2 in Mint 19.2 Cinnamon
Official Driver Installation for NVIDIA 940M
- First make the environment ready for driver installation by running below commands:
Second dowload offical NVIDIA driver from NVIDIA driver websites. It is a .run file which includes necessary scripts to install driver.
Disable Nouveau Nvidia driver
- Confirm Updated files has following contents
- Enter the following linux command to regenerate initramfs:
- Reboot the system when the computer boots up Nouveau Driver has been disabled.
- Stop Desktop Manager. After executing the following linux command the display server will stop, therefore make sure you save all your current work ( if any ) before you proceed:
Hit CTRL+ALT+F1 and login with your username and password to open a new TTY1 session or perform the Nvidia driver installation via SSH bash.
Install Nvidia Driver
- NVIDIA Driver is now installed. Reboot the system
After NVIDIA Driver installation when the splash screen pop-up. Screen will go black hit CTRL+ALT+F1 and login with username and password
Initialize a new X session for the system. GUI Interface will open.
- So, we are back to the GUI now we know that our GPU is NVIDIA Optimus capable so will install nvidia-prime
Reboot the system when the reboot succeed GUI will appear without typing startx or following step 12
Thats it we successfully installed latest Nvidia offical driver to the system. You can configure NVIDIA settings from NVIDIA X Server
Источник
Setup Linux Mint 19 Tara with nvidia cuda for machine learning
Oct 20, 2018 · 3 min read
Install nvidia driver
Method 1: graphically by Driver Manager
Install cuda
Cuda 10 is not supported by tensorflow, if you want to use it without docker try to install 9.0 version (Or build it in your machine as shown here).
Install cuda-toolkit
Update Cuda
To update Cuda It is possible to use Drive manager to obtain the new driver version and after the package manager will find automatically the new Cuda version to update.
When I update my cuda driver from 10.0 to 10.2 I have some problem, because some function should overwrite other old package function.
I try to f i x broken package with synaptic but it does not work so I solve in this way:
This force the new driver to overwrite old function.
Install docker
Before install docker-ce correct the file /etc/apt/sources.list.d/additional-repositories.list
Add the key and after intall docker-ce
Setup docker without sudo
Install docker-compose
Install nvidia-docker2 [Deprecated, go next for actual version]
Create file /etc/apt/sources.list.d/nvidia-docker.list
Now you can install nvidia-docker2
Upgrade nvidia-docker2 [TO SOLVE DEPRECATION]
Up to now nvidia-docler2 is deprecated but it is possible to upgrade as explaned here, it mantains the retrocompatibility.
All of the following option will continue working
But the new sintax is
Install nvidia-docker
Install nvidia-docker using guide here.
Install R
Using the official sites.
If you want to uninstall use:
Install Ide
Download jetbrains toolbox, unzip and run it.
Install PyCharm Community from toolbox.
In order to use venv without error execute:
Источник
Through my Memory Lane.
Rajesh’s Tinkering around with Technologies
Tuesday, August 1, 2017
Installing CUDA on Linux Mint and Hello CUDA Program
CUDA ® is a parallel computing platform and programming model invented by NVIDIA. In case you wanted to write parellel programs that runs on GPU. CUDA will be helpful.
Things that are need for CUDA programming.
- A machine with Nvidia Graphics Card
- A Supported Linux, Kernel and GCC [refer here]
- NVIDIA CUDA Toolkit
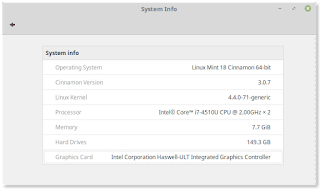
My System Specs is the following:
Dell Inspiron. It has a Nvidia Geforce grapics card.
Installation steps:
WARNING- Read the step completely before starting. I ran into issues with some of these step. Only for expert users or else you may have to endup reinstalling you OS .
1. Go here and download NVIDIA CUDA Toolkit deb/runfile. I am using the deb file. It is about 2GB. So, be careful if you got lesser bandwidth or Internet quota.

$ lspci | grep -i nvidia
08:00.0 3D controller: NVIDIA Corporation GM108M [GeForce 840M] (rev a2)
rajz@warriorwithin
$ uname -a
Linux warriorwithin 4.4.0-71 -generic #92-Ubuntu SMP Fri Mar 24 12:59:01 UTC 2017 x86_64 x86_64 x86_64 GNU/Linux
rajz@warriorwithin
$ gcc —version
gcc (Ubuntu 5.4.0-6ubuntu1
16.04.4) 5.4.0 20160609
3. If nouveau is enabled, then we need to disable it. If the below command prints details which means that it is active. So, just disable it by doing the steps below.
add above two lines and run the below command.
4. Reboot!!
5. lsmod | grep nouveau to check if it is active.
6. Then run the following command based on your file in Step 1. Mine was the following
rajz@warriorwithin
/install $ dpkg -i cuda-repo-ubuntu1604-8-0-local-ga2_8.0.61-1_amd64 .deb
7. Run this sudo apt-get update
8. Run this sudo apt-get install cuda
9. Reboot!!
10. Open
/.bashrc file and Add the two lines at the end of file
11. Created a folder under Documents(or wherever you wish) to Install sample files and Run the below
rajz@warriorwithin
/Documents $ cuda-install-samples-8.0.sh cuda-samples/
12. cd into
/Documents/cuda-samples/NVIDIA_CUDA-8.0_Samples and do make
13. Then do the following


14. If it shows up like in the figure. Then it is all fine.
15. So, far so good. Next up is Hello World CUDA program
I am unsure if the step 3, 4, 5 are really necessary. But still did it for completeness sake.
ALERT.
After Doing these steps. My system went blank after a restart.
I figured it out that My display is by Intel Graphics Controller. Where as after NVIDIA Driver installation it set nvidia as my default display or card. So, I was getting a blank screen; Grub loaded. Linux mint Logo appeared. Even login happened. but I can’t see any thing. even TTY didn’t work.
Workaround to fix this.
1. During Grub loading. Press ‘e’. search a line and prefix nomodeset before quick splash and press enter.
2. It will take you to login. But cinnamon may crash.
3. Using terminal Uninstall all drivers of nvidia sudo apt-get remove nvidia**
4. reboot. I reverted the changes I did in step 3,4 of prev installation.
5. Get to know you GPU model from lspci cmd
6. Download http://www.nvidia.com/Download/index.aspx?lang=en-us your driver based on your MODEL, and OS; Mine was this
7. Go to TTY by pressing CTRL+ALT +F1
8. Use cmd to stop display using Card[on Linuxmint] using sudo service mdm stop
8.1 For ubuntu OS; use sudo service lightdm stop
9. sudo ./NVIDIA-Linux-x86_64-384.59.run —no-opengl-files
follow instruction
9.1 I said no only for 32 bit libs; Rest say positively. IMPORTANT.!
10. sudo service mdm start will get you back to GUI mode.
11. Reboot! huh! Hoping that it won’t go blank!
Let me know if these steps doesn’t work or even if it works! Hope it helps!
Источник


