- Install TensorFlow-GPU + CUDA in Windows 10, with easy to follow instructions.
- Python CUDA set up on Windows 10 for GPU support
- Step 1: Check Configuration and Compatibility
- Step 2: Install VS2017
- Step 3: Install CUDA Toolkit
- Step 4: Install cuDNN
- Step 5: Install Tensorflow GPU
- Step 6: Install Keras
- Step 7: Install Pytorch (Optional)
- Step 8: Verify installation
- How to install Tensorflow GPU with CUDA 10.0 for python on Windows
- Step 1: Verify you have a CUDA-Capable GPU:
- Step 2: Install Visual C++ Build Tools 2015
- Step 3: Download the NVIDIA CUDA Toolkit:
- Step 4: Reboot the system to load the NVIDIA drivers.
- Step 5: Check Cuda Toolkit:
- Step 6: Install MSYS2:
- Step 7: Install cuDNN 7.3.1:
- Step 8: Install bazel build:
- Step 9: Set Windows to use long path :
- 20 Comments on How to install Tensorflow GPU with CUDA 10.0 for python on Windows
Install TensorFlow-GPU + CUDA in Windows 10, with easy to follow instructions.

Installing CUDA and TensorFlow-GPU can be a very challenging task, in this article I will show to install it in a few simple steps.
Before getting started with this installation we need to make sure that your graphics card is CUDA enabled. If it is not then using GOOGLE COLLAB can be a great alternative.Check if your Graphics card is CUDA enabled( link), scroll down and click on CUDA enabled Ge-force and Titan Products. Search for your graphics card from the list.
If you don’t know your graphics card specs:
- Go to Desktop
- Right Click and Select NVIDIA Control Panel
- Click Help and Select System Information from the drop down
- Under Items you can view your graphics card version.
Check the latest version of CUDA supported by TensorFlow. Click on this link . Scroll down to Software Requirements to check for the latest supported build.
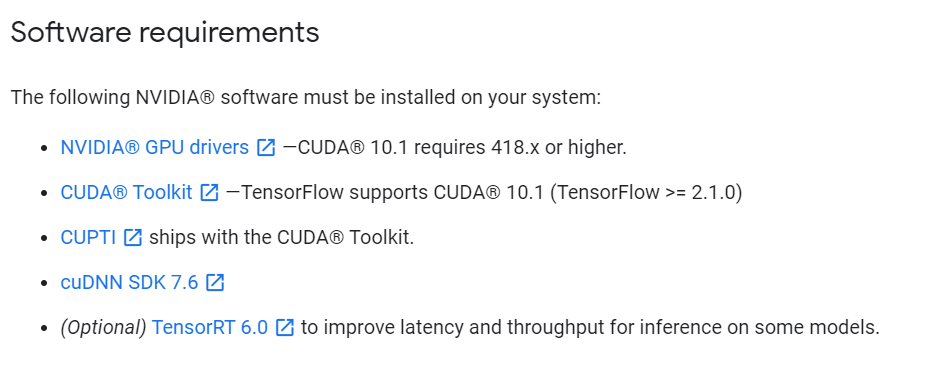
Here CUDA 10.1 and cuDNN SDK 7.6 are the latest supported version by TensorFlow, you can ignore the rest of the things for now.
Okay now that we know what we have to install we first need to clean our system of any NVIDIA programs. That means removing all installation of NVIDIA from our system.
- Go to My Computer/C Drive/Program Files and remove all files having the name NVIDIA.
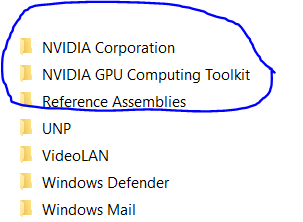
2. Again Go to My Computer/C Drive/Program Files(x86) and do the same thing remove all files having the name NVIDIA.

After removing all the files from your System perform a reboot.
Now Lets Download all the required software
- The First thing we need to download is Visual Studio, as it is a prerequisite for CUDA installation and without this our installation will fail. Go to this linkand download the latest Visual Studio Community Edition. Just follow the default installation settings until you reach Step 4(Choosing Workloads) don’t select any workload and just click on Install.
- Next we need to download CUDA Toolkit(link ). Recall the CUDA Toolkit Version from the TensorFlow Software Requirements(the latest supported build during the time of writing this article is 10.1, but if any new supported build is mentioned on the TensorFlow website go ahead and select it).

Select your Operating System( I have selected mine as Windows)
Python CUDA set up on Windows 10 for GPU support

Dec 30, 2019 · 3 min read
Installation of Python Deep learning on Windows 10 PC to utilise GPU may not be a straight-forward process for many people due to compatibility issues. One good and easy alternative is to use Google Collab, which is free. However, in cases where you can only use deep learning on a private PC and/or without Internet access, you can follow the steps below which I had used.
Note that after following the steps below, do not update from NVIDIA Geforce Game Ready Driver, as this will change your CUDA version, and thus mess up the compatibility issues for your deep learning setup.
- VS2017 (Visual Studio Community 2017)
- cuda_10.0.130_411.31_win10.exe
- cudnn_10.0-windows-x64-v7.4.2.24
Step 1: Check Configuration and Compatibility
- Refer to the GPU section from https://www.tensorflow.org/install/source_windows. It shows the compatibility between Tensorflow, Python, CUDA and CUDNN version.

Step 2: Install VS2017
- Download and install Microsoft Visual Studio Community 2017 from www.visualstudio.com/vs/older-downloads.
- Note that the downloaded version is for web-installation only. If you need to create an offline installation, run the following command from your download directory:
Copy the folder to the remote computer and install by double-clicking on vs_setup.exe in the folder.
Step 3: Install CUDA Toolkit
- Download CUDA from https://developer.nvidia.com/cuda-10.0-download-archive.
- Choose the following target platform:
— Operating System: Windows
— Architecture: x86_64
— Version: 10
— Installation Type: exe (local)

- Copy and install it in your remote computer. Note that after installation, environment variables (i.e. CUDA_PATH and CUDA_PATH_V10_0) will be created automatically.
Step 4: Install cuDNN
- Download from https://developer.nvidia.com/rdp/cudnn-archive. Choose “Download cuDNN v7.4.2 (Dec 14, 2018) for CUDA 10.0” followed by “cuDNN Library for Windows 10”.
- Unzip and copy the folder to your remote computer.
- Go to your Environment Variables and search the path of CUDA_PATH from System variables. In my case, it is in C:\Program Files\NVIDIA GPU Computing Toolkit\CUDA\v10.0 . Go to this CUDA installation folder.
- Copy the content inside bin , include and lib of the cuDNN folder to the CUDA installation folder (i.e. bin\cudnn64_7.dll to the bin\ , include\cudnn.h to the include\ folder and lib\x64\cudnn.lib to the lib\x64\ folder).
From step 5 onwards, I will recommend doing them in virtual conda environment, so that in cases where there are multiple project environments, modifying Python libraries in a conda environment will not affect other projects. The conda environment can also be easily portable (copy-and-paste) to remote computers.
Step 5: Install Tensorflow GPU
Step 6: Install Keras
Step 7: Install Pytorch (Optional)
- Run the following command:
- Alternatively, you can find the command from Pytorch website: https://pytorch.org/get-started/locally. Choose the following (as at time of writing):
— Pytorch Build: Stable (1.3)
— Your OS: Windows
— Package: PIP
— Language: Python 3.6
— CUDA: 10.1 (v10.0 no longer available at time of writing)

Once done, the c o mmand will be given at “Run this command”. Copy and paste in your terminal to run.
Step 8: Verify installation
You can verify if the installation is correct by running the following Python script.
How to install Tensorflow GPU with CUDA 10.0 for python on Windows
15 GB of free space in C drive. You can use another drive as well but need to change path.
Step 1: Verify you have a CUDA-Capable GPU:
Step 2: Install Visual C++ Build Tools 2015
Step 3: Download the NVIDIA CUDA Toolkit:
Step 4: Reboot the system to load the NVIDIA drivers.
Step 5: Check Cuda Toolkit:
Step 6: Install MSYS2:
Step 7: Install cuDNN 7.3.1:
Step 8: Install bazel build:
Step 9: Set Windows to use long path :
20 Comments on How to install Tensorflow GPU with CUDA 10.0 for python on Windows
I am getting an error “Config value cuda is not defined in any .rc file for step 12. Any suggestion?
Here is what I have tried:
$ /c/bazel/bazel build -c opt –config=cuda /c/tensorflow/tensorflow/tensorflow/tools/pip_package:build_pip_package
INFO: Options provided by the client:
Inherited ‘common’ options: –isatty=0 –terminal_columns=80
INFO: Options provided by the client:
‘build’ options: –python_path=C:/Users/adsolank/AppData/Local/Continuum/anaconda3/python.exe
ERROR: Config value cuda is not defined in any .rc file
I got the same error on step12. I am considering that the version of cuDNN is the reason for the error. I am using cuDNN 7.4, what is yours?
I am following the guide but I am getting this error. See if anyone can help.
p_packageuild –config=opt –config=cuda //tensorflow/tools/pip_package:build_pip
Starting local Bazel server and connecting to it…
WARNING: The following configs were expanded more than once: [cuda]. For repeatable flags, repeats are counted twice and may lead to unexpected behavior.
WARNING: Option ‘experimental_shortened_obj_file_path’ is deprecated
Loading:
Loading: 0 packages loaded
Analyzing: target //tensorflow/tools/pip_package:build_pip_package (1 packages loaded)
Analyzing: target //tensorflow/tools/pip_package:build_pip_package (41 packages loaded)
Analyzing: target //tensorflow/tools/pip_package:build_pip_package (95 packages loaded)
Analyzing: target //tensorflow/tools/pip_package:build_pip_package (159 packages loaded)
Analyzing: target //tensorflow/tools/pip_package:build_pip_package (223 packages loaded)
Analyzing: target //tensorflow/tools/pip_package:build_pip_package (241 packages loaded)
Analyzing: target //tensorflow/tools/pip_package:build_pip_package (268 packages loaded)
Analyzing: target //tensorflow/tools/pip_package:build_pip_package (272 packages loaded)
Analyzing: target //tensorflow/tools/pip_package:build_pip_package (293 packages loaded)
Analyzing: target //tensorflow/tools/pip_package:build_pip_package (293 packages loaded)
Analyzing: target //tensorflow/tools/pip_package:build_pip_package (294 packages loaded)
ERROR: Analysis of target ‘//tensorflow/tools/pip_package:build_pip_package’ failed; build aborted: no such package ‘@png_archive//’: Traceback (most recent call last):
File “C:/tensorflow/third_party/repo.bzl”, line 106
_apply_patch(ctx, ctx.attr.patch_file)
File “C:/tensorflow/third_party/repo.bzl”, line 73, in _apply_patch
_execute_and_check_ret_code(ctx, cmd)
File “C:/tensorflow/third_party/repo.bzl”, line 52, in _execute_and_check_ret_code
fail(“Non-zero return code(<1>) when …))
Non-zero return code(256) when executing ‘C:\msys64\usr\bin\bash.exe -l -c “patch” “-p1” “-d” “C:/users/kailok/_bazel_kailok/xv6zejqw/external/png_archive” “-i” “C:/tensorflow/third_party/png_fix_rpi.patch”‘:
Stdout:
Stderr: Timed out
INFO: Elapsed time: 29.694s
INFO: 0 processes.
FAILED: Build did NOT complete successfully (296 packages loaded)
FAILED: Build did NOT complete successfully (296 packages loaded)
vim third_party/repo.bzl
Press “a” on your keyboard. It will go in Insert mode look around def _wrap_bash_cmd(ctx, cmd):
In that function you have to comment a line by adding # at first (may in line 29). See below
Before:
def _wrap_bash_cmd(ctx, cmd):
if _is_windows(ctx):
bazel_sh = _get_env_var(ctx, “BAZEL_SH”)
if not bazel_sh:
fail(“BAZEL_SH environment variable is not set”)
cmd = [bazel_sh, “-l”, “-c”, ” “.join(cmd)]
return cmd
After:
def _wrap_bash_cmd(ctx, cmd):
if _is_windows(ctx):
bazel_sh = _get_env_var(ctx, “BAZEL_SH”)
if not bazel_sh:
fail(“BAZEL_SH environment variable is not set”)
# cmd = [bazel_sh, “-l”, “-c”, ” “.join(cmd)]
return cmd
Press ESE after edit then type
:wq
And press ENTER
I tried that.
It gave me error:
Solution copy NUL WORKSPACE
I tried again.
It gave me error: no member sort in __init__ of some package.
I found solution.
I tried again: now I get
WARNING: The following configs were expanded more than once: [cuda]. For repeatable flags, repeats are counted twice and may lead to unexpected behavior.
WARNING: Option ‘experimental_shortened_obj_file_path’ is deprecated
Loading:
Loading: 0 packages loaded
ERROR: Skipping ‘//tensorflow/tools/pip_package:build_pip_package’: error loading package ‘tensorflow/tools/pip_package’: Extension file not found. Unable to load package for ‘@local_config_rocm//rocm:build_defs.bzl’: The repository could not be resolved
WARNING: Target pattern parsing failed.
ERROR: error loading package ‘tensorflow/tools/pip_package’: Extension file not found. Unable to load package for ‘@local_config_rocm//rocm:build_defs.bzl’: The repository could not be resolved
INFO: Elapsed time: 2.914s
INFO: 0 processes.
FAILED: Build did NOT complete successfully (0 packages loaded)
FAILED: Build did NOT complete successfully (0 packages loaded)
To what stage should I return?
Thanks
Can you share which branch, bazel version you are using for build ?
I’m getting the same error and I’m using the bazel version you mentioned. 0.17.2
If you have an error with eigen (something like execroot\org_tensorflow\external\eigen_archive\eigen\src/Core/arch/CUDA/Half.h(212)), which may occurs because you have Compute capability above 5.3, do the following steps before step 12:
1. download https://github.com/amsokol/tensorflow-windows-build-tutorial
2. copy eigen_half.patch to tensorflow/third_party
3. add Add patch_file = clean_dep(“//third_party:eigen_half.patch”), line to eigen_archive section to tensorflow/tensorflow/workspace.bzl
it should looks like:
tf_http_archive(
name = “eigen_archive”,
build_file = clean_dep(“//third_party:eigen.BUILD”),
patch_file = clean_dep(“//third_party:eigen_half.patch”),
sha256 = “d956415d784fa4e42b6a2a45c32556d6aec9d0a3d8ef48baee2522ab762556a9”,
strip_prefix = “eigen-eigen-fd6845384b86”,
urls = [
“https://mirror.bazel.build/bitbucket.org/eigen/eigen/get/fd6845384b86.tar.gz”,
“https://bitbucket.org/eigen/eigen/get/fd6845384b86.tar.gz”,
],
)
Thank you for this clear instruction.
The result of this building is original tensorflow but the one I needed is tensorflow with gpu support, is there any fix to the instructions?
This instructions is for building tensorflow with gpu support but with cuda 10.
After the installation, I open up CMD and type in “pip list” but there isn’t any sign of tensorflow-gpu but the regular tensorflow is there waiting for me to use it, is there any instructions that differentiate the results as tensorflow or tensorflow-gpu?
Run the following to check tf gpu:
python -c «import tensorflow as tf; print(tf.contrib.eager.num_gpus())»
It shows the gpu is there but when I use tensorflow for python it does not show any usage on the gpu…
Windows 10 Home Edition user doesn’t have gpedit, do we need to spend $200 on it to use tensorflow? 😀
Thanks! for pointing the problem. I will update the article with a link for further information for enabling long path.
The whole installation seems to be tensorflow not tensorflow-gpu
Can any experts update the instructions?
If you’re using a version of Windows that does not provide access to Group Policy, you can edit the registry instead.
Hit the Windows key, type regedit and press Enter.
Navigate to HKEY_CURRENT_USER\SOFTWARE\Microsoft\Windows\ CurrentVersion\Group Policy Objects\ <48981759-12f2-42a6-a048-028b3973495f>Machine\System\CurrentControlSet\Policies
Select the LongPathsEnabled key, or create it as a DWORD (32-bit) value if it does not exist.
Set the value to 1 and close the Registry Editor.


