- Как установить git в Linux
- How to Install Git on Linux Mint 20
- Installing Git on Linux Mint
- Configuring the Git on Linux Mint 20
- Conclusion
- About the author
- Kamran Sattar Awaisi
- Install self-managed GitLab
- Official Linux package
- Ubuntu
- 1. Install and configure the necessary dependencies
- 2. Add the GitLab package repository and install the package
- 3. Browse to the hostname and login
- 4. Set up your communication preferences
- 5. Recommended next steps
- 1. Install and configure the necessary dependencies
- 2. Add the GitLab package repository and install the package
- 3. Browse to the hostname and login
- 4. Set up your communication preferences
- 5. Recommended next steps
- Debian
- 1. Install and configure the necessary dependencies
- 2. Add the GitLab package repository and install the package
- 3. Browse to the hostname and login
- 4. Set up your communication preferences
- 5. Recommended next steps
- 1. Install and configure the necessary dependencies
- 2. Add the GitLab package repository and install the package
- 3. Browse to the hostname and login
- 4. Set up your communication preferences
- 5. Recommended next steps
- CentOS 8
- 1. Install and configure the necessary dependencies
- 2. Add the GitLab package repository and install the package
- 3. Browse to the hostname and login
- 4. Set up your communication preferences
- 5. Recommended next steps
- 1. Install and configure the necessary dependencies
- 2. Add the GitLab package repository and install the package
- 3. Browse to the hostname and login
- 4. Set up your communication preferences
- 5. Recommended next steps
- CentOS 7
- 1. Install and configure the necessary dependencies
- 2. Add the GitLab package repository and install the package
- 3. Browse to the hostname and login
- 4. Set up your communication preferences
- 5. Recommended next steps
- 1. Install and configure the necessary dependencies
- 2. Add the GitLab package repository and install the package
- 3. Browse to the hostname and login
- 4. Set up your communication preferences
- 5. Recommended next steps
Как установить git в Linux
Давеча ставил git на Linux Mint и опять пришлось загуглить пару моментов. Чтобы больше не допускать таких стыдных страниц в своей биографии, фиксирую набор команд на бумаге, а заодно объясняю всем интересующимся, что я делал и зачем. Если Вы уже устанавливали гит хотя бы раз, ничего нового не узнаете. Но если только начинаете интересоваться им, то минимальный набор команд для начала работы будет полезен. Подробности ниже.
Итак, последовательность действий. Во-первых, гит нужно установить
sudo — в Mint или например, в Debian. Для своей ОС наберите подходящее слово для запуска команды из-под рута.
Гит поставили. Теперь нужно сгенерировать пару ключей: публичный и приватный. Запускаем
Убедимся, что ключи созданы, перейдем в каталог .ssh своей домашней папки и посмотрим, что в ней лежит
Увидим там 2 файла: id_rsa и id_rsa.pub. Все правильно, первый ключ приватный, который хранится на Вашей машине и никому не передается. Второй — публичный. Именно его Вы передаете третьим лицам или ресурсам, чтобы получить доступ в нужные репозитории.
Откроем файл id_rsa.pub и скопируем все его содержимое
Или же как крутые хакеры наберем следующее
Эта волшебная строка скопирует содержимое оного файла в буфер обмена — удобно. Конечно, если у Вас установлена утилита xclip. Если нет, не переживайте, установите ее — sudo apt-get install xclip — и запустите команду заново.
Вот теперь все готово. Ключ скопирован, можно отдавать его админам/коллегам-программистам или прописать его самим, если владелец проекта — это Вы.
Я по сугубо сектантским соображениям предпочитаю bitbucket. Добавляются ключи в нем на этой странице — https://bitbucket.org/account/user/username/ssh-keys/, кнопочка «Add key».
После того, как Ваш ключ будет добавлен, можно приступать к полноценной работе с репозиторием, для начала склонировав его
Однако, прежде чем погружаться в дебри нужного проекта, не забудьте прописать в настройках гита имя и email, что гит и коллеги могли Вас идентифицировать
git config —list покажет нам все настройки, сейчас в списке должны присутствовать 2 вышеуказанные настройки.
А вот теперь можно начинать клонировать проект, коммитить, пушить и делать другие страшные вещи. Что плохого можно сотворить с гитом и как именно это сделать, можно узнать из статьи Мой набор команд при работе с git. А у меня на этом все.
Источник
How to Install Git on Linux Mint 20
Git, developed by Linus Torvalds, is the most popular distributed system for version control. Git is a very efficient platform for open-source projects. Using Git, you can collaborate with the other developers, upload the new changes, keep track of the changes, and many more.
Installing Git on Linux Mint
The Git is included in Linux Mint 20 standard repositories can be installed easily using the apt command.
As always, update and upgrade your Linux Mint 20 system before installing the Git package.
Type the below-given command to update the apt package listing:
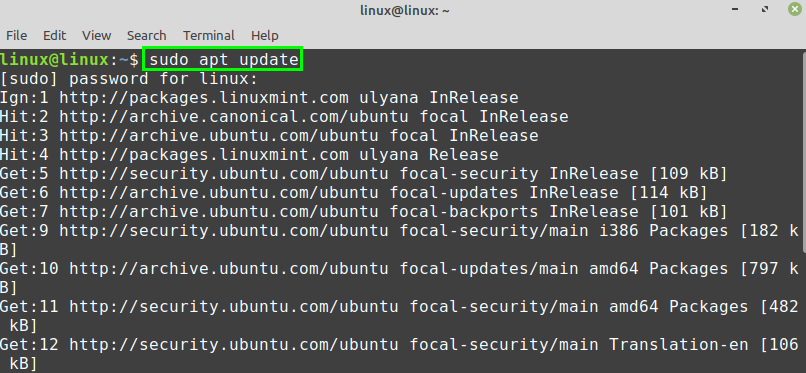
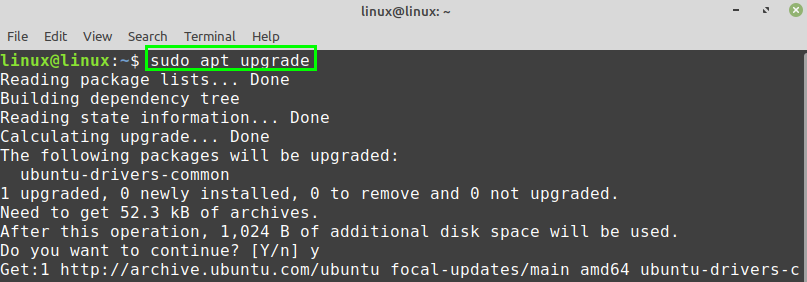
Next, upgrade the system with the command:
After successfully updating and upgrading the Linux Mint 20 system, install Git with the command:
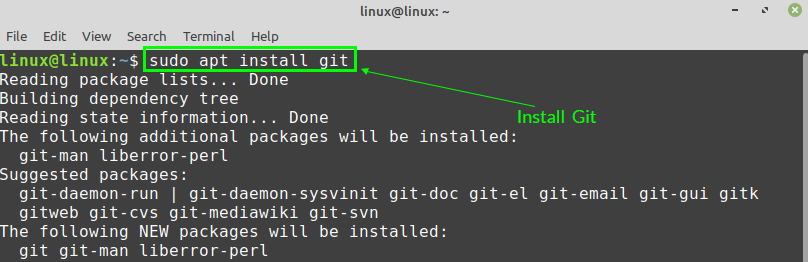
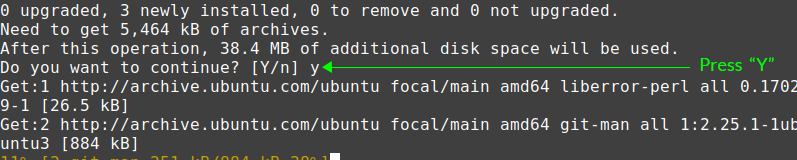
Press ‘y’ to continue installing Git.
When the Git is successfully installed, verify the installation:

Git 2.25.1 is successfully installed on my Linux Mint 20.
Configuring the Git on Linux Mint 20
Next, we have to configure Git. The Git can be configured from the command line. Configuring Git refers to setting a name and email address. The name and email are used while committing changes on the Git repository.
Fire up the terminal and use the below-given command syntax to set a global commit name:

Type the below-given command to set the global commit email:

Finally, when the global commit name and email are set, run the below-given command to check and verify the changes:

The output shows that the global commit name and email are sent successfully.
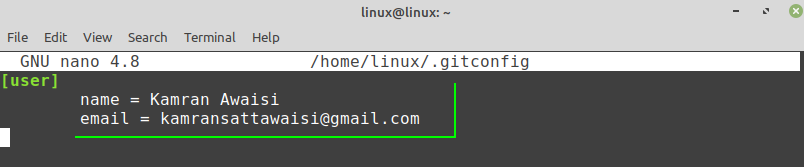
If the changes are not made correctly, or you want to change the global commit name and email any time, then you can edit the configuration settings any time by using the command:

The Git configuration file is opened in the nano editor. You can make any changes in the Git configuration file if you wish to.
Conclusion
Installing Git on Linux Mint 20 is very straightforward. Git is part of the Linux Mint 20 base repositories and can be downloaded and installed with apt command.
About the author

Kamran Sattar Awaisi
I am a software engineer and a research scholar. I like to write article and make tutorial on various IT topics including Python, Cloud Computing, Fog Computing and Deep Learning. I love to use Linux based operating systems.
Источник
Install self-managed GitLab
You can download, install and maintain your own GitLab instance.
Want us to host your instance, no installation required? Try GitLab SaaS today
Want to try GitLab Ultimate for 30 days? Get your free trial
Recommended Installation Method
Official Linux package
This is the recommended method for getting started. The Linux packages are mature, scalable, and are used today on GitLab.com. If you need additional flexibility and resilience, we recommend deploying GitLab as described in the reference architecture documentation.
Linux installation is quicker to install, easier to upgrade and contains features to enhance reliability not found in other methods. Install via a single package (also known as Omnibus) that bundles all the different services and tools required to run GitLab. At least 4 GB of RAM is recommended.
Ubuntu
18.04 LTS, 20.04 LTS
For Ubuntu 20.04, arm64 packages are also available.
1. Install and configure the necessary dependencies
Next, install Postfix to send notification emails. If you want to use another solution to send emails please skip this step and configure an external SMTP server after GitLab has been installed.
During Postfix installation a configuration screen may appear. Select ‘Internet Site’ and press enter. Use your server’s external DNS for ‘mail name’ and press enter. If additional screens appear, continue to press enter to accept the defaults.
2. Add the GitLab package repository and install the package
Add the GitLab package repository.
Next, install the GitLab package. Make sure you have correctly set up your DNS, and change https://gitlab.example.com to the URL at which you want to access your GitLab instance. Installation will automatically configure and start GitLab at that URL.
For https:// URLs, GitLab will automatically request a certificate with Let’s Encrypt, which requires inbound HTTP access and a valid hostname. You can also use your own certificate or just use http:// (without s ).
If you would like to specify a custom password for the initial administrator user ( root ), check the documentation. If a password is not specified, a random password will be automatically generated.
3. Browse to the hostname and login
Unless you provided a custom password during installation, a password will be randomly generated and stored for 24 hours in /etc/gitlab/initial_root_password . Use this password with username root to login.
4. Set up your communication preferences
Visit our email subscription preference center to let us know when to communicate with you. We have an explicit email opt-in policy so you have complete control over what and how often we send you emails.
Twice a month, we send out the GitLab news you need to know, including new features, integrations, docs, and behind the scenes stories from our dev teams. For critical security updates related to bugs and system performance, sign up for our dedicated security newsletter.
Important note: If you do not opt-in to the security newsletter, you will not receive security alerts.
5. Recommended next steps
After completing your installation, consider the recommended next steps, including authentication options and sign-up restrictions.
Debian
For Debian 10, arm64 packages are also available.
1. Install and configure the necessary dependencies
Next, install Postfix to send notification emails. If you want to use another solution to send emails please skip this step and configure an external SMTP server after GitLab has been installed.
During Postfix installation a configuration screen may appear. Select ‘Internet Site’ and press enter. Use your server’s external DNS for ‘mail name’ and press enter. If additional screens appear, continue to press enter to accept the defaults.
2. Add the GitLab package repository and install the package
Add the GitLab package repository.
Next, install the GitLab package. Make sure you have correctly set up your DNS, and change https://gitlab.example.com to the URL at which you want to access your GitLab instance. Installation will automatically configure and start GitLab at that URL.
For https:// URLs, GitLab will automatically request a certificate with Let’s Encrypt, which requires inbound HTTP access and a valid hostname. You can also use your own certificate or just use http:// (without s ).
If you would like to specify a custom password for the initial administrator user ( root ), check the documentation. If a password is not specified, a random password will be automatically generated.
3. Browse to the hostname and login
Unless you provided a custom password during installation, a password will be randomly generated and stored for 24 hours in /etc/gitlab/initial_root_password . Use this password with username root to login.
4. Set up your communication preferences
Visit our email subscription preference center to let us know when to communicate with you. We have an explicit email opt-in policy so you have complete control over what and how often we send you emails.
Twice a month, we send out the GitLab news you need to know, including new features, integrations, docs, and behind the scenes stories from our dev teams. For critical security updates related to bugs and system performance, sign up for our dedicated security newsletter.
Important note: If you do not opt-in to the security newsletter, you will not receive security alerts.
5. Recommended next steps
After completing your installation, consider the recommended next steps, including authentication options and sign-up restrictions.
CentOS 8
and RHEL, Oracle, Scientific
For CentOS and RedHat 8, arm64 packages are also available.
1. Install and configure the necessary dependencies
On CentOS 8, the commands below will also open HTTP, HTTPS and SSH access in the system firewall. This is an optional step, and you can skip it if you intend to access GitLab only from your local network.
Next, install Postfix to send notification emails. If you want to use another solution to send emails please skip this step and configure an external SMTP server after GitLab has been installed.
During Postfix installation a configuration screen may appear. Select ‘Internet Site’ and press enter. Use your server’s external DNS for ‘mail name’ and press enter. If additional screens appear, continue to press enter to accept the defaults.
2. Add the GitLab package repository and install the package
Add the GitLab package repository.
Next, install the GitLab package. Make sure you have correctly set up your DNS, and change https://gitlab.example.com to the URL at which you want to access your GitLab instance. Installation will automatically configure and start GitLab at that URL.
For https:// URLs, GitLab will automatically request a certificate with Let’s Encrypt, which requires inbound HTTP access and a valid hostname. You can also use your own certificate or just use http:// (without s ).
If you would like to specify a custom password for the initial administrator user ( root ), check the documentation. If a password is not specified, a random password will be automatically generated.
3. Browse to the hostname and login
Unless you provided a custom password during installation, a password will be randomly generated and stored for 24 hours in /etc/gitlab/initial_root_password . Use this password with username root to login.
4. Set up your communication preferences
Visit our email subscription preference center to let us know when to communicate with you. We have an explicit email opt-in policy so you have complete control over what and how often we send you emails.
Twice a month, we send out the GitLab news you need to know, including new features, integrations, docs, and behind the scenes stories from our dev teams. For critical security updates related to bugs and system performance, sign up for our dedicated security newsletter.
Important note: If you do not opt-in to the security newsletter, you will not receive security alerts.
5. Recommended next steps
After completing your installation, consider the recommended next steps, including authentication options and sign-up restrictions.
For CentOS and RedHat 8, arm64 packages are also available.
1. Install and configure the necessary dependencies
On CentOS 8 (and RedHat 8), the commands below will also open HTTP, HTTPS and SSH access in the system firewall. This is an optional step, and you can skip it if you intend to access GitLab only from your local network.
Next, install Postfix to send notification emails. If you want to use another solution to send emails please skip this step and configure an external SMTP server after GitLab has been installed.
During Postfix installation a configuration screen may appear. Select ‘Internet Site’ and press enter. Use your server’s external DNS for ‘mail name’ and press enter. If additional screens appear, continue to press enter to accept the defaults.
2. Add the GitLab package repository and install the package
Add the GitLab package repository.
Next, install the GitLab package. Make sure you have correctly set up your DNS, and change https://gitlab.example.com to the URL at which you want to access your GitLab instance. Installation will automatically configure and start GitLab at that URL.
For https:// URLs, GitLab will automatically request a certificate with Let’s Encrypt, which requires inbound HTTP access and a valid hostname. You can also use your own certificate or just use http:// (without s ).
If you would like to specify a custom password for the initial administrator user ( root ), check the documentation. If a password is not specified, a random password will be automatically generated.
3. Browse to the hostname and login
Unless you provided a custom password during installation, a password will be randomly generated and stored for 24 hours in /etc/gitlab/initial_root_password . Use this password with username root to login.
4. Set up your communication preferences
Visit our email subscription preference center to let us know when to communicate with you. We have an explicit email opt-in policy so you have complete control over what and how often we send you emails.
Twice a month, we send out the GitLab news you need to know, including new features, integrations, docs, and behind the scenes stories from our dev teams. For critical security updates related to bugs and system performance, sign up for our dedicated security newsletter.
Important note: If you do not opt-in to the security newsletter, you will not receive security alerts.
5. Recommended next steps
After completing your installation, consider the recommended next steps, including authentication options and sign-up restrictions.
CentOS 7
and RHEL, Oracle, Scientific
1. Install and configure the necessary dependencies
On CentOS 7, the commands below will also open HTTP, HTTPS and SSH access in the system firewall. This is an optional step, and you can skip it if you intend to access GitLab only from your local network.
Next, install Postfix to send notification emails. If you want to use another solution to send emails please skip this step and configure an external SMTP server after GitLab has been installed.
During Postfix installation a configuration screen may appear. Select ‘Internet Site’ and press enter. Use your server’s external DNS for ‘mail name’ and press enter. If additional screens appear, continue to press enter to accept the defaults.
2. Add the GitLab package repository and install the package
Add the GitLab package repository.
Next, install the GitLab package. Make sure you have correctly set up your DNS, and change https://gitlab.example.com to the URL at which you want to access your GitLab instance. Installation will automatically configure and start GitLab at that URL.
For https:// URLs, GitLab will automatically request a certificate with Let’s Encrypt, which requires inbound HTTP access and a valid hostname. You can also use your own certificate or just use http:// (without s ).
If you would like to specify a custom password for the initial administrator user ( root ), check the documentation. If a password is not specified, a random password will be automatically generated.
3. Browse to the hostname and login
Unless you provided a custom password during installation, a password will be randomly generated and stored for 24 hours in /etc/gitlab/initial_root_password . Use this password with username root to login.
4. Set up your communication preferences
Visit our email subscription preference center to let us know when to communicate with you. We have an explicit email opt-in policy so you have complete control over what and how often we send you emails.
Twice a month, we send out the GitLab news you need to know, including new features, integrations, docs, and behind the scenes stories from our dev teams. For critical security updates related to bugs and system performance, sign up for our dedicated security newsletter.
Important note: If you do not opt-in to the security newsletter, you will not receive security alerts.
5. Recommended next steps
After completing your installation, consider the recommended next steps, including authentication options and sign-up restrictions.
1. Install and configure the necessary dependencies
On CentOS 7 (and RedHat/Oracle/Scientific Linux 7), the commands below will also open HTTP, HTTPS and SSH access in the system firewall. This is an optional step, and you can skip it if you intend to access GitLab only from your local network.
Next, install Postfix to send notification emails. If you want to use another solution to send emails please skip this step and configure an external SMTP server after GitLab has been installed.
During Postfix installation a configuration screen may appear. Select ‘Internet Site’ and press enter. Use your server’s external DNS for ‘mail name’ and press enter. If additional screens appear, continue to press enter to accept the defaults.
2. Add the GitLab package repository and install the package
Add the GitLab package repository.
Next, install the GitLab package. Make sure you have correctly set up your DNS, and change https://gitlab.example.com to the URL at which you want to access your GitLab instance. Installation will automatically configure and start GitLab at that URL.
For https:// URLs, GitLab will automatically request a certificate with Let’s Encrypt, which requires inbound HTTP access and a valid hostname. You can also use your own certificate or just use http:// (without s ).
If you would like to specify a custom password for the initial administrator user ( root ), check the documentation. If a password is not specified, a random password will be automatically generated.
3. Browse to the hostname and login
Unless you provided a custom password during installation, a password will be randomly generated and stored for 24 hours in /etc/gitlab/initial_root_password . Use this password with username root to login.
4. Set up your communication preferences
Visit our email subscription preference center to let us know when to communicate with you. We have an explicit email opt-in policy so you have complete control over what and how often we send you emails.
Twice a month, we send out the GitLab news you need to know, including new features, integrations, docs, and behind the scenes stories from our dev teams. For critical security updates related to bugs and system performance, sign up for our dedicated security newsletter.
Important note: If you do not opt-in to the security newsletter, you will not receive security alerts.
5. Recommended next steps
After completing your installation, consider the recommended next steps, including authentication options and sign-up restrictions.
Источник


